Page is loading ...

User’s manual
w w w . v t e c h c a n a d a . c o m
Model:
CD1291
Corded telephone with
answering system

Congratulations
on purchasing your new VTech product. Before using this telephone, please
read Important safety instructions on page 61 of this manual.
This manual has all the feature operations and troubleshooting necessary
to install and operate your new VTech telephone. Please review this manual
thoroughly to ensure proper installation and operation of this innovative and
feature rich VTech product. For support, shopping, and everything new at
VTech, visit our website at www.vtechcanada.com, or call 1 (800) 267-7377.
Telephones identied with this logo have reduced noise and
interference when used with most T-coil equipped hearing aids and
cochlear implants. The TIA-1083 Compliant Logo is a trademark of the
Telecommunications Industry Association. Used under license.

Table of contents
Getting started ................................1
Parts checklist ..................................1
Telephone base layout .....................2
Telephone installation.......................5
Installation options ............................7
Telephone settings .......................13
Set features ....................................13
Feature summary ...........................13
Set date and time ...........................16
Set home area code .......................17
Set local area code .........................18
Set remote code .............................18
Telephone operation ....................19
Making and answering a call ..........19
Last number redial ..........................20
Mute................................................20
Flash/call waiting ............................21
Temporary tone dialing ...................21
Ringer volume ................................22
Handset volume..............................22
Speakerphone volume....................22
Chain dialing ...................................23
Line power mode (no AC power) ....24
One-touch memory .......................25
One-touch storage ..........................25
To review one-touch numbers ........26
To dial a one-touch number............26
To delete a one-touch number .......27
Speed dial memory.......................28
Speed dial storage..........................28
To review speed dial numbers........29
To dial a speed dial number ...........29
To delete a speed dial number .......30
Directory ........................................31
Character chart ...............................31
Directory storage ............................32
To review directory entries .............33
To dial a directory number ..............33
To delete a directory entry ..............34
Caller ID operation........................35
About caller ID ................................35
About home area code and local
area codes .................................35
How caller ID works ........................36
Caller ID messages ........................37
Memory match ................................37
How call history works ....................37
Unreviewed and total calls..............38
To review call history ......................38
To return a call................................39
To store a call history entry in a
memory location ........................40
To store a call history entry in the
directory .....................................41
To delete a call history entry...........42
To delete all call history entries ......42
Answering system operation ......43
Message capacity ...........................43
Answering mode .............................43
Outgoing announcement ................44
Message playback ..........................46
i

Recording and playing memo .........48
Call screening .................................49
Priority call ......................................49
Call intercept...................................49
Remote access ...............................50
Appendix .......................................52
Screen icons ...................................52
Message window displays ..............52
Display screen messages...............53
Alert tones ......................................54
Troubleshooting ..............................55
Important safety instructions...........61
Maintenance ...................................62
FCC, ACTA and IC regulations ......63
Limited warranty .............................65
Technical specications..................67
Index ...............................................68
ii
1
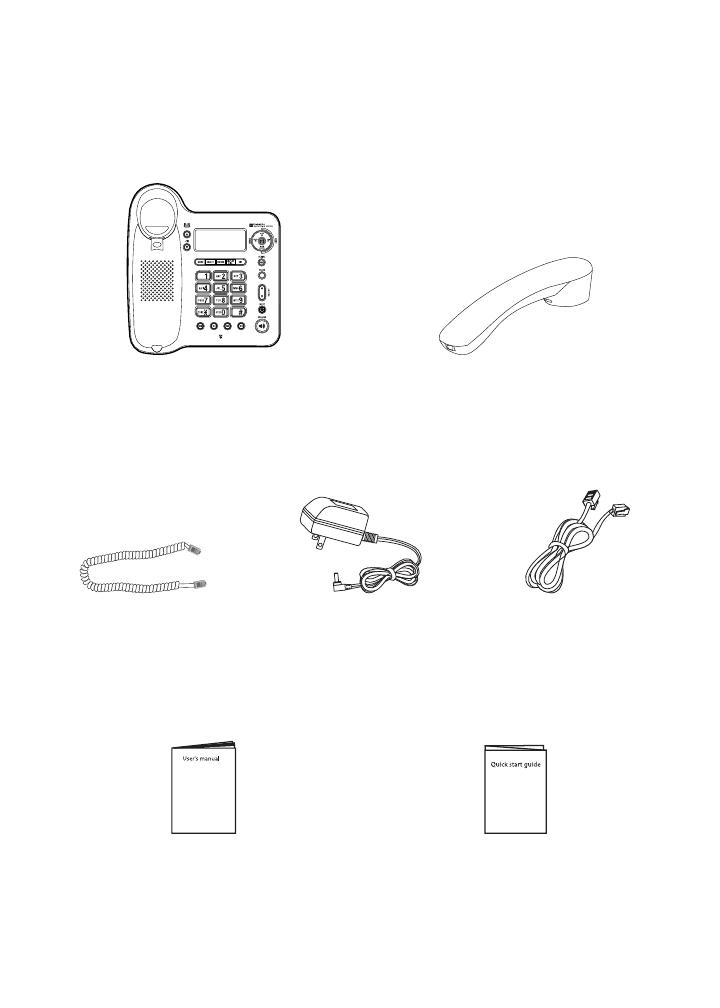
Parts checklist
Your telephone package contains the following items. Save your sales receipt
and original packaging in the event warranty service is necessary.
Getting started
Telephone base with mounting
bracket installed
Corded handset
Coiled handset cord Telephone line cordPower adapter
User’s manual Quick start guide

Getting started
2
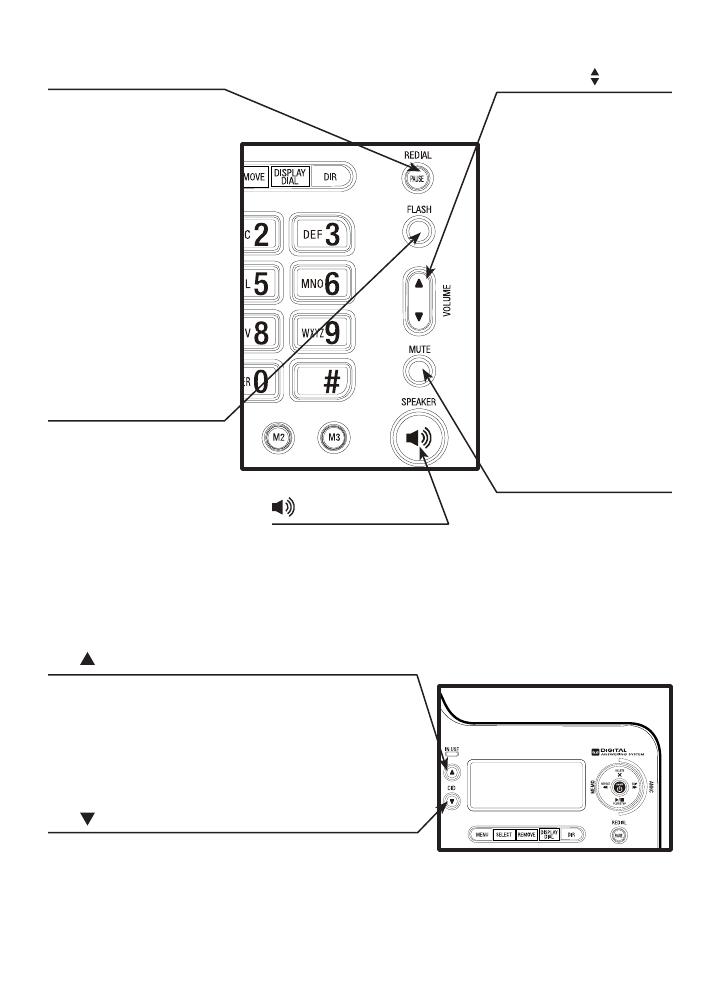
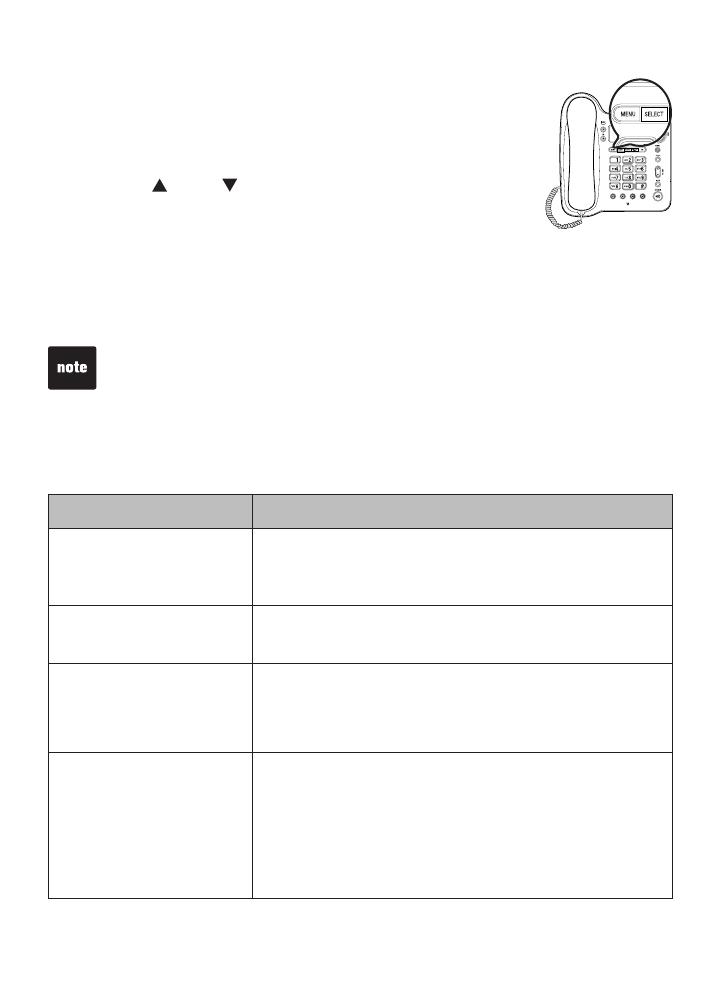
Telephone base layout
MENU
Press to enter the menu
(page 13).
While reviewing the call
history, press to store
the displayed name and
number in the directory
(page 41).
SELECT
While using the menu,
press to save the setting
and move to the next
menu option (page 13).
While reviewing the call
history, press to show
dialing formats
(page 39).
MEM
Press to access one-
touch or speed dial
memory (pages 25
and 28).
M1, M2, M3
Press to access one-
touch memory
(page 26).
REMOVE
While reviewing the
call history, press and
hold to clear all the call
history entries
(page 42).
While reviewing the one-
touch memory, speed
dial memory, directory
or call history entries,
press to delete an entry
(pages 27, 30, 34
and 42).
While entering names
(or numbers), press to
backspace and erase a
character or digit
(page 32).
DIR
Press to enter the
directory (page 33).
DISPLAY DIAL
Press to dial the number
currently displayed
(pages 26, 29, 33
and 39).
Getting started
3
REDIAL/PAUSE
While using the handset
or speakerphone, press
to dial the last number
dialed (page 20).
While editing numbers in
the one-touch memory,
speed dial memory or
directory, press to copy
the last number dialed
(pages 25, 28 and 32).
While entering numbers,
press to insert a four-
second dialing pause
(page 19).
FLASH
During a call, press to
receive an incoming call
if you subscribe to call
waiting service provided
by your telephone
service provider (page
21).
Press to cancel an
operation and return to
idle mode (page 13).
VOLUME
When the telephone is
idle, press to adjust the
ringer volume (page 22).
While using the handset,
press to adjust the
listening volume on the
handset (page 22).
While using the
speakerphone, press
to adjust the listening
volume on the
speakerphone
(page 22).
While playing back
messages, press to
adjust the playback
volume (page 46).
MUTE
During a call, press
to mute the handset
or speakerphone
microphone. Press
again to resume your
conversation (page 20).
CID/
Press to display the call history (page 38).
While using the menu, press to scroll through the
settings (page 13).
While reviewing the directory or call history, press
to scroll up (pages 33 and 38).
CID/
Press to display the call history (page 38).
While using the menu, press to scroll through the
settings (page 13).
While reviewing the directory or call history, press
to scroll down (pages 33 and 38).
SPEAKER
Press to turn on the
base speakerphone.
Press again to end the
call (page 19).
Getting started
4
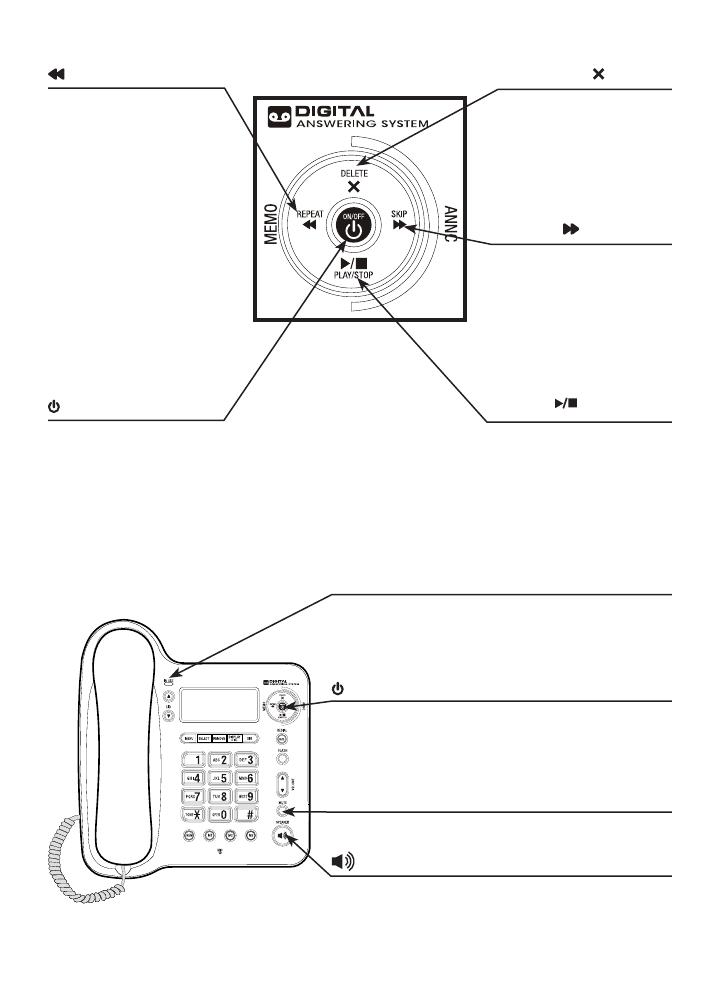
REPEAT/MEMO
While the telephone is
playing the day and time
the current message
was received, press to
go back to the previous
message (page 46).
After the telephone
plays the day and time
the current message
was received, press
to repeat the current
message (page 46).
Press to record memos
(page 48).
ON/OFF
Press to turn the
answering system on or
off (page 43).
DELETE
Press to delete the
message currently
playing (page 46).
Press twice to delete all
old messages (page 47).
SKIP/ANNC
Press to skip to the next
message (page 46).
Press to record or
play the outgoing
announcement (pages
44 and 45).
PLAY/STOP
Press to start or stop
message playback
(page 46).
Press to stop recording
(pages 44 and 48).
IN USE light
On when the line is in use or the answering
system is answering a call.
Flashes when the telephone is ringing.
ON/OFF light
On when the answering system is on.
Flashes when there are new (unreviewed)
messages.
MUTE light
On when the microphone is muted.
SPEAKER light
On when the speakerphone is in use.
Getting started
5
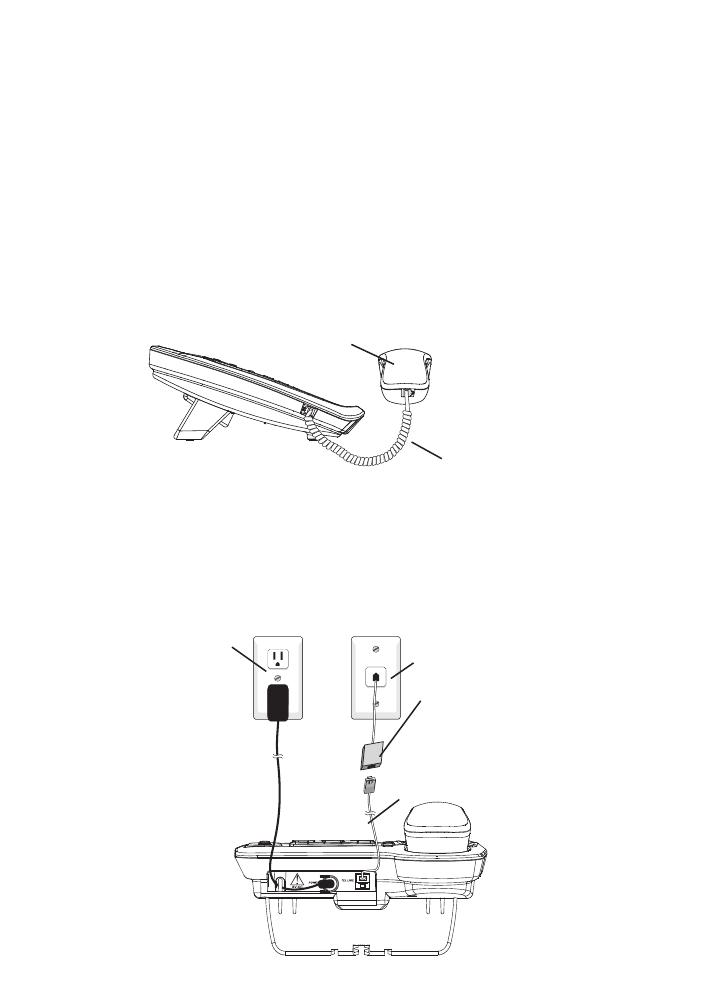
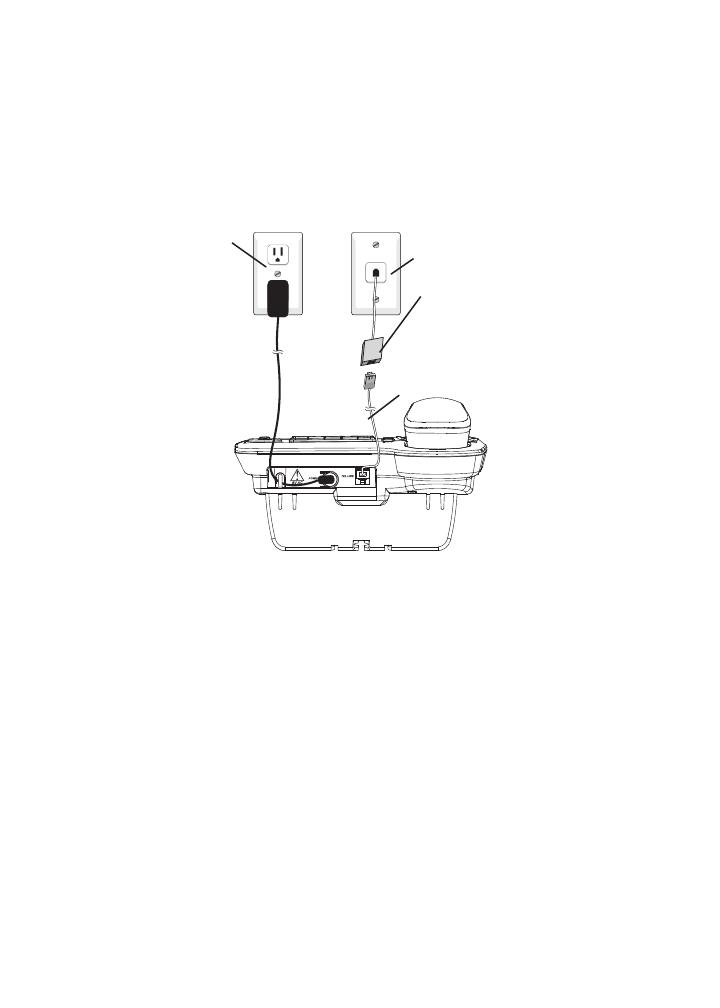
Telephone installation
If you subscribe to high-speed Internet service (digital subscriber line -
DSL) through your telephone line, you must install a DSL lter between the
telephone line cord and the telephone wall jack. The lter prevents noise and
caller ID problems caused by DSL interference. Please contact your DSL
service provider for more information about DSL lters.
Follow the steps below to install the telephone.
Plug one end of the coiled handset cord into the handset jack on the left
side of the telephone base. Plug the other end into the handset and hang
up.
Plug one end of the telephone line cord into the TEL LINE jack on the back
of the telephone base. Plug the other end of the telephone line cord into a
telephone wall jack.
Plug the small end of the power adapter into the POWER jack on the
back of the telephone base. Plug the large end into an electrical outlet not
controlled by a wall switch.
1.
2.
3.
Handset
Coiled handset cord
Telephone line cord
DSL lter (not included),
required if you have
DSL high-speed Internet
service.
Telephone wall jack
Electrical outlet
not controlled by a
wall switch

Getting started
6
Lift the handset or press SPEAKER to check for a dial tone.
Use only the power adapter provided with this product. To obtain a
replacement, visit our website at www.vtechcanada.com or call
1 (800) 267-7377.
The power adapter is intended to be correctly oriented in a vertical or oor
mount position. The prongs are not designed to hold the plug in place if it is
plugged into a ceiling, under-the-table or cabinet outlet.
You can use this telephone without AC power. Without power, the
telephone’s functionality is limited to making or answering calls using
the handset, and adjusting the handset listening volume. For optimal
performance, power your telephone with the supplied power adapter.
•
•
•
4.

Getting started
7
Installation options
The telephone base comes with the bracket attached for tabletop use. If you
want to mount your telephone on a wall, use the provided mounting bracket
to connect with a standard dual-stud telephone wall-mounting plate. If you
do not have this mounting plate, you can purchase one from many hardware
or consumer electronic retailers. Professional assistance may be required to
install the mounting plate.
Tabletop to wall-mount installation
Before installing the telephone base in the wall-mount position, unplug the
power adapter from the electrical outlet and unplug the telephone line cord
from the telephone wall jack.
Lift the handset and place it aside. Hold down the switch hook on the
telephone base, then slide the handset tab upwards to remove it from the
slot. Rotate the handset tab 180 degrees. Push the handset tab down into
the grooves so it clicks into position.
1.
Switch hook
Handset tab
Hold the telephone base with both hands. Press on the outer tabs as shown
below to release the mounting bracket. Lift the mounting bracket away.
2.
Tabletop-mount
position
Outer tabs
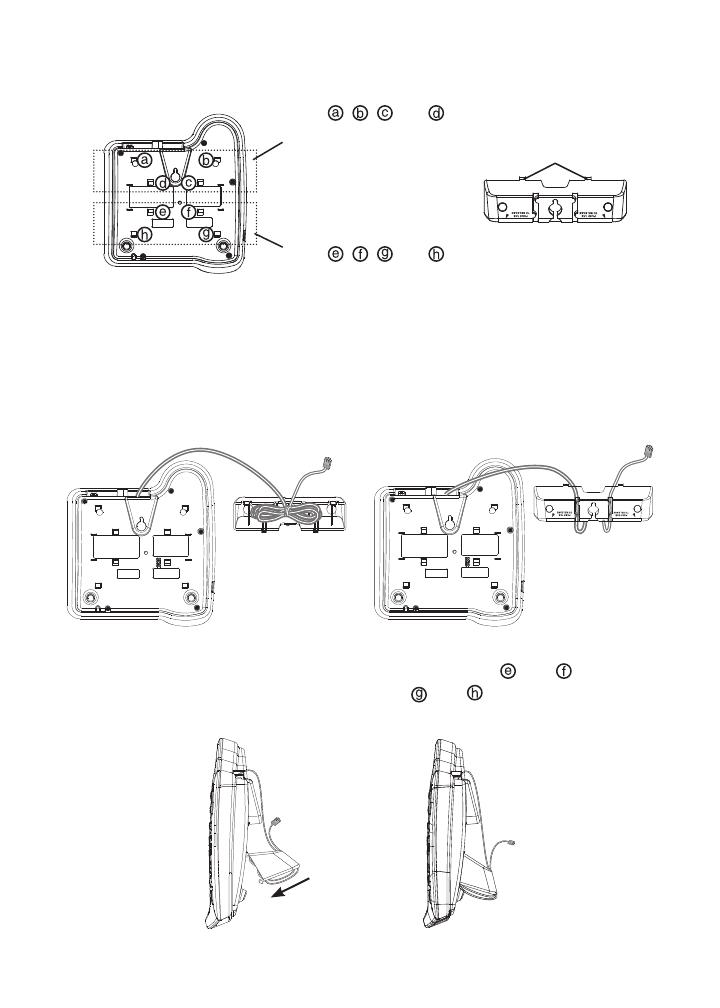
Getting started
8
Rotate the mounting bracket 180 degrees.3.
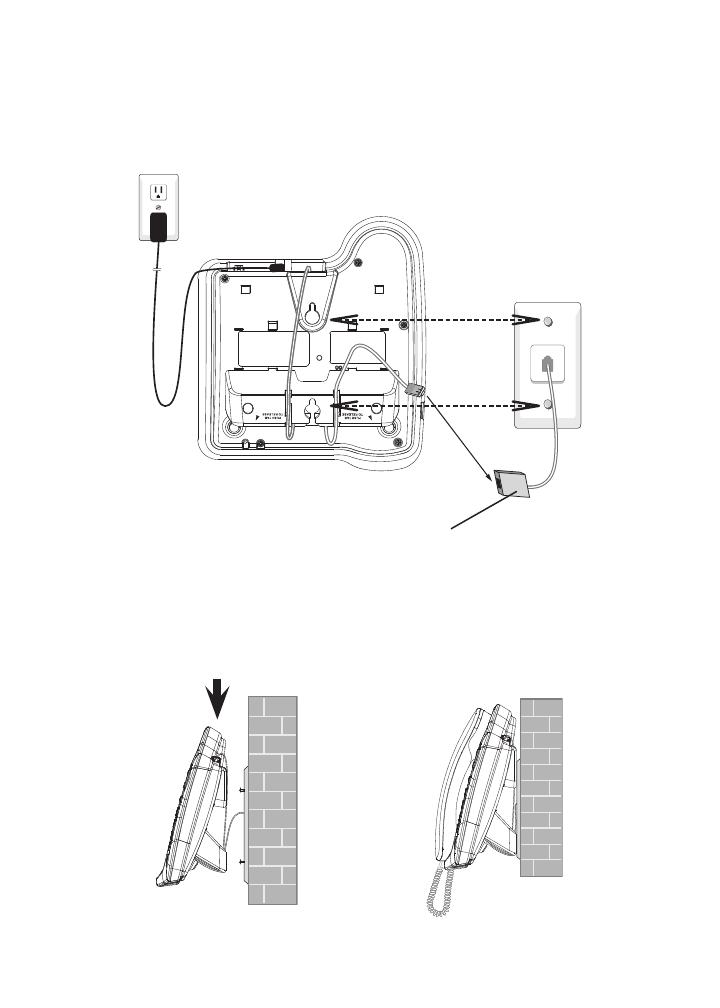
Plug one end of the telephone line cord into the TEL LINE jack on the back
of the telephone base. Bundle the telephone line cord and secure it with a
twist tie. Place the bundled telephone line cord inside the mounting bracket.
Route the telephone line cord through the slots of the mounting bracket.
4.
Insert the center tabs of the mounting bracket in slots and . Snap the
outer tabs of the mounting bracket in slots and .
5.
Use slots , , and for
the tabletop-mount position.
Use slots , , and for
the wall-mount position.
Center tabs
Getting started
9
Plug the other end of the telephone line cord into a telephone wall jack.
Plug the small end of the power adapter into the POWER jack on the
back of the telephone base. Plug the large end into an electrical outlet not
controlled by a wall switch.
6.
7.
Place the telephone just above the telephone outlet mounting studs. Slide
the telephone down until the telephone is held securely on the studs. Place
the handset in the telephone base.
8.
DSL lter (not included),
required if you have DSL high-
speed Internet service.
Getting started
10
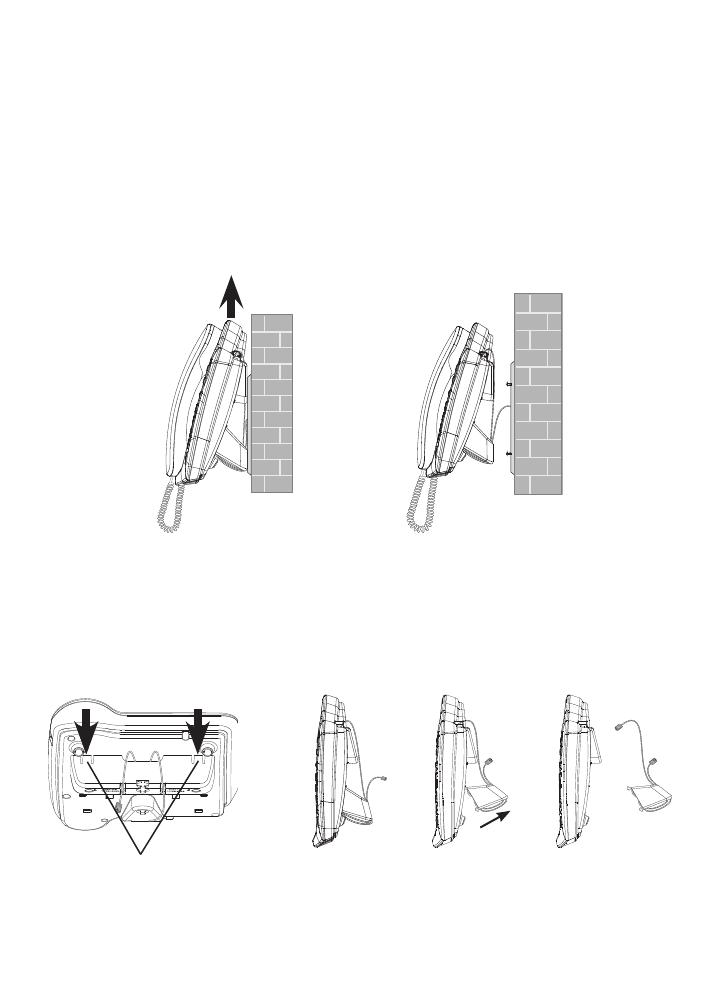
Wall-mount to tabletop installation
To change the telephone base from the wall-mount position to tabletop
position, follow the steps below.
Unplug the large end of the power adapter from the electrical outlet.
Unplug the small end of the power adapter from the POWER jack on the
back of the telephone base.
Slide the telephone base upwards, then pull it away from the mounting
studs.
1.
2.
Unplug the telephone line cord from the telephone wall jack and the back
of the telephone base. Lift the handset and place it aside.
Hold the telephone base with both hands. Press on the outer tabs as shown
below to release the mounting bracket. Lift the mounting bracket away.
3.
4.
Wall-mount position
Outer tabs

Getting started
11
Switch hook
Handset tab
Remove the telephone line cord from the slots of the mounting bracket.
Remove the telephone line cord from the mounting bracket. Untie the
bundled telephone line cord.
Rotate the mounting bracket 180 degrees.
5.
6.
Insert the center tabs of the mounting bracket in slots and . Snap the
outer tabs of the mounting bracket in slots and .
7.
Hold down the switch hook on the telephone base, then slide the handset
tab upwards to remove it from the slot. Rotate the handset tab 180
degrees. Push the handset tab down into the grooves so it clicks into
position.
8.
Use slots , , and for
the tabletop-mount position.
Use slots , , and for
the wall-mount position.
Center tabs
Getting started
12
Plug one end of the telephone line cord into the TEL LINE jack on the
back of the telephone base. Plug the other end of the telephone line cord
into a telephone wall jack. Place the handset in the telephone base.
Plug the small end of the power adapter into the POWER jack on the
back of the telephone base. Plug the large end into an electrical outlet not
controlled by a wall switch.
9.
10.
Telephone line cord
DSL lter (not included),
required if you have
DSL high-speed Internet
service.
Telephone wall jack
Electrical outlet
not controlled by a
wall switch
13
Telephone settings
Set features
To change the telephone settings:
Press MENU repeatedly until the screen shows the
desired feature.
Press CID/ or CID/ until the screen displays your
selected setting. Refer to Feature summary on this page
for a full description of the features and your choices.
Press SELECT or MENU to save your selection and automatically
move to the next option. When you nish setting features, the telephone
automatically returns to standby after 30 seconds, or you can press FLASH
to exit programming immediately.
You can exit feature setup at any time by pressing FLASH or by lifting the
handset when there is no incoming call.
1.
2.
3.
Telephone settings
Feature summary
Default settings are indicated below by an asterisk (*) symbol.
Feature/options Function
SET TIME/DATE
--:-- -----
Set the date and time. Use the dial pad keys to change
the digits.
Refer to Set date and time on page 16 for details.
SET CONTRAST
1, 2*, 3, 4
Adjust screen brightness to a comfortable level, from 1
(light) to 4 (dark).
CALL LOG
ALL CALLS*
NO CALLS
Choose whether incoming calls are stored or not.
The telephone stores all calls received.
The telephone does not store call history.
REPEATED CALLS
COMBINED
SEPARATE*
Choose how calls from the same number are displayed
in the call history.
The screen shows only the most recent call from a
particular number. REP displays to indicate multiple calls
from that number.
Each call from a particular number is listed separately.
14
Telephone settings
Feature/options Function
CALL LIST ORDER
BY TIME*
NEW CALL FIRST
Choose in what order received calls are displayed.
Reverse order. Last call received is displayed rst.
Unreviewed calls are displayed rst, then calls by time.
LANGUAGE
ENGLISH*
ESPANOL
FRANCAIS
Choose whether the display text appears in English,
Spanish, or French.
HOME AREA CODE
HAC - - -
Set the telephone to recognize calls from your area code
(7 digit local dialing).
Refer to Set home area code on page 17 for details.
LOCAL AREA CODE
LAC 1 - - -
LAC 2 - - -
LAC 3 - - -
LAC 4 - - -
Program up to four local area codes that do not require
dialing a 1 before them (10 digit local dialing).
Refer to Set local area code on page 18 for details.
DIAL TYPE
TONE*
PULSE
Set tone (touch-tone) or pulse (dial-pulse) dialing.
If you have dial-pulse dialing service only, you
can temporarily switch from dial-pulse to touch-
tone dialing during a call (see Temporary tone
dialing on page 21).
# OF RINGS
2, 3, 4*, 5, 6, 7,
tS 2-4, tS 4-6
Set how many times the telephone rings before the
answering system picks up the call.
If you choose tS 2-4 (or tS 4-6), the answering system
answers after two (four, if you select tS 4-6) rings if there
are new messages. When there are no new messages,
the answering system answers after four (six, if you
select tS 4-6) rings. When retrieving messages from a
long distance call, disconnect your call after three (ve,
if you select tS 4-6) rings to avoid long distance charges
(also known as toll saver).
MESSAGE ALERT
ON
OFF*
Turn the audible message alert on or off.
The telephone beeps every 15 seconds when there are
new messages.
No audible message alert.
15
Telephone settings
Feature/options Function
REMOTE CODE
500*
Select a three-digit number to allow remote access from
another telephone (away from your home or ofce).
Refer to Remote access on page 50 for details.
PRIORITY CODE
999*
Select a three-digit number as your priority code for the
answering system.
Refer to Priority call on page 49 for details.
To avoid confusing the answering system, the
priority code you entered should be different
from the remote code.
CALL SCREENING
ON*
OFF
Choose whether incoming messages are played through
the speaker while they are being recorded.
The incoming messages are played through the speaker
while they are being recorded.
The speaker does not play incoming messages while
they are being recorded.
Refer to Call screening on page 49 for details.
16
Telephone settings
Set date and time
When the telephone is idle, the screen shows the date and time. The month,
day and time can be set manually or automatically by incoming caller ID
information.
Press MENU. The screen shows SET TIME/DATE.
Press SELECT to show MM/DD/YYYY.
Use the dial pad keys (0 through 9) to set the blinking
digit. To enter a number that is less than 10, you must
enter a zero (0) before the number. Use CID/ or
CID/ to move to the next or previous digit.
For example, to enter the month of March, you must
enter 03.
Press SELECT. The screen shows hh:mm AM/PM.
Use the dial pad keys (0 through 9) to set the blinking digits. To enter a
number that is less than 10, you must enter a zero (0) before the number.
For example, to enter 2 o’clock, you must enter 02.
Press CID/ to select A (for AM) or CID/ to select P (for PM).
Press SELECT or MENU to save the new setting and move to the next
option.
If the date and time are not set and the telephone is powered up, SET CLOCK
ashes on the screen.
The month, day and time can be set automatically by incoming caller ID
information only if you subscribe to caller ID service provided by your telephone
service provider (see About caller ID on page 35).
Setting the date and time in this menu also sets the date and time for the
answering system. Before playing each message, the answering system
announces the day and time the message was received (see Information
about messages on page 46). Before using the answering system, use this
menu to set the year so that the system can determine the correct day of the
week. If you do not subscribe to caller ID service provided by your telephone
service provider, you also have to set the day and time, so that messages are
dated correctly.
•
•
•
1.
2.
3.
4.
5.
6.
7.
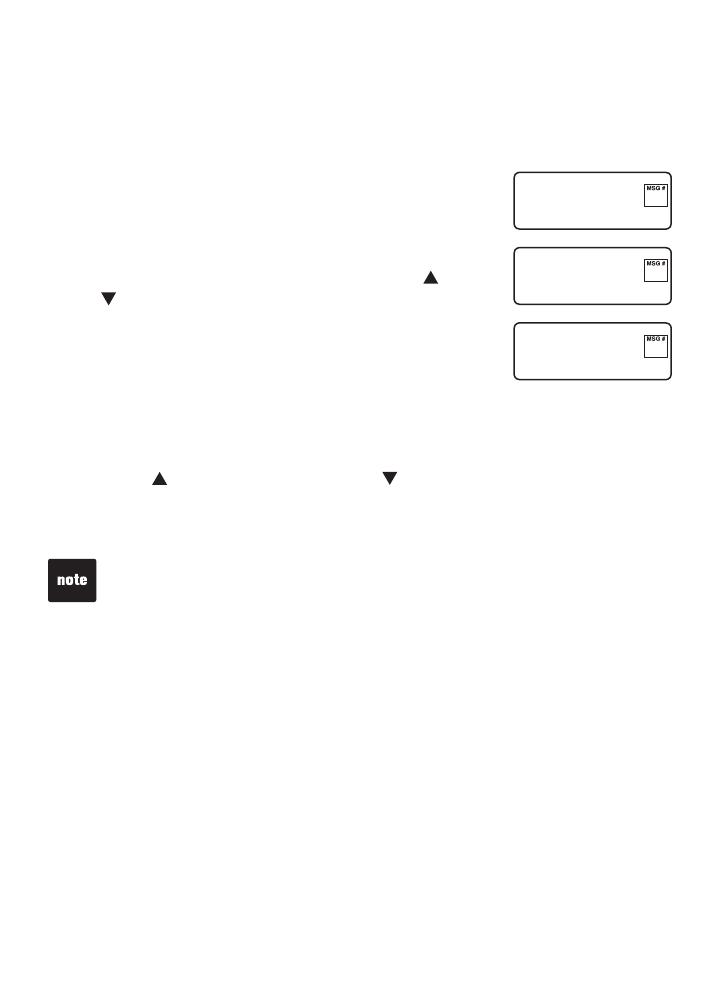
SET TIME/DATE
--:--
-- - --
15
1 2 3 0 2 0 0 9
MM/DD/YYYY
--:--
-- - --
15
1 1 2 0 A
hh:mm AM/PM
--:--
-- - --
15
/