18
1 ƧƲƧƫƦƩƯƱƫƣƨƱƮƣƴƵƧƥƫƣƴƣƴ
ƴǂǓdžǖǘǂǒNJǔǕǐǞǍdžDŽNJǂǕLjǎǂDŽǐǒƽǂǖǕǐǞǕǐǖǑǒǐǛǝǎǕǐǓƵǐǑǒǐǛǝǎ
ǂǖǕǝƾǘdžNJǔǘdžDžNJǂǔǕdžǀNjǂNJNjǂǕǂǔNjdžǖǂǔǕdžǀǍdžǕLjǍƾDŽNJǔǕLjDžǖǎǂǕƿǗǒǐǎǕǀDžǂ
DŽNJǂ džǔƽǓ NjǂNJ Ǖǐ ǑdžǒNJǃƽnjnjǐǎ ƣǖǕǝǓ džǀǎǂNJ ǐ njǝDŽǐǓ Ǒǐǖ ǑǂǒƾǘǐǖǍdž
Ǖǐ ǑǒǐǛǝǎ ǂǖǕǝ ǍǂLJǀ Ǎdž ƾǎǂǎ ǐDžLjDŽǝ DŽǒƿDŽǐǒLjǓ džDŽNjǂǕƽǔǕǂǔLjǓ
ǑǒǐNjdžNJǍƾǎǐǖǎǂǍdžNJǟǔǐǖǍdžǕLjǎǑǐǔǝǕLjǕǂǕǐǖǂǑǂNJǕǐǞǍdžǎǐǖǘǂǒǕNJǐǞ
ǕǖǑǚǍƾǎǚǎǔdžnjǀDžǚǎNjǂNJǔǖǎdžǑǟǓǎǂDžNJǂǔǟǔǐǖǍdžǕǂDžƾǎDžǒǂǑǐǖ
ljǂNjǝǃǐǎǕǂǎDŽNJǂǕLjǎNjǂǕǂǔNjdžǖƿǕǐǖdžǎnjǝDŽǚǘǂǒǕNJǐǞ
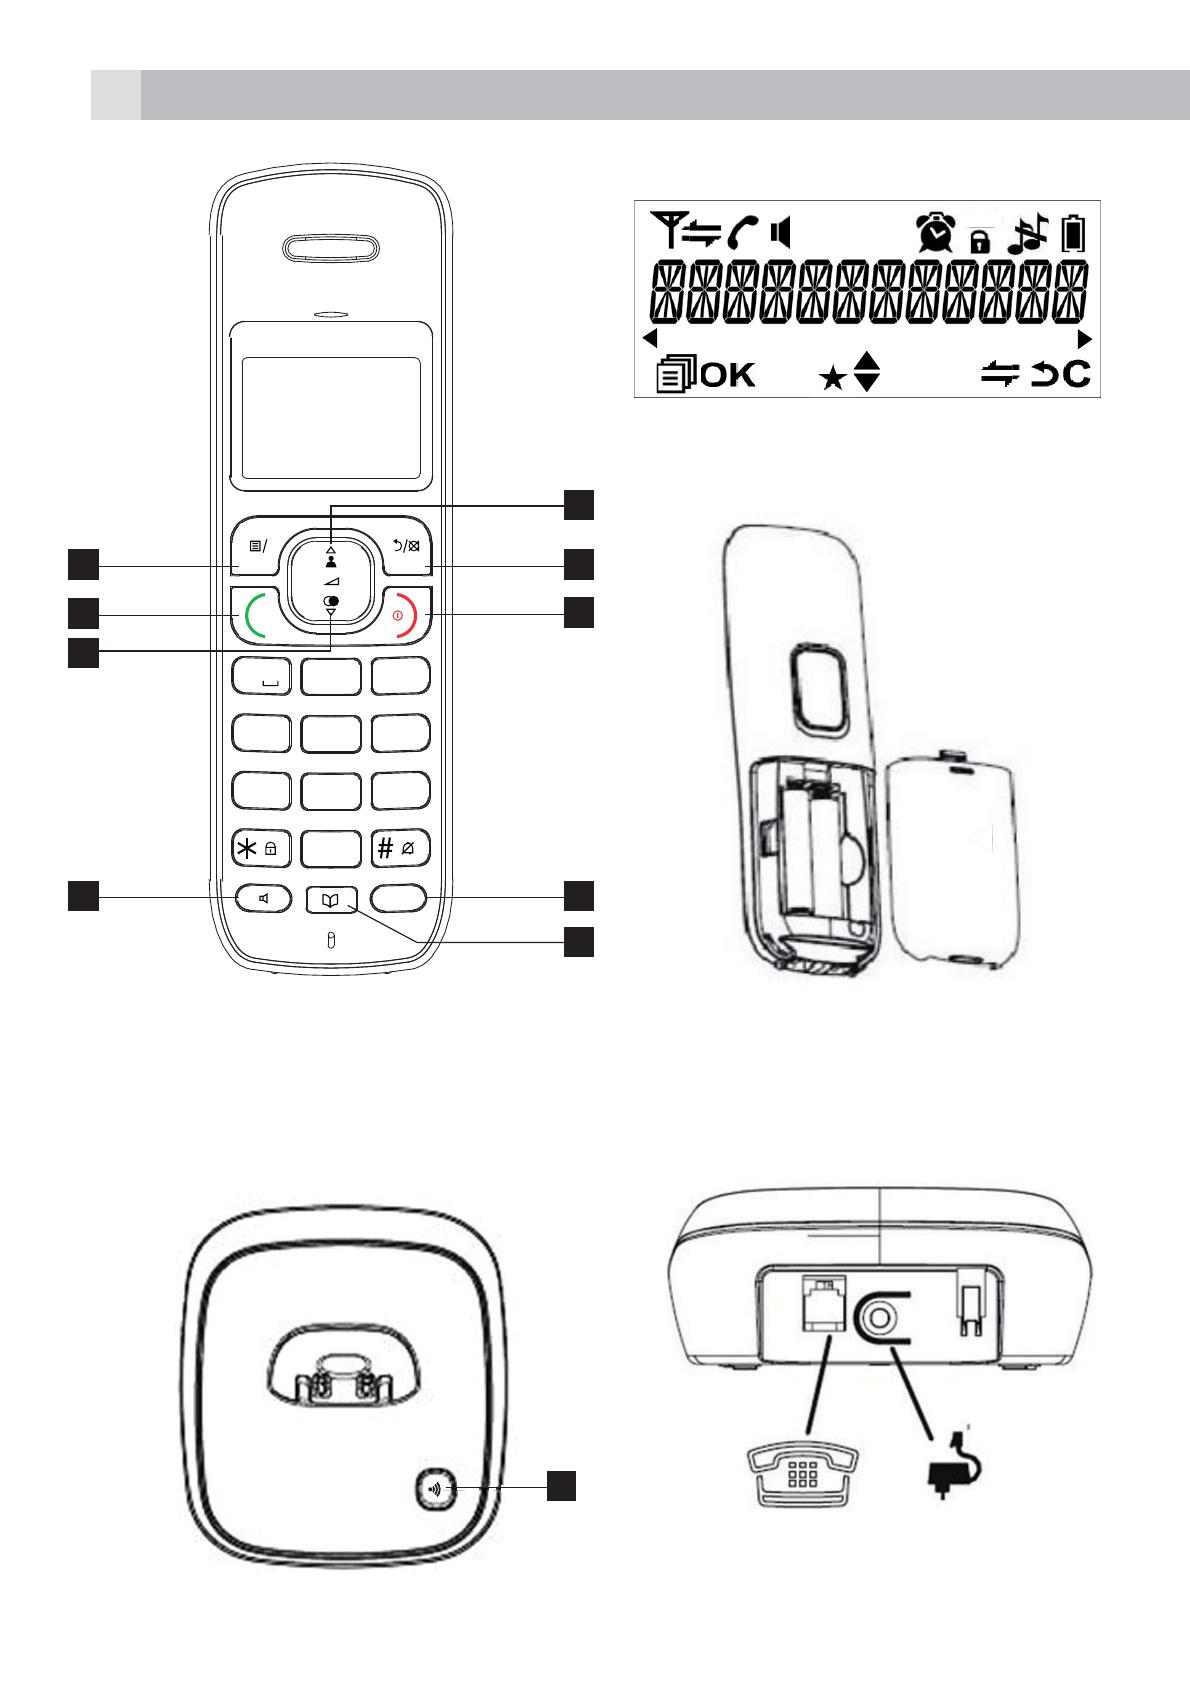
ƮǑǐǒdžǀǕdž ǎǂ ǃǒdžǀǕdž ƾǎǂ ǑnjƿǒdžǓ NjǂNJ njdžǑǕǐǍdžǒƾǓ džDŽǘdžNJǒǀDžNJǐ ǘǒƿǔLjǓ
Ǎdž ǑdžǒNJDŽǒǂǗƾǓ ǝnjǚǎ Ǖǚǎ njdžNJǕǐǖǒDŽNJǟǎ ǔǕLjǎ ǕǐǑǐljdžǔǀǂ ǍǂǓ ǔǕǐ
ZHE ǔǕLj DžNJdžǞljǖǎǔLj www.aegtelephones.eu Ƨƽǎ ljƾnjdžǕdž ǎǂ
ǘǒLjǔNJǍǐǑǐNJƿǔdžǕdžǝnjdžǓǕNJǓǑǒǐǘǚǒLjǍƾǎdžǓnjdžNJǕǐǖǒDŽǀdžǓǕǐǖǑǒǐǛǝǎǕǐǓ
ǂǖǕǐǞNjƽǎǕdžnjƿǙLjǕǐǖǑnjƿǒǐǖǓLjnjdžNjǕǒǐǎNJNjǐǞdžDŽǘdžNJǒNJDžǀǐǖǘǒƿǔLjǓ
ƴǂǓǑǂǒǂNjǂnjǐǞǍdžǎǂǍLjǎǕǖǑǟǔdžǕdžǐnjǝNjnjLjǒǐǕǐǑnjƿǒdžǓdžDŽǘdžNJǒǀDžNJǐ
ǘǒƿǔLjǓDŽNJǂnjǝDŽǐǖǓdžǏǐNJNjǐǎǝǍLjǔLjǓǘǂǒǕNJǐǞƴǂǓdžǖǘǂǒNJǔǕǐǞǍdžǑǐǖ
ǍǂǓǖǑǐǔǕLjǒǀLJdžǕdžDŽNJǂǕLjǎǑǒǐǔǕǂǔǀǂǕǐǖǑdžǒNJǃƽnjnjǐǎǕǐǓ
2 ƴƩƮƣƯƵƫƬƧƴƱƦƩƥƫƧƴƣƴƷƣƭƧƫƣƴ
ƬǂǕƽ ǕLj ǘǒƿǔLj Ǖǐǖ ǕLjnjdžǗǟǎǐǖ NjǂNJ ǑǒǐNjdžNJǍƾǎǐǖ ǎǂ ǍdžNJǚljdžǀ ǐ
NjǀǎDžǖǎǐǓ ǑǒǝNjnjLjǔLjǓ ǑǖǒNjǂDŽNJƽǓ LjnjdžNjǕǒǐǑnjLjǏǀǂǓ NjǂNJ ǔǚǍǂǕNJNjǟǎ
ǃnjǂǃǟǎljǂǑǒƾǑdžNJǑƽǎǕǐǕdžǎǂǕLjǒǐǞǎǕǂNJǐNJǃǂǔNJNjƾǓǑǒǐǗǖnjƽǏdžNJǓ
ǂǔǗǂnjdžǀǂǓǝǑǚǓdžǀǎǂNJǍdžǕǂǏǞƽnjnjǚǎǐNJǑǂǒǂNjƽǕǚ
ƮdžnjdžǕƿǔǕdžNjǂNJNjǂǕǂǎǐƿǔǕdžǝnjdžǓǕNJǓǐDžLjDŽǀdžǓ
ƣNjǐnjǐǖljdžǀǕdž ǝnjdžǓ ǕNJǓ ǑǒǐdžNJDžǐǑǐNJƿǔdžNJǓ NjǂNJ ǕNJǓ ǐDžLjDŽǀdžǓ Ǒǐǖ
džǑNJǔLjǍǂǀǎǐǎǕǂNJǑƽǎǚǔǕǐǑǒǐǛǝǎ
ƲǒǐǕǐǞdžNjǕdžnjƾǔdžǕdždžǒDŽǂǔǀdžǓNjǂljǂǒNJǔǍǐǞǃDŽƽLJdžǕdžǕǐǕǒǐǗǐDžǐǕNJNjǝ
ǂǑǝǕLjǎǑǒǀLJǂƮLjǘǒLjǔNJǍǐǑǐNJdžǀǕdžNjǂljǂǒNJǔǕNJNjƽǔdžǖDŽǒƿǍǐǒǗƿ
ƿǔdžǔǑǒƾǖƸǒLjǔNJǍǐǑǐNJdžǀǕdžƾǎǂdžnjǂǗǒƽǃǒdžDŽǍƾǎǐǑǂǎǀDŽNJǂǕǐǎ
NjǂljǂǒNJǔǍǝ
ƦNJǂǕLjǒdžǀǕdž Ǖǐ ǕLjnjƾǗǚǎǐ ǍǂNjǒNJƽ ǂǑǝ ǔǖǎljƿNjdžǓ ǖǙLjnjƿǓ
ljdžǒǍǐNjǒǂǔǀǂǓǖDŽǒǂǔǀǂǓNjǂNJƽǍdžǔLjǓLjnjNJǂNjƿǓǂNjǕNJǎǐǃǐnjǀǂǓǍLjǎ
ǕǐǂǗƿǔdžǕdžǎǂǃǒǂǘdžǀNjǂNJǍLjǎǕǐ ǘǒLjǔNJǍǐǑǐNJdžǀǕdž NjǐǎǕƽ ǔdž ǎdžǒǝ
ǑǘDžǀǑnjǂǔdžǍǑǂǎNJƾǒǂǎdžǒǐǘǞǕLjǎNJǑǕƿǒǂƿǑNJǔǀǎǂ
ƮLjǎ ǖǑdžǒǗǐǒǕǟǎdžǕdž ǕNJǓ ǑǒǀLJdžǓ NjǂNJ ǕNJǓ ǍǑǂnjǂǎǕƾLJdžǓ DžNJǝǕNJ NjƽǕNJ
ǕƾǕǐNJǐljǂǍǑǐǒǐǞǔdžǎǂǑǒǐNjǂnjƾǔdžNJǑǖǒNjǂDŽNJƽƿLjnjdžNjǕǒǐǑnjLjǏǀǂ
ƤDŽƽnjǕdžǕǐǑǒǐǛǝǎǂǖǕǝǂǑǝǕLjǎǑǒǀLJǂǔǕNJǓǑǂǒǂNjƽǕǚǔǖǎljƿNjdžǓ
ƟǕǂǎǕǐNjǂnjǟDžNJǐǒdžǞǍǂǕǐǓƿǕǐǗNJǓǕǐǖƾǘdžNJǖǑǐǔǕdžǀLJLjǍNJƽ