
DIY INSTALLATION GUIDELINES
FOR ASTROLAWN ARTIFICIAL GRASS
!
!
!
!
!
!
!
!
!
!
!
!
!
!
!
!
MEASURING THE AREA
!
!
!
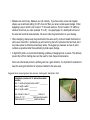
BEFORE AFTER

!
!
• Mistakes can cost money. Measure your job carefully. If you have many curves and irregular
shapes, we recommend adding 10- 20% more turf than your area’s actual square footage. When
designing, keep in mind the turf comes in 15’ foot wide sections. The turf is sold in 15’ widths by
whatever linear feet you order (example 15’ x 20’). Use graph paper or a sketchpad to draw out
the area and record all measurements. Be sure to note the grain direction on your drawing.
• When designing, always keep the grain direction the same and try to face it toward the direction it
will be seen most often. Sometimes you will need to lay the turf in a direction that isn’t best, but it
may make sense to eliminate unnecessary waste. We suggest you measure as close to exact
numbers as possible rather than estimating by total square footage.
• In high traffic paths, we recommend installing a pathway of stepping stone or pavers. This will help
prevent the turf from matting down and the need for more frequent maintenance.
Note: Like other textile products, artificial grass has a grain direction. It is important to remember to
keep the same grain direction for all pieces installed in the same area.
Suggested tools: measuring wheel, tape measure, marking paint, sketchpad or iPad
!
!
!
!
!
!
!
!
!
!
Calculations: (measure in 15’ wide sections when
possible)
Area 1: length (at longest point) x width = __________
Area 2: length x width = __________
Area 3: length x width = __________
Area 1+Area 2+ Area 3 = __________ total sq. ft.
Total sq. ft. / 15 = __________ total linear feet needed
Order turf as 15’ x __________ (total from above)
!

MEASURING AND ESTIMATING MATERIALS
!
!
!
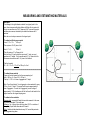
Example:
The drawing to the right indicates a sketch for a typical yard. In this
case, there is an area with plants (bottom left) that will not require turf.
As you can see there is a 15’x16’ area and a 9’x7’ area so this project
would require a seam, indicated by the dotted line between the 2
sections.
Note: be sure to always measure to the longest point.
To estimate artificial grass needed:
Area 1: 15’ x 16’ = 240 sq. ft.
This requires a 15’x16’ piece of turf.
Area 2: 7’ x 9’ = 63 sq. ft.
This will require a 15’ a 9’ piece of turf.
Note for Area 2: Even though this area is only 7’ wide, you must
purchase in 15’ widths. So you would need a 15’ x 9’ piece of turf for
this area and would have an 8’ x 9’ piece of turf leftover.
Total turf needed:
15’ x 16’ + 15’ x 9’ = 15’ x 24’ or 360 sq. ft. of turf.
To estimate base material:
Figure out the total square feet for the area requiring turf:
Area 1: 240 sq. ft. + Area 2: 63 = 303 sq. ft.
Total sq. ft. / 100 = # of tons of aggregate at 3” depth
Note: You will need about 1 ton of aggregate or base material for every
100 sq. ft. at a 3” depth. This project would require approximately 3
tons of aggregate. For each ton of aggregate, you are looking at
approximately 13-16 wheelbarrows full that will need to be hauled to the
project area from the staged dumping area.
To estimate other materials:
Seaming cloth: measure full length of area to be seamed. In this case
you would need about 12’ of seam tape.
Adhesive: 1 qt. of Henry’s glue will cover about 15-20’ or one tube of
Heavy Duty Liquid Nails covers about 20 linear ft.
Nails: Nails should be placed about every 6-8” around the perimeter
and staggered along seam.

SITE PREPARATION
• Have the project site’s water turned off a few days before starting the synthetic turf installation.
• Irrigation modifications: If you have irrigation lines existing in the area you will be installing turf,
make sure all the project site’s sprinklers are removed and capped off or cut the irrigation valves.
Note: Don’t forget to run drip lines to trees or plants that were receiving water from this source.
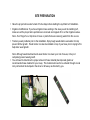
• Treat any weed problems prior to the installation. Spray tough weeds before excavation to help
prevent further growth. Weed barrier can also be installed on top of your base prior to laying turf to
help deter weed growth.
Note: Although weed treatments and weed barrier can lower your risk of issues, it may not
completely prevent weed growth.
• You will need to determine the proper amount of base material (decomposed granite or
recommended base material for your area). This material will need to be ordered through a local
rock yard and will be dumped in the street or driveway as directed by you.
!
!
!
!
!
!
!
!
!
!

!
EXCAVATION AND SOD REMOVAL
!
!
• You will need to remove the grass, dirt, rock, or whatever is in the area the AstroLawn
will be installed. Depending on your area, you will need to remove between 3”- 4” to
create an adequate drainage base.
• Use a sod cutter or flat shovel and haul away material.
• Grade sub grade level and compact if needed.
• If there is no grass and the yard consists of dirt, pay close attention to the depth in all
areas to determine the amount of base material needed.
Note: It is highly recommended for any projects over 150 sq. ft. to use a sod cutter to
remove existing sod.
Suggested tools: sod cutter, flat shovel
!
!
!
!
! !
!
!
!
!
!
Calculations:
3” in depth – Total sq. ft. of area / 100 = ______
4” in depth – Total sq. ft. of area / 80 = ______
This calculation will provide you with the total
TONS of base material needed. !

INSTALLING THE BASE
!
• Rock yards use different materials to create Road Base. Please inquire with your local rock
company to determine the best option for your area and which product is best suited for your
compacted drainage bed.
• Install weed barrier on top of prepared sub grade if needed for tough weed problems.
• Haul base material from street using wheelbarrows and dump in desired area until you create a 3”-
4” base.
• Using a grading rake, prepare the base level for proper drainage.
Note: When installing next to a concrete slab or walkway the compacted base should be 1” to 1.5”
below the surrounding concrete. This depends on pile height of turf and project design.
• Water down graded base area to help with base compaction.
• Use a hand tamp or vibratory compactor to compact base until you reach an 80% compaction rate.
Improper or incomplete compaction could result in improper drainage. Repeat as needed to
acquire desired base.
Note: It is highly recommended to rent a vibratory plate compactor for any projects larger than 150
sq. ft.
Suggested tools: hand tamp, vibratory plate compactor, rake, wheelbarrow
!
!
!
!
!
!
!

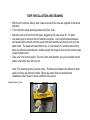
TURF INSTALLATION
!
!
• Unroll and cut turf in the client’s driveway or in a large open area. Slightly over- measure being
cautious so you are not left short on the job.
• Before laying the turf, be sure the grain direction aligns with the original design.
• Lay the turf in the desired area before you make any other cuts.
• The final detail cuts are made after turf is nailed in place. Always cut turf from the back-side.
• Place cut turf on the completed base in install location.
• Using 6” (60d) galvanized nails or garden staples, nail one end of the turf section, tightly pulling
other end in place. If turf section is large, you can kick the turf forward using your feet, this helps
tighten the turf into place. Nail the other end into base. All turf edges should be secured with nails
every 8” to 12”, nailing through the turf and into the base. Be careful not to crimp the turf fibers
under the nail heads.
• Perform final detail cuts and nail into base.
Note: If turf is being installed over concrete, a glue-down method may be used and no base is
required. Also note that it is highly recommended to have help carrying and moving custom cut
turf rolls due to the weight of the product.
!
Suggested tools: carpet knife, garden staples or 6” galvanized nails
!
!
!
!
!
!
!
!
!

TURF INSTALLATION AND SEAMING
!
• With the turf sections side by side, make sure all of the rows are aligned in the same
direction.
• Try to maintain equal spacing between the fiber rows.
• Nail each side of the turf into the base, staggering the nails every 8”- 12” apart.
• Use seam tape to connect the turf sections together. Use recommended adhesive
and spread with a trowel onto the seam cloth and carefully lay the turf over onto the
seam cloth. The seam will need time to dry or cure based on recommended curing
times by adhesive manufacturer. Adding weight like bags of sand on the seams helps
create a better bond.
• Take your time on the seams. The more time and attention you give to details on the
seams, the better they will turn out.
Note: The seaming process can be tricky. Professional installers are trained to hide
seams so they are almost invisible. Please be aware that non-professional
installations could result in more visibility to the seams.
!
Suggested tools: trowel
!
!
!
!
!
!

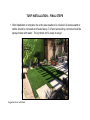
TURF INSTALLATION – FINAL STEPS
!
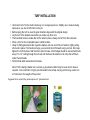
• After all the turf is installed and secured to the base, we recommend adding a layer of
sand onto the turf fibers. Coated sand, silica sand or zeolite can be used to infill the
turf. Use a drop seed spreader, or your hands, to evenly disperse sand. Be sure to
broom the sand into the turf so it migrates to the primary backing. We recommend
about 1-2 lbs. of sand per sq. ft., depending on the application and the product. The
sand acts as ballast and helps protect from UV rays.
Note: For projects larger than 150 sq. ft. it is highly recommended to use a drop seed
spreader to add your sand.
• With each layer of sand, the turf needs to be vigorously brushed using a power broom,
carpet rake or coarse bristle nylon broom. The sand will help support the fibers to
stand upright. The turf should be brushed across the fibers.
• The turf seams should be cross-brushed in both directions. This will make the seams
less visible.
Note: Be sure your levels of sand are consistent throughout.
!
Suggested tools: Carpet Rake, power broom, drop seed spreader
!
!
!
! !
!
!
!

TURF INSTALLATION – FINAL STEPS
!
!
• After installation is complete, the entire area needs to be cleaned. All excess sand or
debris should be removed and hauled away. Turf and surrounding concrete should be
sprayed down with water. The synthetic turf is ready to enjoy!
!
!
!
!
!
!
!
!
!
!
!
!
!
!
!
!
!
!
!
!
!
!
Suggested tools: leaf blower

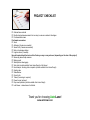
PROJECT CHECKLIST
!
!
!
!
!
! Ordered base material
! Double checked measurements for accuracy to ensure no material shortages
! Purchased AstroLawn
Purchased accessories:
! Sand
! Adhesive (if seams are needed)
! Seam Cloth (if seams are needed)
! Nails or landscape staples
! Irrigation items (if needed)
Have all required tools (below is a list of tools you may or may not need, depending on the size of the project)
! Measuring wheel/ tape measure
! Marking paint
! Sketchpad or drawing app
! Sod cutter (rentals available from Home Depot) or flat shovel
! Hand tamp or vibratory plate compactor (rentals available from Home Depot)
! Grading rake
! Wheelbarrow
! Carpet knife
! Trowel (if seaming is required)
! Power broom (optional)
! Drop seed spreader (rentals available from Home Depot)
! Leaf blower - cleaned area of all debris
Thank you for choosing AstroLawn!
www.astrolawn.com
-
 1
1
-
 2
2
-
 3
3
-
 4
4
-
 5
5
-
 6
6
-
 7
7
-
 8
8
-
 9
9
-
 10
10
-
 11
11


AstroLawn ALL608387UJ1500 Installation guide
- Type
- Installation guide
- This manual is also suitable for
Ask a question and I''ll find the answer in the document
Finding information in a document is now easier with AI
Related papers

Other documents
-
SYNLawn FER53-8215-UJ-006006 Installation guide
-
TrafficMASTER GLCPRM65F75CTL Installation guide
-
Ames 1825200 User guide
-
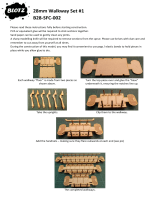 BLOTZ B28-SFC-002 Assembly Instructions
-
-
MSI LTRFRPUG15X100 Installation guide
-
 RealGrass Lwn-LN Installation guide
-
 Aquaphalt 211728 Installation guide
-
-
Scotts 18320 Installation guide


