
Manual
Manual
D IY SWING S E T
It’s time to swing!

Dear valued customer
Congratulations! You have purchased the Swingan DIY Swing set, where
the fun begins!
Please read this entire booklet completely before beginning the
assembly process. We have included important safety information that
you must adhere to, to prevent injuries.
PLEASE RETAIN THESE INSTRUCTIONS FOR FUTURE REFERENCE.
KEEP THEM IN A SAFE PLACE WHERE YOU CAN REFER TO THEM AS
NEEDED.
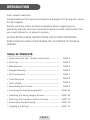
INTRODUCTION
Safe Use ....................................................................
Instructions for use – Safety Instructions ..............
Maintenance ..............................................................
Swingan Warranty .......................................................
Kit Components .........................................................
Tools Required .........................................................
How to Build
...........................................................
Preparing the Swing Hanging Bar ............................
Installing the Swing Hanger Screws .........................
Attaching the top Beam to the a-frames .................
Assembling the Belt Swing .......................................
Hanging the Swings ..................................................
PAGE 3
PAGE 4
PAGE 5
PAGE 6
PAGE 7
PAGE 8
PAGE 9
PAGE 10
PAGE 10
PAGE 11
PAGE 12
PAGE 12
•
•
•
•
•
•
•
Assembling the A Frame
...........................................................
PAGE 9
•
•
•
•
•
•
PAGE 2

• Use a water sealant on your beams to protect the wood and prevent
cracking and warping.
• Install the swing set only on a level surface.
• Never install the swing set on a hard surface such as tiles, concrete,
packed earth etc. Only install the swing set over a soft and proper
shock-absorbent material such as wood chips, mulch or shredded
rubber, of sufficient depth – between 9-12”. Dirt and grass, which are
the most prevalent surfaces under home playground equipment, do not
adequately protect children from serious head injuries.
• Do not install loose fill surfacing over hard surfaces such as concrete or
asphalt.
• The swing set should be placed at least 6ft from any surrounding
structures, and surface material should extend the full 6ft around the
swing set in all directions.
• Remove any tripping hazards, such as rocks, tree stumps, loose toys
etc. from the play area.
• Always anchor your swing set into the ground to prevent movement and
guarantee stability when the swing set is played on.
Carefully read the following instructions BEFORE using your Swingan
product. This information was meticulously put together for your safety
and to reduce risk of injury. Always keep the safety of your children in
mind as you build your set and as your children play on it.
INSTRUCTIONS FOR USE – SAFETY INSTRUCTIONS
SAFETY ADVISORIES
INSTALLATION
PAGE 3

● The swing set is designed to be used by children ages 4 and up. No
more than 4 persons should use the set at once, not more than one
person per swing.
● An adult should always supervise children using the swing set.
● Do not allow a child or adult to use the swing set if they have a physical
condition that hampers their ability to use the equipment properly.
● Teach children not to walk close to, in front, in between or behind
moving swings.
● Make sure your children know not to jump off a swing that is in motion.
● Teach children not to twist or loop the swing chains/ropes. This may
weaken the strength of the chain/rope.
● Teach children to only use each swing in the proper manner it is
intended for. Children should learn to sit in the centre of the swing, with
their full weight on the seat.
● Instruct children not to push empty seats – the swing may hit them on
the rebound, and may cause serious injury.
● All who use the swing set should dress appropriately e.g. avoiding loose
strings that could get caught in the swing chains.
● Take care when using the equipment after it has gotten wet, only allow
children on the swings when there is sufficient traction for them to be
safe.
● No one should use the equipment before you have checked that it is
assembled and anchored properly.
SAFE USE
PAGE 4

PAGE 5
For more detailed information on playground safety, download the
United States Consumer Product Safety Commission’s Outdoor Home
Playground Safety Handbook at no cost:
https://www.cpsc.gov/s3fs-public/324.pdf
Check the swing equipment before each use, and perform maintenance
regularly. This includes, but is not limited to checking the swing set for
cracks, breaks, missing pieces, excess wear, loose connections,
decreased stability and for overall integrity.
● Carry out maintenance checks monthly or before the start of a usage
period, checking more regularly in seasons of high usage.
● Inspect nuts and bolts for tightness
● Oil all moving steel parts
● Check water sealant and repaint areas of exposure. We recommend
sealing annually to keep your swing set looking brand new.
● Scan for rough areas that may need sanding
● Check that all accessories and parts are in proper working order
MAINTENANCE

Please take the time to enter the information below. You will need this
information for warranty claims.
Place of Purchase: _____________ Date of Purchase: _____________
Swingan products are manufactured under the highest standards of
quality and workmanship. Your Swingan item comes with a limited
warranty showing our dedication to providing only quality products.
Our warranty covers defects in material and workmanship. Allowing for
reasonable wear and tear, should any such defect become apparent
during the warranty period, Swingan will supply a free replacement for any
defective part (installation not included). This limited warranty does not
cover damage incurred through regular wear and tear, improper
maintenance, abuse and misuse, commercial use or accidents.
The warranty is effective from the date of purchase as shown on your
receipt, and in accordance with the applicable legalities of your state
and/or region. All parts of this swing set are under warranty for 1 year from
the date of purchase.
After the warranty expires, we offer a 15% discount on all our replacement
pa
rts, up until 2 years from the original purchase date. Customers must
show proof of purchase in order to receive this discount. We make every
effort to ensure that we ship our products in perfect condition. In the event
that you receive your swing or ladder with any of the parts missing or
broken, contact Swingan customer service for immediate replacement at
no cost to you.
If you made an error when purchasing your swing, ladder, or part, we will
gladly make an exchange. However, you will be responsible for any shipping
charges required for the exchange.
FOR YOUR RECORDS:
S WING AN W A RRANT Y
STAPLE RECEIPT HERE
SWINGAN WARRANTY
PAGE 6

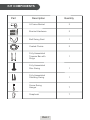
KIT COMPONENTS
Part Description Quantity
A-Frame Backet
Bracket Hardware
Belt Swing Seat
Coated Chains
Fully Assembled
Trapeze Bar with
Rings
Fully Assembled
Disc Swing
Fully Assembled
Standing Swing
Screw Swing
Hanger
Snaphook
2
2
1
2
1
1
1
7
7
PAGE 7

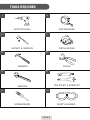
TOOLS REQUIRED
ELECTRIC DRILL
SOCKET & WRENCH
HAMMER
WRENCH
SCREWDRIVER
TAPE MEASURE
CIRCULAR SAW
PLIERS
PHILIPS BIT & SPADE BIT
SAFETY GLASSES
1.
2.
3.
4.
5.
10.
9.
8.
7.
6.
PAGE 8

HOW TO BUILD YOUR SWING SET
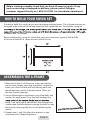
ASSEMBLING THE A-FRAME
1. Measure the two 4”x4”x8’ beams to ensure that they
are the same length, adjusting as needed. Lay the two
beams on a level surface and slide the top ends into
the leg openings on the A-frame bracket. These are
the two shorter openings.
2. Secure the bracket to the beams using 4 lag bolts and
washers for each beam. Drive the bolts through the
beam, 2 on each side of each beam. (Pre-drilling holes
smaller than the bolts before screwing the bolts in may
allow easier securing with less risk of splintering the
wood.)
3. Repeat steps 1 and 2 for the other bracket, so you
now have two V-shaped leg frames.
In order to build this swing set you must purchase wooden beams. The A-frame brackets are
designed to be used with a 4x6 top beam and 4x4 support beams. To build the swing set
8ft depth and 7.8ft height.
Before building this swing set, check that you have a minimum space of 24ft by 20ft,
to ensure at least 6ft of space on each side of the set.
PAGE 9
Before starting assembly, check that you have all necessary parts. If any
parts are missing or damaged on delivery, please contact Swingan
customer support directly on 1-800-574-9323 for immediate replacement.
x

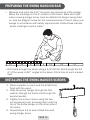
PREPARING THE SWING HANGING BAR
INSTALLING THE SWING HANGER SCREWS
• Drill holes through the beam using a 3/8" drill bit. Drill through the full
6” of the wood, at 90° angles to the beam. Drill a hole at each marked
spot.
PAGE 10
1. Place a washer on each end the drilled hole,
flush with the wood.
2. Slide the screw hanger through the first
washer, through the beam and through the
second washer.
3. Tighten the screw in place using the two
accompanying nuts, screwing them onto the
top of the screw hanger on the other side of
the beam.
4. Repeat steps 1-3 at each drilled hole and
swing hanger screw.
• Measure and mark the 120” top beam for placement of the swings.
Make the markings on the 4” surface of the beam. Mark each spot
where a swing hanger screw must be installed to hang a swing chain
on. See the diagram below for the measurements of how to place your
swings in accordance with safety requirements. Dotted lines indicate
where markings must be made.
12’’
16’’
16’’
15’’
8’’
8’’
25’’
20’’

ATTACHING THE TOP BEAM TO THE A-FRAMES
You are now ready to start hanging your swings!
120’’
12 ft
PAGE 11
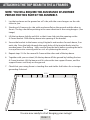
NOTE: YOU WILL REQUIRE THE ASSISTANCE OF ANOTHER
PERSON FOR THIS PART OF THE ASSEMBLY.
1. Lay the top beam on the ground on a 6” side, with the screw hangers on the side
closer to you.
2. Stand one A-Frame on its side, with one beam at on the ground and the other in
the air. The legs should be pointing in the same direction as the swing hangers. (See
Image)
3. Lift the top beam slightly and tilt it so that it can slide into the opening on the
A-Frame bracket. Slide the top beam into opening of the bracket.
4. Secure the bracket to the beams using 6 lag bolts and washers for each beam, 3 on
each side. Drive the bolts through the ready holes of the bracket rmly into the
wooden beam. (Pre-drilling holes smaller than the bolts before screwing the bolts
in may allow easier securing with less risk of splintering the wood. )
5. Repeat steps 2-4 for the second A-Frame at the other end of the top beam.
6. Together with your assistant, life the top beam o the ground by holding the two
A-Frame brackets. Lift the beam until it is above the two support frames, and the
support frames rest rmly on the ground.
7. Check that your swing frame is standing rm and stable. Add stakes for a stronger
grounding if desired.

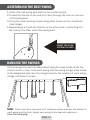
ASSEMBLING THE BELT SWING
HANGING THE SWINGS
1. Collect the belt swing seat and the two coated chains.
2. Thread the S-Hook on the end of a chain through the hole on one end
of the swing seat.
3. Crimp the hook opening closed using pliers to secure the connection.
(See Image)
4.Repeat steps 2-3 with the S-Hook on the other chain, connecting it to
the hole on the other end of the swing seat.
All the swings are now fully assembled. Using the snap hooks at the top
There must be a minimum of 8" clearance space between the bottom of
each swing and the floor. Adjust each swing to the desired height and ....
have fun swinging!
of each chain or rope, hook each swing onto the swing hanger snap hooks,
at its designated spot. See the image below for the position of each swing.
(Image not drawn to scale.)
CRIMP THE HOOK
OPENING CLOSED
PAGE 12
NOTE:

Your swingset
is fully assembled
and
ready for FUN!
CONTACT INFO:
2 Mill St. Cornwall NY 12518
Web: www.swingan.com
US: 1800-574-9323
UK: 020-3150-0484
-
 1
1
-
 2
2
-
 3
3
-
 4
4
-
 5
5
-
 6
6
-
 7
7
-
 8
8
-
 9
9
-
 10
10
-
 11
11
-
 12
12
-
 13
13


Ask a question and I''ll find the answer in the document
Finding information in a document is now easier with AI
Other documents
-
Gorilla Playsets Tandem Swing Operating instructions
-
Kmart 43268436 User manual
-
-
-
 Creative Cedar Designs 3512-Y-G User manual
-
Gorilla Playsets Sun Palace I Operating instructions
-
 Creative Cedar Designs 3512-B Installation guide
-
-
-

