Toro GrandStand Multi Force Mower, With 52in TURBO FORCE Cutting Unit User manual
- Category
- Lawnmowers
- Type
- User manual
This manual is also suitable for

FormNo.3415-584RevC
GrandStand
®
MultiForceMower
With52inor60inTURBOFORCE
®
Cutting
Unit
ModelNo.74523—SerialNo.316000001andUp
ModelNo.74529—SerialNo.316000001andUp
Registeratwww.Toro.com.
OriginalInstructions(EN)
*3415-584*C

ItisaviolationofCaliforniaPublicResourceCode
Section4442or4443touseoroperatetheengineon
anyforest-covered,brush-covered,orgrass-covered
landunlesstheengineisequippedwithaspark
arrester,asdenedinSection4442,maintainedin
effectiveworkingorderortheengineisconstructed,
equipped,andmaintainedforthepreventionofre.
WARNING
Removingstandardoriginalequipmentparts
andaccessoriesmayalterthewarranty,
traction,andsafetyofthemachine.Failureto
useoriginalToropartscouldcauseserious
injuryordeath.Makingunauthorizedchanges
totheengine,fuelorventingsystem,may
violateEPAandCARBregulations.
Replaceallpartsincluding,butnotlimited
to,tires,belts,blades,andfuelsystem
componentswithoriginalToroparts.
Pleaserefertotheenginemanufacturer’sinformation
includedwiththemachine.
WARNING
CALIFORNIA
Proposition65Warning
Theengineexhaustfromthisproduct
containschemicalsknowntotheStateof
Californiatocausecancer,birthdefects,
orotherreproductiveharm.
Batteryposts,terminals,andrelated
accessoriescontainleadandlead
compounds,chemicalsknownto
theStateofCaliforniatocause
cancerandreproductiveharm.Wash
handsafterhandling.
Useofthisproductmaycauseexposure
tochemicalsknowntotheStateof
Californiatocausecancer,birthdefects,
orotherreproductiveharm.
Introduction
Thisrotaryblade,ridinglawnmowerisintendedtobe
usedbyprofessional,hiredoperators,orresidential
homeowners.Itisdesignedprimarilyforcuttinggrass
onwell-maintainedlawnsonresidentialorcommercial
properties.Itisnotdesignedforcuttingbrushorfor
agriculturaluses.
Readthisinformationcarefullytolearnhowtooperate
andmaintainyourproductproperlyandtoavoid
injuryandproductdamage.Youareresponsiblefor
operatingtheproductproperlyandsafely.
YoumaycontactT orodirectlyatwww.Toro.com
forproductsafetyandoperationtrainingmaterials,
accessoryinformation,helpndingadealer,orto
registeryourproduct.
Wheneveryouneedservice,genuineToroparts,or
additionalinformation,contactanAuthorizedService
DealerorT oroCustomerServiceandhavethemodel
andserialnumbersofyourproductready.Figure1
identiesthelocationofthemodelandserialnumbers
ontheproduct.Writethenumbersinthespace
provided.
g032686
Figure1
1.Locationofthemodelandserialnumbers
ModelNo.
SerialNo.
Thismanualidentiespotentialhazardsandhas
safetymessagesidentiedbythesafety-alertsymbol
(Figure2),whichsignalsahazardthatmaycause
seriousinjuryordeathifyoudonotfollowthe
recommendedprecautions.
©2018—TheToro®Company
8111LyndaleAvenueSouth
Bloomington,MN55420
2
Contactusatwww.Toro.com.
PrintedintheUSA
AllRightsReserved

g000502
Figure2
1.Safety-alertsymbol
Thismanualuses2wordstohighlightinformation.
Importantcallsattentiontospecialmechanical
informationandNoteemphasizesgeneralinformation
worthyofspecialattention.
Contents
Safety.......................................................................4
SafeOperatingPractices....................................4
ToroMowerSafety..............................................6
SlopeIndicator...................................................8
SafetyandInstructionalDecals..........................9
ProductOverview...................................................13
Controls...........................................................13
Specications..................................................14
Attachments/Accessories.................................15
Operation................................................................15
ThinkSafetyFirst..............................................15
AddingFuel......................................................15
CheckingtheEngine-OilLevel..........................17
BreakinginaNewMachine..............................17
OperatingtheParkingBrake.............................17
OperatingtheMower-Blade-ControlSwitch
(PTO)............................................................18
OperatingtheThrottle.......................................18
OperatingtheKeySwitch.................................18
UsingtheFuel-ShutoffValve.............................19
StartingtheEngine...........................................19
ShuttingOfftheEngine.....................................20
TheSafety-InterlockSystem.............................20
OperatingthePlatform......................................21
DrivingForwardorBackward............................22
StoppingtheMachine.......................................23
PushingtheMachinebyHand..........................23
TransportingtheMachine.................................24
LoadingtheMachine........................................25
SideDischargingorMulchingthe
Grass............................................................26
AdjustingtheHeight-of-Cut...............................26
AdjustingtheAnti-ScalpRollers........................27
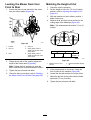
AdjustingtheFlowBafe..................................27
UsingtheMid-SizeWeight................................28
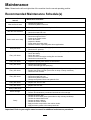
Maintenance...........................................................29
RecommendedMaintenanceSchedule(s)...........29
Pre-MaintenanceProcedures..............................30
ReleasingtheCushionforRearAccess............30
Lubrication..........................................................30
GreasingtheAccessoryFrame.........................30
GreasingtheT orsionIdler.................................31
GreasingtheFrontCasterPivots......................31
GreasingtheCaster-WheelHubs.....................31
GreasingtheEngineVoltageRegulator............32
GreasingtheBrakeCalipers.............................32
GreasingtheMotionControls...........................33
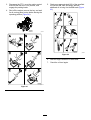
EngineMaintenance...........................................33
ServicingtheAirCleaner..................................33
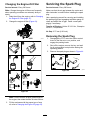
ServicingtheEngineOil....................................35
ServicingtheSparkPlug...................................37
CheckingtheSparkArrester.............................38
FuelSystemMaintenance...................................39
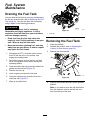
DrainingtheFuelT ank......................................39
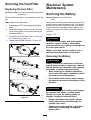
RemovingtheFuelTank...................................39
ServicingtheFuelFilter...................................40
3

ElectricalSystemMaintenance...........................40
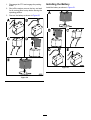
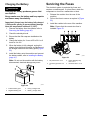
ServicingtheBattery.........................................40
ServicingtheFuses..........................................42
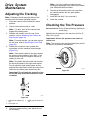
DriveSystemMaintenance..................................43
AdjustingtheTracking......................................43
CheckingtheTirePressure...............................43
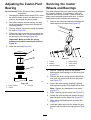
AdjustingtheCaster-PivotBearing...................44
ServicingtheCasterWheelsand
Bearings........................................................44
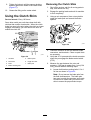
UsingtheClutchShim......................................45
CheckingtheWheel-LugNuts..........................47
CheckingtheWheel-HubNuts..........................47
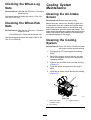
CoolingSystemMaintenance..............................47
CleaningtheAir-IntakeScreen.........................47
CleaningtheCoolingSystem............................47
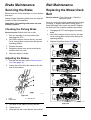
BrakeMaintenance.............................................48
ServicingtheBrake..........................................48
BeltMaintenance................................................48
ReplacingtheMower-DeckBelt........................48
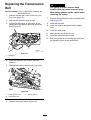
ReplacingtheTransmissionBelt......................49
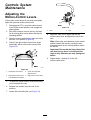
ControlsSystemMaintenance.............................50
AdjustingtheMotion-ControlLevers.................50
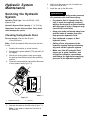
HydraulicSystemMaintenance...........................51
ServicingtheHydraulicSystem........................51
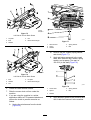
MowerDeckMaintenance....................................53
RemovingtheMowerDeck...............................53
InstallingtheMowerDeck.................................55
ServicingtheBlades.........................................55
CorrectingtheQualityofCut.............................57
AdjustingtheDeck-LiftSpring...........................60
ReplacingtheGrassDeector..........................60
Cleaning..............................................................61
CleaningundertheMowerDeck.......................61
DisposingoftheWaste.....................................61
Storage...................................................................61
CleaningandStorage.......................................61
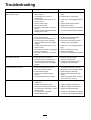
Troubleshooting......................................................63
Schematics.............................................................65
Safety
Improperuseormaintenancebytheoperatoror
ownercanresultininjury.T oreducethepotential
forinjury,complywiththesesafetyinstructions,
andpayattentiontothesafetyalertsymbol,which
meansCaution,Warning,orDanger—personalsafety
instruction.Failuretocomplywiththeinstructions
mayresultinpersonalinjuryordeath.
Thismachinewasmanufacturedaccordingtothe
appropriateregulatorystandardsineffectatthetime
ofmanufacture.Modifyingthismachineinanyway
maycauseittobeoutofcompliancewiththose
standardsandwiththeinstructionsinthisOperator’s
Manual.Modicationstothismachineshouldonly
bemadebyeitherthemanufactureroranAuthorized
ToroDealer.
Thisproductiscapableofamputatinghandsandfeet.
Followallsafetyinstructionstoavoidseriousinjury
ordeath.
Theowner/usercanpreventandisresponsiblefor
accidentsorinjuriesoccurringtopeople,ordamage
toproperty.
Theadditionofattachmentsmadebyother
manufacturersthatdonotmeetAmericanNational
StandardsInstitutecerticationmaycause
noncomplianceofthismachine.
SafeOperatingPractices
ThefollowinginstructionsarefromANSIstandard
B71.4-2012.
Training
•ReadtheOperator'sManualandothertraining
material.Iftheoperator(s)ormechanic(s)cannot
readthemanuallanguage,itistheowner's
responsibilitytoexplainthismaterialtothem.
•Becomefamiliarwiththesafeoperationofthe
equipment,operatorcontrols,andsafetysigns.
•Alloperatorsandmechanicsshouldbetrained.
Theownerisresponsiblefortrainingtheusers.
•Neverletchildrenoruntrainedpeopleoperateor
servicetheequipment.Localregulationsmay
restricttheageoftheoperator.
•Theowner/usercanpreventandisresponsible
foraccidentsorinjuriesoccurringtohimselfor
herself,otherpeople,ordamagetoproperty.
4

Preparation
•Evaluatetheterraintodeterminewhataccessories
andattachmentsyouneedtoproperlyandsafely
performthejob.Useonlyaccessoriesand
attachmentsapprovedbythemanufacturer.
•Wearappropriateclothing;includingsafety
glasses,longpants,substantialslip-resistant
footwear,gloves,andhearingprotection.Tieback
longhair.Donotwearjewelry.
•Inspecttheareawhereyouwillusetheequipment
andensurethatallobjectsareremovedfromthe
areabeforeuse.
•Useextracarewhenhandlingfuels.Theyare
ammableandvaporsareexplosive.
–Useonlyanapprovedcontainer.
–Donotremovethefuelcaporaddfuelwiththe
enginerunning.Allowtheenginetocoolbefore
refueling.Donotsmokenearthemachine
whentheengineisrunning.
–Donotrefuelordrainthemachineindoors.
•Checkthattheoperator'spresencecontrols,safety
switches,andshieldsareattachedandfunctioning
properly.Donotoperatethemachineunlessthey
arefunctioningproperly.
Operation
•Lightningcancausesevereinjuryordeath.If
lightningisseen,orthunderisheardinthearea,
donotoperatethemachine;seekshelter.
•Donotrunanengineinanenclosedarea.
•Operateonlyinwell-litareas,keepingawayfrom
holesandhiddenhazards.
•Ensurethatalldrivesareinneutralandthatthe
parkingbrakeisengagedbeforestartingengine.
Starttheengineonlyfromtheoperator’sposition.
•Makesurethatyouhavegoodfootingwhile
usingthismachine,especiallywhenbackingup.
Reducedfootingcouldcauseslipping.
•Slowdownanduseextracareonhillsides.Be
suretotravelsidetosideonhillsides.Turf
conditionscanaffectthestabilityofthemachine.
Usecautionwhileoperatingneardrop-offs.
•Slowdownandusecautionwhenmakingturns
andwhenchangingdirectionsonslopes.
•Donotraisethemowerdeckwiththeblades
running.
•DonotoperatethemachinewithoutthePTO
shieldorotherguardssecurelyinplace.Besure
thatallinterlocksareattached,adjustedproperly,
andfunctioningproperly.
•Donotoperatewiththedischargedeectorraised,
removedoraltered,unlessyouareusingagrass
catcher.
•Donotchangetheenginegovernorsettingor
overspeedtheengine.
•Stopthemachineonlevelground,disengagethe
drives,engagetheparkingbrake,andshutoffthe
enginebeforeleavingtheoperator'spositionfor
anyreason,includingemptyingthecatchersor
uncloggingthechute.
•Stopthemachineandinspectthebladesafter
strikingobjectsorifanabnormalvibrationoccurs.
Makethenecessaryrepairsbeforeresuming
operations.
•Keepyourhandsandfeetawayfromthecutting
unit.
•Lookbehindanddownbeforebackingupto
ensureaclearpath.
•Keeppetsandbystandersawayfromanoperating
machine.
•Slowdownandusecautionwhenmakingturns
andcrossingroadsandsidewalks.Stopthe
bladesifyouarenotmowing.
•Beawareofthemower-dischargedirectionand
donotpointitatanyone.
•Donotoperatethemachinewhiletired,ill,or
undertheinuenceofalcoholordrugs.
•Usecarewhenloadingorunloadingthemachine
intoorfromatrailerortruck.
•Usecarewhenapproachingblindcorners,shrubs,
trees,orotherobjectsthatmayobscurevision.
SafeHandlingofFuels
•Toavoidpersonalinjuryorpropertydamage,use
extremecareinhandlingfuel.Fuelisextremely
ammableandthevaporsareexplosive.
•Extinguishallcigarettes,cigars,pipes,andother
sourcesofignition.
•Useonlyanapprovedfuelcontainer.
•Donotremovethefuelcaporaddfuelwiththe
enginerunning.
•Allowtheenginetocoolbeforefueling.
•Donotfuelthemachineindoors.
•Donotstorethemachineorfuelcontainerwhere
thereisanopename,spark,orpilotlight,such
asonawaterheateroronotherappliances.
•Donotllcontainersinsideavehicle,onatruck,
oronatrailerbedwithaplasticliner.Alwaysplace
containersonthegroundawayfromyourvehicle
beforelling.
•Removeequipmentfromthetruckortrailerand
fuelitontheground.Ifthisisnotpossible,
thenaddfuelwithsuchequipmentasaportable
containerratherthanfromafuel-dispensernozzle.
5

•Keepthenozzleincontactwiththerimofthefuel
tankorcontaineropeningatalltimesuntilfueling
iscomplete.Donotuseanozzlelock-opendevice.
•Ifyouspillfuelonclothing,changeyourclothing
immediately.
•Donotoverllthefueltank.Replacethefuelcap
andtightenitsecurely.
MaintenanceandStorage
•Disengagedrives,engagetheparkingbrake,shut
offtheengine,andremovethekeyordisconnect
spark-plugwire.Waitforallmovementtostop
beforeadjusting,cleaning,orrepairing.
•Cleangrassanddebrisfromthecuttingunit,
drives,mufers,andenginetohelppreventres.
•Cleanupoilorfuelspills.
•Lettheenginecoolbeforestoringthemachine.
•Donotstorefuelnearamesordrainthefuel
indoors.
•Donotallowuntrainedpersonneltoservicethe
machine.
•Usejackstandstosupportcomponentswhen
required.
•Carefullyreleasepressurefromcomponentswith
storedenergy.
•Disconnectthebatteryorremovethespark-plug
wirebeforemakinganyrepairs.Disconnectthe
negativeterminalrstandthepositiveterminal
last.Connectthepositiveterminalrstand
negativelast.
•Usecarewhencheckingtheblades.Wrapthe
blade(s)orweargloves,andusecautionwhen
servicingthem.Onlyreplaceblades;donot
straightenorweldthem.
•Keephandsandfeetawayfrommovingparts.If
possible,donotmakeadjustmentswiththeengine
running.
•Keepallpartsingoodworkingconditionandall
hardwaretightened.Replaceallwornordamaged
decals.
Hauling
•Usecarewhenloadingorunloadingthemachine
intoatraileroratruck.
•Usefull-widthrampsforloadingmachineintoa
traileroratruck.
•Tiethemachinedownsecurelyusingstraps,
chains,cable,orropes.Bothfrontandrearstraps
shouldbedirecteddownandoutwardfromthe
machine.
ToroMowerSafety
Thefollowinglistcontainssafetyinformationspecic
toToroproductsandothersafetyinformationthatyou
mustknow.
Thisproductiscapableofamputatinghandsand
feetandofthrowingobjects.Alwaysfollowallsafety
instructionstoavoidseriousinjuryordeath.
Thisproductisdesignedforcuttingandrecycling
grass,or,whenequippedwithagrassbagger,for
catchingcutgrass.Anyuseforpurposesother
thanthesecouldprovedangeroustotheuserand
bystanders.
GeneralOperation
•Besurethattheareaisclearofbystandersbefore
mowing.Stopthemachineifanyoneentersthe
area.
•Donottouchequipmentorattachmentpartswhich
maybehotfromoperation.Allowalloftheparts
tocoolbeforeattemptingtomaintain,adjust,or
servicethemachine.
•UseonlyToro-approvedattachments.Warranty
maybevoidedifusedwithanyunapproved
attachments.
•Checkcarefullyforoverheadclearances(i.e.,
branches,doorways,electricalwires,etc.)before
operatingunderanyobjects,anddonotcontact
them.
•Slowdownbeforemakingturnsanduseextra
caution.
•Usecautionwhenridingtheplatformovercurbs,
rocks,roots,orotherobstructions.
•Lookbehindanddownbeforebackinguptoensure
aclearpath.Useextracarewhenoperatingthe
machineinreverse.
•Donotjerkthecontrols;useasteadymotion.
•Whenloadingorunloadingthemachine,useone
full-widthrampthatiswideenoughtoextend
beyondthewidthofthemachine.
•Donotcarrypassengers.
•Donotcarryequipmentonthemachine.
6

SlopeOperation
Allslopesandrampsrequireextracaution.Ifyoufeel
uneasyonaslope,donotmowit.
•Removeobstaclessuchasrocks,treelimbs,etc.
fromthemowingarea.
•Watchforholes,rutsorbumps.T allgrasscan
hideobstacles.
•Usecautionneardrop-offs,ditches,or
embankments.Themachinecouldsuddenlyturn
overifawheelgoesovertheedgeofacliffor
ditch,orifanedgecavesin.
•Useextracarewithgrasscatchersorother
attachments.Thesecanchangethestabilityof
themachine.
•Keepallmovementonslopesslowandgradual.
•Donotmakesuddenchangesinspeedor
direction.
•Mowslopessidetoside.
•Donotmowslopesgreaterthan20degrees.
Service
•Donotstorethemachineorafuelcontainerinside
wherethereisanopename,suchasneara
waterheaterorfurnace.
•Keepthenutsandboltstight,especiallythe
blade-attachmentbolts.
•Neverremoveortamperwithsafetydevices.
Checktheirproperoperationregularly.Neverdo
anythingtointerferewiththeintendedfunctionofa
safetydeviceortoreducetheprotectionprovided
byasafetydevice.
•Tobestprotectyourinvestmentandmaintain
optimalperformanceofyourToroequipment,count
onTorogenuineparts.Whenitcomestoreliability,
Torodeliversreplacementpartsdesignedtothe
exactengineeringspecicationsofourequipment.
Forpeaceofmind,insistonT orogenuineparts.
•Checktheoperationofthebrakesfrequently.
Adjustandservicethemasrequired.
7

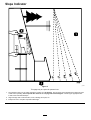
SlopeIndicator
g011841
Figure3
Thispagemaybecopiedforpersonaluse.
1.Themaximumslopeyoucansafelyoperatethemachineonis20degrees.Usetheslopecharttodeterminethedegreeofslope
ofhillsbeforeoperating.Donotoperatethismachineonaslopegreaterthan20degrees.Foldalongtheappropriateline
tomatchtherecommendedslope.
2.Alignthisedgewithaverticalsurface,atree,building,fencepole,etc.
3.Exampleofhowtocompareslopewithfoldededge
8

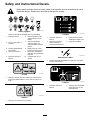
SafetyandInstructionalDecals
Safetydecalsandinstructionsareeasilyvisibletotheoperatorandarelocatednearanyarea
ofpotentialdanger.Replaceanydecalthatisdamagedormissing.
decalbatterysymbols
BatterySymbols
Someorallofthesesymbolsareonyourbattery.
1.Explosionhazard
6.Keepbystandersasafe
distanceawayfromthe
battery.
2.Nore,opename,or
smoking
7.Weareyeprotection;
explosivegasescan
causeblindnessandother
injuries.
3.Causticliquid/chemical
burnhazard
8.Batteryacidcancause
blindnessorsevereburns.
4.Weareyeprotection.9.Flusheyesimmediately
withwaterandgetmedical
helpfast.
5.ReadtheOperator's
Manual.
10.Containslead;donot
discard
decal93-7818
93-7818
1.Warning—readtheOperator'sManualforinstructionson
torquingthebladebolt/nutto115to149N∙m(85to110
ft-lb).
decal106-5517
106-5517
1.Warning—donottouchthehotsurface.
decal112-3858
112-3858
1.ReadtheOperator's
Manual.
3.Removethekeybefore
adjustingtheheightofcut.
2.Readtheinstructions
beforeservicingor
performingmaintenance.
4.Height-of-cutsettings.
decaloemmarkt
Manufacturer'sMark
1.Indicatesthebladeisidentiedasapartfromtheoriginal
machinemanufacturer.
decal116-8775
116-8775
1.ReadtheOperator’s
Manual.
2.Warning—lltothebottom
ofthellerneck;donot
overllthetank.
9

decal131-1180
131-1180
1.ReadtheOperator's
Manual.
3.Baggingsetting
2.Short,lightgrass;dry
conditions
4.Tall,densegrass;wet
conditions
decal131-3507
131-3507
1.ReadtheOperator's
Manual.
2.Belttensioner
decal131-3521
131-3521
1.Heightofcut
decal131-3524
131-3524
1.ReadtheOperator's
Manual.
3.Fluidlevel
2.Transmissionuid
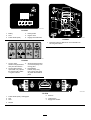
131-3528
15A 15A 10A
7.5A
decal131-3528
131-3528
1.Keyswitch—15A
3.Powertakeoff(PTO)—10
A
2.Accessoryport—15A
4.Infocenter—7.5A
10

decal131-3536
131-3536
1.Battery4.Parkingbrake
2.Time5.Engine—start
3.Powertakeoff(PTO)
6.Engagethehandlebars.
decal133-4604
133-4604
1.Thrownobject
hazard—keepbystanders
awayfromthemachine.
3.Severinghazardofhand
orfoot—keepawayfrom
movingparts.
2.Thrownobjecthazard,
openbafe—onlyoperate
themachinewithabafe
oragrasscollector.
4.Entanglement
hazard—keepaway
frommovingparts;keep
allguardsandshieldsin
place.
decal133-4648
133-4648
1.ReadtheOperator'sManualformoreinformationon
servicingthemachine.
decal131-3526
131-3526
1.Powertakeoff(PTO)—disengaged
5.Reverse
2.Fast6.Tractiondrive
3.Slow
7.Engagethehandles.
4.Neutral
11

decal131-3527
131-3527
1.Warning—readtheOperator'sManual.5.Thrownobjecthazard—keepbystandersawayfromthe
machine.
2.Warning—receivetrainingbeforeoperatingthemachine.6.Warning—1)Engagetheparkingbrake,shutofftheengine,
andremovethekeyfromtheswitch;2)ReadtheOperator's
Manualbeforeservicingorperformingmaintenance.
3.Thrownobjecthazard—keepthedeectorloweredduring
operation.
7.Warning—engagetheparkingbrake,shutofftheengine,and
removethekeyfromtheswitchbeforeleavingthemachine.
4.Cutting/severinghazardofhandorfoot—keepawayfrom
movingparts;keepallguardsandshieldsinplace.
8.Tippinghazard—donotoperateneardrop-offsornearwater.
decal133-1432
133-1432
1.Disengagetheparkingbrake.
4.PushdowntoturnoffthePTO.
2.Engagetheparkingbrake.
5.Enginespeed—fast
3.PulluptoturnonthePTO.
6.Enginespeed—slow
12

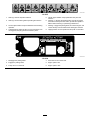
ProductOverview
g033080
Figure4
1.Adjustablecaster
9.Controllevers
2.Accessory-framelock
10.Hydraulictank
3.Anti-scalproller(60-inch
decksonly)
11.Fueltank
4.Frontcasterwheel
12.Platform(downposition)
5.Side-dischargechute13.Fuel-shutoffvalve
6.Accessoryframe
14.Battery
7.Engine15.Mowerdeck
8.Controls
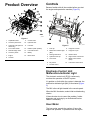
Controls
Becomefamiliarwithallthecontrolsbeforeyoustart
theengineandoperatethemachine(Figure5).
g031505
Figure5
1.Fuelcap
8.Height-of-cutlever
2.Malfunction-indicatorlight
(MIL)
9.Height-of-cutpin
3.Parking-brakelever
10.Platformlatch
4.Hydraulic-tankcap11.Rightmotion-controllever
5.Hourmeter12.Blade-controlswitch
(PTO)
6.Keyswitch
13.Leftmotion-controllever
7.Throttlecontrol
Electronic-ControlUnit
Malfunction-IndicatorLight
Theelectronic-controlunit(ECU)continuously
monitorstheoperationoftheEFIsystem.
Ifaproblemorfaultwithinthesystemisdetected,the
malfunction-indicatorlight(MIL)isilluminated(Figure
5).
TheMIListheredlightlocatedintheconsolepanel.
WhentheMILilluminates,makeinitialtroubleshooting
checks.
Ifthesechecksdonotcorrecttheproblem,further
diagnosisandservicingbyanAuthorizedService
Dealerisnecessary.
HourMeter
Thehourmeterrecordsthenumberofhoursthe
enginehasoperated.Itoperateswhentheengine
13

isrunning.Usethesetimesforschedulingregular
maintenance(Figure5).
Safety-InterlockIndicators
Symbolsonthehourmeterindicatewithablack
trianglethattheinterlockcomponentisinthecorrect
position(Figure5).
Battery-IndicatorLight
IfthekeyisturnedtotheONpositionforafew
seconds,thebatteryvoltagedisplaysinthearea
wherethehoursarenormallydisplayed.
Thebatterylightturnsonwhenthekeyisturnedtothe
ONpositionandwhenthechargeisbelowthecorrect
operatinglevel(Figure5).
ThrottleControl
ThethrottlecontrolisvariablebetweenFastand
Slow(Figure5).
Blade-ControlSwitch(PTO)
Usetheblade-controlswitch(PTO)toengageand
disengagethemowerblades(Figure5).
KeySwitch
Thekeyswitch,usedtostartandshutofftheengine,
has3positions:OFF,RUN,andSTART.Referto
OperatingtheKeySwitch(page18).
Motion-ControlLevers
Usethemotion-controlleverstodrivethemachine
forward,reverse,andturneitherdirection(Figure5).
Fuel-ShutoffValve
Closethefuel-shutoffvalvewhentransportingor
storingthemachine;refertoUsingtheFuel-Shutoff
Valve(page19).
AccessoryFrame
UsetheaccessoryframetoattachonlyToro-approved
accessoriestothemachine(Figure4).Refertothe
Operator’sManualfortheaccessoryforinstallation
instructions.
Accessory-FrameLock
Theaccessory-framelockholdstheframeinplaceon
themachineusingthelockpin.Alwayslocktheframe
unlessahydraulickitisinstalledwithanaccessory
onthemachine(Figure4).
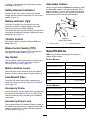
AdjustableCasters
Whenusingthemachinewithoutanaccessory,place
theadjustablecastersinthemowingposition(front
hole)asshowninFigure6.Whenusingthemachine
withanaccessory,refertotheOperator’sManualfor
thataccessoryforthecorrectcasterposition.
g033081
Figure6
RightCasterShown
1.Mowingposition2.Accessorypositions
Specications
Note:Specicationsanddesignaresubjectto
changewithoutnotice.
52-inchMowers
Widthwithdeectordown173cm(68inches)
Widthwithdeectorraised137cm(54inches)
Lengthwithplatformdown191cm(75inches)
Lengthwithplatformup155cm(61inches)
Height
122cm(48inches)
Weight
412kg(908lb)
60-inchMowers
Widthwithdeectordown193cm(76inches)
Widthwithdeectorraised157cm(62inches)
Lengthwithplatformdown201cm(79inches)
Lengthwithplatformup165cm(65inches)
Height
122cm(48inches)
Weight
427kg(941lb)
14

Attachments/Accessories
AselectionofT oroapprovedattachmentsand
accessoriesisavailableforusewiththemachineto
enhanceandexpanditscapabilities.Contactyour
AuthorizedServiceDealerorDistributororgoto
www.T oro.comforalistofallapprovedattachments
andaccessories.
Tobestprotectyourinvestmentandmaintainoptimal
performanceofyourToroequipment,countonToro
genuineparts.Whenitcomestoreliability,Toro
deliversreplacementpartsdesignedtotheexact
engineeringspecicationofourequipment.Forpeace
ofmind,insistonTorogenuineparts.
Operation
Note:Determinetheleftandrightsidesofthe
machinefromthenormaloperatingposition.
ThinkSafetyFirst
Carefullyreadallthesafetyinstructionsanddecals
inthesafetysection.Knowingthisinformationcould
helpyouorbystandersavoidinjury.
CAUTION
Thismachineproducessoundlevelsin
excessof85dBAattheoperator'searand
cancausehearinglossfromextendedperiods
ofexposure.
Wearhearingprotectionwhenoperatingthis
machine.
g229846
Figure7
1.Wearhearingprotection.
AddingFuel
•Forbestresults,useonlyclean,fresh(lessthan
30daysold),unleadedgasolinewithanoctane
ratingof87orhigher((R+M)/2ratingmethod).
•Ethanol:Gasolinewithupto10%ethanol
(gasohol)or15%MTBE(methyltertiarybutyl
ether)byvolumeisacceptable.Ethanoland
MTBEarenotthesame.Gasolinewith15%
ethanol(E15)byvolumeisnotapprovedforuse.
Neverusegasolinethatcontainsmorethan
10%ethanolbyvolume,suchasE15(contains
15%ethanol),E20(contains20%ethanol),orE85
(containsupto85%ethanol).Usingunapproved
gasolinemaycauseperformanceproblemsand/or
enginedamagewhichmaynotbecoveredunder
warranty.
•Donotusegasolinecontainingmethanol.
•Donotstorefueleitherinthefueltankorfuel
containersoverthewinterunlessyouuseafuel
stabilizer.
•Donotaddoiltogasoline.
15

DANGER
Incertainconditions,fuelisextremely
ammableandhighlyexplosive.Areor
explosionfromfuelcanburnyouandothers
andcandamageproperty.
•Fillthefueltankoutdoors,inanopenarea,
whentheengineiscold.Wipeupanyfuel
thatspills.
•Neverllthefueltankinsideanenclosed
trailer.
•Donotllthefueltankcompletelyfull.
Addfueltothefueltankuntilthelevelis6
to13mm(1/4to1/2inch)belowthebottom
ofthellerneck.Thisemptyspaceinthe
tankallowsfueltoexpand.
•Neversmokewhenhandlingfuel,andstay
awayfromanopenameorwherefuel
fumesmaybeignitedbyaspark.
•Storefuelinanapprovedcontainerand
keepitoutofthereachofchildren.Never
buymorethana30-daysupplyoffuel.
•Donotoperatewithoutentireexhaust
systeminplaceandinproperworking
condition.
DANGER
Incertainconditionsduringfueling,static
electricitycanbereleasedcausingaspark,
whichcanignitethefuelvapors.Areor
explosionfromfuelcanburnyouandothers
andcandamageproperty.
•Alwaysplacefuelcontainersontheground
awayfromyourvehiclebeforelling.
•Donotllfuelcontainersinsideavehicle
oronatruckortrailerbedbecauseinterior
carpetsorplastictruckbedlinersmay
insulatethecontainerandslowthelossof
anystaticcharge.
•Whenpractical,removegas-powered
equipmentfromthetruckortrailerand
refueltheequipmentwithitswheelsonthe
ground.
•Ifthisisnotpossible,thenrefuelsuch
equipmentonatruckortrailerfroma
portablecontainerratherthanfroma
fuel-dispensernozzle.
•Ifyoumustuseafuel-dispensernozzle,
keepthenozzleincontactwiththerimof
thefueltankorcontaineropeningatall
timesuntilfuelingiscomplete.
WARNING
Fuelisharmfulorfatalifswallowed.
Long-termexposuretovaporscancause
seriousinjuryandillness.
•Avoidprolongedbreathingofvapors.
•Keepfaceawayfromnozzleandfueltank
orconditionerbottleopening.
•Avoidcontactwithskin;washoffspills
withsoapandwater.
UsingStabilizer/Conditioner
Useafuelstabilizer/conditionerinthemachineto
providethefollowingbenets:
•Keepsfuelfreshduringstorageof90daysorless.
Forlongerstorage,drainthefueltank.
•Cleanstheenginewhileitruns
•Eliminatesgum-likevarnishbuildupinthefuel
system,whichcauseshardstarting
Important:Donotusefueladditives
containingmethanolorethanol.
Addthecorrectamountoffuelstabilizer/conditioner
tothefuel.
16

Note:Afuelstabilizer/conditionerismost
effectivewhenmixedwithfreshfuel.T ominimize
thechanceofvarnishdepositsinthefuelsystem,
usefuelstabilizeratalltimes.
FillingtheFuelTank
1.Parkthemachineonalevelsurface,disengage
thePTO,movethemotion-controlleverstothe
NEUTRAL-LOCKposition,andengagetheparking
brake.
2.Shutofftheengine,removethekey,andwait
forallmovingpartstostopbeforeleavingthe
operatingposition.
3.Cleanaroundthefuel-tankcapandremovethe
cap.
4.Fillthefueltanktothebottomofthellerneck.
Note:Donotllthefueltankcompletelyfull.
Theemptyspaceinthetankallowsthegasoline
toexpand.
5.Installthefuel-tankcapsecurely.Wipeupany
spilledfuel.
CheckingtheEngine-Oil
Level
Beforeyoustarttheengineandusethemachine,
checktheoillevelintheenginecrankcase;referto
CheckingtheEngine-OilLevel(page35).
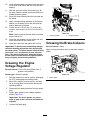
BreakinginaNewMachine
Newenginestaketimetodevelopfullpower.Mower
decksanddrivesystemshavehigherfrictionwhen
new,placingadditionalloadontheengine.Allow
40to50hoursofbreak-intimefornewmachinesto
developfullpowerandbestperformance.
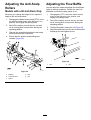
OperatingtheParking
Brake
Alwaysengagetheparkingbrakewhenyoustopthe
machineorleaveitunattended.Beforeeachuse,
checktheparkingbrakeforproperoperation.
Iftheparkingbrakedoesnotholdsecurely,adjustit;
refertoAdjustingtheBrakes(page48).
CAUTION
Childrenorbystandersmaybeinjuredifthey
moveorattempttooperatethemachinewhile
itisunattended.
Alwaysremovethekeyandengagethe
parkingbrakewhenleavingthemachine
unattended.
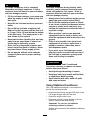
EngagingtheParkingBrake
Pulltheparking-brakeleverrearwardintothe
ENGAGEDposition(Figure8).
g009465
Figure8
1.Parkingbrake—engaged2.Parking
brake—disengaged
DisengagingtheParkingBrake
Pushtheparking-brakeleverforward(Figure8).
17

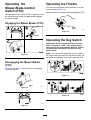
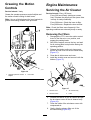
Operatingthe
Mower-Blade-Control
Switch(PTO)
Usetheblade-controlswitch(PTO)inconjunctionwith
themotion-controlleverstoengageanddisengage
themowerblades.
EngagingtheMowerBlades(PTO)
g031592
Figure9
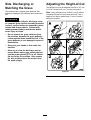
DisengagingtheMowerBlades
(PTO)
Figure10andFigure11show2waystodisengage
themowerblades.
g009174
Figure10
g031593
Figure11
OperatingtheThrottle
YoucanmovethethrottlecontrolbetweenFASTand
SLOWpositions(Figure12).
AlwaysusetheFASTpositionwhenengagingthePTO.
g008946
Figure12
OperatingtheKeySwitch
Important:Donotengagethestarterformore
than5secondsatatime.Iftheenginefailsto
start,wait15secondsbetweenattempts.Failure
tofollowtheseinstructionscanburnoutthe
startermotor.
Note:Youmayneedtorepeatthecycleforstarting
theenginewhenyoustartitforthersttimeafteryou
havelledacompletelyemptyfuelsystemwithfuel.
g031239
Figure13
g031281
Figure14
18

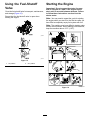
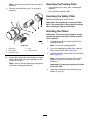
UsingtheFuel-Shutoff
Valve
Closethefuel-shutoffvalvefortransport,maintenance,
andstorage(Figure15).
Ensurethatthefuel-shutoffvalveisopenwhen
startingtheengine.
g032688
g031238
Figure15
1.ONposition2.OFFposition
StartingtheEngine
Important:Donotengagethestarterformore
than5secondsatatime.Iftheenginefailsto
start,wait15secondsbetweenattempts.Failure
tofollowtheseinstructionscanburnoutthe
startermotor.
Note:Youmayneedtorepeatthecycleforstarting
theenginewhenyoustartitforthersttimeafteryou
havelledacompletelyemptyfuelsystemwithfuel.
Note:Themachinemayhavedifcultystartingunder
severecoldconditions.Whenstartingacoldmachine,
keepthemachineabove-23°C(-10°F).
g032689
Figure16
19

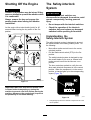
ShuttingOfftheEngine
CAUTION
Childrenorbystandersmaybeinjuredifthey
moveorattempttooperatethemachinewhile
itisunattended.
Alwaysremovethekeyandengagethe
parkingbrakewhenleavingthemachine
unattended.
Lettheengineidleatslowthrottle(turtle)for60
secondsbeforeturningthekeyswitchtotheOFF
position.
g030982
Figure17
Important:Makesurethatthefuel-shutoffvalve
isclosedbeforetransportingorstoringthe
machinetopreventafuelleak.Beforestoringthe
machine,disconnectthesparkplug(s)toprevent
thepossibilityofaccidentalstarting.
TheSafety-Interlock
System
CAUTION
Ifthesafety-interlockswitchesare
disconnectedordamaged,themachinecould
operateunexpectedly,causingpersonal
injury.
•Donottamperwiththeinterlockswitches.
•Checktheoperationoftheinterlock
switchesdailyandreplaceanydamaged
switchesbeforeoperatingthemachine.
Understandingthe
Safety-InterlockSystem
Thesafety-interlocksystemisdesignedtoprevent
themowerbladesfromrotatingunlessyoudo1of
thefollowing:
•Moveeithermotion-controllevertothecenter,
unlockedposition.
•Pulltheblade-controlswitch(PTO)totheON
position.
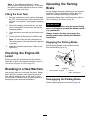
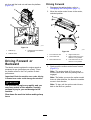
Thesafety-interlocksystemisdesignedtostop
themowerbladesifyoumoveorreleaseboth
motion-controlleversintotheNEUTRAL-LOCK
position.
Thehourmeterhassymbolstonotifytheuser
wheneachinterlockcomponentisinthecorrect
position.Whenthecomponentisinthecorrect
position,atrianglelightsupinthecorresponding
square(Figure18).
g031282
Figure18
1.Triangleslightupwhentheinterlockcomponentsareinthe
correctposition.
20
Page is loading ...
Page is loading ...
Page is loading ...
Page is loading ...
Page is loading ...
Page is loading ...
Page is loading ...
Page is loading ...
Page is loading ...
Page is loading ...
Page is loading ...
Page is loading ...
Page is loading ...
Page is loading ...
Page is loading ...
Page is loading ...
Page is loading ...
Page is loading ...
Page is loading ...
Page is loading ...
Page is loading ...
Page is loading ...
Page is loading ...
Page is loading ...
Page is loading ...
Page is loading ...
Page is loading ...
Page is loading ...
Page is loading ...
Page is loading ...
Page is loading ...
Page is loading ...
Page is loading ...
Page is loading ...
Page is loading ...
Page is loading ...
Page is loading ...
Page is loading ...
Page is loading ...
Page is loading ...
Page is loading ...
Page is loading ...
Page is loading ...
Page is loading ...
Page is loading ...
Page is loading ...
Page is loading ...
Page is loading ...
-
 1
1
-
 2
2
-
 3
3
-
 4
4
-
 5
5
-
 6
6
-
 7
7
-
 8
8
-
 9
9
-
 10
10
-
 11
11
-
 12
12
-
 13
13
-
 14
14
-
 15
15
-
 16
16
-
 17
17
-
 18
18
-
 19
19
-
 20
20
-
 21
21
-
 22
22
-
 23
23
-
 24
24
-
 25
25
-
 26
26
-
 27
27
-
 28
28
-
 29
29
-
 30
30
-
 31
31
-
 32
32
-
 33
33
-
 34
34
-
 35
35
-
 36
36
-
 37
37
-
 38
38
-
 39
39
-
 40
40
-
 41
41
-
 42
42
-
 43
43
-
 44
44
-
 45
45
-
 46
46
-
 47
47
-
 48
48
-
 49
49
-
 50
50
-
 51
51
-
 52
52
-
 53
53
-
 54
54
-
 55
55
-
 56
56
-
 57
57
-
 58
58
-
 59
59
-
 60
60
-
 61
61
-
 62
62
-
 63
63
-
 64
64
-
 65
65
-
 66
66
-
 67
67
-
 68
68


Toro GrandStand Multi Force Mower, With 52in TURBO FORCE Cutting Unit User manual
- Category
- Lawnmowers
- Type
- User manual
- This manual is also suitable for
Ask a question and I''ll find the answer in the document
Finding information in a document is now easier with AI
Related papers
-
Toro GrandStand Mower, With 48in TURBO FORCE Cutting Unit User manual
-
-
-
Toro GrandStand Mower, With 122cm TURBO FORCE Cutting Unit User manual
-
-
-
Toro GrandStand Multi Force Mower, With 52in TURBO FORCE Cutting Unit User manual
-
-
-
Toro GrandStand Mower, With 60in TURBO FORCE Cutting Unit User manual
Other documents
-
SportsArt A996 Owner's manual
-
Edsal PT3060 Operating instructions
-
Titan 7.5 FT Aluminum Plate Top Ramp 2 PK 1 User manual
-
Titan Fitness Rack Mount Leg Roller and Lat Tower Knee Holder User manual
-
Flymo 5011759013901 Datasheet
-
VonHaus 3515168 User manual
-
 Adir Corp. ADI613 User manual
-
 Dixon 100 TON RAM SEC07 Converting User manual
-
 Dixon 50 TON RAM SEC07 Converting User manual


