Sanyo pdg dxl100 User manual
- Category
- Data projectors
- Type
- User manual
This manual is also suitable for

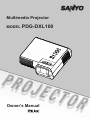
Multimedia Projector
MODEL PDG-DXL100
Owner's Manual

English
1
English
Table of Contents
Table of Contents
Usage Notice
Precautions ............................................................2
Introduction
Product Features ...................................................5
Package Overview .................................................6
Product Overview .................................................. 7
Projector .............................................................7
Connection Ports ................................................8
Control Panel ......................................................8
Remote Control ...................................................9
Remote Control Battery Installation .................. 12
Remote Control Operating Range ....................12
Installation
Connecting the Projector ..................................... 13
Connect to Computer/Notebook .......................13
Connect to Video ..............................................14
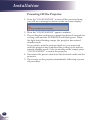
Powering On/Off the Projector ............................. 15
Powering On the Projector ................................15
Powering Off the Projector ................................16
Warning Indicator ..............................................17
Adjusting the Projected Image .............................18
Adjusting the Height of Projector Image ...........18
Adjusting the Projector Focus ........................... 19
Adjusting Projection Image Size ....................... 19
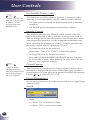
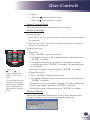
User Controls
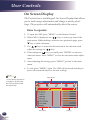
On Screen Display ...............................................20
How to operate .................................................20
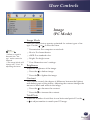
Image(PC Mode) ..............................................21
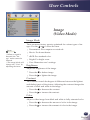
Image(Video Mode) ..........................................23
Screen ..............................................................25
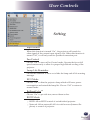
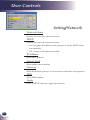
Setting ...............................................................27
Setting/Network ................................................30
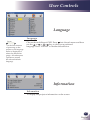
Language .......................................................... 31
Information ........................................................ 31
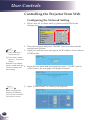
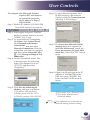
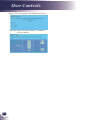
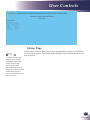
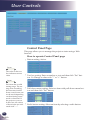
Controlling the Projector From Web .................... 32
Conguring the Network Setting ....................... 32
Home Page ....................................................... 35
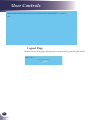
Control Panel Page ...........................................36
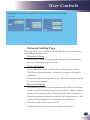
Network Setting Page .......................................37
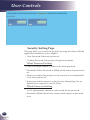
Security Setting Page .......................................38
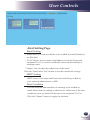
Alert Setting Page ............................................. 39
Logout Page .....................................................40
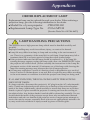
Appendices
Troubleshooting ................................................... 41
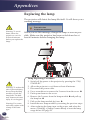
Replacing the lamp ..............................................46
Cleaning the Air Filters ........................................48
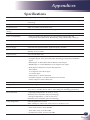
Specications.......................................................49
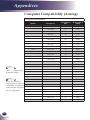
Computer Compatibility (Analog) ......................... 50
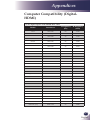
Computer Compatibility (Digital-HDMI)................51
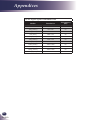
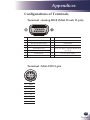
Congurations of Terminals ................................. 53
Terminal : Analog RGB (Mini D-sub 15 pin) ...... 53
Terminal : Mini DIN 8-pin ..................................53
Regulation & Safety Notices ................................54
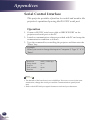
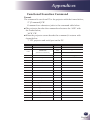
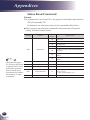
Serial Control Interface ........................................56
Operation ..........................................................56
Functional Execution Command ....................... 57
Status Read Command ....................................58
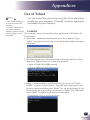
Use of Telnet ........................................................59
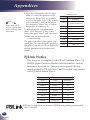
PJLink Notice .......................................................60
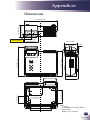
Dimensions ..........................................................61
Table of Contents

2
English
Usage Notice
Precautions
Follow all warnings, precautions and maintenance as recom-
mended in this user’s guide to maximize the life of your unit.
■ Warning-
This apparatus must be earthed.
■ Warning-
Do not look into the projector’s lens when the
lamp is on. The bright light may hurt your eyes.
■ Warning-
To reduce the risk of re or electric shock, do not
expose this projector to rain or moisture.
■ Warning-
Please do not open or disassemble the projector
as this may cause electric shock.
■ Warning-
When replacing the lamp, please allow unit to
cool down, and follow all replacement instruc-
tions..
■ Warning-
This projector will detect the life of the lamp
itself. Please be sure to change the lamp when it
shows warning messages.
■ Warning-
Reset the “Lamp Counter Reset” function from
the on-screen display “Setting” menu after re-
placing the lamp module (refer to page 29).
■ Warning-
When switching the projector off, please ensure
the cooling cycle has been completed before
disconnecting power. Allow 120 seconds for the
projector to cool down.
■ Warning-
Do not use lens cap when projector is powered
on.
■ Warning-
Turn on the projector rst and then the signal
sources.
■ Warning-
When the lamp reaches the end of its life, it will
burn out and may make a loud popping sound.
If this happens, the projector will not turn back
on until the lamp module has been replaced. To
replace the lamp, follow the procedures listed
under “Replacing the Lamp”.

English
3
English
Usage Notice
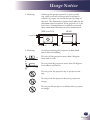
■ Warning-
Allowing the proper amount of space on the
top, sides, and rear of the projector cabinet is
critical for proper air circulation and cooling of
the unit. The dimensions shown here indicate the
minimum space required. If the projector is to be
built into a compartment or similarly enclosed,
these minimum distances must be maintained.
1.5' (50 cm)
1.5' (50 cm) 1.5' (50 cm)
3' (1 m)
SIDE and TOP REAR
■ Warning-
Avoid positioning the projector as described
below when installing.
Do not roll the projector more than 9 degrees
from side to side.
Do not pitch the projector more than 15 degrees
from above and below.
Do not point the projector up to project an im-
age.
Do not point the projector down to project an
image.
Do not put the projector on either side to project
an image.

4
English
Usage Notice
Do:
■ Turn off the product before cleaning.
■ Use a soft cloth moistened with mild detergent to clean the
display housing.
■ Disconnect the power plug from AC outlet if the product is not
being used for a long period of time.
Do not:
■ Block the slots and openings on the unit provided for ventila-
tion.
■ Use abrasive cleaners, waxes or solvents to clean the unit.
■ Use under the following conditions:
- Extremely heat, cold or humidity.
- In areas susceptible to excessive dust and dirt.
- Near any appliance generating a strong magnetic eld.
- In direct sunlight.

English
5
English
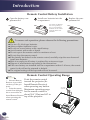
Introduction
Product Features
This product is an XGA single chip 0.55” DLP
®
projector. Out-
standing features include:
■ True XGA, 1024 x 768 addressable pixels
■ Single chip DLP
®
technology
■ NTSC3.58/NTSC4.43/PAL(B/D/G/H/I/M/N)/
SECAM (B/D/G/K/K1/L) and SDTV(480i/576i),
EDTV(480p/576p), HDTV(720p/1080i/1080p) compat-
ible
■ Multi-Auto functions: Auto detection, Auto image and
Auto saving the adjustments
■ Full function remote control
■ User friendly multilingual on screen display
■ Advanced digital keystone correction and high quality
full screen image re-scaling
■ Built-in mono 8-Watt speaker.
■ UXGA, WXGA, SXGA+, SXGA compression and VGA,
SVGA re-sizing
■ Macintosh compatible
Introduction

6
English
Introduction
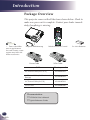
Power Cable VGA Cable
Wireless Remote Control
Projector with lens cap
Package Overview
This projector comes with all the items shown below. Check to
make sure your unit is complete. Contact your dealer immedi-
ately if anything is missing.
Due to the differ-
ence in applications
for each country, some
regions may have dif-
ferent accessories.
N
o
t
e
Documentation:
CD-ROM User’s Manual
Quick Reference Guide
Cable Factory code
AC Power Cable (for U.S.A.) 42.00105G011
AC Power Cable (for Continental
Europe)
42.00120G011
AC Power Cable (for UK) 42.00110G011
VGA Cable 42.00200G005
2 x AAA Batteries

English
7
English
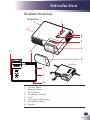
Introduction
1. Control Panel
2. Remote Sensor
3. Focus Ring
4. Ventilation (outlet)
5. Lens
6. Lens Cap (with String)
7. Ventilation (inlet)
8. Speaker
Projector
Product Overview
1
2
3
7
5
4
4
6
4
8
7
7
7
Air Flow

8
English
Introduction
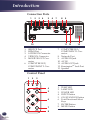
Connection Ports
SERVICE
PORT
COMPUTER IN 1
COMPONENT IN 1
(
VARIABLE
)
AUDIO OUT
MONITOR OUT
S-VIDEO IN
VIDEO IN
AUDIO IN
COMPUTER IN 2
COMPONENT IN 2
1 2 3 4 5
10 13
1. SERVICE Port
2. HDMI Port
3. S-VIDEO IN Connector
4. VIDEO IN Connector
5. MONITOR OUT Con-
nector
6. COMPUTER IN 2/
COMPONENT 2 Con-
nector
7 8 9
11 12
7. COMPUTER IN 1/
COMPONENT 1 Con-
nector
8. Network Port
9. AUDIO IN Jack
10. AC IN
11. AUDIO OUT Jack
12. Kensington
TM
Lock Port
13. Speaker
Control Panel
1 2 3
4
5
7
8
6
1. TEMP LED
2. LAMP LED
3. POWER LED
4. INPUT Button
5. ON/STAND-BY Button
6. Four Directional Select
Keys
7. ENTER Button
8. MENU Button
6

English
9
English
Introduction
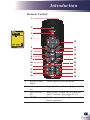
Remote Control
1 Infrared trans-
mitter
Sends signals to the projector.
2 Infrared indica-
tor
Signals indicator for sending.
3 ON/STAND-
BY
Refer to the “Power On/Off the Pro-
jector” section. (See pages 15~16)
4 ENTER Conrm your section of items in sub
menu operation.
2
3
5
15
7
9
11
16
4
17
18
19
20
8
6
12
13
21
22
23
24
10
14
1

10
English
Introduction
5 MENU Press “MENU” to launch the On-
screen display (OSD), back to the top
level of OSD for the OSD main menu
operation
6 IMAGE Select the Image mode from Presenta-
tion, Movie, sRGB, Bright and User.
7 INPUT Press “INPUT” to choose RGB,
SCART, Component, S-Video, Com-
posite and HDMI sources.
8 D.ZOOM - Zoom out the projector display.
9 KEYSTONE
+/-
Adjust the image to compensate for
distortion caused by tilting the projec-
tor.
10 LAMP CON-
TROL
Select the lamp mode. (refer “ECO
Mode” function)
11 AV-MUTE Momentarily turn off/on the audio
and video.
12 COMPUTER 1 Press “COMPUTER 1” to choose
Computer in 1/Component in 1 con-
nector.
13 COMPUTER 2 Press “COMPUTER 2” to choose
Computer in 2/Component in 2 con-
nector.
14 FREEZE Pause the screen image. Press again to
resume the screen image.
15 Four
Directional
Select Keys
Use or or or to select items or
make adjustments to your selection.
16 ASPECT Display the “Aspect Ratio” section of
the on-screen display menu to select
the desired aspect ratio.
17 D.ZOOM + Zoom in the projector display.
18 INFORMA-
TION
Display information menu.
To quick change
remote control code,
press “MENU” and
“IMAGE” buttons
about 10 seconds at the
same time.
N
o
t
e

English
11
English
Introduction
19 VOLUME +/- Increase/decrease speaker volume.
20 Keypad 1~9 For input a password in the “Security
settings”.
21 AUTO. ADJ Automatically synchronize the projec-
tor to the input source.
22 HDMI Press “HDMI” to choose HDMI con-
nector.
23 S-VIDEO Press “S-VIDEO” to choose S-Video
connector.
24 VIDEO Press “VIDEO” to choose Video con-
nector.

12
English
Introduction
Remote Control Battery Installation
Open the battery com-
partment lid.
1
Replace the com-
partment lid.
3
Install new batteries into the
compartment.
2
Two AAA size batteries
For correct polarity (+
and –), be sure battery
terminals are in contact
with pins in the com-
partment.
To ensure safe operation, please observe the following precautions :
■ Use two (2) AAA type batteries.
■ Always replace batteries in sets.
■ Do not use a new battery with a used battery.
■ Avoid contact with water or liquid.
■ Do not expose the remote control to moisture or heat.
■ Do not drop the remote control.
■ If the battery has leaked on the remote control, carefully wipe the case clean and
install new batteries.
■ Risk of an explosion if battery is replaced by an incorrect type.
■ Dispose of used batteries according to the instructions.
■ If the new battery are installed into the compartment within 3~4 hours, the remote
control code will not be returned to default.
■ The original setting will be kept and will not be erased.
Remote Control Operating Range
Point the remote control
toward the projector (In-
frared Remote Receiver)
when pressing any button.
Maximum operating range
for the remote control is
about 39.4’ (12m) and 60° in
top of the projector.
39.4’ (12m)
Approx.30°
Infrared Remote
Receiver is provided
on the top of the pro-
jector.
Point the remote
control from obliquely
above toward the In-
frared Remote Receiver
when operating the
remote control.
N
o
t
e

English
13
English
Installation
SERVICE
PORT
COMPUTER IN 1
COMPONENT IN 1
(
VARIABLE
)
AUDIO OUT
MONITOR OUT
S-VIDEO IN
VIDEO IN
AUDIO IN
COMPUTER IN 2
COMPONENT IN 2
E62405SP
R
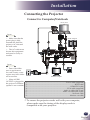
Connecting the Projector
Due to the differ-
ence in applications
for each country, some
regions may have differ-
ent accessories.
When AUDIO
OUTPUT is plugged-in,
the projector’s build-in
speaker is not available.-
N
o
t
e
To ensure the projector works well with your computer,
please make sure the timing of the display mode is
compatible with your projector.
1............................................................................................Power cable (supplied)
2................................................................................................................RS232 cable
3...................................................................................................... HDMI-DVI cable
4.............................................................................................. VGA cable (supplied)
5...................................................................................... Audio in cable jack to jack
6....................................................................................Audio out cable jack to jack
7...........................................................................................................Network cable
8.....................................................................................................Monitor out cable
VGA, DVI
Make sure that the
power plug is fully
inserted into both the
projector AC inlet and
the wall outlet.
The AC outlet must
be near this equipment
and must be easily ac-
cessible.
N
o
t
e
1
2 43
6
5
Connect to Computer/Notebook
8 7
Audio Output
Monitor Output

14
English
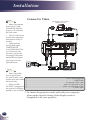
Installation
SERVICE
PORT
COMPUTER IN 1
COMPONENT IN 1
(
VARIABLE
)
AUDIO OUT
MONITOR OUT
S-VIDEO IN
VIDEO IN
AUDIO IN
COMPUTER IN 2
COMPONENT IN 2
E62405SP
R
Due to the differ-
ence in applications
for each country, some
regions may have differ-
ent accessories.
When AUDIO
OUTPUT is plugged-in,
the projector’s build-in
speaker is not available.
N
o
t
e
To ensure the projector works well with your computer,
please make sure the timing of the display mode is
compatible with your projector.
1............................................................................................Power cable (supplied)
2...............................................................................................................HDMI cable
3............................................................................................ Composite video cable
4...................................................................................... Audio in cable jack to jack
5....................................................................................Audio out cable jack to jack
6............................................................................................................ S-Video cable
Video Output
S-Video Output
DVD player, Set-top Box
HDTV receiver
Make sure that the
power plug is fully
inserted into both the
projector AC inlet and
the wall outlet.
The AC outlet must
be near this equipment
and must be easily ac-
cessible.
Other than the
analog RGB signal,
COMPUTER IN
1/2-COMPONENT IN
1/2 Connectors can
be used to project the
incoming Component
and RGB Scart signals.
(See Page 49 for the
Optional Parts.)
N
o
t
e
1
2 43
6 5
Connect to Video
Audio Output

English
15
English
Installation
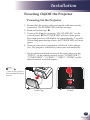
Powering On the Projector
1. Ensure that the power cable and signal cable are securely
connected. The POWER LED will turn orange.
2. Remove the lens cap.
3. Turn on the lamp by pressing “ON/STAND-BY” on the
control panel. The POWER LED will now ash green.
The startup screen will display in approximately 5 seconds.
When disappear startup screen, the POWER LED will turn
green.
4. Turn on your source (computer, notebook, video player,
etc.) The projector will detect your source automatically.
If you connect multiple sources at the same time, use the
“INPUT” on the remote control or use “COMPUTER 1”,
“COMPUTER 2”, “S-VIDEO”, “VIDEO”, “HDMI” on the
remote control to switch inputs.
Powering On/Off the Projector
Turn on the projector
rst and then the signal
sources.
N
o
t
e
Lens Cap Power
1
2

16
English
Installation
Powering Off the Projector
1. Press the “ON/STAND-BY” to turn off the projector lamp,
you will see a message as below on the on-screen display.
2. Press the “ON/STAND-BY” again to conrm.
3. The cooling fan continues to operate for about 60 seconds for
cooling cycle and the POWER LED will ash green. When
the light starts ashing orange, the projector has entered
standby mode.
If you wish to turn the projector back on, you must wait
until the projector has completed the cooling cycle and has
entered standby mode. Once in standby mode, simply press
“ON/STAND-BY” to restart the projector.
4. Disconnect the power cable from the electrical outlet and the
projector.
5. Do not turn on the projector immediately following a power
off procedure.

English
17
English
Installation
Warning Indicator
When the “TEMP” LED indicator turns red, it indicates the
projector has overheated. The projector will automatically
shut itself down.
When you see the message below displays on-screen, the
projector has detected that the lamp is approaching its end
of life. Please change the lamp as soon as possible or contact
your local dealer or our service center.
When the “TEMP” LED indicator ashes red and the mes-
sage below displays on-screen, it indicates the fan failed.
Stop using the projector and disconnect the power cable
from the electrical outlet, then contact your local dealer or
our service center.

18
English
Installation
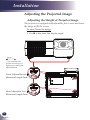
Adjusting the Projected Image
Adjusting the Height of Projector Image
The projector is equipped with adjustable feet to raise and lower
the image to ll the screen.
To raise/lower the image:
1. Use to ne-tune the display angle.
You can raise the
projector front up to 3
degrees by rotating the
adjustable feet.
N
o
t
e
1
Front Adjustable feet
Rear Adjustable feet
1
Maximun Length:7mm
Maximun Length:2mm

English
19
English
Installation
40"
(101.6cm)
100"
(254.0cm)
150"
(381.0cm)
200"
(508.0cm)
250"
(635.0cm)
307"
(779.8cm)
1.624'
12.464'
10.150'
8.120'
6.090'
4.060'
(0.495m)
(3.799m)
(3.094m)
(2.475m)
(1.856m)
(1.237m)
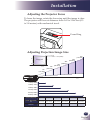
Lens Center
A
B
H
A
Lens Center
H : A = 6.78
B ÷ H x 100% = 115%(Offset)
B
Diagonal
Focus Ring
Adjusting the Projector Focus
To focus the image, rotate the focus ring until the image is clear.
The projector will focus at distances from 1.62 to 12.46 feet (0.5
to 3.8 meters) with mechanical travel.
Adjusting Projection Image Size
This graph is for user’s reference only.
Screen (Diagonal)
40” (101.6cm) 100” (254.0cm) 150” (381.0cm) 200” (508.0cm) 250” (635.0cm) 307” (779.8cm)
Screen Size (WxH)
cm
32.0” x 24.0”
(81.3 x 61.0cm)
80.0” x 60.0”
(203.2 x 152.4cm)
120.0” x 90.0”
(304.8 x 228.6cm)
160.0” x 120.0”
(406.4 x 304.8cm)
200.0” x 150.0”
(508.0 x 381.0cm)
245.6” x 184.2”
(623.8 x 467.9cm)
Distance
1.624’ (0.495m) 4.060’ (1.237m) 6.090’ (1.856m) 8.120’ (2.475m) 10.150’ (3.094m) 12.464’ (3.799m)
Page is loading ...
Page is loading ...
Page is loading ...
Page is loading ...
Page is loading ...
Page is loading ...
Page is loading ...
Page is loading ...
Page is loading ...
Page is loading ...
Page is loading ...
Page is loading ...
Page is loading ...
Page is loading ...
Page is loading ...
Page is loading ...
Page is loading ...
Page is loading ...
Page is loading ...
Page is loading ...
Page is loading ...
Page is loading ...
Page is loading ...
Page is loading ...
Page is loading ...
Page is loading ...
Page is loading ...
Page is loading ...
Page is loading ...
Page is loading ...
Page is loading ...
Page is loading ...
Page is loading ...
Page is loading ...
Page is loading ...
Page is loading ...
Page is loading ...
Page is loading ...
Page is loading ...
Page is loading ...
Page is loading ...
Page is loading ...
Page is loading ...
-
 1
1
-
 2
2
-
 3
3
-
 4
4
-
 5
5
-
 6
6
-
 7
7
-
 8
8
-
 9
9
-
 10
10
-
 11
11
-
 12
12
-
 13
13
-
 14
14
-
 15
15
-
 16
16
-
 17
17
-
 18
18
-
 19
19
-
 20
20
-
 21
21
-
 22
22
-
 23
23
-
 24
24
-
 25
25
-
 26
26
-
 27
27
-
 28
28
-
 29
29
-
 30
30
-
 31
31
-
 32
32
-
 33
33
-
 34
34
-
 35
35
-
 36
36
-
 37
37
-
 38
38
-
 39
39
-
 40
40
-
 41
41
-
 42
42
-
 43
43
-
 44
44
-
 45
45
-
 46
46
-
 47
47
-
 48
48
-
 49
49
-
 50
50
-
 51
51
-
 52
52
-
 53
53
-
 54
54
-
 55
55
-
 56
56
-
 57
57
-
 58
58
-
 59
59
-
 60
60
-
 61
61
-
 62
62
-
 63
63


Sanyo pdg dxl100 User manual
- Category
- Data projectors
- Type
- User manual
- This manual is also suitable for
Ask a question and I''ll find the answer in the document
Finding information in a document is now easier with AI
Related papers
-
Sanyo PJLINK PDG-DXL100 Owner's manual
-
-
-
-
-
Sanyo PDG-DSU30 - 2500 Owner's manual
-
-
-
-