Page is loading ...
USER GUIDE
RangePlus Wireless
PCI Adapter
Model No: WMP110

About This Guide
i
RangePlus Wireless PCI Adapter
About This Guide
Icon Descriptions
While reading through the User Guide you may see
various icons that call attention to specific items. Below is
a description of these icons:
NOTE: This check mark indicates that there is
a note of interest and is something that you
should pay special attention to while using the
product.
WARNING: This exclamation point indicates
that there is a caution or warning and it is
something that could damage your property or
product.
WEB: This globe icon indicates a noteworthy
website address or e-mail address.
Online Resources
Website addresses in this document are listed without
http:// in front of the address because most current web
browsers do not require it. If you use an older web browser,
you may have to add http:// in front of the web address.
Resource Website
Linksys www.linksys.com
Linksys International www.linksys.com/international
Glossary www.linksys.com/glossary
Network Security www.linksys.com/security
Copyright and Trademarks
Linksys is a registered trademark or
trademark of Cisco Systems, Inc. and/
or its affiliates in the U.S. and certain
other countries. Copyright © 2008
Cisco Systems, Inc. All rights reserved.
Other brands and product names are
trademarks or registered trademarks
of their respective holders.

Table of Contents
ii
RangePlus Wireless PCI Adapter
Chapter 1: Product Overview 1
LED . . . . . . . . . . . . . . . . . . . . . . . . . . . . . . . . . . . . . . . . . . . . . . . . . . . . . . 1
Chapter 2: Wireless Security Checklist 2
General Network Security Guidelines . . . . . . . . . . . . . . . . . . . . . . . . . . . . . . . . . 2
Additional Security Tips . . . . . . . . . . . . . . . . . . . . . . . . . . . . . . . . . . . . . . . . . 2
Chapter 3: Advanced Conguration 3
How to Access the Wireless Network Monitor. . . . . . . . . . . . . . . . . . . . . . . . . . . . 3
How to Use the Wireless Network Monitor. . . . . . . . . . . . . . . . . . . . . . . . . . . . . . 3
Status . . . . . . . . . . . . . . . . . . . . . . . . . . . . . . . . . . . . . . . . . . . . . . . . . . . . . 3
Connect . . . . . . . . . . . . . . . . . . . . . . . . . . . . . . . . . . . . . . . . . . . . . . . . . . . 6
Profiles . . . . . . . . . . . . . . . . . . . . . . . . . . . . . . . . . . . . . . . . . . . . . . . . . . . .12
Appendix A: Troubleshooting 24
Appendix B: Windows Vista Conguration 2
5
Windows Vista Configuration . . . . . . . . . . . . . . . . . . . . . . . . . . . . . . . . . . . . . .25
New Wireless Connection . . . . . . . . . . . . . . . . . . . . . . . . . . . . . . . . . . . . . . . .25
Appendix C: Windows XP Wireless Zero Conguration 28
Windows XP Wireless Zero Configuration . . . . . . . . . . . . . . . . . . . . . . . . . . . . . .28
Appendix D: Specications 30
Appendix E: Warranty Information 3
1
Limited Warranty. . . . . . . . . . . . . . . . . . . . . . . . . . . . . . . . . . . . . . . . . . . . . .31
Exclusions and Limitations. . . . . . . . . . . . . . . . . . . . . . . . . . . . . . . . . . . . . . . .31
Obtaining Warranty Service . . . . . . . . . . . . . . . . . . . . . . . . . . . . . . . . . . . . . . .31
Technical Support . . . . . . . . . . . . . . . . . . . . . . . . . . . . . . . . . . . . . . . . . . . . .32
Appendix E: Regulatory Information 33
FCC Statement . . . . . . . . . . . . . . . . . . . . . . . . . . . . . . . . . . . . . . . . . . . . . . .33
Safety Notices. . . . . . . . . . . . . . . . . . . . . . . . . . . . . . . . . . . . . . . . . . . . . . . .33
Industry Canada Statement . . . . . . . . . . . . . . . . . . . . . . . . . . . . . . . . . . . . . . .33
Avis d’Industrie Canada. . . . . . . . . . . . . . . . . . . . . . . . . . . . . . . . . . . . . . . . . .34
Wireless Disclaimer . . . . . . . . . . . . . . . . . . . . . . . . . . . . . . . . . . . . . . . . . . . .34
Avis de non-responsabilité concernant les appareils sans fil . . . . . . . . . . . . . . . . . .34
User Information for Consumer Products Covered by EU Directive 2002/96/EC on Waste
Electric and Electronic Equipment (WEEE) . . . . . . . . . . . . . . . . . . . . . . . . . . . . . .35

Chapter 1
Product Overview
1
RangePlus Wireless PCI Adapter
Chapter 1:
Product Overview
Thank you for choosing the Linksys RangePlus Wireless PCI
Adapter. Using the latest wireless networking technology,
the Adapter adds or upgrades wireless connectivity on
your desktop computer. To help protect your data and
privacy, you can use industrial-strength WPA2 encryption
to protect your wireless connection. The included Setup
Wizard will walk you through configuring the Adapter to
your network’s settings, step by step.
LED
Link (Green) The LED flashes when there is
wireless network activity.
Chapter 2
Wireless Security Checklist
2
RangePlus Wireless PCI Adapter
Chapter 2:
Wireless Security Checklist
Wireless networks are convenient and easy to install, so
homes with high-speed Internet access are adopting them
at a rapid pace. Because wireless networking operates by
sending information over radio waves, it can be more
vulnerable to intruders than a traditional wired network.
Like signals from your cellular or cordless phones, signals
from your wireless network can also be intercepted. Since
you cannot physically prevent someone from connecting
to your wireless network, you need to take some additional
steps to keep your network secure.
1. Change the default wireless
network name or SSID
Wireless devices have a default wireless network name
or Service Set Identifier (SSID) set by the factory. This
is the name of your wireless network, and can be up
to 32 characters in length. Linksys wireless products
use linksys as the default wireless network name. You
should change the wireless network name to something
unique to distinguish your wireless network from other
wireless networks that may exist around you, but do not
use personal information (such as your Social Security
number) because this information may be available for
anyone to see when browsing for wireless networks.
2. Change the default password
For wireless products such as access points and routers,
you will be asked for a password when you want to change
their settings. These devices have a default password set
by the factory. The Linksys default password is admin.
Hackers know these defaults and may try to use them
to access your wireless device and change your network
settings. To thwart any unauthorized changes, customize
the device’s password so it will be hard to guess.
3. Enable MAC address filtering
Linksys routers give you the ability to enable Media Access
Control (MAC) address filtering. The MAC address is a
unique series of numbers and letters assigned to every
networking device. With MAC address filtering enabled,
wireless network access is provided solely for wireless
devices with specific MAC addresses. For example, you can
specify the MAC address of each computer in your home
so that only those computers can access your wireless
network.
4. Enable encryption
Encryption protects data transmitted over a wireless
network. Wi-Fi Protected Access (WPA/WPA2) and Wired
Equivalency Privacy (WEP) offer different levels of security
for wireless communication.
A network encrypted with WPA/WPA2 is more secure
than a network encrypted with WEP, because WPA/WPA2
uses dynamic key encryption. To protect the information
as it passes over the airwaves, you should enable the
highest level of encryption supported by your network
equipment.
WEP is an older encryption standard and may be the
only option available on some older devices that do not
support WPA.
General Network Security Guidelines
Wireless network security is useless if the underlying
network is not secure.
Password protect all computers on the network and
individually password protect sensitive files.
Change passwords on a regular basis.
Install anti-virus software and personal firewall
software.
Disable file sharing (peer-to-peer). Some applications
may open file sharing without your consent and/or
knowledge.
Additional Security Tips
Keep wireless routers, access points, or gateways away
from exterior walls and windows.
Turn wireless routers, access points, or gateways
off when they are not being used (at night, during
vacations).
Use strong passphrases that are at least eight characters
in length. Combine letters and numbers to avoid using
standard words that can be found in the dictionary.
WEB: For more information on wireless
security, visit www.linksys.com/security
•
•
•
•
•
•
•

Chapter 3
Advanced Configuration
3
RangePlus Wireless PCI Adapter
Chapter 3:
Advanced Configuration
Advanced configuration is performed through the Wireless
Network Monitor (the Monitor). Use it to check the status
information, search for available wireless networks, or
create profiles that hold different configuration settings.
Diagnostics is performed through the Diagnostic utility.
Use it to detect the Adapter, test the driver and Monitor,
and troubleshoot if needed.
How to Access the Wireless Network
Monitor
After installing the Adapter, the Monitor icon appears in
the system tray of your computer. If the Monitor is enabled,
the icon is green. If the Monitor is disabled or the Adapter
is not inserted, the icon is gray.
Wireless Network Monitor Icon
Double-click the icon to open the Monitor.
How to Use the Wireless Network Monitor
The opening screen of the Monitor is the Status screen.
From this screen, you can find out how strong the current
wireless signal is and how good the connection’s quality
is. You can also click the Wi-Fi Protected Setup button to
connect to a router that supports Wi-Fi Protected Setup.
NOTE: The Adapter supports Wi-Fi Protected
Setup, which is a feature that makes it easy to
set up your wireless network.
Click More Information to view additional status
information about the current connection. To search for
available wireless networks, click the Connect tab. To
perform configuration changes or create connection
profiles, click the Profiles tab.
Status
The Status screen displays network mode, signal strength,
and link quality information about the current connection.
It also displays the Wi-Fi Protected Setup button. Click
More Information for additional status information.
Wi-Fi Protected Setup Button
Status
Signal Strength The Signal Strength bar indicates signal
strength.
Link Quality The Link Quality bar indicates the quality of
the wireless network connection.
More Information Click More Information to view
additional information about the wireless network
connection on the Wireless Network Status screen.
Wi-Fi Protected Setup Click the Wi-Fi Protected Setup
button to connect to a router that supports Wi-Fi
Protected Setup. Proceed to the “Wi-Fi Protected Setup”
section.
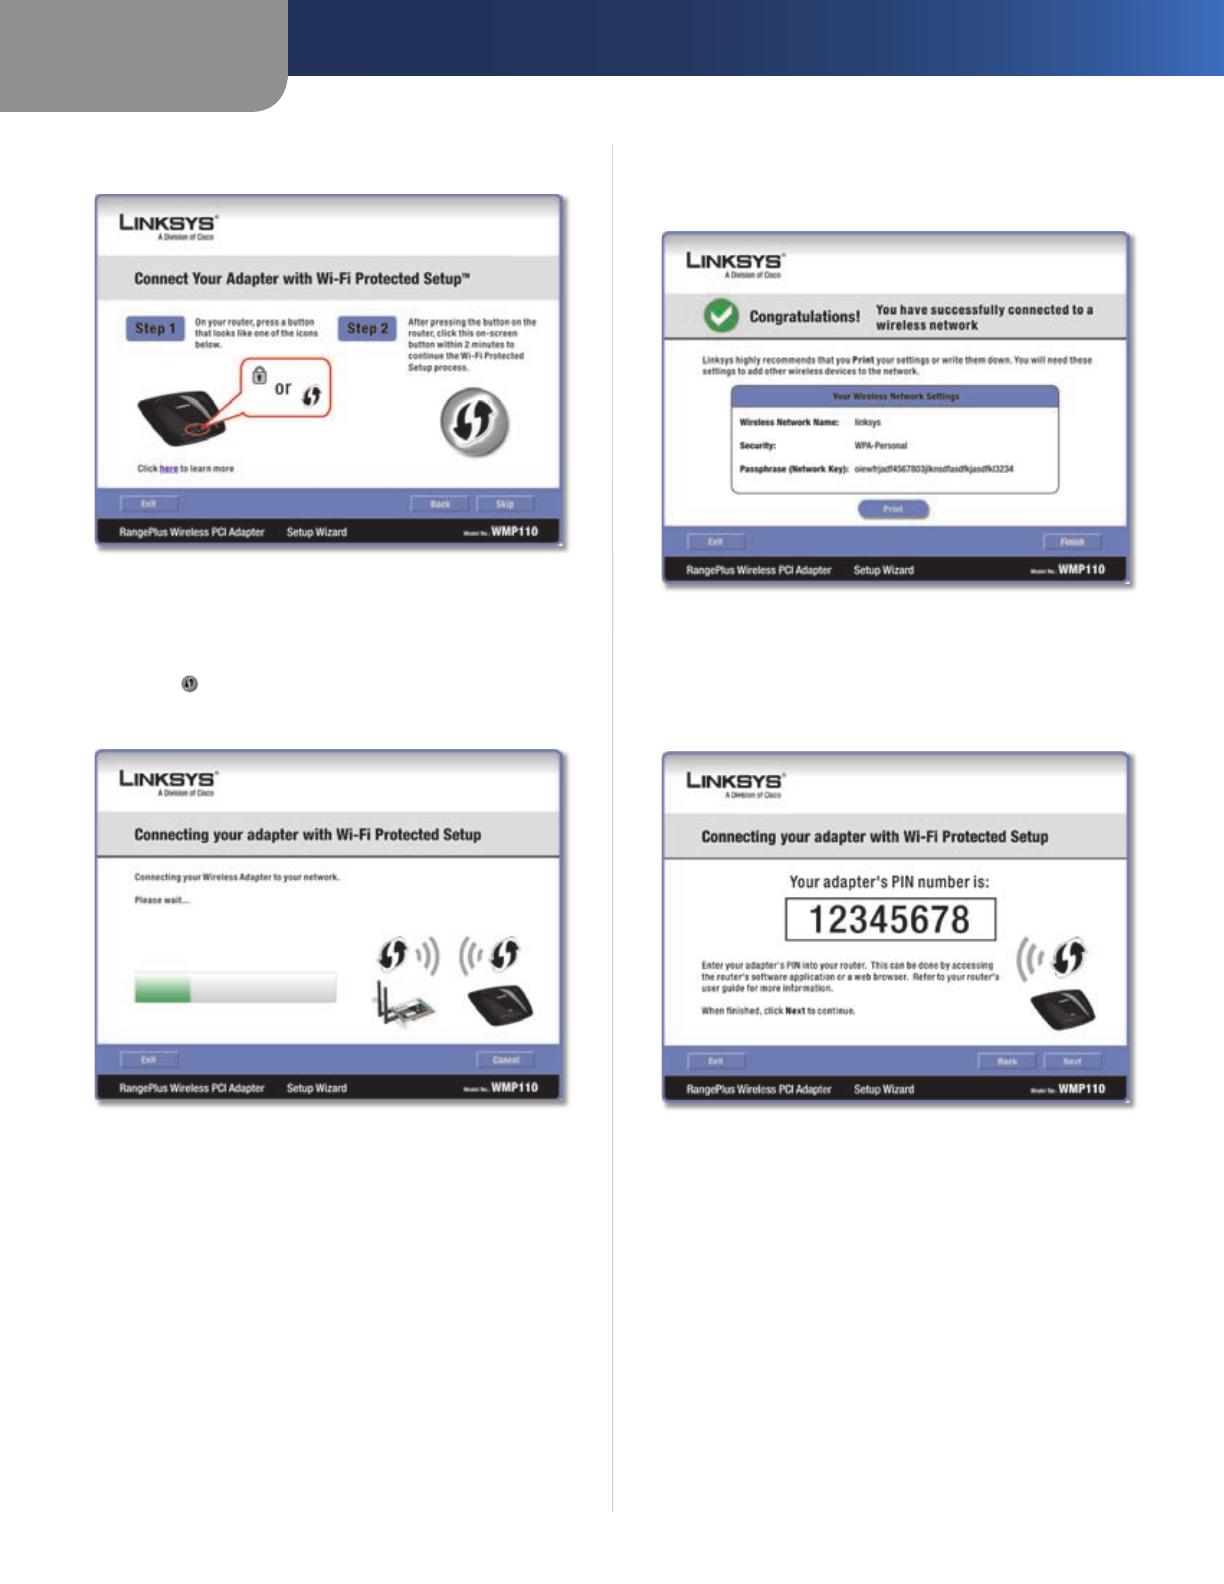
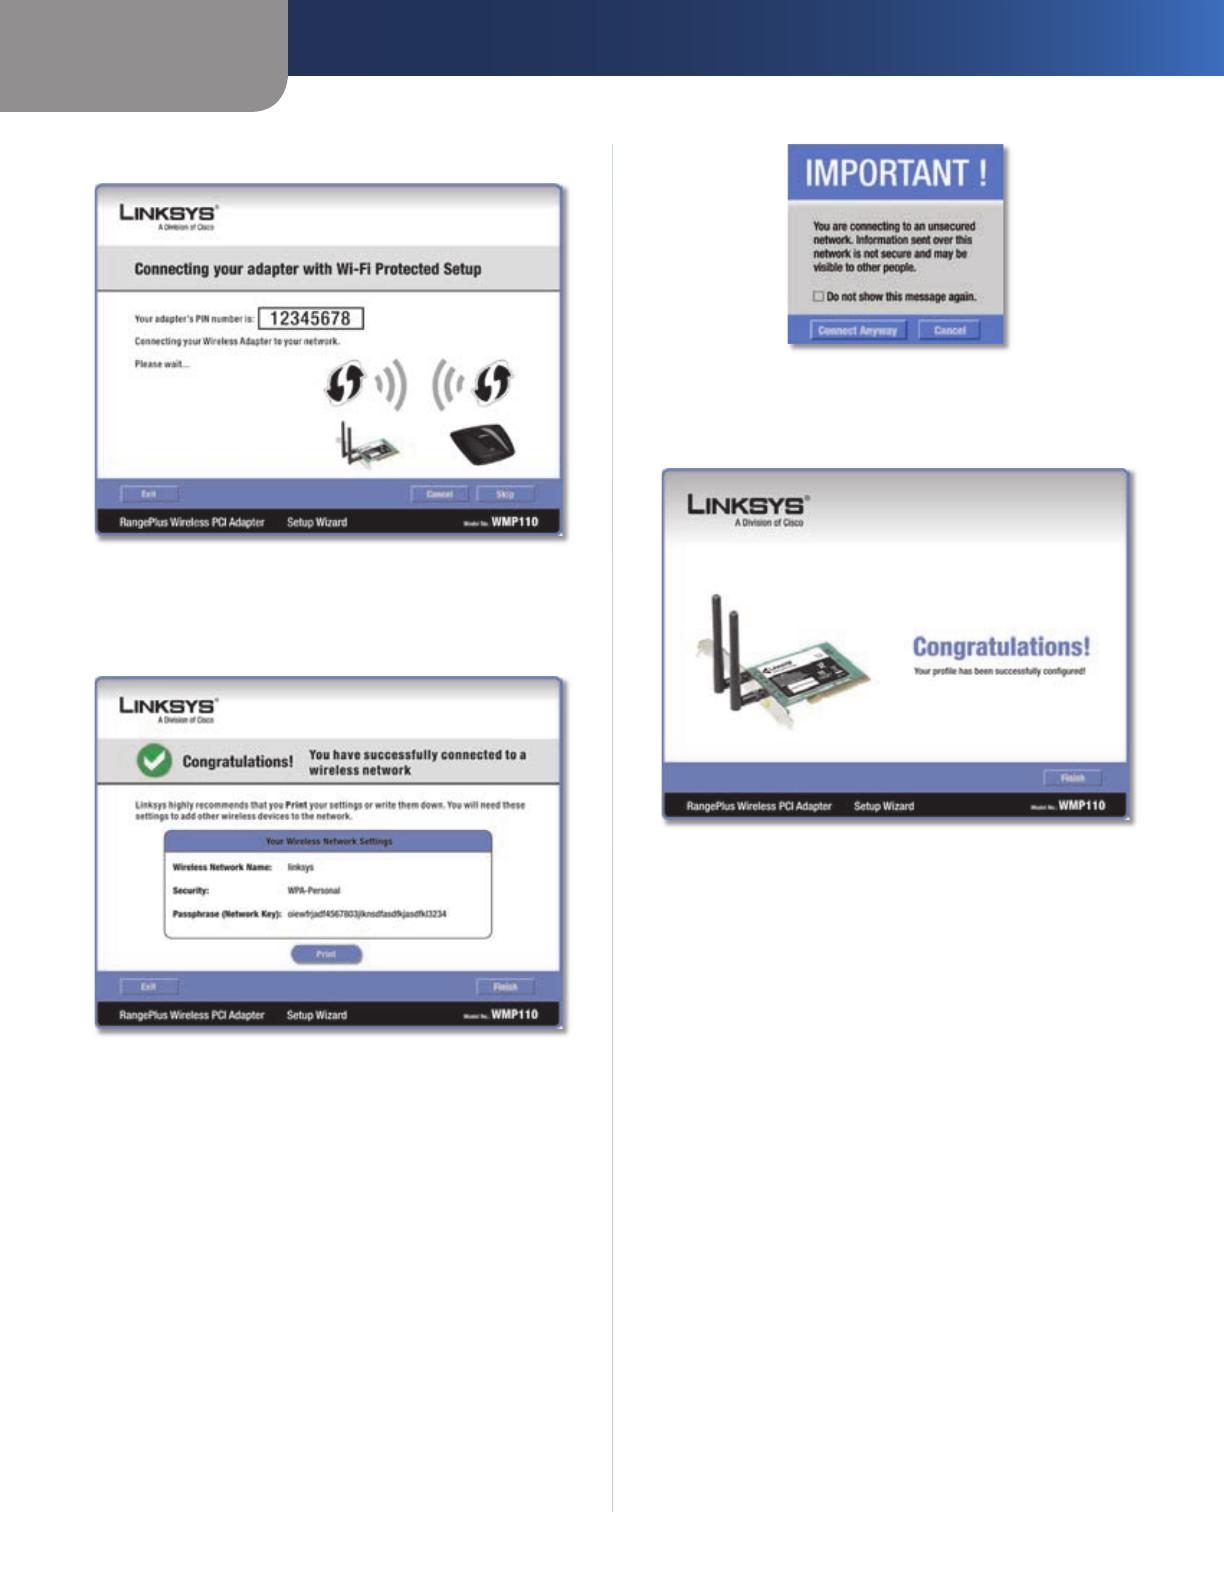
Wi-Fi Protected Setup
NOTE: Make sure the router supports Wi-Fi
Protected Setup.
Before you begin, make sure the router and the computer
with the Adapter are in the same room. Then select the
method that is most convenient for you.
Select a Method

Chapter 3
Advanced Configuration
4
RangePlus Wireless PCI Adapter
Push Button (Recommended) Select this option to use
the push button method.
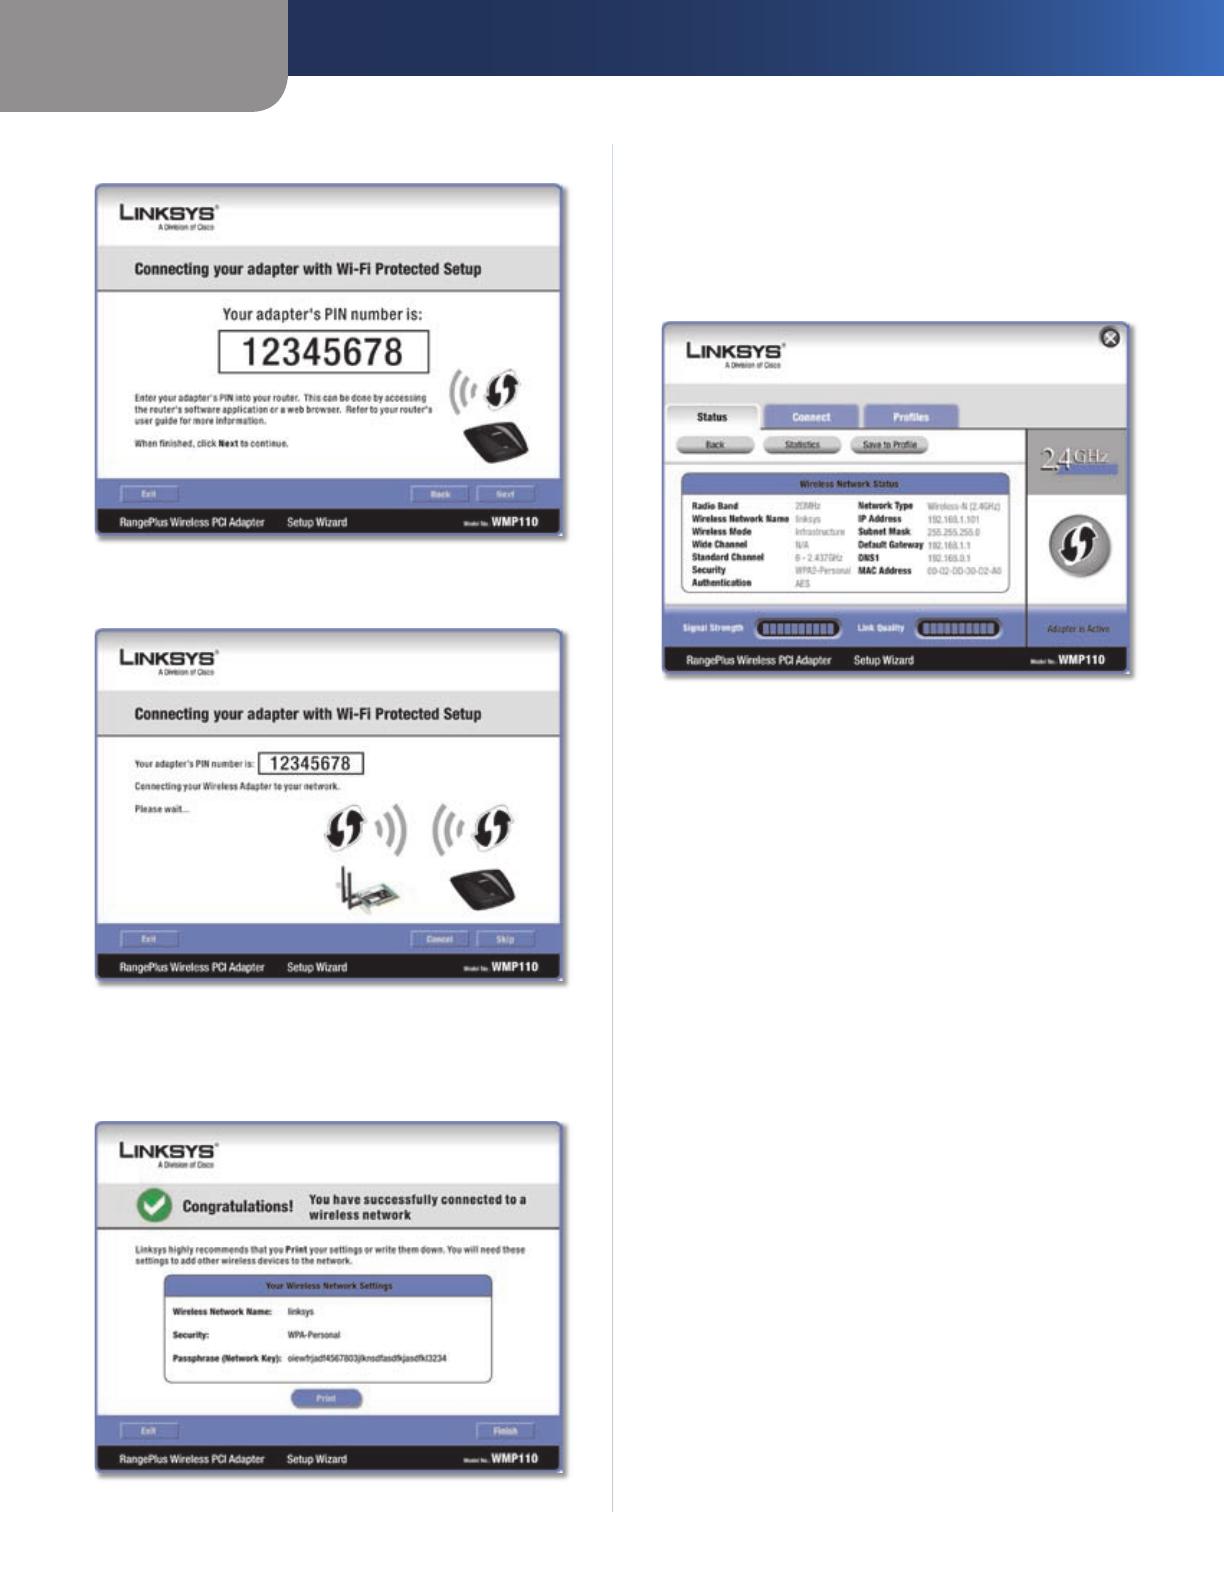
Use Adapter’s PIN number Select this option to enter
the Adapter’s PIN number on the router.
Click Next to continue, or click Back to return to the
previous screen.
Proceed to the instructions for the method you selected.
Use the Push Button
Use the Push Button
Press the Wi-Fi Protected Setup button on the
router.
Within two minutes, click the Wi-Fi Protected Setup
button on this screen.
The Adapter connects to the network.
Connecting to the Network
1.
2.
3.
Click Print to print out your wireless network settings.
Then click Finish to return to the Status screen, or click
Exit to exit the Monitor.
Congratulations
Congratulations! The Adapter is connected to
the network.
Enter the Adapter’s PIN Number
Enter the PIN Number
Access the web-based utility of the router. (Refer to the
router’s documentation for instructions.)
On the router’s Wi-Fi Protected Setup screen, enter
the Adapter’s PIN number in the PIN field. Then click
Register.
4.
1.
2.
Chapter 3
Advanced Configuration
5
RangePlus Wireless PCI Adapter
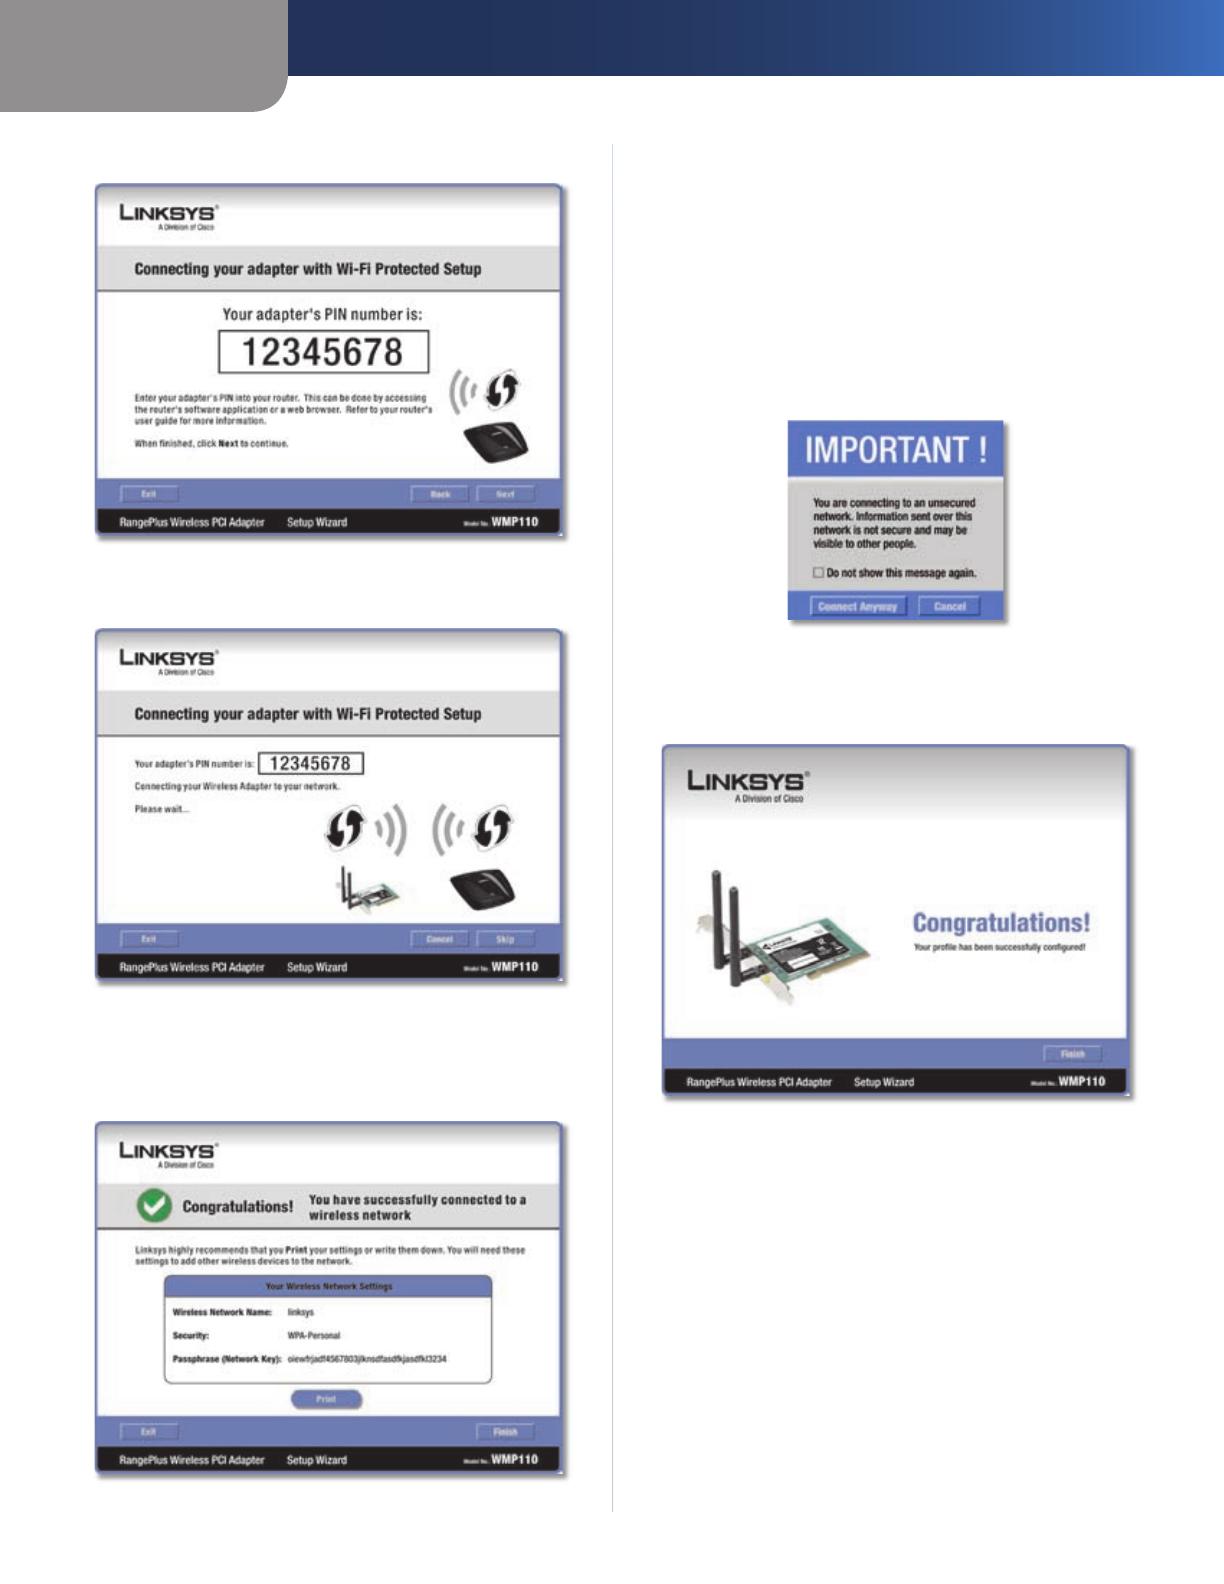
On the Adapter’s PIN number screen, click Next.
Enter the PIN Number
The Adapter connects to the network.
Connecting to the Network
Click Print to print out your wireless network settings.
Then click Finish to return to the Status screen, or click
Exit to exit the Monitor.
Congratulations
3.
4.
5.
Congratulations! The Adapter is connected to
the network.
Wireless Network Status
The Wireless Network Status screen provides information
on your current network settings.
Wireless Network Status
Radio Band This is the radio band used on the network.
Wireless Network Name This is the unique name (SSID)
of the wireless network.
Wireless Mode This is the mode of the wireless network
currently in use.
Wide Channel This is the Wireless-N primary channel
used with a 40 MHz radio band network.
Standard Channel This is the channel used by your
wireless network.
Security This is the status of the wireless security
feature.
Authentication This is your wireless network’s
authentication method.
Network Type This is the wireless network type.
IP Address This is the IP Address of the Adapter.
Subnet Mask This is the Adapter’s Subnet Mask.
Default Gateway This is the Default Gateway address.
DNS1 This is the DNS address of the Adapter.
MAC Address This is the MAC address of the wireless
network’s wireless router or access point.
Signal Strength The Signal Strength bar indicates the
signal strength.
Link Quality The Link Quality bar indicates the quality of
the wireless network connection.
Statistics Click Statistics to go to the Wireless Network
Statistics screen.
Chapter 3
Advanced Configuration
6
RangePlus Wireless PCI Adapter
Back Click Back to return to the initial Status screen.
Save to Profile Click Save to Profile to save the currently
active connection settings to a profile.
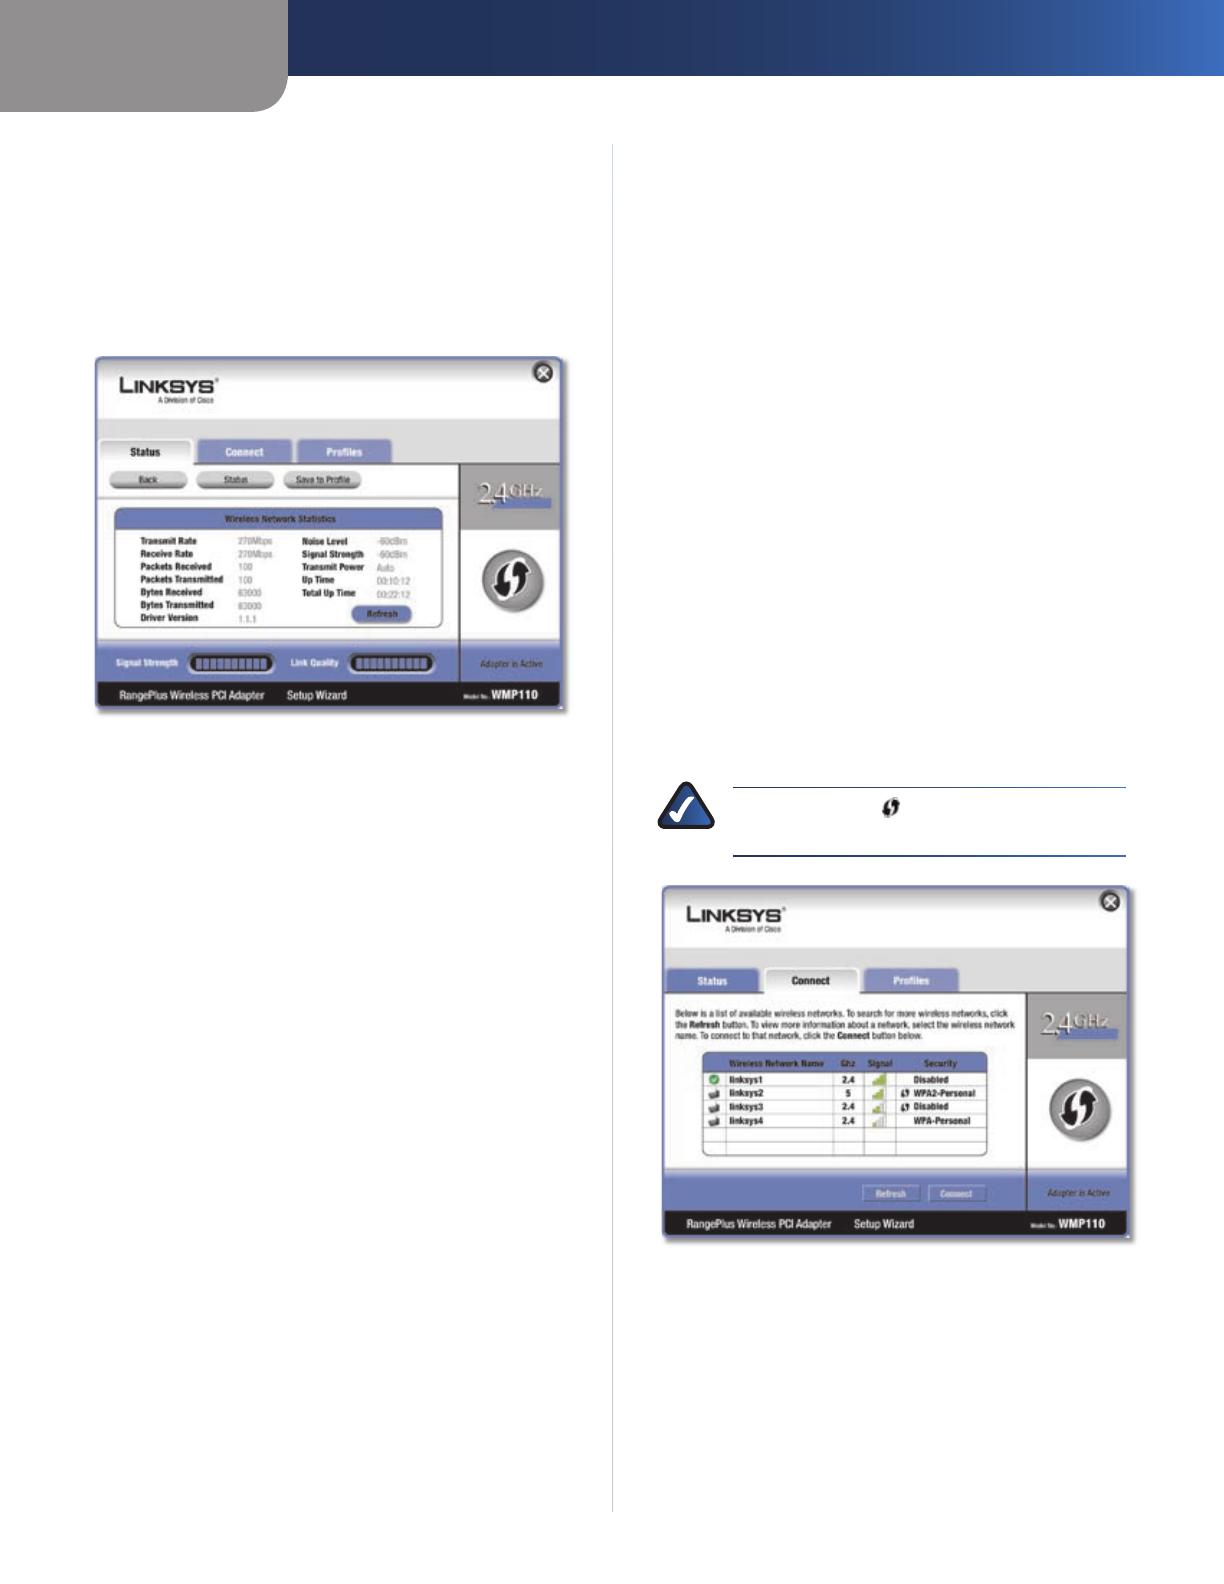
Wireless Network Statistics
The Wireless Networks Statistics screen provides statistics
on your current network settings.
Wireless Network Statistics
Transmit Rate This is the data transmission rate of
the current connection. (In Auto mode, the Adapter
dynamically shifts to the fastest data transmission rate at
any given time.)
Receive Rate This is the rate that the Adapter receives
data.
Packets Received This shows the packets that the
Adapter receives, in real time, after connecting to the
wireless network or after clicking Refresh.
Packets Transmitted This shows the packets that the
Adapter transmits, in real time, after connecting to the
wireless network or after clicking Refresh.
Bytes Received This shows the bytes that the Adapter
receives, in real time, after connecting to the wireless
network or after clicking Refresh.
Bytes Transmitted This shows the bytes that the Adapter
transmits, in real time, after connecting to the wireless
network or after clicking Refresh.
Driver Version This shows the Adapter’s driver version.
Noise Level This shows the level of background noise
that affects the wireless signal. A lower reading translates
into a higher quality signal.
Signal Strength This is the intensity of the wireless signal
that the Adapter receives.
Transmit Power This is the power output at which the
Adapter transmits.
Up Time This indicates the length of the most recent
connection to a wireless network.
Total Up Time This indicates the cumulative total of the
Adapter’s connection time.
Signal Strength The Signal Strength bar indicates the
signal strength.
Link Quality The Link Quality bar indicates the quality of
the wireless network connection.
Back Click Back to return to the initial Status screen.
Status Click Status to go to the Wireless Network Status
screen.
Save to Profile Click Save to Profile to save the currently
active connection settings to a profile.
Refresh Click Refresh to reset the statistics.
Connect
The Connect screen displays a list of available networks
in the table. The table shows each network’s wireless
network name, radio band, signal strength, and security
method. You may click the column heading (Wireless
Network Name, GHz, Signal strength, or Security method)
to sort by that field.
NOTE: The icon indicates that the router
supports Wi-Fi Protected Setup.
Connect
Wireless Network Name This is the SSID or unique name
of the wireless network.
GHz This is the radio band used on the network. The
number 2.4 indicates Wireless-B, -G, or -N (2.4 GHz). The
number 5 indicates Wireless-A or -N (5 GHz).
Signal This is the percentage of signal strength, from 0
to 100%.
Chapter 3
Advanced Configuration
7
RangePlus Wireless PCI Adapter
Security This is the security method used by the
network.
Wi-Fi Protected Setup Click the Wi-Fi Protected Setup
button to connect to a router that supports Wi-Fi
Protected Setup. Refer to the “Wi-Fi Protected Setup”
instructions in the “Status” section at the beginning of
this chapter.
Refresh Click Refresh to perform a new search for
wireless devices.
Connect To connect to one of the networks on the list,
select the wireless network, and click Connect.
If the router does not support Wi-Fi Protected Setup,
proceed to the section, “No Wi-Fi Protected Setup”. If the
router supports Wi-Fi Protected Setup , proceed to the
section, “Wi-Fi Protected Setup”.
No Wi-Fi Protected Setup
If the router does not use Wi-Fi Protected Setup, proceed
to the appropriate section, “Wireless Security Disabled” or
“Wireless Security Enabled”.
Wireless Security Disabled
If you connect to a network whose wireless security is
disabled, then you will view this screen:
Click Connect Anyway
Click Connect Anyway.
Click Finish.
Congratulations
1.
2.
Congratulations! The Adapter is connected to
the network.
Wireless Security Enabled
If you connect to a network whose wireless security is
enabled, then you will view one of three screens.
Proceed to the appropriate instructions.
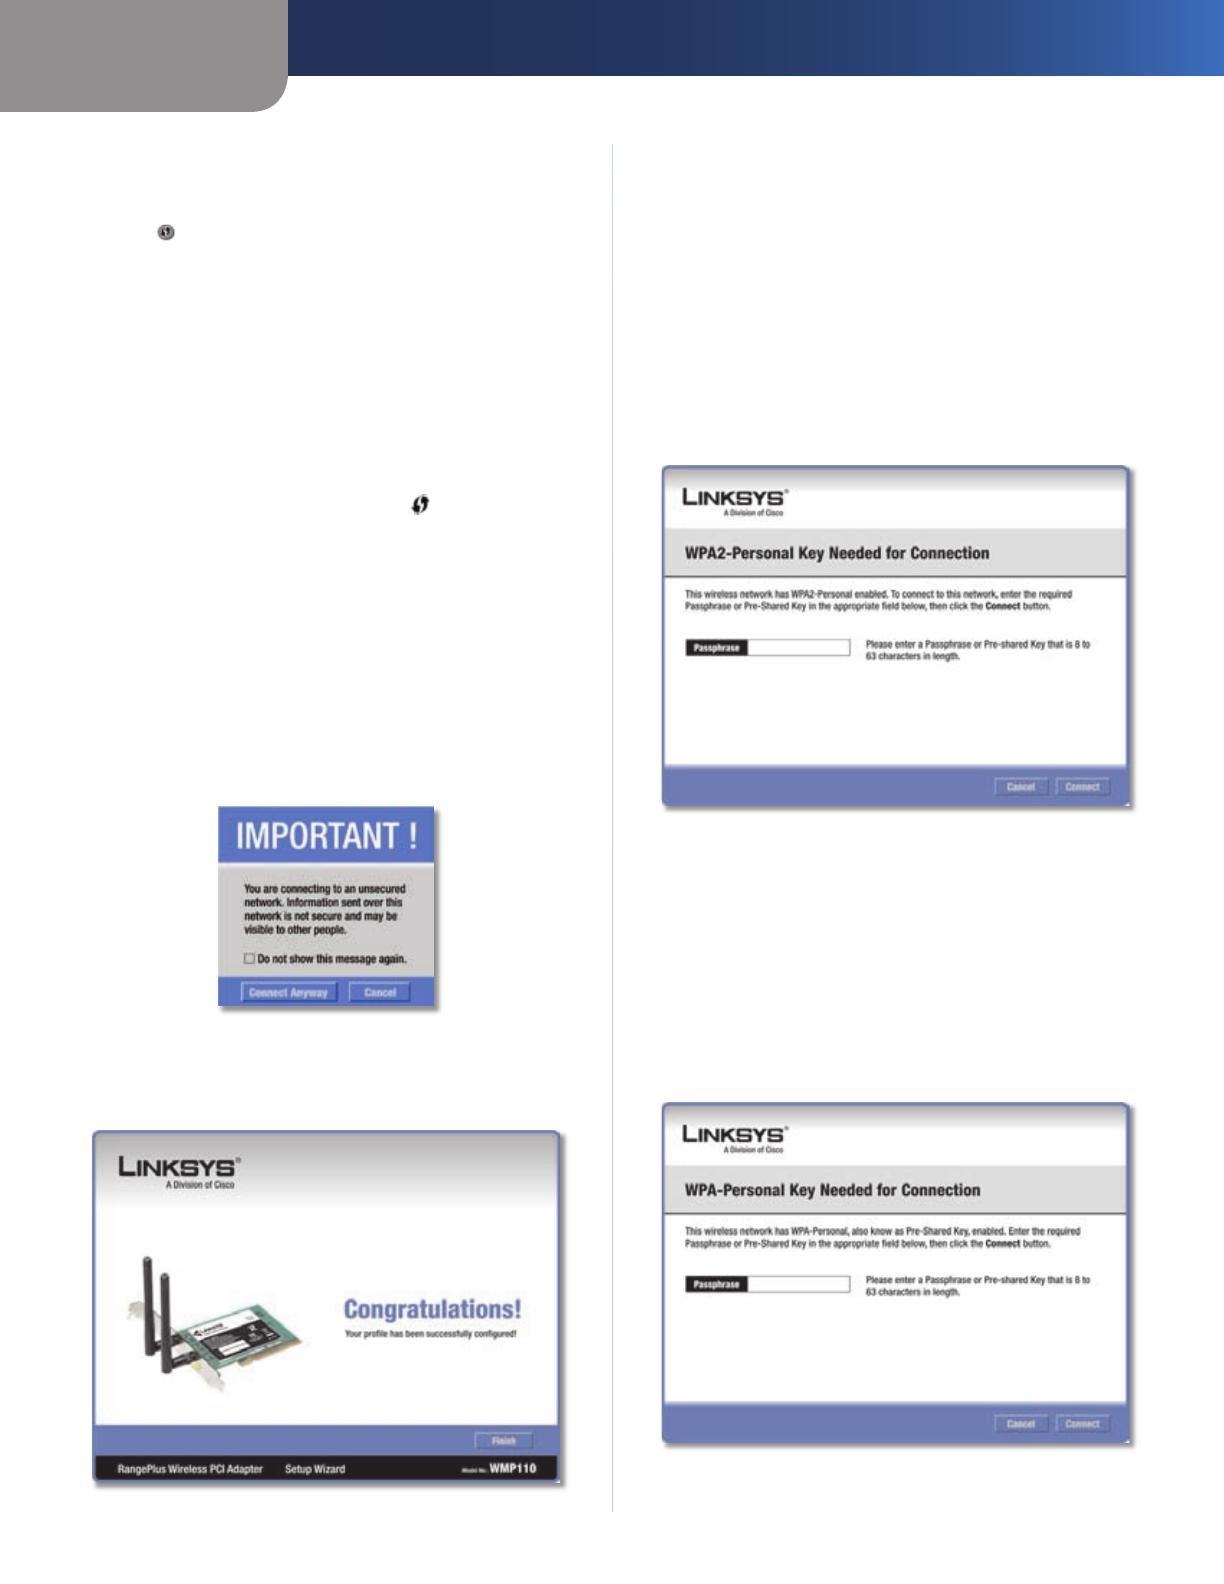
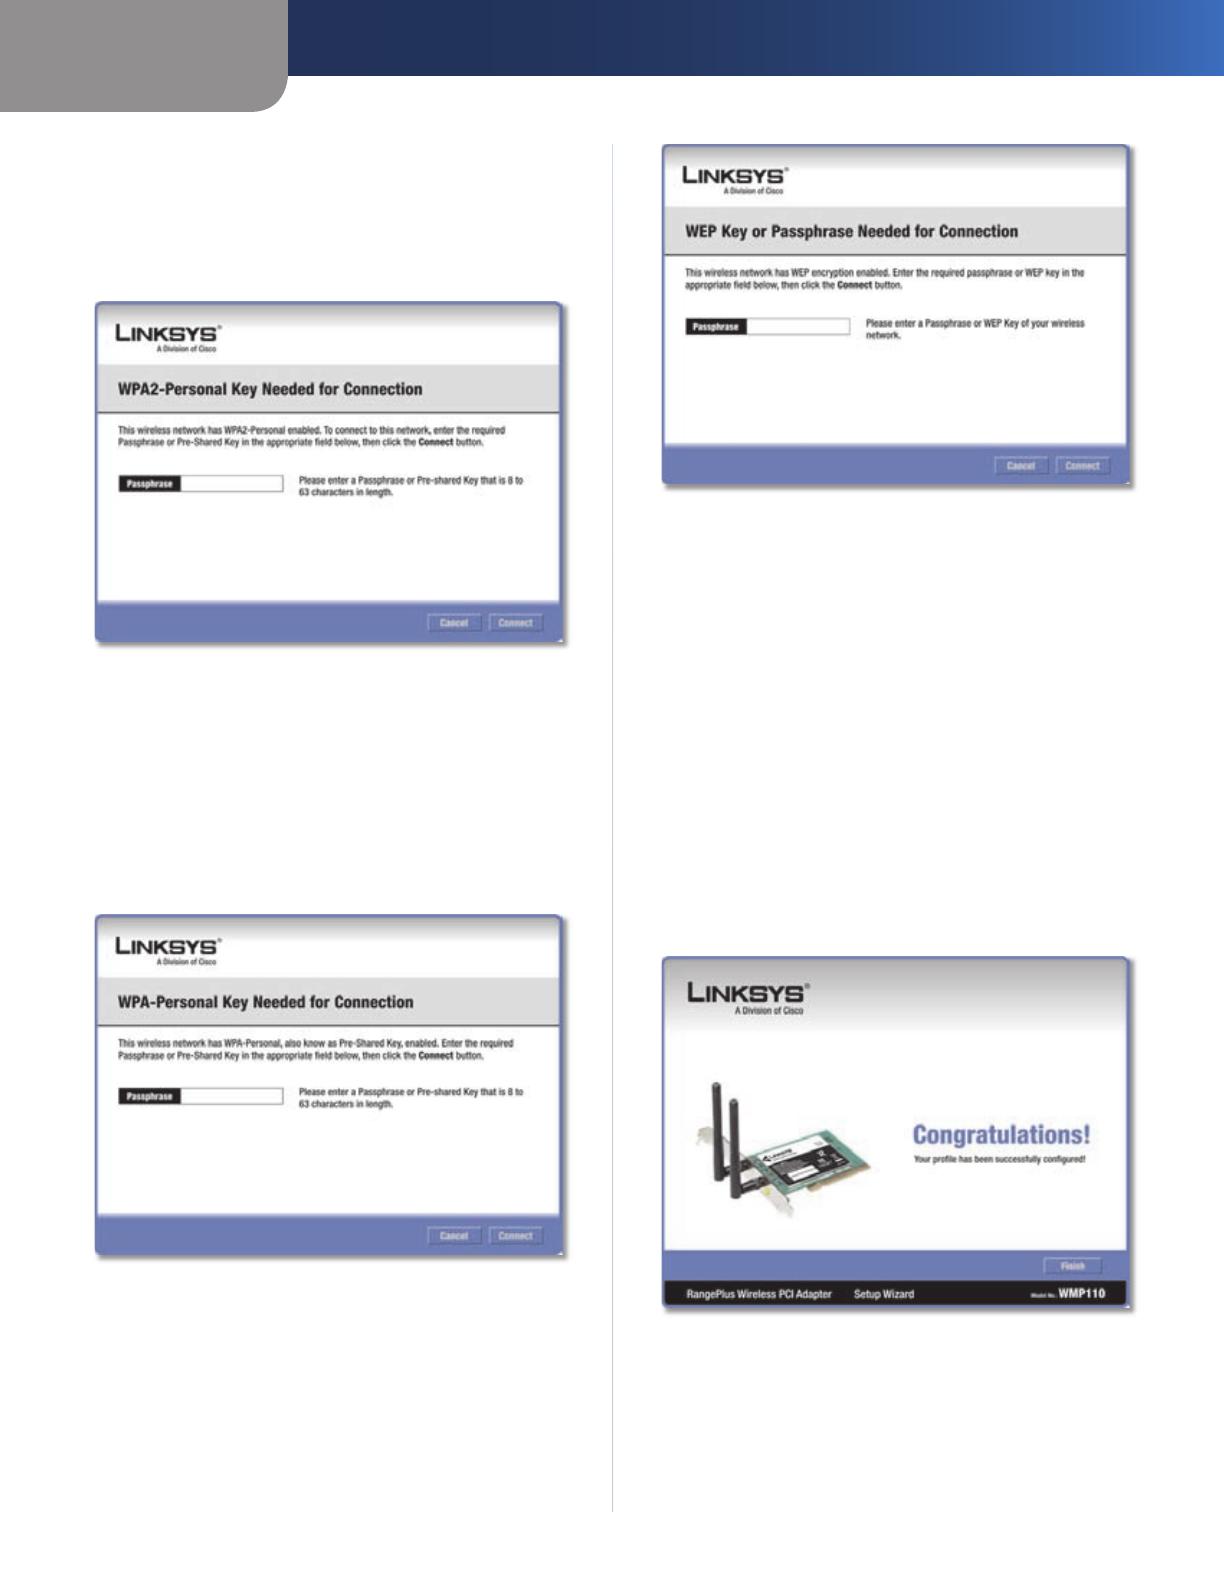
WPA2 (Wi-Fi Protected Access 2)
If the network uses WPA2 Personal security, then
the WPA2-Personal Key Needed for Connection screen
appears.
WPA2-Personal Security
Passphrase Enter the network’s Passphrase (also
called a pre-shared key) of 8-63 characters.
To connect to the network, click Connect. To cancel
the connection, click Cancel.
WPA (Wi-Fi Protected Access)
If the network uses WPA Personal security, then
the WPA-Personal Key Needed for Connection screen
appears.
WPA-Personal Security
1.

Chapter 3
Advanced Configuration
8
RangePlus Wireless PCI Adapter
Passphrase Enter the network’s Passphrase (also
called a pre-shared key) of 8-63 characters.
To connect to the network, click Connect. To cancel
the connection, click Cancel.
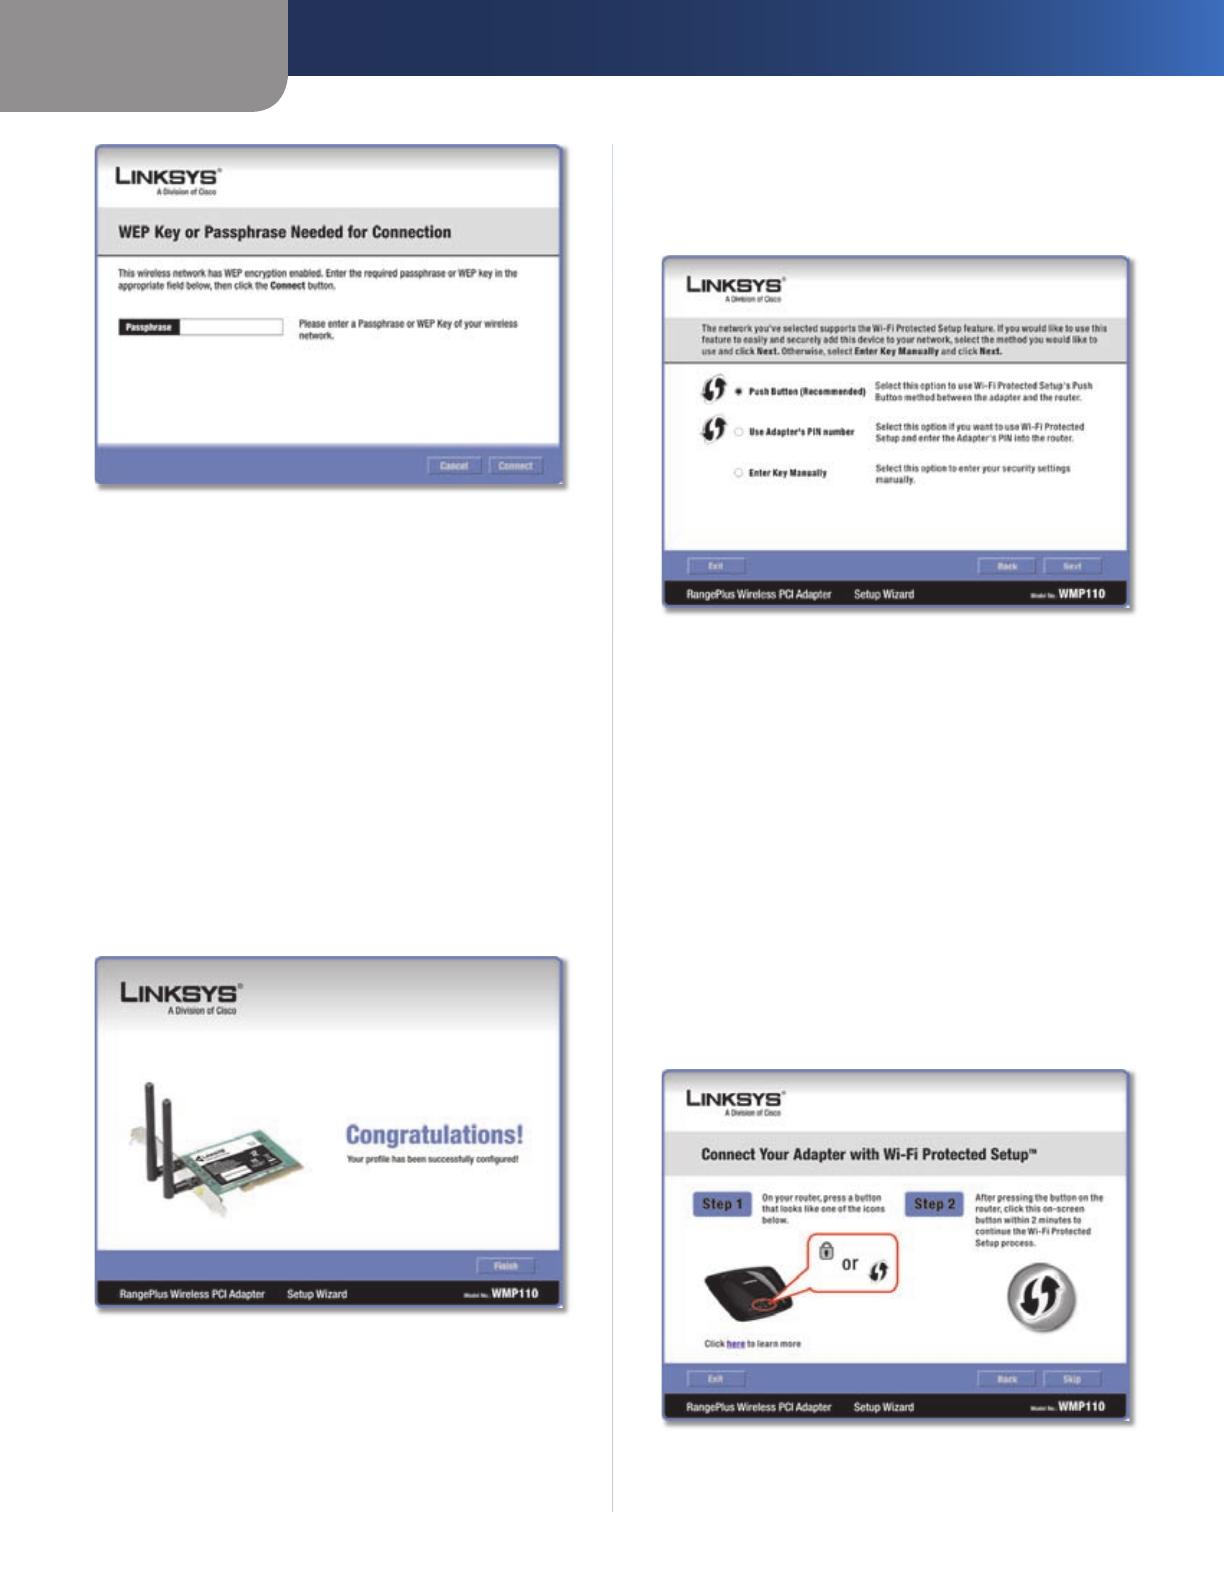
WEP (Wired Equivalent Privacy)
If the network uses WEP encryption, then the WEP Key
or Passphrase Needed for Connection screen appears.
WEP Security
Passphrase Enter the Passphrase or WEP key.
The passphrase is case-sensitive and must be 16 or
fewer alphanumeric characters. It must match the
passphrase of your other wireless network devices
and is compatible with Linksys wireless products only.
(For non-Linksys wireless products, enter the WEP key
manually.)
If you enter the network’s WEP key, enter the
appropriate number of hexadecimal characters (“0” to
“9” and “A” to “F”). For 64-bit encryption, enter exactly
10 hexadecimal characters. For 128-bit encryption,
enter exactly 26 hexadecimal characters.
To connect to the network, click Connect. To cancel
the connection, click Cancel.
Click Finish.
Congratulations
Congratulations! The Adapter is connected to
the network.
Wi-Fi Protected Setup
If you connect to a router that supports Wi-Fi Protected
Setup, then you will view this screen:
Select a Method
Before you begin, make sure the router and the computer
with the Adapter are in the same room. Then select the
method that is most convenient for you.
Push Button (Recommended) Select this option to use
the push button method.
Use Adapter’s PIN number Select this option to enter
the Adapter’s PIN number on the router.
Enter Key Manually Select this option to manually enter
the security key.
Click Next to continue, or click Back to return to the
previous screen.
Proceed to the instructions for the method you selected.
2.
Chapter 3
Advanced Configuration
9
RangePlus Wireless PCI Adapter
Use the Push Button
Use the Push Button
Press the Wi-Fi Protected Setup button on the
router.
Within two minutes, click the Wi-Fi Protected Setup
button on this screen.
The Adapter connects to the network.
Connecting to the Network
1.
2.
3.
Click Print to print out your wireless network settings.
Then click Finish to return to the Status screen, or click
Exit to exit the Monitor.
Congratulations
Congratulations! The Adapter is connected to
the network.
Enter the Adapter’s PIN Number
Enter the PIN Number
Access the web-based utility of the router. (Refer to the
router’s documentation for instructions.)
On the router’s Wi-Fi Protected Setup screen, enter
the Adapter’s PIN number in the PIN field. Then click
Register.
4.
1.
2.
Chapter 3
Advanced Configuration
10
RangePlus Wireless PCI Adapter
On the Adapter’s PIN number screen, click Next.
Enter the PIN Number
The Adapter connects to the network.
Connecting to the Network
Click Print to print out your wireless network settings.
Then click Finish to return to the Status screen, or click
Exit to exit the Monitor.
Congratulations
3.
4.
5.
Congratulations! The Adapter is connected to
the network.
Enter Key Manually
Proceed to the appropriate section, “Wireless Security
Disabled” or “Wireless Security Enabled”.
Wireless Security Disabled
If you connect to a network whose wireless security is
disabled, then you will view this screen:
Click Connect Anyway
Click Connect Anyway.
Click Finish.
Congratulations
Congratulations! The Adapter is connected to
the network.
Wireless Security Enabled
If you connect to a network whose wireless security is
enabled, then you will view one of three screens.
1.
2.
Chapter 3
Advanced Configuration
11
RangePlus Wireless PCI Adapter
Proceed to the appropriate instructions.
WPA2 (Wi-Fi Protected Access 2)
If the network uses WPA2 Personal security, then
the WPA2-Personal Key Needed for Connection screen
appears.
WPA2-Personal Security
Passphrase Enter the network’s Passphrase (also
called a pre-shared key) of 8-63 characters.
To connect to the network, click Connect. To cancel
the connection, click Cancel.
WPA (Wi-Fi Protected Access)
If the network uses WPA Personal security, then the
WPA-Personal Key Needed for Connection screen.
WPA-Personal Security
Passphrase Enter the network’s Passphrase (also
called a pre-shared key) of 8-63 characters.
To connect to the network, click Connect. To cancel
the connection, click Cancel.
WEP (Wired Equivalent Privacy)
If the network uses WEP encryption, then the WEP Key
or Passphrase Needed for Connection screen appears.
1.
WEP Security
Passphrase Enter the Passphrase or WEP key.
The passphrase is case-sensitive and must be 16 or
fewer alphanumeric characters. It must match the
passphrase of your other wireless network devices
and is compatible with Linksys wireless products only.
(For non-Linksys wireless products, enter the WEP key
manually.)
If you enter the network’s WEP key, enter the
appropriate number of hexadecimal characters (“0” to
“9” and “A” to “F”). For 64-bit encryption, enter exactly
10 hexadecimal characters. For 128-bit encryption,
enter exactly 26 hexadecimal characters.
To connect to the network, click Connect. To cancel
the connection, click Cancel.
Click Finish.
Congratulations
Congratulations! The Adapter is connected to
the network.
2.

Chapter 3
Advanced Configuration
12
RangePlus Wireless PCI Adapter
Profiles
The Profiles screen lets you save different configuration
profiles for different network setups. The table on the left
displays a list of available profiles with their profile names
and wireless network names.
Profiles
Profile This is the name of the profile.
Wireless Network Name This is the SSID or unique name
of the wireless network.
Profile Information
For each profile selected, the following are listed:
Wireless Mode This is the mode of the wireless network
currently in use.
Standard Channel This is the channel used by your
wireless network.
Security This is the status of the wireless security.
Authentication This is the authentication setting for the
network.
IP Address This is the method used by the network to
assign IP addresses.
Connect To connect to a wireless network using a specific
profile, select the profile, and click Connect.
Wi-Fi Protected Setup Click the Wi-Fi Protected Setup
button to connect to a router that supports Wi-Fi
Protected Setup. Refer to the “Wi-Fi Protected Setup”
instructions in the “Status” section at the beginning of this
chapter.
New Click New to create a new profile. See the next
section, “Create a New Profile,” for instructions.
Edit Select the profile you want to change and click Edit.
Import Click Import to import a profile that is saved in
another location. Select the appropriate file, and click
Open.
Export Select the profile you want to save in a different
location, and click Export. Direct Windows to the
appropriate folder, and click Save.
Delete Select the profile you want to delete and click
Delete.
NOTE: If you want to export more than one
profile, you must export them one at a time.
Create a New Profile
The next screen is the Available Wireless Networks screen.
Available Wireless Networks
This screen provides two options for setting up the
Adapter.
Available Wireless Networks (For most users) Use this
option if you already have a network set up. The networks
available to this Adapter are listed on this screen. You
can choose one of these networks and click Connect
to connect to it. Click Refresh to update the Available
Wireless Networks list.
Advanced Setup If your network is not listed on this
screen, select Advanced Setup to set up the Adapter
manually. This method is for advanced users only.
The setup for each option is described, step by step, under
the appropriate heading on the following pages.
Available Wireless Networks
The available networks are listed in the table on the center
of the screen by Wireless Network Name. Select the wireless
network you wish to connect to and click Connect. (If you
do not see your network listed, click Refresh to bring the
list up again.)
If the router does not support Wi-Fi Protected Setup,
proceed to the section, “No Wi-Fi Protected Setup”. If the
router supports Wi-Fi Protected Setup , proceed to the
section, “Wi-Fi Protected Setup”.

Chapter 3
Advanced Configuration
13
RangePlus Wireless PCI Adapter
No Wi-Fi Protected Setup
If the router does not use Wi-Fi Protected Setup, proceed
to the appropriate section, “Wireless Security Disabled” or
“Wireless Security Enabled”.
Wireless Security Disabled
If you connect to a network whose wireless security is
disabled, then you will view this screen:
Click Connect Anyway
Click Connect Anyway.
Click Finish.
Congratulations
Congratulations! The Adapter is connected to
the network.
Wireless Security Enabled
If you connect to a network whose wireless security is
enabled, then you will view one of three screens.
Proceed to the appropriate instructions.
WPA2 (Wi-Fi Protected Access 2)
If the network uses WPA2 Personal security, then
the WPA2-Personal Key Needed for Connection screen
appears.
1.
2.
1.
WPA2-Personal Security
Passphrase Enter the network’s Passphrase (also
called a pre-shared key) of 8-63 characters.
To connect to the network, click Connect. To cancel
the connection, click Cancel.
WPA (Wi-Fi Protected Access)
If the network uses WPA Personal security, then
the WPA-Personal Key Needed for Connection screen
appears.
WPA-Personal Security
Passphrase Enter the network’s Passphrase (also
called a pre-shared key) of 8-63 characters.
To connect to the network, click Connect. To cancel
the connection, click Cancel.
WEP (Wired Equivalent Privacy)
If the network uses WEP encryption, then the WEP Key
or Passphrase Needed for Connection screen appears.
Chapter 3
Advanced Configuration
14
RangePlus Wireless PCI Adapter
WEP Security
Passphrase Enter the Passphrase or WEP key.
The passphrase is case-sensitive and must be 16 or
fewer alphanumeric characters. It must match the
passphrase of your other wireless network devices
and is compatible with Linksys wireless products only.
(For non-Linksys wireless products, enter the WEP key
manually.)
If you enter the network’s WEP key, enter the
appropriate number of hexadecimal characters (“0” to
“9” and “A” to “F”). For 64-bit encryption, enter exactly
10 hexadecimal characters. For 128-bit encryption,
enter exactly 26 hexadecimal characters.
To connect to the network, click Connect. To cancel
the connection, click Cancel.
Click Finish.
Congratulations
Congratulations! The Adapter is connected to
the network.
2.
Wi-Fi Protected Setup
If you connect to a router that supports Wi-Fi Protected
Setup, then you will view this screen:
Select a Method
Before you begin, make sure the router and the computer
with the Adapter are in the same room. Then select the
method that is most convenient for you.
Push Button (Recommended) Select this option to use
the push button method.
Use Adapter’s PIN number Select this option to enter
the Adapter’s PIN number on the router.
Enter Key Manually Select this option to manually enter
the security key.
Click Next to continue, or click Back to return to the
previous screen.
Proceed to the instructions for the method you selected.
Use the Push Button
Use the Push Button

Chapter 3
Advanced Configuration
15
RangePlus Wireless PCI Adapter
Press the Wi-Fi Protected Setup button on the
router.
Within two minutes, click the Wi-Fi Protected Setup
button on this screen.
The Adapter connects to the network.
Connecting to the Network
Click Print to print out your wireless network settings.
Then click Finish to return to the Status screen, or click
Exit to exit the Monitor.
Congratulations
Congratulations! The Adapter is connected to
the network.
1.
2.
3.
4.
Enter the Adapter’s PIN Number
Enter the PIN Number
Access the web-based utility of the router. (Refer to the
router’s documentation for instructions.)
On the router’s Wi-Fi Protected Setup screen, enter
the Adapter’s PIN number in the PIN field. Then click
Register.
On the Adapter’s PIN number screen, click Next.
Enter the PIN Number
1.
2.
3.
Chapter 3
Advanced Configuration
16
RangePlus Wireless PCI Adapter
The Adapter connects to the network.
Connecting to the Network
Click Print to print out your wireless network settings.
Then click Finish to return to the Status screen, or click
Exit to exit the Monitor.
Congratulations
Congratulations! The Adapter is connected to
the network.
Enter Key Manually
Proceed to the appropriate section, “Wireless Security
Disabled” or “Wireless Security Enabled”.
Wireless Security Disabled
If you connect to a network whose wireless security is
disabled, then you will view this screen:
4.
5.
Click Connect Anyway
Click Connect Anyway.
Click Finish.
Congratulations
Congratulations! The Adapter is connected to
the network.
Wireless Security Enabled
If you connect to a network whose wireless security is
enabled, then you will view one of three screens.
1.
2.

Chapter 3
Advanced Configuration
17
RangePlus Wireless PCI Adapter
Proceed to the appropriate instructions.
WPA2 (Wi-Fi Protected Access 2)
If the network uses WPA2 Personal security, then
the WPA2-Personal Key Needed for Connection screen
appears.
WPA2-Personal Security
Passphrase Enter the network’s Passphrase (also
called a pre-shared key) of 8-63 characters.
To connect to the network, click Connect. To cancel
the connection, click Cancel.
WPA (Wi-Fi Protected Access)
If the network uses WPA Personal security, then the
WPA-Personal Key Needed for Connection screen.
WPA-Personal Security
Passphrase Enter the network’s Passphrase (also
called a pre-shared key) of 8-63 characters.
To connect to the network, click Connect. To cancel
the connection, click Cancel.
WEP (Wired Equivalent Privacy)
If the network uses WEP encryption, then the WEP Key
or Passphrase Needed for Connection screen appears.
1.
WEP Security
Passphrase Enter the Passphrase or WEP key.
The passphrase is case-sensitive and must be 16 or
fewer alphanumeric characters. It must match the
passphrase of your other wireless network devices
and is compatible with Linksys wireless products only.
(For non-Linksys wireless products, enter the WEP key
manually.)
If you enter the network’s WEP key, enter the
appropriate number of hexadecimal characters (“0” to
“9” and “A” to “F”). For 64-bit encryption, enter exactly
10 hexadecimal characters. For 128-bit encryption,
enter exactly 26 hexadecimal characters.
To connect to the network, click Connect. To cancel
the connection, click Cancel.
Click Finish.
Congratulations
Congratulations! The profile is
successfully configured.
2.
/