Whirlpool CH60DTXF User manual

Category
Barbecues & grills
Type
User manual

This manual is also suitable for

This appliance must be installed in accordance with the regulations in force and
only used in a well ventilated space.
Read these instructions before installing or using the appliance and retain
them for future reference.
Use and Installation Instructions
CH60DTCF
CH60DTXF
CH60DPCF
CH60DPXF
Please phone us on
08448 24 24 24
to activate your
guarantee
PLEASE PHONE US TO REGISTER YOUR APPLIANCE AND ACTIVATE YOUR PARTS GUARANTEE ON 08448 24 24 24
2
PLEASE PHONE US TO REGISTER YOUR APPLIANCE AND ACTIVATE YOUR PARTS GUARANTEE ON 08448 24 24 24
CONTENTS
PAGE
Introduction 3
Safety Information 4
Installation 6
Features 13
The Controls 14
The Cooking Modes in your Cooker 17
Electronic Clock and Automatic Cooking Feature 19
Temperature Conversion Chart 22
Hotplate 23
Solar Plus Twin Grill 25
Top Oven - Conventional Cooking 27
Top Oven Cooking Temperature Charts 28
Main Oven - The Precision Cooking System 30
Main Oven Cooking Temperature Charts 31
Care and Cleaning 34
Something wrong with your Cooker 37
Disposal of the appliance 38
Guarantee Information 39
Service Information 40
Retention of this Instruction Book
This Instruction Book must be kept handy for reference as it contains important details on the safe and proper
use of the appliance.
If you sell or pass the appliance to someone else, or move house and leave it behind, make sure this Book is
also provided so the new owner can become familiar with the appliance and safety warnings.
3
PLEASE PHONE US TO REGISTER YOUR APPLIANCE AND ACTIVATE YOUR PARTS GUARANTEE ON 08448 24 24 24
INTRODUCTION
To help you make the best use of your cooker, PLEASE READ THIS BOOKLET CAREFULLY.
Your new cooker is guaranteed and will give lasting service. The guarantee is only applicable if the cooker has
been installed in accordance with the Installation Instructions.
The cooker is designed specifically for domestic use and responsibility will not be accepted for use in any other
installation.
When first using the cooker ensure that the room is well ventilated (e.g. open a window or use an extractor fan)
and that persons who may be sensitive to the odour avoid any fumes. It is suggested that any pets be removed
from the room until the smell has ceased. This odour is due to any temporary finish and also any moisture
absorbed by the insulation.
Our policy is one of continual improvement in design and development, therefore strict accuracy of illustrations
and descriptions cannot be guaranteed.
This appliance conforms with the following European Economic Community directives:This appliance conforms with the following European Economic Community directives:
This appliance conforms with the following European Economic Community directives:
- 2006/95/
EC EC
EC EC
EC of 12/12/06 (Low Voltage) and subsequent modifications;
- 2004/108/
ECEC
ECEC
EC of 15/12/04 (Electromagnetic Compatibility) and subsequent modifications;
- 90/396/
EECEEC
EECEEC
EEC of 29/06/90 (Gas) and subsequent modifications (only for models which use gas);
- 93/68/
EECEEC
EECEEC
EEC of 22/07/93 and subsequent modifications.
- 2002/96/
ECEC
ECEC
EC
- 1275/2008 (Stand-by/Off mode)
Technical Characteristics
Top Oven
Usable Volume: 35 Litres
ENERGY LABEL - Top Oven
Directive 2002/40/EC on the label of electric ovens
Norm EN 50304
Declared energy consumption for
Natural convection Class
heating mode: Conventional
Main Oven
Usable Volume: 65 Litres
ENERGY LABEL - Main Oven
Directive 2002/40/EC on the label of electric ovens
Norm EN 50304
Declared energy consumption for
Natural convection Class
heating mode: Fan Oven
Voltage and Frequency
230-240V~ 50Hz
4
PLEASE PHONE US TO REGISTER YOUR APPLIANCE AND ACTIVATE YOUR PARTS GUARANTEE ON 08448 24 24 24
FOR YOUR SAFETY
Please read the precautions below before using your cooker.
ALWAYS . . .
ALWAYS make sure you understand the controls before using the cooker.
ALWAYS check that all controls on the cooker are turned off after use.
ALWAYS stand back when opening an oven door to allow heat to disperse.
ALWAYS use dry, good quality oven gloves when removing items from the ovens.
ALWAYS take care when removing items from the top oven/grill when the main oven is on, as the contents may
be hot.
ALWAYS keep the oven and grill doors closed when the cooker is not in use.
ALWAYS place pans centrally over the hotplate burners and position them so that the handles cannot acciden-
tally be caught or knocked or become heated by other burners.
ALWAYS keep the cooker clean, as a build up of grease or fat from cooking can cause a fire.
ALWAYS allow the cooker to cool before cleaning.
ALWAYS follow the basic principles of food handling and hygiene to prevent the possibility of bacterial growth.
ALWAYS keep ventilation slots clear of obstructions.
ALWAYS turn off the electricity supply before cleaning or replacing an oven lamp.
ALWAYS refer servicing to CORGI registered appliance service engineers.
z The appliance should not be operated by people (including children) with reduced physical, sensory or mental
capacities, by inexperienced individuals or by anyone who is not familiar with the product. These individuals
should, at the very least, be supervised by someone who assumes responsibility for their safety or receive
preliminary instructions relating to the operation of the appliance.
z The appliance must be used by adults only for the preparation of food, in accordance with the instructions
outlined in this booklet. Any other use of the appliance (e.g. for heating the room) constitutes improper use and
is dangerous. The manufacturer may not be held liable for any damage resulting from improper, incorrect and
unreasonable use of the appliance.
z This product complies with the requirements of the latest European Directive on the limitation of power con-
sumption of the standby mode.
If no operations are carried out for a period of 2 minutes, the appliance automatically switches to the standby
mode.
The standby mode is visualised by the high luminosity "Watch Icon".
As soon as interaction with the machine resumes, the system's operating mode is restored.
5
PLEASE PHONE US TO REGISTER YOUR APPLIANCE AND ACTIVATE YOUR PARTS GUARANTEE ON 08448 24 24 24
NEVER . . .
NEVER leave children unsupervised where the cooker is installed as all surfaces will get hot during and after
use.
NEVER allow anyone to sit or stand on any part of the cooker.
NEVER store items that children may attempt to reach above the cooker.
NEVER heat up unopened food containers as pressure can build up causing the container to burst.
NEVER store chemicals, food stuffs, pressurised containers in or on the cooker, or in cabinets immediately
above or next to the cooker.
NEVER fill a deep fat frying pan more than 1/3 full of oil, and never use a lid. DO NOT LEAVE UNATTENDED
WHILE COOKING.
NEVER place flammable or plastic items on or near the hotplate.
NEVER use proprietary spillage collectors on the hotplate.
NEVER use the cooker as a room heater.
NEVER dry clothes or place other times over or near to the hotplate or oven/gril doors.
NEVER wear garments with long flowing sleeves whilst cooking.
NOTE:NOTE:
NOTE:NOTE:
NOTE: The use of a gas cooking appliance results in the production of heat and moisture in the room in which it
is installed. Always ensure that the kitchen is well ventilated; keep natural ventilation holes open or install a
mechanical ventilation device (mechanical extractor hood).
In particular when using the grill or more than one hotplate burner, open a window if a mechanical ventilation
device is not operating.
! The appliance should not be operated by people (including children) with reduced physical, sensory or mental
capacities, by inexperienced individuals or by anyone who is not familiar with the product. These individuals
should, at the very least, be supervised by someone who assumes responsibility for their safety or receive
preliminary instructions relating to the operation of the appliance.
FOR YOUR SAFETY
6
PLEASE PHONE US TO REGISTER YOUR APPLIANCE AND ACTIVATE YOUR PARTS GUARANTEE ON 08448 24 24 24
Prior to installation, ensure that the local distribution conditions (nature of the gas and gas pressure) and the
adjustment conditions are compatible. The adjustment conditions for this appliance are stated on the data
badge which is fitted on the back panel.
This appliance is not designed to be connected to a combustion products evacuation device. It must be
installed and connected in accordance with current installation regulations. particular attention should be given
to the relevant requirements regarding ventilation.
MODEL NUMBERS:
Category II2H3+ (GB)
These models are set to burn NATURAL GAS (G20) at 20 mbar but can be converted for use on BUTANE (G30)
at 28-30mbar or PROPANE (G31) at 37mbar with the use of the LPG conversion kit that can be obtained free of
charge, if you contact our Genuine Parts and Accessories department (see Key Contacts, back page).
GAS SAFETY (INSTALLATION & USE) REGULATIONS
It is the law that all gas appliances are installed by competent persons in accordance with the current edition of
the above regulations. It is in your interest and that of safety to ensure compliance with the law. In the UK,
CORGI registered installers work to safe standards of practice. The cooker must also be installed in accordance
with BS 6172. Failure to install the cooker correctly could invalidate the warranty liability claims and could lead
to prosecution.
LOCATION
The cooker may be located in a kitchen, kitchen/diner or a bed-sitting room, but not in a room containing a bath
or shower. The cooker must not be installed in a bed-sitting room of less than 20m
3
.
When adjusted for use on Butane (G30) or Propane (G31), the cooker must not be installed in a room or internal
space below ground level, e.g. in a basement.
PROVISION FOR VENTILATION
The room containing the cooker should have an air supply in accordance with BS 5440: Part 2.
The room must have an opening window or equivalent; some rooms may also require a permanent vent. If the
room has a volume between 5 and 10m
3
, it will require an air vent of 50cm
2
effective area unless it has a door
which opens directly to outside. If the room has a volume of less than 5m
3
, it will require an air vent of 100cm
2
effective area. If there are other fuel burning appliances in the same room, BS 5440: Part 2 should be consulted
to determine air vent requirements.
INSTALLATION INSTRUCTIONS
CH60DTCF
CH60DTXF
CH60DPCF
CH60DPXF
7
PLEASE PHONE US TO REGISTER YOUR APPLIANCE AND ACTIVATE YOUR PARTS GUARANTEE ON 08448 24 24 24
INSTALLATION INSTRUCTIONS
TECHNICAL DATA
Gas connection Rp ½ (½" BSP female)
Pressure test point Front left hotplate injector
Gas rate adjustment None
Aeration adjustment None
Electrical connection 4mm
2
twin and earth
230/240V a.c. 50Hz.
13A fuse.






HEAT INPUT INJECTOR HEAT INPUT INJECTOR
HOTPLATE
Front Left
4.1 kW 100+72+100 3.8 kW (275g/h) 63+42+63
HOTPLATE
Rear Right
3.05 kW 116 3.0 kW (220g/h) 86
HOTPLATE
Front Right and Rear Left
2.0 kW 103 2.0 kW (145g/h) 70
TOTAL LOAD 4.5 / 4.9 kW
!"
!




HEAT INPUT INJECTOR HEAT INPUT INJECTOR
HOTPLATE
Front Left and Rear Right
3.05 kW 116 3.0 kW (220g/h) 86
HOTPLATE
Front Right and Rear Left
2.0 kW 103 2.0 kW (145g/h) 70
TOTAL LOAD 4.5 / 4.9 kW
F
8
PLEASE PHONE US TO REGISTER YOUR APPLIANCE AND ACTIVATE YOUR PARTS GUARANTEE ON 08448 24 24 24
INSTALLATION INSTRUCTIONS
SPACE FOR FIXING
The cooker can be close fitted below hotplate level. This requires a minimum distance of 600mm between cupboard
units of hotplate height.
When installing next to a tall cupboard, partition or wall, for a minimum distance of 400mm above hotplate level,
allow a side clearance of at least 65mm.
The diagram below illustrates the minimum clearance between the cooker and adjacent walls, cupboards etc.
The wall behind the cooker, 50mm below and 450mm above, and the width of the cooker, must be a non-
combustible material such as ceramic wall tiles.
If the cooker is to be fitted close to a corner on the left hand side, ensure that there is a clearance of at least 50mm
to allow the main oven door to open fully for when removing oven shelves.
65 mm Min
840 mm Min
400 mm Min
600 mm Min
750mm Min
COOKER HOODS
If a cooker hood is to be installed, refer to the cooker hood manufacturers' instructions regarding fixing height.
9
PLEASE PHONE US TO REGISTER YOUR APPLIANCE AND ACTIVATE YOUR PARTS GUARANTEE ON 08448 24 24 24
INSTALLATION INSTRUCTIONS
SPACE FOR FIXING
The cooker can be close fitted below hotplate level. This requires a minimum distance of 600mm between cupboard
units of hotplate height.
When installing next to a tall cupboard, partition or wall, for a minimum distance of 400mm above hotplate level,
allow a side clearance of at least 65mm.
The diagram below illustrates the minimum clearance between the cooker and adjacent walls, cupboards etc.
The wall behind the cooker, 50mm below and 450mm above, and the width of the cooker, must be a non-
combustible material such as ceramic wall tiles.
If the cooker is to be fitted close to a corner on the left hand side, ensure that there is a clearance of at least 50mm
to allow the main oven door to open fully for when removing oven shelves.
65 mm Min
840 mm Min
400 mm Min
600 mm Min
750mm Min
COOKER HOODS
If a cooker hood is to be installed, refer to the cooker hood manufacturers' instructions regarding fixing height.
10
PLEASE PHONE US TO REGISTER YOUR APPLIANCE AND ACTIVATE YOUR PARTS GUARANTEE ON 08448 24 24 24
INSTALLATION INSTRUCTIONS
UNPACKING THE COOKER
Unpack the components from inside the grill and oven. Check that the following parts are present:
Grill pan and grid Aluminium burner bodies (4)
Baking dish Pan supports
Main oven shelves (2) Enamelled burner caps (4)
Top oven/grill shelf (1) Literature
LEVELLING
Four skid feet are fitted which can be adjusted up or down to level the cooker.
CONVERSION FOR USE ON BUTANE (G30) OR PROPANE (G31)
Each burner requires the injector to be replaced and bypass screws adjusted or replaced as follows:
1. Remove the loose hotplate burner parts.
2. Using a 7mm socket, replace the hotplate injectors as appropriate (see table on previous page).
3. Re-position the loose burner parts.
4. Carefully pull off the hotplate control knobs.
5. Using a narrow flat bladed screwdriver rotate the bypass screws fully clockwise. The hotplate tap bypass
screws are located down the centre of the spindle.
6. Re-assemble the control panel parts.
7. Secure the self-adhesive LPG conversion label over the gas details on the data badge.
11
PLEASE PHONE US TO REGISTER YOUR APPLIANCE AND ACTIVATE YOUR PARTS GUARANTEE ON 08448 24 24 24
INSTALLATION INSTRUCTIONS
STABILITY CHAIN
A hole in the gas inlet valve bracket can be used to engage a stability chain.
CONNECTING TO GAS SUPPLY
300
670
Connection to the cooker should be made with an approved appliance flexible connection to BS 669. A length of
0.9 to 1.25m is recommended. The length of hose chosen should be such that when the cooker is in situ, the
hose does not touch the floor.
Those cookers converted to use on LPG should be connected with a hose suitable for LPG and capable of
withstanding a pressure of 50 mbar.
An adaptor backplate should be fitted within the shaded area shown, to allow the cooker to be pushed fully to
the wall and to ensure that the flexible hose is only likely to come into contact with areas at the rear of the
cooker that do not exceed a temperature rise of 70°C.
12
PLEASE PHONE US TO REGISTER YOUR APPLIANCE AND ACTIVATE YOUR PARTS GUARANTEE ON 08448 24 24 24
WARNING - THIS APPLIANCE MUST BE EARTHED.
The cooker must be connected by a qualified electrician to a suitable double - pole control unit with a minimum
rating of 32A and a minimum contact clearance of 3mm, which should be fitted adjacent to (but not above) the
cooker, in accordance with IEE regulations.
The power supply cable should conform to BS6004 with a conductor size of 4mm
2
.
The control unit should be easily accessible in the event of an emergency.
This appliance conforms to EN55014 regarding suppression of radio and television interference.
The cooker terminals are behind the cover at the rear The mains cable must pass through the cable clamp and
the screws must be fully tightened. Sufficient cable should be used to allow the cooker to be pulled out for
servicing. Ensure that the cover is fully closed and secure afterwards.
Take care not to trap the mains cable when pushing the cooker into its final position.
ELECTRICAL CONNECTION
INSTALLATION INSTRUCTIONS
OPERATIONAL CHECKS
After installation, check for gas soundness. The supply pressure can be checked at one of the hotplate burner
injectors.
Check that the hotplate burners ignite correctly and burn with a steady flame. Check for a steady flame at the
low setting.
Instruct the user on the operation of the cooker.
13
PLEASE PHONE US TO REGISTER YOUR APPLIANCE AND ACTIVATE YOUR PARTS GUARANTEE ON 08448 24 24 24
FEATURES
NOTE: To keep the controls cool when the appliance is used, a gentle flow of air may be blown from
beneath the control panel. If the appliance is still warm, this cooling fan may run on or restart itself
when all controls have been turned off.
This is normal and is
not a fault.
The fan will stop once the appliance has cooled.
NOTE: Children should not be allowed to play with the appliance or tamper with the controls.
WARNING: DO NOT touch the oven doors when the oven is in use as these areas can become hot.
Control Panel
Timer
Telescopic Grill
Pan Runners
Solar Plus Grill
Gas Burner (all models)
- Gas Wok Burner (C60DPF)
- Gas Burner (C60DTF)
Gas Burner (all models)
Top Oven/Grill
Rod Shelf
Heat Clean Liner
Door Switch
Main Oven Rod Shelf
Oven Fan
Oven Light
Model number and
Serial number Label
Removable Inner
Door Glass
Main oven door seal
split at these corners
Heat Clean Liner
Grill Pan, Food Support
Removable Inner
Door Glass
Meat Pan
Main Oven
Door
Top Oven Wire
Work Shelf Support
Glass Lid (C60DTF only)
Top Oven Door
Oven Light
14
PLEASE PHONE US TO REGISTER YOUR APPLIANCE AND ACTIVATE YOUR PARTS GUARANTEE ON 08448 24 24 24
THE CONTROLS
Switch on the electricity supply to the cooker at the Cooker Control Unit.
Gas Hob Controls
Grill
Control
Top
Oven
Control
Main
Oven
Control
Timer
Gas Hob Controls
Push in and turn the control knob anti-clockwise to the large flame symbol. Continue to
push in the control until the sparks light the gas.
Turn the control knob anti-clockwise to reduce the heat input.
Only turn the control between the large flame symbol and the small flame symbol
when adjusting the setting.
To turn off, turn the control knob fully clockwise to the symbol 'O', its off position.
Main Oven Light
The main oven light can be switched on, when the oven is not in use, by pressing the
oven light button on the display. The oven light will also operate whenever the main
oven door is opened.
NOTE: The oven light can be switched off when the door is opened by pressing
the oven light button on the display, or by closing the door.
Cooling Fan
The cooling fan operates with the ovens and grill. The fan will operate at full speed for
a few seconds and then reduce to a lower speed. The cooling fan will only increase to
full speed if the temperature inside the cooker reaches above a certain limit.
15
PLEASE PHONE US TO REGISTER YOUR APPLIANCE AND ACTIVATE YOUR PARTS GUARANTEE ON 08448 24 24 24
-
+
Main Oven:
- Recommended
Shelf Position
and
- Preheat
Temperature
Indicator
Top Oven:
- 'ON' Indicator
and
- Preheat
Temperature
Indicator
Main Oven
Light
Grill
control
Top Oven
control
Main Oven
Select control
Time / Mode
Minute
Minder
Cooking
Duration
End
Time
Set
Time
+/- Control
Knob
1.FAN
OVEN
2.TRADITIONAL
OVEN
4.ROAST
CHICKEN
6.BREAD
3.ROAST
MEAT
5.FISH
7.CAKES
Main Oven Functions (1-7):
Grill Control - Top Oven
The grill control will not operate unless the top oven control is in the 'O' off position.
The grill control provides fully variable heat control for either the twin grill or single (left
hand side) grill by selecting any number between 1 & 4.
When turned clockwise the twin grill will be switched on and any power setting from 1 -
4 can be selected. The power level numbers are indicated on the control knob.
When turned anti-clockwise the single grill will be switched on and any power setting
from 1 - 4 can be selected. The power level numbers are indicated on the control
knob.
The off position is identified by an 'O'.
Top Oven Control
This control switches on the top and bottom heating elements in the top oven. The
temperature in the oven can be set anywhere between 100°C and 220°C.
The top oven ON indicator (TOP) and the top oven preheat temperature indicator (
symbol) will be on the display (bottom left hand corner). The top oven preheat
temperature indicator (
symbol) will switch OFF and an audible tone will sound when
the top oven has reached the required temperature.
When in operation the oven light will be illuminated.
The off position is identified by an 'O'.
Notes
If both the top oven and grill controls are turned on together, the (TOP) and (
symbol) will flash on the display. The cooker will continue to operate in the function
which was selected first.
THE CONTROLS
16
PLEASE PHONE US TO REGISTER YOUR APPLIANCE AND ACTIVATE YOUR PARTS GUARANTEE ON 08448 24 24 24
THE CONTROLS
Main Oven Control
This control switches on the top and rear heating elements at various times in the main
oven, dependent on which mode has been set.
The temperature of the main oven can be set anywhere between 80°C and 230°C in
cooking modes 1 - 5.
The main oven preheat temperature indicator (
symbol) will be on the display
(middle, left hand side).
The main oven preheat temperature indicator (
symbol) will switch OFF and an
audible tone will sound when the main oven has reached the required temperature.
The Main Oven Cooking Functions
The main oven has eight cooking functions. Use the main oven control to select the
cooking mode you require. The display will show the function you have selected,
across the top (1 - 7) with the eighth function being shown on the clock display as
'(RISE)'.
Adjusting the Main Oven Temperature
When a program is set (position 1 - 5), the display will automatically suggest a
cooking temperature. If you wish you can use the +/- control knob to change the
suggested temperature to one of your own choice, within a range which is suitable for
the particular cooking mode.
17
PLEASE PHONE US TO REGISTER YOUR APPLIANCE AND ACTIVATE YOUR PARTS GUARANTEE ON 08448 24 24 24
THE COOKING MODES
IN YOUR COOKER
Your new cooker is equipped with a number of different cooking modes:
Conventional Heating (Top Oven)
- with upper and lower heat. This system is particularly suitable for roasting and
baking on one shelf only.
Variable Grilling (Top Oven)
- the oven can also be used for conventional grilling with a full or half width fully
controllable grill.
Note: The Top Oven door should be open when grilling.Note: The Top Oven door should be open when grilling.
Note: The Top Oven door should be open when grilling.
Fan Oven (Main Oven)
- the fan oven operates by constantly blowing heated air, from an element wrapped
around the fan, into the oven. This gives improved efficiency and in general, enables
the use of lower temperatures for cooking. It also means that there is less need to be
particolar about shelf positions and that you can bake at more than one level
simultaneously (Batch Baking).
Traditional (Main Oven)
- the upper and rear heating elements are switched on in this position. The traditional
oven brings an outstanding level of temperature distribution and reduced
consumption. In traditional cooking use only one rack to ensure good heat distribution.
By using the various shelf positions available you can balance the quantity of heat
between the upper and lower part. If cooking requires more heat from below or above,
use the lower or higher shelves respectively.
Roast Meat (Main Oven)
- specially created for cooking joints of meat. This mode raises the temperature in the
oven to a very high heat for the first part of the cooking cycle, to seal the outside of
the joint and retain the juices of the meat throughout cooking. After this the
temperature is reduced to the set temperature using each heating element in turn to
guarantee a homogeneous temperature for the cooking period. A temperature is
suggested on this mode but this can be altered using the '+/-' control knob.
Roast Chicken (Main Oven)
- specially created for cooking excellent roast poultry. This mode can be used to roast
chickens, duck, turkey and other poultry to perfection. Each heating element is used
in the cycle to guarantee a homogeneous temperature within the oven. A temperature
is suggested on this mode but this can be altered using the '+/-' control knob.
18
PLEASE PHONE US TO REGISTER YOUR APPLIANCE AND ACTIVATE YOUR PARTS GUARANTEE ON 08448 24 24 24
THE COOKING MODES
IN YOUR COOKER
Fish (Main Oven)
- this mode provides gently pulsing top and rear heat to lightly poach fish dishes
without overcooking or drying out. A temperature is suggested on this mode but this
can be altered using the '+/-' control knob.
Rising (Main Oven)
- this mode heats and holds the oven at 40°C. It is ideal for proving bread and yeast
based dough mixtures. When this mode is selected a cooking duration of 14 minutes
is automatically set, this can be altered by pressing the 'time/mode' button until the
cooking duration icon flashes. Then use the '+/-' control knob to adjust the cooking
duration.
Bread cycle - Auto
- this mode is fully automatic and lasts for 1 hour. When this mode is selected the
time and temperature cannot be adjusted. It is suitable for baking bread weighing up
to 1.5kg, either in a tin or on a baking tray. This mode includes a proving cycle and a
baking cycle. If an initial proving cycle is needed this can be done using the RISE
mode (8). Some recipe ideas are included in the recipe book supplied with the cooker.
Cake cycle - Auto
- this mode is fully automatic and lasts for 1 hour. When this mode is selected the
time and temperature cannot be adjusted. It is suitable for baking sponge based
cakes that take between 30 minutes and 1 hour to cook. Some recipe ideas are
included in the recipe book supplied with the cooker.
19
PLEASE PHONE US TO REGISTER YOUR APPLIANCE AND ACTIVATE YOUR PARTS GUARANTEE ON 08448 24 24 24
ELECTRONIC CLOCK & AUTOMATIC
COOKING FEATURE
When you first switch on the appliance you will be prompted to set the 'Time of Day' on the display.
You must ensure you have done this before attempting to use the automatic cooking feature.
AUTOMATIC COOKING
The main oven can be controlled automatically.
HINTS ON AUTOMATIC COOKING
- Select food which will require the same cooking time and temperature.
- To ensure food does not cool down and require reheating, set the end time so the food is ready when you
require it.
- Always ensure that meat and poultry is defrosted before placing in the oven.
- Whenever possible, take food out of the refrigerator and keep it as cool as possible.
- If cooking food that requires frying before placing in the oven for automatic cooking, keep the delay time to a
minimum.
- Never place hot or warm food in the oven for delayed start cooking as it could cause the oven to be warm and
produce harmful bacteria in the food.
- We advise that dishes containing left-over cooked poultry and meat, eg. shepherds pie, should not be cooked
automatically if there is to be a delay period.
- Ensure that delay start times are kept to a minimum to prevent bacterial growth in food.
- Wine or beer may ferment and cream may curdle during the delay period, so it is best to add these ingredients
just before serving.
- Foods which discolour should be protected by coating in fat or tossing in water to which lemon juice has been
added, prior to placing food in the oven.
- Dishes containing liquid should not be filled too full to prevent boiling over.
- Food should be well sealed (but not airtight) in a container to prevent the loss of liquid during cooking. Aluminium
foil gives a good seal.
- Always ensure that food is piping hot and cooked thoroughly bifore serving.
- Only reheat food once.
SETTING THE TIME OF DAY:
-
+
Main Oven
Light
Time/Mod
e
STEP 1. Check the electricity supply to the cooker is turned on.
STEP 2. When switched on the display will show both 00:00 and the 'set time' symbol flashing. Wait until
these stop flashing.
STEP 3. Press the Time/Mode button once, so that the 'Set Time' symbol and the display are flashing. Turn
the +/- control knob until the correct hour is set.
STEP 4. Press the Time/Mode button once, so that the 'Set Time' symbol and the display are flashing. Turn
the +/- control knob until the correct minutes are set. Press the Time/Mode button again.
TIME OF DAY IS NOW SET.
To alter the time of day after the first setting, simply press the Time/Mode button. The 'Set Time' symbol and
the display will flash. Repeat STEPS 3 and 4.
20
PLEASE PHONE US TO REGISTER YOUR APPLIANCE AND ACTIVATE YOUR PARTS GUARANTEE ON 08448 24 24 24
ELECTRONIC CLOCK &
AUTOMATIC
COOKING FEATURE
SETTING THE MINUTE MINDER:
-
+
Main Oven
Light
Time/Mod
e
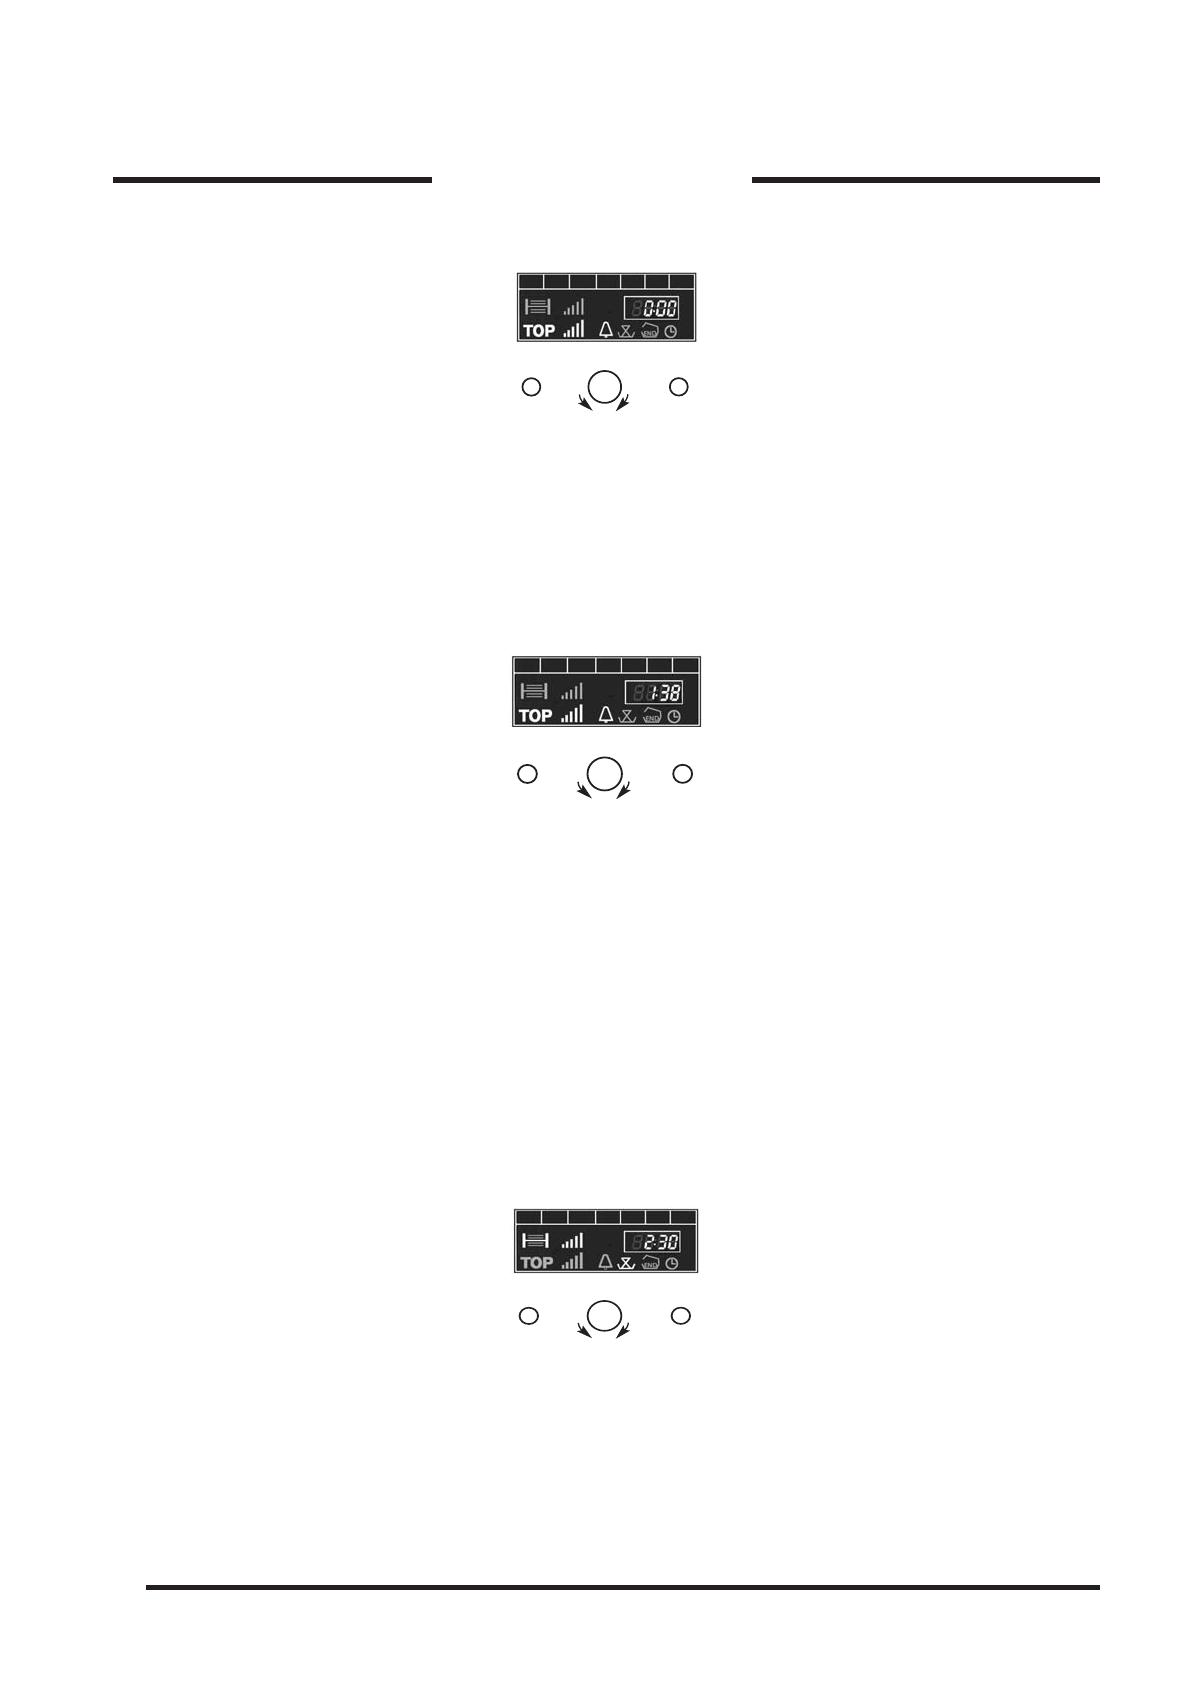
STEP 1. Press the Time/Mode button, until the 'bell' symbol is flashing.
STEP 2. Turn the +/- control knob to set the duration in minute increments until the required time is set.
After a few seconds the 'bell' symbol will stop flashing and the time will count down.
THE MINUTE MINDER IS NOW SET.
At the end of the set time an audible tone will be heard and the 'bell' symbol will go out. After a few seconds
the audible tone will stop and after a few seconds the display will revert back to the time of day.
-
+
Main Oven
Light
Time/Mod
e
The minute minder can be cancelled at any time by following STEPS 1 and 2, setting the time period to zero
using the +/- control knob. The display will revert back to the time of day.
The display shows HOURS and MINUTES eg. 1 hour 38 minutes
AUTO COOKING TIMER
There are two Auto Cooking programmes for the main oven, that can be selected using the display:
(a) To set the main oven to switch ON immediately and OFF automatically after a time of your choice.
(b) To set the main oven to switch ON and OFF automatically, at the times of your choice.
(a) To set the main oven to switch ON immediately and OFF automatically:
This allows you to cook for a specified duration, after which the oven will automatically switch off.
To adjust the duration of the cooking cycle press the Set timer button once. Adjust the presentTo adjust the duration of the cooking cycle press the Set timer button once. Adjust the present
To adjust the duration of the cooking cycle press the Set timer button once. Adjust the present
time by rotating the Set Temperature/Time knob to the required time. Once the desired durationtime by rotating the Set Temperature/Time knob to the required time. Once the desired duration
time by rotating the Set Temperature/Time knob to the required time. Once the desired duration
of time is displayed press the Set Time button once to activate the programme.of time is displayed press the Set Time button once to activate the programme.
of time is displayed press the Set Time button once to activate the programme.
-
+
Main Oven
Light
Time/Mod
e
STEP 1. Check that the correct time of day is set, if not follow instructions for setting the time of day.
STEP 2. Place food to be cooked on shelf in the oven.
STEP 3. Switch the main oven control to the desired mode. The display will automatically suggest a cooking
temperature. This can be changed by turning the +/- control knob. (The oven will start).
STEP 4. Press the Time/Mode button, until the 'cooking duration' symbol is flashing.
STEP 5. Turn the +/- control knob to set the cooking duration you require. After a few seconds the 'cooking
duration' symbol will stop flashing and the display will show the temperature that has been set.
This will change every few seconds when the display will show the cooking duration remaining.
  • Page 1 1
  • Page 2 2
  • Page 3 3
  • Page 4 4
  • Page 5 5
  • Page 6 6
  • Page 7 7
  • Page 8 8
  • Page 9 9
  • Page 10 10
  • Page 11 11
  • Page 12 12
  • Page 13 13
  • Page 14 14
  • Page 15 15
  • Page 16 16
  • Page 17 17
  • Page 18 18
  • Page 19 19
  • Page 20 20
  • Page 21 21
  • Page 22 22
  • Page 23 23
  • Page 24 24
  • Page 25 25
  • Page 26 26
  • Page 27 27
  • Page 28 28
  • Page 29 29
  • Page 30 30
  • Page 31 31
  • Page 32 32
  • Page 33 33
  • Page 34 34
  • Page 35 35
  • Page 36 36
  • Page 37 37
  • Page 38 38
  • Page 39 39
  • Page 40 40

Whirlpool CH60DTXF User manual

Category
Barbecues & grills
Type
User manual
This manual is also suitable for

Ask a question and I''ll find the answer in the document

Finding information in a document is now easier with AI