Page is loading ...

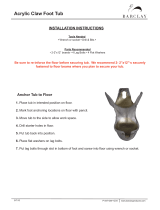
105205-2-AA (-)
Copyright 1997 Kohler Co.
INDUSTRIAL EXPOSED SHOWERS
BEFORE YOU BEGIN
NOTES
Shut off the main water supply.
Observe all local plumbing codes.
Assemble body, riser, loop, and showerhead for
the model selected, before installing.
Kohler Co. reserves the right to make revisions
without notice in the design of faucets, as specified
in the Price Book.
REQUIRED TOOLS AND MATERIALS
Adjustable or open end wrench
Strap wrench
Assorted screwdrivers
Thread sealant
ROUGHING-IN DIMENSIONS
2”
9”
6-1/2”
24-3/4”
1/2”
HOT
1/2”
COLD
3”3”
3-1/4”
48” TO
FLOOR
(TYPICAL)
1/2”
N.P.T.
2”
9”
6-1/2”
24-3/4”
1/2”
HOT
1/2”
COLD
3” 3”
48” TO
FLOOR
(TYPICAL)
3”3”
2”
9”
6-1/4”
24”
1/2”
COLD
48” TO
FLOOR
(TYPICAL)
1/2”
HOT
K-7252
K-7258
K-7254

2
105205-2-AA (-)
Kohler Co., Kohler, WI
SHOWER INSTALLATION
K-7252 with bottom wall supplies.
Install or relocate supplies as necessary to conform to
roughing-in dimensions. Use thread sealant where
applicable.
Slide loop onto riser and thread on showerhead. Thread
riser into body, aligning showerhead toward the front.
Insert union joint through nut and thread onto ell. Thread
nipple into the ell and slide on escutcheon. Thread nipples
into hot and cold supplies in wall, aligning ells in an upward
position.
Slide flange onto loop and install body onto union joints,
tightening nuts securely. Move loop and flange to top of the
vertical riser, and attach flange to wall with screws.
Tighten screw on flange, loop, and escutcheon to complete
assembly.
Turn water supplies on and run water to check for leaks at
all connections.
Loop
Showerhead
Screw
Riser
Screw
Screw
Screw
Escutcheon
Nipple
Ell
Body
Union Joint
Flange
Nut
Hot Supply
Cold Supply
K-7254 with top or bottom supplies. (bottom shown)
Install or relocate supplies as necessary to conform to
roughing-in dimensions. Use thread sealant where
applicable.
Slide loop onto riser and thread on showerhead. Thread
riser into body, aligning showerhead toward the front.
Thread nipple into body and bottom flange onto nipple.
Insert union joint through nut and thread onto hot and cold
supplies.
Slide top flange onto loop and install body onto union joints,
tightening nuts securely. Adjust bottom flange as necessary
and attach to wall with screws. Move loop and top flange to
top of the vertical riser, and attach top flange to wall with
screws.
Tighten screw on top flange, and loop to complete assembly.
Turn water supplies on and run water to check for leaks at
all connections.
Loop
Showerhead
Screw
Riser
Screw
Screw
Screw
Body
Union Joint
Top Flange
Nut
Hot Supply
Cold Supply
Bottom Flange
Nipple
K-7258 with top or bottom supplies. (top shown)
Install or relocate supplies as necessary to conform to
roughing-in dimensions. Use thread sealant where
applicable.
Slide ring onto riser and thread on showerhead. Thread riser
into body, aligning showerhead toward the front. Thread
nipple into body and bottom flange onto nipple.
Insert union joint through nut and thread onto hot and cold
supplies.
Slide top flange onto ring and install body onto union joints,
tightening nuts securely. Adjust bottom flange as necessary
and attach to wall with screws. Move ring and top flange to
top of the vertical riser, and attach top flange to wall with
screws.
Turn water supplies on and run water to check for leaks at
all connections.
Ring
Showerhead
Riser
Screw
Screw
Body
Union Joint
Top Flange
Nut
Hot Supply
Cold Supply
Bottom
Flange
Nipple
/