Kodak R7 User manual

Category
Film cameras
Type
User manual
Not For Resale
Free Download at
http://homepage.ntl
world.com/joechan/
manuals
User Manual
LEICA R7
Not For Resale
Free Download at
http://homepage.ntl
world.com/joechan/
manuals
II
We wish you a great deal of pleasure
and many years of successful photography
with your new LEICA R7.
To enable you to fully enjoy and take advantage
of the wide range of possibilities offered by this
high-quality, precision camera, we recommend
that you first read this manual carefully.
This user manual was printed on paper bleached
without chlorine - a process which protects our
natural water resources and the environment.
Leica Akademie.
Leica not only develops and manufactures high-
performance products for photography,
projection, observation and photographic
reproduction - an additional service available to
you is the Leica Akademie. For many years, this
internationally famous school has been teaching
photographic know-how in application-oriented
seminars and training courses. It meets the needs
of photo enthusiasts, both beginners and
advanced students, for special training in
demanding areas of 35mm photography,
projection, and enlargement.
Up-to-date, well-equipped classrooms at our
Solms headquarters are available for courses,
which are held by experienced instructors, with
syllabuses ranging from general photography to
specialized fields of interest. They provide a
wealth of practical suggestions, help, and advice.
Further information and details of seminars are
available from:
Leica Camera GmbH, Leica Akademie
Oskar-Barnack-Strasse 11,
D-35606 Solms, Germany
Telephone +49 (06442) 208-421
Not For Resale
Free Download at
http://homepage.ntl
world.com/joechan/
manuals
III
Brief description
1 Window for display and
illumination of aperture scale
2 Self-timer LED
3 Coaxial flash-cable contact
4 Eyelet for carrying strap
5 Depth of field lever
6 Bayonet lock
7 Electronic self-timer
8 Connection for independent mirror
release
9 Switch for aperture scale illumination
10 Focusing ring
11 Depth of field scale
12 Red dot for alignment of
interchangeable lenses
13 Aperture setting ring
14 Release button for override lock
15 Window for override setting display
16 Override setting lever
17 Hinged rewind crank
18 Film speed setting ring
19 ISO film speed control window
20 Release button for setting film speed
21 LED (light diode)
22 Accessory shoe with central hot-shoe
and control contacts
Not For Resale
Free Download at
http://homepage.ntl
world.com/joechan/
manuals
1
Contents Page
Brief description III, VI
Attaching the carrying strap 2
Changing the lens 3
Inserting the batteries 4
Compatible batteries 4
Automatic battery check 5
Exposure release without batteries 5
Quick-wind lever 5
Inserting the film 6
Automatic DX-code film speed setting 8
Manually setting film speed 9
Rewinding and removing the film 9
Exposure metering modes 10
Full-field integral metering 11
Selective metering 11
Working diagram of exposure meter 12
Switching on the exposure meter 14
Using the exposure meter at full aperture 14
Using the exposure meter at working aperture 15
Low-light warning 15
Manual override control 16
Shutter speed setting dial 17
Viewfinder image 18
Mode selection 20
Manual setting of shutter speed, selective mode
m 21
Aperture priority,
full-field integral metering
A
22
Aperture priority, selective metering A 24
Exposure metering memory 24
Aperture priority,
full-field integral metering T 26
Automatic program mode,
full-field integral metering
P
28
Program functioning in different shutter speed
Settings 29
Characteristics, tendencies and application of the
variable automatic program mode 32
Supplementary light for aperture scale 33
Eyepiece adjustment 33
Focusing with the universal focusing screen 34
Eyepiece shutter 35
Using flash equipment 36
TTL flash-exposure control in manual mode m 37
TTL flash-exposure control in aperture
priority mode
A , A 38
TTL fill-in flash control in shutter
priority mode T 38
Variable TTL flash-exposure control in automatic
program mode
P 39
Overview of flash exposure programs 40
Flash readiness display 41
Flash control display 41
Self timer 42
Independent mirror release 42
Multiple exposures 44
Depth of field lever 45
Depth of field scale on lens 45
Holding the camera 46
Using filters 47
Using existing LEICA Lenses and accessories 47
LEICA M-Lenses on the LEICA R7 48
Tips on care 48
Accessories 49
Camera spare parts 54
Enlarger, Projectors 54
Customer Service 55
Technical Data 57
Reference index VII
Not For Resale
Free Download at
http://homepage.ntl
world.com/joechan/
manuals
2
1
2
Attaching the carrying
strap
3
4
Not For Resale
Free Download at
http://homepage.ntl
manuals
3
Changing the lens
To avoid damage to your LEICA R7, do not
attempt to fit any lens that does not have a
control cam for a LEICA R Camera (see page
47).
To insert a LEICA R-Lens regardless of the
focus and aperture settings, proceed as follows:
Hold the lens by the fixed ring [11
]
. Position the
red dot
[
12
]
on the lens mount opposite the dot
on the bayonet lock
[
6
]
on the camera body.
Insert the lens in this position. A slight clockwise
turn locks the lens into position audibly.
Removing the lens:
Hold the lens by the fixed ring [11]. Press in the
bayonet lock [6] on the camera body. Turn the
lens anticlockwise and remove.
Always change lenses in the shade or in your
body's shadow.
Not For Resale
Free Download at
http://homepage.ntl
manuals
4
Inserting the batteries
The exposure meter and shutter release of the
LEICA R7 require a 6V power supply, either
four silver oxide button cells (1.5V) or two
lithium cells (3V).
Open the battery compartment cap [37] by
pressing the locking button [36] and push the cap
in the direction of the camera front. Use a clean
cloth to wipe off any oxidization on the surface
of the battery cells and insert the batteries in the
battery cap; position them as marked by symbols
in the battery cap. Close battery compartment
cap and push it toward the camera back until it
clicks shut.
Notes on battery care and use:
Store battery cells in a cool, dry place. Keep
away from children. Never use old and new
battery cells together. Do not mix battery cells of
different makes. These battery cells are not
rechargeable.
Batteries contain toxic and environmentally
damaging substances. Do not discard used
battery cells, but return them to your camera
dealer for recycling or dispose of them at special
waste collection points.
Compatible batteries
Silver oxide button cells suitable for the LEICA
R7 (valid Spring 1992):
Duracell D 357 (10 L 14)
EverReady EPX 76
Kodak KS76
Maxell SR44
National SR44
Panasonic SR44
Philips 357
Ray-o-vac 357
Sony SR44
Ucar EPX 76
Varta V 76 PX
Not For Resale
Free Download at
http://homepage.ntl
manuals
5
Lithium cells
(valid Spring 1992):
Duracell DL J N
Kodak K 58 L
Philips CR J N
Ucar 2 L 76
Varta CR J N
Automatic Battery Check
If battery power is low, the symbol "BC" lights
up in the lower right corner of the viewfinder.
This indicates sufficient power for the camera to
operate, but the batteries should be replaced as
soon as possible. If battery power is too low for
camera functioning, the exposure release is
blocked and all displays, except the "BC" symbol
extinguish. If the battery is completely flat, the
"BC" symbol no longer lights up.
Shutter release without batteries
You can still use the camera when the battery
cells are flat or have been removed. To do so, set
the shutter speed to "B" or "100
".
Quick-wind lever
The quick-wind lever
[27]
winds the film, cocks
the shutter, and turns the frame counter
[28]
.
When hinged out in the stand-by position, there
is room to slide your thumb behind it and firmly
support the camera. After each exposure, the film
should be advanced immediately to the next
frame to ensure instant readiness for the next
photograph.
Not For Resale
Free Download at
http://homepage.ntl
manuals
6
Inserting the film
Pull up the rewind crank [17] and knob past the
spring resistance to release and open the camera
back. The frame counter resets to “S” (start).
Not For Resale
Free Download at
http://homepage.ntl
manuals
7
Incorrect Correct
Pick up the film cartridge as shown above, with
the emulsion side facing up. Slide the end of the
film obliquely from above into one of the slots of
the take-up spool, making sure that the film is
gripped by at least one of the retaining clips and
projects under the next clip.
Pull up the rewind crank as far as it will go and
insert the film cartridge in the empty cartridge
chamber, then push in the rewind crank. The
edge of the film must be parallel with the film
guide. As you move the quick-wind lever, the
sprockets of the transport drum must engage in
the edge perforations of the film.
Use the quick-wind lever to wind the film one
frame forward, to ensure that it lies tensioned in
the film guide and that the mouth of the cartridge
does not project too far. You may occasionally
wish to take out a partly exposed film and later
insert it again.
Not For Resale
Free Download at
http://homepage.ntl
manuals
8
To ensure that the film is always inserted under
the same conditions, use the quick-wind lever to
cock the shutter, then release the shutter before
you insert the film.
Snap shut the camera back to close the camera.
Release the shutter. Wind the film one frame
forward, release the shutter again, then wind on
one more frame. The camera is now ready for
use. The frame counter
[28]
stands at "1". It
counts up to "36".
Important: Bright light may enter through the
mouth of the cartridge and damage your film.
Always insert film in your body's shadow;
never in bright light.
Normally, the film speed setting ring
[18]
can be
left in the "DX" position, other film speeds can
be manually set (see following section). The
camera is now ready for exposure.
Automatic DX-Setting
If DX-coded films are used, push the locking
button
[20]
to switch the setting ring
[18]
to the
"DX" position, as displayed in the window. It
appears at the end of the ASA scale, i.e. next to
the ASA setting "12800". "Reading" and setting
the film speed occurs automatically for all speeds
from ISO 25/15° to ISO 5000/38°.
If, in this setting, a non DX-coded film is
inserted, or if there is no film in the camera at all,
the symbol "ASA" blinks in the viewfinder
display. The outer LED [21] also blinks.
Not For Resale
Free Download at
http://homepage.ntl
manuals
9
If exposure is nevertheless released, the selected
aperture and shutter speed settings are activated,
regardless of the camera mode chosen.
In the case of discrepancy between the manually
set film speed and the DX-code, the manually set
value becomes operative. The warning symbol
lights up at right in the viewfinder display.
Setting the film speed manually
To set the film speed in ISO units, press the
release button
[20]
and turn the setting ring
[18]
at the same time until the window
[19]
displays
the required film speed in ASA.
The setting range covers all values from ISO 6/9°
to ISO 12800/42° inclusive.
(However, only the ASA-value is displayed,
i.e. "6" to "12800")
Rewinding and removing the exposed film
Exposure of the last frame blocks the action of
the quick-wind lever. Rewind the film into its
cartridge before removing it from the camera.
Press the rewind release button
[39]
in the
camera's baseplate, hinge out the rewind crank
[17]
and turn it clockwise in the direction
indicated by the arrow until you feel a slight
resistance as the film is pulled out of the take-up
spool. Pull up the rewind crank and knob to open
the camera back, and remove the cartridge with
the exposed film.
Not For Resale
Free Download at
http://homepage.ntl
manuals
10
Full-field integral metering
Exposure metering modes
The LEICA R7 has an exposure-meter system
that provides two alternative metering modes:
Full-field integral metering
Selective metering
The exposure metering modes are linked to the
camera mode chosen, i.e. they form independent
programs.
Selective metering
The exposure meter measures the light that
passes through the lens (TTL exposure metering
system). It uses a silicon photodiode, placed in
the base of the camera to protect it from stray
light. When you use any LEICA R-Lens with an
automatic spring-back diaphragm, the exposure
meter works at full aperture. The symbol
displayed in the window
[23]
next to the mode
selector
[26]
and at the lower left of the
viewfinder indicates the program (mode)
selected.
Not For Resale
Free Download at
http://homepage.ntl
manuals
11
Full-field integral mode
Most photographic subjects contain details
of varied brightness. The light reflected by
this type of subject has a mean grey value of
18%, i.e. it is the same as that of a standard
grey area that reflects 18% of the light it
receives. This is the calibration value for all
exposure meters.
The full-field integral mode is suitable for all
subjects in normal light, with no extremes of
light or color, and where the light and dark
areas are fairly evenly distributed over the
entire visual field. For this type of subject,
choose one of the programs that use the
full-field integral mode
A
,
T
or
P
.
Selective mode
This is the method of choice with high-
contrast subjects that have a wide bright-
ness range and correct exposure of a
certain detail is particularly important.
The large central circle in the viewfinder
indicates the field covered in this mode, in
which the exposure meter measures only
the light reflected by the exact area of the
subject that you want determine the expo-
sure. The field is the same size on all focu-
sing screens and for all lenses, whatever
their focal length, and is clearly marked in
the viewfinder. For selective mode, choose
programs
A
and
m
.
Not For Resale
Free Download at
http://homepage.ntl
manuals
12
Working diagram of the exposure meter
The diagram shows the relationship
between film speed Sv (speed value) and
brightness Bv (brightness value) on the one
hand, and between shutter speed Tv (time
value) and aperture Av (aperture value) on
the other, together with the resulting
exposure value Ev. The diagram is in two
parts connected by diagonal lines that
represent the exposure values Ev. A typical
example, marked in red, shows how these
values correlate. Assuming a film speed of
ISO 400/27°, follow the vertical line to the
point where it intersects with the horizontal
line for brightness, in this case 0.5 cd/m
2
,
typical for night-time photography.
A diagonal which passes through this point
of intersection leads to the relevant
exposure value, in this case Ev 4. Various
combinations of aperture and shutter speed
can produce this value, i.e. transfer to the
camera's working range.
For correct exposure, the points of inter-
section of the vertical Av and the horizontal
Tv lines must always lie exactly on a
diagonal Ev line. In the example, three such
combinations are shown: A = stop 2 at ¼s;
B = stop 8 at 4s; and C = stop 16 at 15s.
Each corresponds to the correct exposure
value.
In the modes shutter priority and aperture
priority, one of these values is preset, the
corresponding value is set automatically; in
automatic program mode, the camera auto-
matically sets both.
Not For Resale
Free Download at
http://homepage.ntl
manuals
13
Not For Resale
Free Download at
http://homepage.ntl
manuals
14
Switching on the exposure meter
Turn the shutter speed setting dial to any value
between 1/2000 s and 4 s. Press lightly on the
shutter-release button [25] as far as the first
pressure point or press the locking button on the
selector switch [29]. When the LEICA R7's
exposure meter is switched on, the LED display
in the viewfinder lights up. If the shutter is
cocked when you release the button you have
used to activate the system, the LEDs continue to
light for about 12s. If the shutter is not cocked,
they extinguish at once.
Exposure metering at full aperture
Most LEICA R-Lenses feature an automatic
spring-back diaphragm. This means that, when
you take an exposure meter reading, a spring
opens the diaphragm to full aperture regardless
of the preset stop and then closes it again to the
required aperture setting for the exposure. When
using the following lenses, exposure metering
takes place at working aperture:
PC-SUPER-ANGULON-R
f/2,8/28 mm,
PA-CURTAGON-R
f/4/35 mm,
TELYT-R f/6,8/400 mm,
TELYT-R f/6,8/560 mm und
TELYT-S f/6,3/800 mm
Not For Resale
Free Download at
http://homepage.ntl
manuals
15
Exposure metering at working aperture
Some lenses and accessories do not have an
automatic spring back diaphragm or lack the
linkage mechanism for it. In these cases, you
have to obtain the exposure-meter reading at
working aperture, stopping up or down to adjust
the amount of light reaching the exposure meter's
photocell.
With lenses and accessories not equipped with
automatic springback diaphragm, the modes
A ,
A and m can be used.
Low-light warning
The given measuring range of the LEICA R7 has
a linear characteristic. If the light intensity level
is below the minimum requirement, this
characteristic is no longer guaranteed due to the
insufficient photocell current. This can lead to
incorrect measurements.
Not For Resale
Free Download at
http://homepage.ntl
manuals
16
Manual override control
(exposure correction)
Exposure meters are calibrated to a standard grey
(18% reflection) value for an average
photographic subject. If the subject does not
conform to this standard, manual override
correction of the exposure-meter reading
becomes necessary.
Manual override is more often necessary with
full-field integral exposure metering. In selective
mode, the more limited metering field makes it
possible to measure a representative detail with
an average grey value, thus ensuring accurate
measurement.
Example for "plus" (+) override correction
For a very brightly lit subject, such as snow,
sand, or water, the high reflectivity causes the
exposure meter to indicate too short an exposure.
The snow itself is likely to appear grey, people
much too dark: underexposure. To correct this,
the time of exposure must be increased, i.e. set
the override control to +2.
Example for "minus" (-) override correction
For a very dark subject that reflects only a small
amount of light, the exposure meter indicates too
long an exposure. A black car appears grey:
overexposure. The exposure time must be
reduced i.e. set the override control to -1.
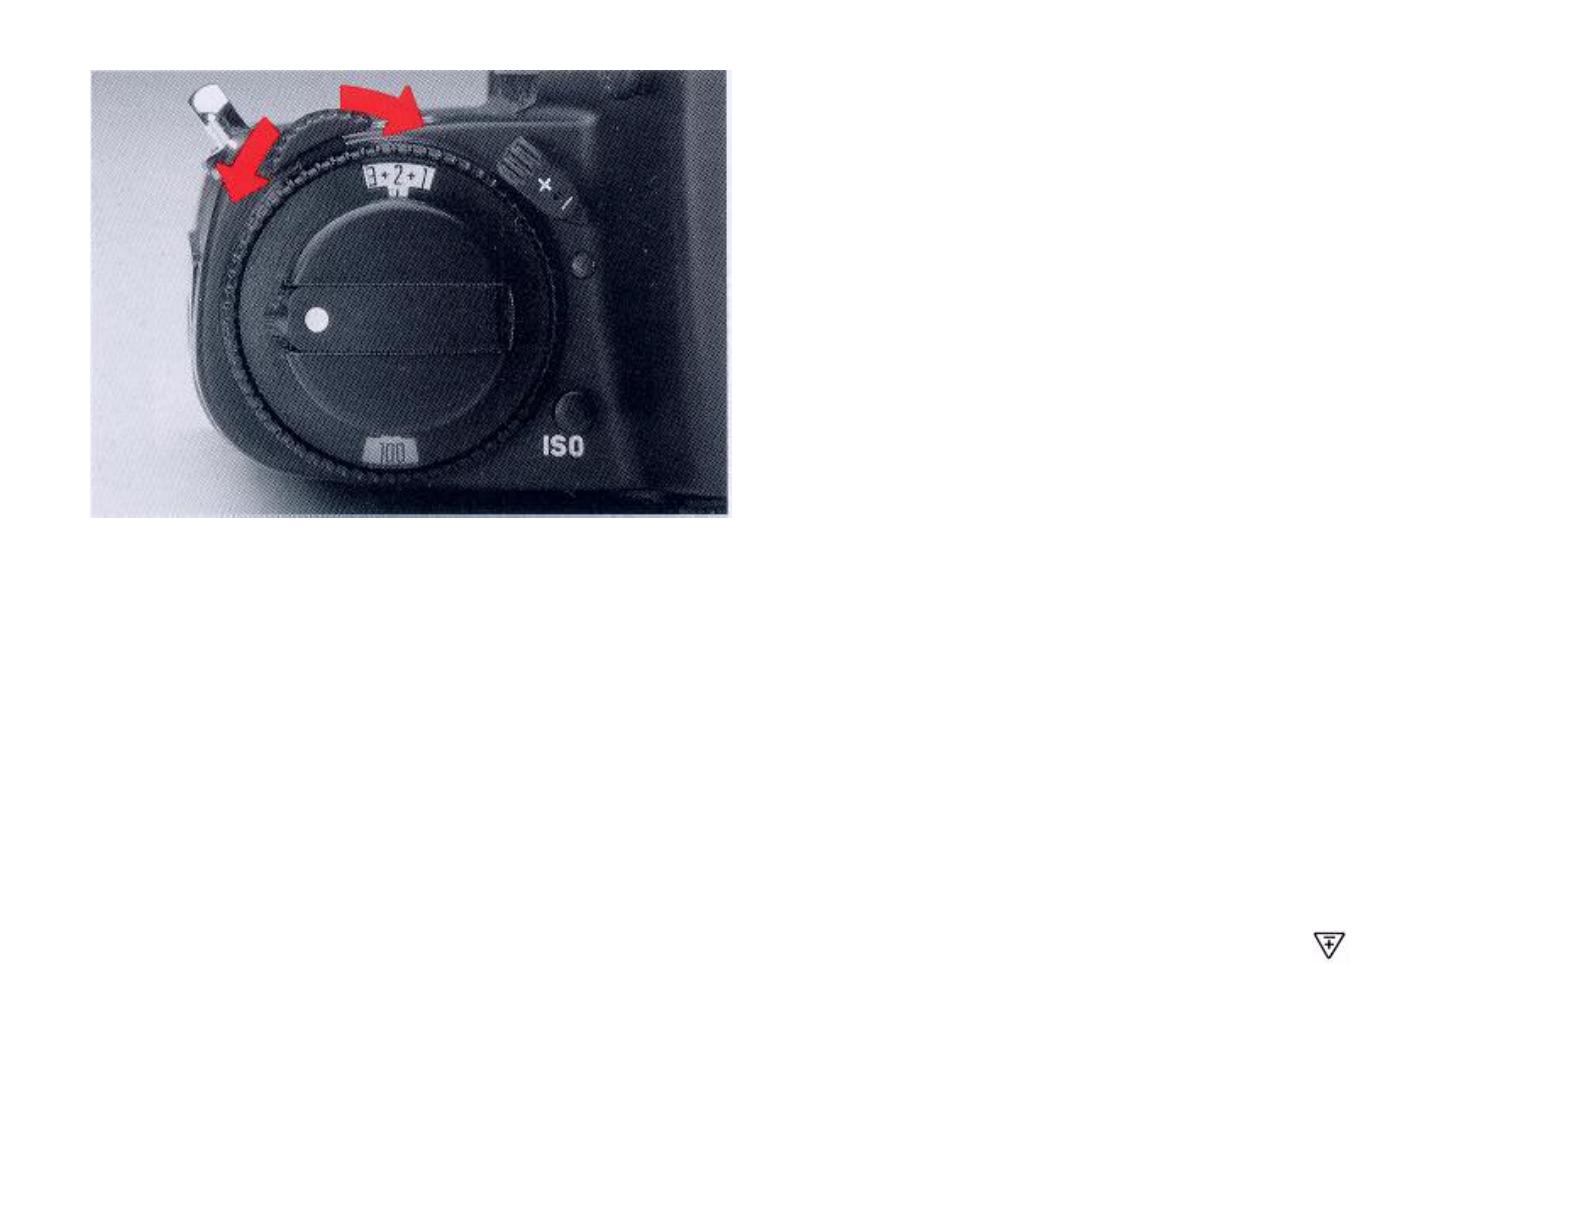
To set the override control, press the locking
button
[14]
and turn the setting scale
[15]
to the
required value by lever
[16]
. To lock the button
[14]
, press it in and turn it anticlockwise. When
the override control is at 0, the lever
[16]
fits
snugly into the camera body. The override
control can be set in steps of one-half of an
exposure value, from Ev +3 to Ev -3. When
override is active, the symbol
flashes at
bottom left in the viewfinder.
Not For Resale
Free Download at
http://homepage.ntl
manuals
17
Shutter speed setting dial
The shutter speed setting dial should be set to
"OFF" when the camera is not in use. In this
setting, the exposure meter is switched off and
the electronic shutter release blocked, preventing
unnecessary battery drain.
In the program modes
T and m the shutter
speed between 1/2000 s and 4s must be set
manually by turning the setting dial
[26]
. Half
values can also be set.
In the
P program mode, the shutter speed setting
influences the tendency of the automatic program
mode.
In program modes
A and A , the shutter speed
setting dial can be engaged at any value except
"B" or "100 ". The shutter speed is
automatically computed to values between
1/2000 s and 16s.
When using non-system flash units, the shutter
speed must be set to "100
". In the "B" setting,
the shutter remains open for a long as the
exposure release button is pressed down. The
symbol "bulb" is displayed in the viewfinder.
In "B" and "100
", the shutter can be released
without battery power. In these settings, no
exposure metering occurs (except TTL-flash
exposure metering), even if batteries have been
inserted.
  • Page 1 1
  • Page 2 2
  • Page 3 3
  • Page 4 4
  • Page 5 5
  • Page 6 6
  • Page 7 7
  • Page 8 8
  • Page 9 9
  • Page 10 10
  • Page 11 11
  • Page 12 12
  • Page 13 13
  • Page 14 14
  • Page 15 15
  • Page 16 16
  • Page 17 17
  • Page 18 18
  • Page 19 19
  • Page 20 20
  • Page 21 21
  • Page 22 22
  • Page 23 23
  • Page 24 24
  • Page 25 25
  • Page 26 26
  • Page 27 27
  • Page 28 28
  • Page 29 29
  • Page 30 30
  • Page 31 31
  • Page 32 32
  • Page 33 33
  • Page 34 34
  • Page 35 35
  • Page 36 36
  • Page 37 37
  • Page 38 38
  • Page 39 39
  • Page 40 40
  • Page 41 41
  • Page 42 42
  • Page 43 43
  • Page 44 44
  • Page 45 45
  • Page 46 46
  • Page 47 47
  • Page 48 48
  • Page 49 49
  • Page 50 50
  • Page 51 51
  • Page 52 52
  • Page 53 53
  • Page 54 54
  • Page 55 55
  • Page 56 56
  • Page 57 57
  • Page 58 58
  • Page 59 59
  • Page 60 60
  • Page 61 61
  • Page 62 62
  • Page 63 63
  • Page 64 64
  • Page 65 65
  • Page 66 66

Kodak R7 User manual

Category
Film cameras
Type
User manual

Ask a question and I''ll find the answer in the document

Finding information in a document is now easier with AI