HP P-650 Operating instructions

Category
Bridge cameras
Type
Operating instructions

This manual is also suitable for

p650
Digital Camera
Appareil photo numérique
Cámara digital
Câmera digital
Quick Start Guide
Guide de démarrage rapide
Guía rápida
Guia rápido de instruções
For the full version of the p650 product user manual go to: www.hp.com/support
Pour la version complète du manuel d’utilisateur du modèle p650, allez sur: www.hp.com/support
Para descargarse la versión completa del manual de instrucciones del modelo p650, puede acceder al siguiente enlace: www.hp.com/support
Para a versão completa do manual da p650, visite: www.hp.com/support
1
Camera
NOTE
Note that the battery of a newly purchased camera is not charged. Perform the
steps below to load the battery into the camera and charge it.
Use only the provided  or type of battery and charger that came with your
camera. Using other types of battery or charger may damage the equipment and
invalidate the warranty.
Quick Start Guide
General Guide
ENGLISH
1 2 3 4 5 6 7
89
[ ]
[
SET
]
[ ]
[ ]
[ ]
10
18 17 16 15 14
11 12 13
1 Zoom controller
2 Shutter button
3 Front lamp
4 [ON/OFF] (Power)
5 Flash Cover
6 Flash

7 Strap 
8
Lens
9 Microphone
10 [ ] (REC)

button
11 LED 
12 [
] (Movie) button
13 Strap 
14 [SET] button
15 [ ] (Delete) button
16 [ ] (PLAY) button
17

([ ][ ][ ][ ])
Back
19 Battery/memory card slots
20 Tripod hole
Use this hole when attaching to a tripod.
Front
20
19
Bottom
2
The first time you load a battery into the camera, a screen appears for configuring the
display language, date, and time settings. Failure to set the date and time correctly
will cause the wrong date and time data to be recorded with images.
1. Press [ON/OFF] (Power) to  on the
camera.
2. Use [ ], [ ], [ ], and [ ] to select the
language you want and then press
[SET].
3. Use [ ] and [ ] to select a date format and then press [SET].
4. Set the date and the time.
Use [ ] and [ ] to select the setting you want to
change and then use [ ] and [ ] to change it.
To switch between 12-hour and 24-hour format, press
[ ] (Movie).
5. After setting the date and time, use [ ] and [ ]
to select “Apply” and then press [SET].
Configuring Basic Settings the First Time You Turn On the
Camera
[ ]
[
SET
]
[ ]
[ ]
[ ]
[ON/OFF] (Power)
[ ] (Movie)
3
There are 5 modes can be set by turning the Mode dial, such as Voice REC,
Intelligent Scene, Scene mode, Record Mode, ART mode. Once turning the Mode
dial, it will enter the selected mode immediately even in Playback mode or during
movie recording.For detail operation, please see the following sections.
The table below shows the available settings for Mode dial.
Using the mode dial
Voice REC This mode is used to record audio clips.
Intelligent
Scene
The camera detects the shooting conditions
and automatically switches to the appropriate
scene mode.
Scene mode
Turns the mode dial to enter last used Scene
mode. Press the MENU button to select other
scene mode.
Auto Mode
Turns the mode dial to enter Auto mode. It’s
the simplest way to shoot basic images.
Settings are adjusted automatically.
ART mode
This function applies different art  on the

4
1. In the , press [SET].
This will select one of the Control Panel icons and display its settings.
2. Use [ ] and [ ] to select the setting you want to change.
*!"#$
3. Use [ ] and [ ] to change the setting.
4. If you want to configure another setting, repeat steps 2 and 3.
5. After all of the settings are the way you want, press [SET].
This will apply the settings and return to the mode.
If you selected “MENU”, the REC menu will appear.
If you selected “SCN”, the Scene Mode scene menu will appear.
You can close the Control Panel by pressing (Disable).
Using the Control Panel
Control Panel
Available settings
1
9
5
3
4
7
8
2
6
[SET]
[] [] [] []
1 size/quality*
2 Movie image quality
3Flash
4Self-timer
5Soft Skin
%&'*
7 Silent
8
9 Scene Mode
5
1. Configure the quality setting for the movie.
The length of the  you can record will depend on the quality setting you
select.
2. In the REC mode, point the camera
at the subject and then press
[ ] (Movie).
This will start recording and display
on the monitor screen.
Movie recording includes monaural
audio.
3. Press [ ] (Movie) again to stop
recording.
Movie recording also will stop
automatically if memory becomes full
before you press [ ] (Movie).
1. In the REC mode, press [SET].
2. Use [ ] and [ ] to select the
bottom Control Panel option (SCN)
and then press [SET].
This will display a menu of Scene Mode
scenes.
The initial default selection is
(Auto).
3. Use [ ], [ ], [ ], and [ ] to move
the boundary to the scene you
want to select.
The scene menu has multiple pages.
Use [ ] and [ ] to scroll between menu pages.
You can access information about the currently selected scene.
To return to normal snapshot recording, select Scene 1 (Auto).
To record a movie
To  with Scene Mode
Recording time
Remaining recording time
[ ] (Movie)
Scene number
Scene name
[SET]
[ ] [ ] [ ] [ ]
Currently selected scene
(with boundary)
6
4. Press [SET] to configure the camera with the settings for the currently
selected scene.
This returns to the REC mode.
The settings of the scene you selected remain in effect until you select a
different scene.
To select a different Scene Mode scene, repeat the above procedure from
step 1.
5. Press the shutter button (if you are ) or
(Movie) (if you are ).
7
Example REC Menu Screen Operation
1. In the REC mode, press [SET].
2. Use [ ] and [ ] to select the second Control Panel
option from the bottom (MENU) and then press
[SET].
This will display the REC menu screen.
3. Use [ ] and [ ] to select the tab where the menu
item you want to configure is located.
4. Use [ ] and [ ] to select the menu item you
want, and then press [ ].
5. Use [ ] and [ ] to change the setting of the
selected menu item.
6. After the setting is the way you want, press
[SET] to apply the setting and return to the
viewfinder screen.
Pressing [ ] instead of [SET] applies the
selected setting and returns to the menu item
selection.
To configure settings on another tab after
pressing [ ] to return to the menu item selection,
use [ ] or [ ] (Delete) to move the highlighting
up to the tabs, and then use [ ] and [ ] to select
the tab you want.
NOTE
[ ] (Delete) provides a helpful way to navigate around tabs and menus.
Pressing [ ] (Delete) while a tab is selected will display the viewfinder screen.
Pressing [ ] (Delete) while menu item or setting is selected will “back step” in
the following sequence: Settings Menu items Tab.
Using On-screen Menus
[SET]
[ ] [ ] [ ] [ ]
Quality
EV Compensation
White Balance
ISO
Color Mode
REC
SetupQuality
Fine
Normal
Example:
When “ Quality” is
selected on the “Quality”
tab
Tabs
Selected menu item
Settings
8
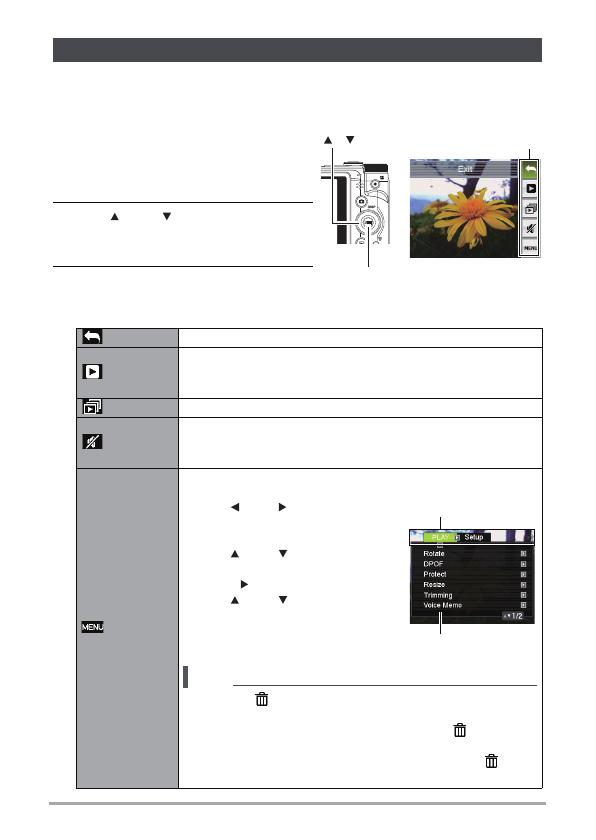
Pressing [SET] in the PLAY mode will display the PLAY Panel.
Example PLAY Panel Operation
1. In the PLAY mode, press [SET].
The PLAY Panel will appear along the
right side of the monitor screen.
2. Use [ ] and [ ] to select the PLAY
Panel item you want, and then
press [SET].
3. The following describes the
operations you can perform for
each of the PLAY Panel items.
Using the PLAY Panel
Exit Exits the PLAY Panel.
Start
The operation that is performed when this item is selected
depends on the type of file that is currently displayed on the
monitor screen.
Slideshow Displays a slideshow menu.
Silent
The Silent mode turns off camera operation sounds so you
can avoid disturbing others around you when playing back
images.
Menu
Displays the PLAY menu. You can perform the following
operations on the PLAY menu.
1
Use [ ] and [ ] to select the tab
where the menu item you want to
configure is located.
2
Use [ ] and [ ] to select the
menu item you want, and then
press [ ].
3
Use [ ] and [ ] to change the
setting of the selected menu
item.
4
Press [SET] to apply the setting.
NOTE
Pressing [ ] (Delete) performs one of the following
operations.
If you previously selected a tab, pressing [ ] (Delete)
returns to the viewfinder screen.
If you previously selected menu item, pressing [ ]
(Delete) returns to the tab.
[SET]
[] []
PLAY Panel
Selected menu item
Tabs
  • Page 1 1
  • Page 2 2
  • Page 3 3
  • Page 4 4
  • Page 5 5
  • Page 6 6
  • Page 7 7
  • Page 8 8
  • Page 9 9

HP P-650 Operating instructions

Category
Bridge cameras
Type
Operating instructions
This manual is also suitable for

Ask a question and I''ll find the answer in the document

Finding information in a document is now easier with AI