Intellinet 524759 Installation guide

Type
Installation guide

This manual is also suitable for

Wireless 300N
PreseNtatioN
Gate Way
quick
iNstall
Guide
MODEL 524759
INT-524759-QIG-0509-01
2
Thank you for purchasing the INTELLINET NETWORK SOLUTIONS
Wireless 300N Presentation Gateway, Model 524759.
This quick install guide presents the rudimentary steps required to set
up and operate this device. For detailed instructions and specications,
refer to the user manual 1) on the CD enclosed with this product; 2) on
the Web site listed below; or 3) in some cases, printed and enclosed
with this product. Contact your INTELLINET NETWORK SOLUTIONS
dealer with comments or questions, or visit www.intellinet-network.com
for information on the latest software and rmware updates, related
products and additional contact information.
Package Contents
• Wireless 300N Presentation Gateway
• Power adapter
• Ethernet Cat5 RJ45 cable: 1.0 m (3 ft.)
• Remote control with CR2302 lithium battery installed
• 2 3-dbi antennas
• 4 footpad stickers
• Quick install guide plus CD with user manual
Some screen images have been modied to t the format of this guide.
NOTE: Refer to the user manual on the enclosed CD for important
safety guidelines and FCC compliance statements.
hardWare iNstallatioN
Before proceeding with the hardware connections, ensure that you have
the items listed above in Package Contents at hand. Also check that the
surface where you intend to place the Wireless 300N Presentation
Gateway is level, stable and capable of supporting the device.
• If you intend to horizontally position and operate the device on a at
surface, adhere the four included footpads to the bottom of the
chassis near each corner (to help prevent scratching a desk, table or
whatever).
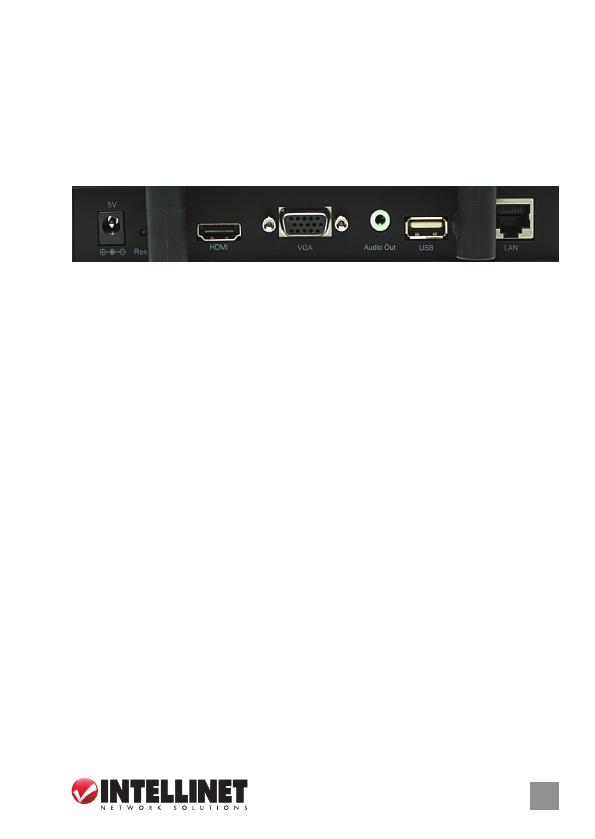
• Connect the included Ethernet cable to the LAN port (1).
• If using an external amplier and/or speakers, connect them to the
Audio Out port (2).
Connect your external video display to either the HDMI or VGA port (3).
NOTE: Only one or the other can be used at a time.
Attach the two antennas (4) and set them upright (perpendicular to the
chassis). NOTE: This is generally best for optimal performance: Adjust
as needed.
• Plug the included power adapter into an A/C outlet, then connect it to
the 5 V jack (5).
• Press the Power button — (6) below — on the front panel of the
Wireless 300N Presentation Gateway and check that the Power LED
— (7) below — is on. (If there is no indication of power, refer to the
Troubleshooting section in the user manual.)
33
Rear panel
1
5
4
4
3
23
4
softWare iNstallatioN
You can proceed with the Wireless 300N Presentation Gateway software
installation once the hardware installation is complete.
1. Press the Power button
(6). The Power LED (7)
should light, and your
external display device
should present a
Loading... screen
introducing the Wireless
300N Presentation
Gateway (also referred
to as a Wireless
Projector Server).
2. The Wireless 300N Presentation Gateway may need a minute or so
to start up. The
subsequent screen
that displays will
feature both the
WLAN (wireless)
and LAN (wired)
IP addresses, as
shown at right in
the lower-left
corner. Note the
Login Code that
appears on your
screen — the one here is just an example — for later use (see Step 9).
4
Front panel
6
7
3. Use your Web browser to connect to the Wireless 300N Presentation
Gateway (WLAN or LAN IP address). NOTE: If using a wireless network,
rst search for the Wireless 300N Presentation Gateway SSID and
connect to it. Enter the WLAN IP address in your browser, and it will
direct you to the next screen.
4. Click “Start” to
download the
software.
5. With the Security Warning screen(s) displayed, click “Run” to continue.
6. When the InstallShield Wizard Welcome screen displays, click “Next
and follow the instructions on the subsequent screens to complete the
software installation. For details, refer to the user manual.
5
7. Should a Software
Installation warning
screen display, click
“Continue Anyway,
regardless of how
many times it may
appear.
8. When the software installation is complete, a new “WPS” icon
will appear on the desktop. Double-click this icon (shown here)
to launch the Wireless 300N Presentation Gateways client software.
NOTE: If you have
personal rewall
software installed,
you may see
message screens
similar to this (right).
Click “Unblock” to
continue.
6
9. The client software will search for the Wireless 300N Presentation
Gateway (here,
projector server)
connected to the
LAN, and the
devices SSID
will be displayed
in the “Projector
SSID” eld. Enter
your username
(something that
others will easily
recognize as you) and the login code displayed on-screen in Step 2.
10. You’re now connected to the Wireless 300N Presentation Gateway
as one of the users. Click “Presentation” and the content of your
computer display
will be transmitted
to the Wireless
300N Presentation
Gateways display.
At this point, you
can also access
the Internet
through the
gateway.
11. If your computer display’s resolution setting is different from that of
the Wireless 300N Presentation Gateway, you’ll be prompted to change
it. Click “Yes” to change your computer’s display resolution to match
(your computer must be able to support the resolution), or click “No”
to keep your
computers display
resolution setting
as it is (unchanged).
7
INTELLINET NETWORK SOLUTIONS
offers a complete line
of active and passive networking products.
Ask your local computer dealer for more information or visit
www.intellinet-network. com.
Copyright © INTELLINET NETWORK
SOLUTIONS
All products mentioned are trademarks or registered trademarks of their respective owners.
  • Page 1 1
  • Page 2 2
  • Page 3 3
  • Page 4 4
  • Page 5 5
  • Page 6 6
  • Page 7 7
  • Page 8 8

Intellinet 524759 Installation guide

Type
Installation guide
This manual is also suitable for

Ask a question and I''ll find the answer in the document

Finding information in a document is now easier with AI