
Page 1
BarcoMed
®
5MP Family
Imaging Boards
Software Installation Guidelines
for Windows Systems
KM570649–04
June 20, 2003

Page 2
NOTICE
Although every attempt has been made to achieve technical accuracy
in this document, we assume no responsibility for errors that may be
found. Our goal is to provide you with the most accurate and usable
documentation possible; if you discover errors, please let us know.
BarcoView and Barco software products are the property of
BarcoView, LLC. They are distributed under copyright by BarcoView,
LLC., for use only under the specific terms of a software license
agreement between BarcoView, LLC and the licensee. No other use,
duplication, or disclosure of a BarcoView, LLC software product, in
any form, is authorized.
The specifications of BarcoView, LLC products are subject to change
without notice.
TRADEMARKS
All Trademarks and registered trademarks are of their respective
companies.
COPYRIGHT
This document is copyrighted. All rights are reserved. This document
may not, in whole or in part, be copied, photocopied, reproduced,
translated or reduced to an electronic medium or machine readable
form without prior written consent from BarcoView, LLC.
FCC CLASS A NOTICE
Note: This equipment has been tested and found to comply with the
limits for a Class A digital device, pursuant to part 15 of the FCC
Rules, when installed in a suitable host. These limits are designed to
provide reasonable protection against harmful interference when the
equipment is operated in a commercial environment. This equipment
generates, uses, and can radiate radio frequency energy. If not
installed and used in accordance with the instruction manual, it may
cause harmful interference in which case the user will be required to
correct the interference at his own expense.
© 2003 BarcoView, LLC — MIS. All rights reserved.

Page 3
CONTENTS
Product Overviews ................................................................................ 7
BarcoMed 5MP2 AURA Overview .................................................................7
Features of the BarcoMed 5MP2 AURA ................................................7
Minimum System Requirements ............................................................7
Supported Resolutions — Standard Model............................................7
Supported Resolutions — 76 Hz Model ................................................8
System Configuration Guidelines ...........................................................8
BarcoMed 5MP2 Overview ............................................................................9
Features of the BarcoMed 5MP2 ...........................................................9
Minimum System Requirements ............................................................9
Supported Resolutions ...........................................................................9
System Configuration Guidelines ...........................................................9
BarcoMed 5MP1HM Product Overview .......................................................11
Features of the BarcoMed 5MP1HM ....................................................11
Minimum System Requirements ..........................................................11
Supported Resolutions .........................................................................11
System Configuration Guidelines .........................................................11
BarcoMed 5MP1H Overview .......................................................................13
Features of the BarcoMed 5MP1H.......................................................13
Minimum System Requirements ..........................................................13
Supported Resolutions .........................................................................13
System Configuration Guidelines .........................................................14
Software Installation ........................................................................... 15
Overview......................................................................................................15
Software ...............................................................................................15
BarcoMed Software Installation Wizard ...............................................15
System Preparation .....................................................................................16
VGA Support................................................................................................16
Installing the BarcoMed 5MP2 AURA, 5MP2, 5MP1HM or 5MP1H
Windows NT 4.0 Software.............................................................17
Using the BarcoMed Product Installation Wizard.................................17
Driver Installation..................................................................................19
BARCO DPMS Screen Saver Installation ...........................................21
Setting the Resolution of Your High Resolution Display ......................23
Reinstalling the BarcoMed Driver.........................................................26
Planning Your Barcomed Windows 2000 Installation .................................27
Installing the BarcoMed 5MP2 AURA, 5MP2, 5MP1HM or 5MP1H
Windows 2000 Software ...............................................................29
Using the BarcoMed Product Installation Wizard.................................29
Driver Installation..................................................................................31
BARCO DPMS Screen Saver Installation ............................................35

Page 4
Setting the Resolution of Your 5MP2 AURA or 5MP2 with
DualView Disabled, or Your 5MP1HM or 5MP1H ........................38
Setting the Resolution of Your 5MP2 AURA or 5MP2 with
DualView Enabled ........................................................................41
Disabling DualView for the 5MP2 AURA or 5MP2 under
Windows 2000 ..............................................................................43
Re-enabling DualView for the 5MP2 AURA or 5MP2 under
Windows 2000 ..............................................................................44
Reinstalling or Updating your BarcoMed 5MP2 AURA, 5MP2,
5MP1HM or 5MP1H Driver ...........................................................45
Planning Your Barcomed Windows XP Installation.....................................46
Installing the BarcoMed 5MP2 AURA, 5MP2, 5MP1HM or 5MP1H
Windows XP Software...................................................................48
Using the BarcoMed Product Installation Wizard.................................48
Driver Installation..................................................................................49
BARCO DPMS Screen Saver Installation ............................................53
Setting the Resolution of Your 5MP2 AURA or 5MP2 with
DualView enabled, or Your 5MP1HM or 5MP1H..........................56
Setting the Resolution of Your 5MP2 AURA or 5MP2 with
DualView Disabled........................................................................59
Disabling DualView under Windows XP...............................................61
Re-enabling DualView under Windows XP ..........................................62
Reinstalling or Updating your BarcoMed 5MP2 AURA, 5MP2,
5MP1HM or 5MP1H Drivers .........................................................63
BarcoMed Driver Tab .......................................................................... 65
Introduction ..................................................................................................65
Configuring the Windows 2000 or Windows XP desktop ............................67
Status ......................................................................................................67
Graphics Board.....................................................................................67
Driver Version......................................................................................67
Resolution............................................................................................67
Palette Mode................................................................................................67
UserModifiable Color Palette................................................................67
Static Gray Palette including standard system colors ..........................68
Static Gray Palette with NO system colors...........................................68
Drawing Modes............................................................................................69
Enable DirectDraw...............................................................................69
Enable Dithering ..................................................................................70
Monitor Configuration ..................................................................................70
Languages supported..................................................................................70
BarcoMed Hardware Tab..................................................................... 71
Introduction ..................................................................................................71
Using The BarcoMed Hardware Tab ...........................................................73

Page 5
Device...................................................................................................73
PCI Information.....................................................................................74
Firmware Information...........................................................................74
Barco DPMS Screen Saver Overview................................................. 77
Introduction ..................................................................................................77
BARCO DPMS Screen Saver Options ........................................................78
Current Scheme ...................................................................................78
Save As ................................................................................................78
Delete ...................................................................................................78
Work Schedule .....................................................................................78
Begin Work Day....................................................................................78
End Work Day ......................................................................................78
Screen Saver During Work Day ...........................................................79
Available Savers...................................................................................79
Settings.................................................................................................79
DPMS Settings After Work Day............................................................79
Amount of Time in each DPMS State...................................................79
Monitor Settings....................................................................................80
Use As Logon Screen Saver ................................................................80
Getting started with the BARCO DPMS Screen Saver................................80
Using the BARCO DPMS Screen Saver .....................................................81
Installing or Reinstalling BARCO DPMS .....................................................86
Uninstalling BARCO DPMS .........................................................................86

Page 6
(This page intentionally left blank.)

Page 7
PRODUCT OVERVIEWS
BarcoMed 5MP2 AURA Overview
The BarcoMed 5MP2 AURA Imaging Board delivers a quality 2048 x
2560 pixel image with 256 simultaneous shades of gray for medical
imaging applications. The BarcoMed 5MP2 AURA is designed as a
“drop-in” replacement for the BarcoMed 5MP2. It has all the same
functionality of the BarcoMed 5MP2. The BarcoMed 5MP2 AURA is
fully compatible with the BarcoMed 5MP2 and may be installed in
systems which also have a BarcoMed 5MP2 Imaging Board installed.
Features of the BarcoMed 5MP2 AURA
• Up to 2048 x 2560 resolution
• 10 bit input DAC
• 32 MB Video Memory (VRAM)
• Dual Head Configuration
• 256 Simultaneous shades of gray from Palette of 1024
• Hardware cursor
• Full Speed VGA Emulation
• Single slot PCI card
• Display Properties Control Panel to dynamically change display
settings
• Control Panel support for the English ( U.S. ), Dutch, German,
Japanese, Korean, Simplified Chinese and Traditional Chinese
languages
Minimum System Requirements
• Half length PCI slot with no obstructions
• PCI 2.1 Compliant System
• Sufficient power and cooling (see “System Configuration
Guidelines” on the next page).
• NT 4.0 SP4 and above, Windows 2000 SP1 and above, or
Windows XP
Supported Resolutions — Standard Model
• 2048x2560 @ 71 Hz (primary)
• 2048x2688 @ 68 Hz
• 1824x2400 @ 76 Hz

Page 8
Supported Resolutions — 76 Hz Model
• 2048x2560 @ 76 Hz (primary)
System Configuration Guidelines
Because of the low power consumption and low heat generation of
the 5MP2 AURA, multiple boards may be installed in adjacent PCI
slots or adjacent to other PCI boards. Additionally there should be no
need to modify either the PC’s power supply and/or cooling system.

Page 9
BarcoMed 5MP2 Overview
The BarcoMed 5MP2 imaging board delivers a quality 2048 x 2560
pixel image with 256 simultaneous shades of gray for medical imaging
applications.
Features of the BarcoMed 5MP2
• Up to 2048 x 2560 resolution
• 10 bit input DAC
• 16 MB Video Memory (VRAM)
• Dual Head Configuration
• 256 Simultaneous shades of gray from Palette of 1024
• Hardware cursor
• Full Speed VGA Emulation
• Single slot PCI card
• Display Properties Control Panel to dynamically change display
settings
• Control Panel support for the English ( U.S. ), Dutch, German,
Japanese, Korean, Simplified Chinese and Traditional Chinese
languages
Minimum System Requirements
• Full length PCI slot with no obstructions
• PCI 2.1 Compliant System
• Sufficient power and cooling (see “System Configuration
Guidelines.”)
• VGA compatible high resolution displays or a separate VGA card
and display
• NT 4.0 SP4 and above, Windows 2000 SP1 and above, or
Windows XP
Supported Resolutions
• 2048x2560 @ 71 Hz (primary)
• 2048x2688 @ 68 Hz
• 1824x2400 @ 76 Hz
System Configuration Guidelines
With 16 MB of on-board VRAM and ultra-high speed DAC output, the
BarcoMed 5MP2 requires PCs to have a sufficient power supply and

Page 10
proper cooling for optimum performance. In some low-cost systems,
the airflow may not be sufficient to ensure that the BarcoMed 5MP2 or
adjacent PCI boards operate reliably. The following guidelines are
provided to assist system integrators in selecting and configuring a
PC suitable for use with the BarcoMed 5MP2:
a) Ensure that the PC has a minimum power supply of 250W when
installing one or two BarcoMed 5MP2s. Higher power ratings are
recommended for more boards.
b) For configurations that require more than two BarcoMed 5MP2
boards, we strongly recommend the use of an external PCI
expansion chassis or a professional workstation with a large
number of PCI slots (at least twice the number of BarcoMed
boards) and a 300W or larger power supply.
c) Install an extra fan if the only fan in the PC is inside the power
supply. Most PCs have a fitting for a fan at the front of the PCI
card cage. A 30-cfm fan installed here and blowing air over the
PCI boards towards the bulkhead (I/O panel) will provide good
cooling.
d) Ensure that the PC does not have a thermostatically controlled fan
or, if it does, that the thermostatic operation is disabled or
controlled by temperature near the BarcoMed 5MP2. A fan
controlled by the power supply temperature may switch off even
when the PCI board temperature is too high.
e) Ensure that fans are not switched off when the PC enters “sleep,”
“suspend” or other power-saving modes. This may be a BIOS
option in some newer PCs.
f) In multiple board systems, avoid putting the BarcoMed 5MP2 in
adjacent slots. Place them so that there is either an empty slot or
a lower-power board between them.
g) The cooling system of professional-oriented workstations, such as
the IBM 43P or the DEC 500, are typically sufficient for up to 2
BarcoMed 5MP2 boards without an expansion chassis.
Even with the above corrective actions, Barco Medical Imaging
Systems cannot guarantee its products when they are used in an
environment that does not meet their power and cooling needs.

Page 11
BarcoMed 5MP1HM Product Overview
The BarcoMed 5MP1HM Display Controller delivers a quality 2048 x
2560 pixel image with 1024 simultaneous shades of gray for medical
imaging applications. The BarcoMed 5MP1HM includes features
specifically designed to meet the demands of mammography.
Features of the BarcoMed 5MP1HM
• 2048 x 2560 resolution
• 14 bit input and 10 bit output DAC
• 256 MB Memory
• Accelerated image loading and panning
• Single Head Configuration
• 1024 Simultaneous shades of gray
• Hardware cursor
• Full Speed VGA Emulation
• Single slot PCI card
• Display Properties Control Panel to dynamically change display
settings
• Control Panel support for the English (U.S.), Dutch, German,
Japanese, Korean, Simplified Chinese and Traditional Chinese
languages
Minimum System Requirements
• Half length PCI slot with no obstructions
• PCI 2.1 Compliant System
• NT 4.0 SP4 and above, Windows 2000 SP1 and above, or
Windows XP
Supported Resolutions
• 2048x2560 @ 76 Hz (primary)
System Configuration Guidelines
Because of the low power consumption and low heat generation of
the 5MP1HM, multiple boards may be installed in adjacent PCI slots
or adjacent to other PCI boards. Additionally there should be no need
to modify either the PC’s power supply and/or cooling system.

Page 12
(This page intentionally left blank.)

Page 13
BarcoMed 5MP1H Overview
The BarcoMed 5MP1H Graphics Controller delivers a quality 2048 x
2560 pixel image with 1024 simultaneous shades of gray for medical
imaging applications.
Features of the BarcoMed 5MP1H
• Up to 2048 x 2560 resolution
• 12 bit input DAC
• 16 MB Video Memory (VRAM)
• 16 Bits per pixel
• 1024 Simultaneous shades of gray
• All-Range real-time windowing and leveling
• Large Color Lookup Table
• Hardware cursor
• Single slot PCI card
• Control Panel supports the English ( U.S. ), Dutch, German,
Japanese, Korean, Simplified Chinese and Traditional Chinese
languages
• Display properties control panel to dynamically change display
settings
Minimum System Requirements
• Full length PCI slot with no obstructions
• PCI 2.1 Compliant System
• A separate VGA card and display
• Sufficient power and cooling (see “System Configuration
Guidelines” on the next page).
• NT 4.0 SP4 and above, Windows 2000 SP1 and above, or
Windows XP
Supported Resolutions
• 2048x2560 @ 71 Hz (primary)
• 2048x2560 @ 70 Hz
• 2560x2048 @ 72 Hz
• 2048x2688 @ 68 Hz
• 1824x2400 @ 76 Hz

Page 14
System Configuration Guidelines
With 16 MB of on-board VRAM and ultra-high speed DAC output, the
BarcoMed 5MP1H requires PCs to have a sufficient power supply and
proper cooling for optimum performance. In some low-cost systems,
the airflow may not be sufficient to ensure that the BarcoMed 5MP1H
or adjacent PCI boards operate reliably. The following guidelines are
provided to assist system integrators in selecting and configuring a
PC suitable for use with the BarcoMed 5MP1H:
a) Ensure that the PC has a minimum power supply of 250W when
installing one or two BarcoMed 5MP1Hs. Higher power ratings are
recommended for more boards.
b) For configurations that require more than two BarcoMed 5MP1H
boards, we strongly recommend the use of an external PCI
expansion chassis or a professional workstation with a large
number of PCI slots (at least twice the number of BarcoMed
boards) and a 300W or larger power supply.
c) Install an extra fan if the only fan in the PC is inside the power
supply. Most PCs have a fitting for a fan at the front of the PCI
card cage. A 30 cfm fan installed here and blowing air over the
PCI boards towards the bulkhead (I/O panel) will provide good
cooling.
d) Ensure that the PC does not have a thermostatically controlled fan
or, if it does, that the thermostatic operation is disabled or
controlled by temperature near the BarcoMed 5MP1H. A fan
controlled by the power supply temperature may switch off even
when the PCI board temperature is too high.
e) Ensure that fans are not switched off when the PC enters “sleep,”
“suspend” or other power-saving modes. This may be a BIOS
option in some newer PCs.
f) In multiple board systems, avoid putting the BarcoMed 5MP1H in
adjacent slots. Place them so that there is either an empty slot or
a lower-power board between them.
g) The cooling system of professional-oriented workstations, such as
the IBM 43P or the DEC 500, are typically sufficient for up to 2
BarcoMed 5MP1H boards without the need for an expansion
chassis.
Even with the above corrective actions, Barco Medical Imaging
Systems cannot guarantee its products when they are used in an
environment that does not meet their power and cooling needs.

Page 15
SOFTWARE INSTALLATION
Overview
The BarcoMed Software Installation section has been divided into
three sections, one for each of the three supported versions of the
Windows operating system. They are: Windows NT 4.0, Windows
2000 and Windows XP.
Software
In addition to the device driver(s) for your BarcoMed Display
Controller(s), your BarcoMed Software CD also includes several
additional tools. They are: the BarcoMed Driver Tab, the BarcoMed
Hardware Tab, and the BARCO DPMS Screen Saver. The BarcoMed
Driver Tab and the BarcoMed Hardware Tab are automatically
installed with BarcoMed Display Controller driver and become part of
the Windows Display Control Panel. The BARCO DPMS (Display
Power Management Signaling) Screen Saver is an optional tool which
must be installed separately.
The BarcoMed Driver Tab helps you manage the special features of
your BarcoMed Display Controller(s). The BarcoMed Hardware Tab
gathers information about the BarcoMed Display Controller(s) and
your system that is useful when diagnosing problems. The BarcoMed
Hardware Tab can also be used to update the firmware on BarcoMed
Display Controllers that are based on the AURA chipset.
BarcoMed Software Installation Wizard
The BarcoMed Software Installation Wizard is a Graphical User
Interface (GUI) designed to install the BarcoMed Display Controller
Driver, and the BARCO DPMS Screen Saver in a single operation
prior to rebooting. The user may also use the BarcoMed Software
Installation Wizard to reinstall either the BarcoMed Display Controller
Driver(s) and/or modify, repair or remove the BARCO DPMS Screen
Saver from his system. The BarcoMed Display Controller Driver
should be installed prior to installing the BARCO DPMS Screen
Saver.

Page 16
System Preparation
Regardless of what operating system you are using with your
computer, the steps for preparing your system for installation of the
BarcoMed Windows Systems Display Driver is identical.
Prior to installing the BarcoMed Display Controller Driver you MUST:
1. Install the BarcoMed Display Controller(s), if you are using
the VGA capabilities of your BarcoMed controller you must
remove any third party VGA controller(s) from your system
or disable the integrated VGA controller.
2. Connect the high-resolution display(s) to the BarcoMed
Display Controller(s).
3. Turn the high-resolution display(s) on.
Refer to the Hardware Installation section of this manual for
instructions on installing the BarcoMed Display Controller(s) and
connecting them to the high-resolution display(s).
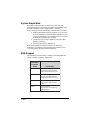
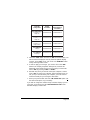
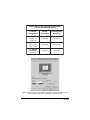
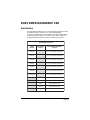
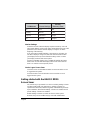
VGA Support
The following chart shows which controllers of the BarcoMed 5MP
Family of Display Controllers support VGA.
deMocraB
rellortnoC
ledoM
yalpsiDAGV
ARUA2PM5enonodeyalpsidsegassemtooB
noituloserhgih,ycneuqerfdexif
.tropyramirpehthguorhtrotinom
2PM5enonodeyalpsidsegassemtooB
noituloserhgih,ycneuqerfdexif
.tropyramirpehthguorhtrotinom
MH1PM5enonodeyalpsidsegassemtooB
noituloserhgih,ycneuqerfdexif
.rotinom
H1PM5 oN ,troppuSAGV
rofderiuqerdracAGVytrapdr3
.noitallatsnirevird

Page 17
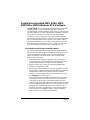
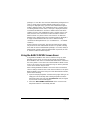
Installing the BarcoMed 5MP2 AURA, 5MP2,
5MP1HM or 5MP1H Windows NT 4.0 Software
SPECIAL NOTE: Prior to installing the BarcoMed drivers and related
software you MUST install the BarcoMed Display Controller(s),
connect the high resolution display(s) to the card(s), and turn the high
resolution display(s) on. Refer to the Hardware Installation section of
this manual for instructions on installing the BarcoMed Display
Controller(s) and connecting them to the high resolution display(s).
The following software installation instructions presume that Windows
NT 4.0 is already installed on your system. If you need to install or
reinstall Windows NT 4.0 on your system you must first remove the
BarcoMed Display Controller(s) and use a 3
rd
party VGA card and
VGA monitor during the Windows NT 4.0 installation process.
Using the BarcoMed Product Installation Wizard
To install your BarcoMed 5MP2 AURA, 5MP2, 5MP1HM or 5MP1H
Windows Display Controller Driver and BARCO DPMS Screen Saver
for the first time follow the steps below. If you are reinstalling the
drivers or installing a new driver release over an existing driver
release, skip step 1 below:
1. Install the BarcoMed Display Controller(s) into your machine.
Please refer to the Hardware Installation Guide that came with
your BarcoMed Display Controller(s) for more information.
2. Boot the machine, log in using an account with administrator
privileges and follow these steps.
3. Insert your BarcoMed Software CD into your computer’s CD drive.
The “BarcoMed Software Product Installation Wizard” should start
automatically. If it doesn’t start within 3 minutes, browse the
contents of your BarcoMed Software CD and double click on the
file, “Setup.exe” to start the wizard.
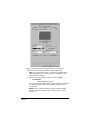
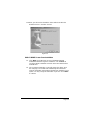
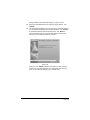
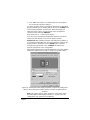
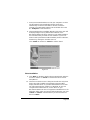
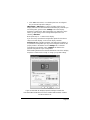
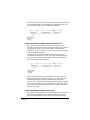
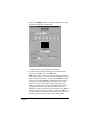
The BarcoMed Product Installation Wizard will start by inspecting
your system to make certain that all of the necessary Windows
components are up to date. If it determines that the Microsoft
Installer is current, the wizard will start by displaying the BarcoMed
Product Installation Wizard’s welcome screen (see figure 2 on the
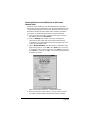
next page). If it determines that the Microsoft Installer is either
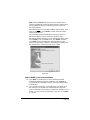
missing or out of date, it will display the screen shown in figure 1
on the next page. Click “OK” to continue, the wizard will then
install a newer version of the Microsoft Installer.

Page 18
Figure 1
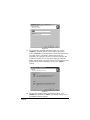
The BarcoMed Product Installation Wizard will advise you when it
has successfully installed the new version of the Microsoft
Installer. Click “OK” to continue.
The BarcoMed Product Installation Wizard may prompt you to
restart your system. If it does, click “Yes” to restart your system.
When your system restarts, log in using an account with
administrator privileges. The BarcoMed Product Installation Wizard
will restart automatically.
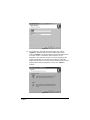
If the wizard doesn’t prompt you to restart your system, it will
continue to the BarcoMed Product Installation Wizard Welcome
Screen (see figure 2).
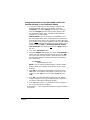
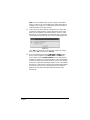
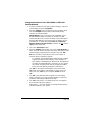
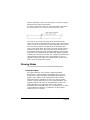
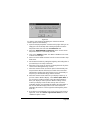
4. By default all the software on the BarcoMed Software CD will be
selected. For the initial installation we recommend that you install
all of the software. If you do not want to install a particular
BarcoMed Software product, deselect it by clearing the checkbox
next to it.
Click “Install” to continue or “Cancel” to exit the wizard.
Figure 2

Page 19
Driver Installation
5. Click “Next” on the Display Driver Wizard’s Welcome Screen to
continue or “Cancel” to exit the Display Driver Wizard and return
to the Software Install Wizard.
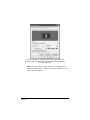
6. The Device Selection Screen lists the devices supported by the
drivers on the CD. Since Windows NT 4.0 supports only one type
of video device at a time, you may choose only one type of device
to install. The following chart lists the names of the BarcoMed
controllers and the driver that should be selected for each driver.
emaNrellortnoC emaNrevirD
ARUA2PM5ARUA2PM5
2PM5ARUA2PM5
MH1PM5MH1PM5
H1PM5H1PM5
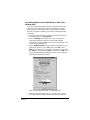
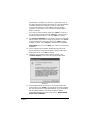
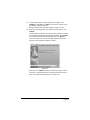
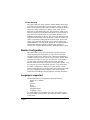
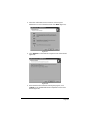
Selected the device driver you want to install and click “Next”. If
you selected a device with an existing driver, the wizard will
compare the existing driver’s version against the version of the
driver you are installing. If the existing driver’s version is newer
than the one you are installing, the Wizard will warn you that the
current driver is newer than the one you installing (figure 3).
Figure 3
Click “OK” to continue. If you don’t want to replace the exiting
driver, click “OK” and then click “Cancel”.
7. The Device Confirmation Screen lists the device driver that will be
installed. If you want to change your selection, click “Back” to
return to the Device Selection Screen. Click “Next” to begin
installing the driver. Click “Cancel” to abort the driver installation.
Special Note: Once you click “Next”, you cannot cancel the driver
installation.
During the BarcoMed driver installation, an install progress window
is displayed.

Page 20
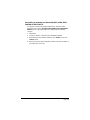
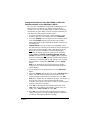
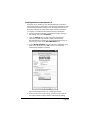
8. When the Wizard tells you that it has successfully installed the
selected driver, click “Finish”. The wizard will now begin installing
the next selected piece of BarcoMed Software. If you are working
with the default selections, this will be the BARCO DPMS
InstallShield Wizard. Please turn to the section, “BARCO DPMS
Screen Saver Installation”.
Note: Clicking “Cancel” will also return you to the BarcoMed
Product Install Wizard, but will not delete the Barco Display Driver.
The wizard will also begin to install the next selected piece of
BarcoMed Software.
If the Wizard
failed to successfully install the selected driver, it will
warn you (figure 4). Click “Finish” to return to the BarcoMed
Product Install Wizard.
The wizard will now begin installing the next selected piece of
BarcoMed Software. Click “Cancel”, then click “Yes” then click
“Finish” and then click “Back” and try reinstalling the driver
following the steps above or using the steps outlined in
“Reinstalling or Updating your BarcoMed Drivers” section found
later in this chapter.
Figure 4
Page is loading ...
Page is loading ...
Page is loading ...
Page is loading ...
Page is loading ...
Page is loading ...
Page is loading ...
Page is loading ...
Page is loading ...
Page is loading ...
Page is loading ...
Page is loading ...
Page is loading ...
Page is loading ...
Page is loading ...
Page is loading ...
Page is loading ...
Page is loading ...
Page is loading ...
Page is loading ...
Page is loading ...
Page is loading ...
Page is loading ...
Page is loading ...
Page is loading ...
Page is loading ...
Page is loading ...
Page is loading ...
Page is loading ...
Page is loading ...
Page is loading ...
Page is loading ...
Page is loading ...
Page is loading ...
Page is loading ...
Page is loading ...
Page is loading ...
Page is loading ...
Page is loading ...
Page is loading ...
Page is loading ...
Page is loading ...
Page is loading ...
Page is loading ...
Page is loading ...
Page is loading ...
Page is loading ...
Page is loading ...
Page is loading ...
Page is loading ...
Page is loading ...
Page is loading ...
Page is loading ...
Page is loading ...
Page is loading ...
Page is loading ...
Page is loading ...
Page is loading ...
Page is loading ...
Page is loading ...
Page is loading ...
Page is loading ...
Page is loading ...
Page is loading ...
Page is loading ...
Page is loading ...
Page is loading ...
Page is loading ...
Page is loading ...
-
 1
1
-
 2
2
-
 3
3
-
 4
4
-
 5
5
-
 6
6
-
 7
7
-
 8
8
-
 9
9
-
 10
10
-
 11
11
-
 12
12
-
 13
13
-
 14
14
-
 15
15
-
 16
16
-
 17
17
-
 18
18
-
 19
19
-
 20
20
-
 21
21
-
 22
22
-
 23
23
-
 24
24
-
 25
25
-
 26
26
-
 27
27
-
 28
28
-
 29
29
-
 30
30
-
 31
31
-
 32
32
-
 33
33
-
 34
34
-
 35
35
-
 36
36
-
 37
37
-
 38
38
-
 39
39
-
 40
40
-
 41
41
-
 42
42
-
 43
43
-
 44
44
-
 45
45
-
 46
46
-
 47
47
-
 48
48
-
 49
49
-
 50
50
-
 51
51
-
 52
52
-
 53
53
-
 54
54
-
 55
55
-
 56
56
-
 57
57
-
 58
58
-
 59
59
-
 60
60
-
 61
61
-
 62
62
-
 63
63
-
 64
64
-
 65
65
-
 66
66
-
 67
67
-
 68
68
-
 69
69
-
 70
70
-
 71
71
-
 72
72
-
 73
73
-
 74
74
-
 75
75
-
 76
76
-
 77
77
-
 78
78
-
 79
79
-
 80
80
-
 81
81
-
 82
82
-
 83
83
-
 84
84
-
 85
85
-
 86
86
-
 87
87
-
 88
88
-
 89
89


Barco Med 5MP2FH PCI User guide
- Type
- User guide
- This manual is also suitable for
Ask a question and I''ll find the answer in the document
Finding information in a document is now easier with AI
Related papers
-
Barco BarcoMed 5MP1HM User guide
-
-
-
Barco Coronis 1MP MFGD-1318 User guide
-
-
Barco Coronis 5MP MDCG-5121 User guide
-
-
Barco NioWatch User manual
-
-


