
V60
C R O S S C O U N T R Y
QUICK GUIDE

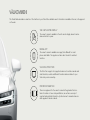
VÄLKOMMEN!
This Quick Guide describes a selection of the functions in your Volvo. More detailed owner's information is available in the car, in the app and
on the web.
THE CAR'S CENTRE DISPLAY
The owner's manual is available in the car's centre display, where it can be
accessed via the top view.
MOBILE APP
The owner's manual is available as an app (Volvo Manual) for smart-
phones and tablets. The app also contains video tutorials for selected
functions.
VOLVO'S SUPPORT SITE
The Volvo Cars support site (support.volvocars.com) contains manuals and
video tutorials, as well as additional information and assistance for your
Volvo and your car ownership.
PRINTED INFORMATION
There is a supplement to the owner's manual in the glovebox that con-
tains information on fuses and specifications, as well as a summary of
important and practical information. A printed owner's manual and associ-
ated supplement can be ordered.

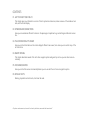
CONTENTS
01. GET TO KNOW YOUR VOLVO
This chapter gives you information on some of Volvo's systems and services, and an overview of the inside and out-
side, and the centre display.
02. INTERIOR AND CONNECTIONS
Here you can read about different functions in the passenger compartment e.g. seat settings and Internet connec-
tion.
03. THE CENTRE DISPLAY'S VIEWS
Here you can find information on the centre display's different main views, from where you can control many of the
car's functions.
04. SMART DRIVING
This chapter describes several of the car's driver support systems and gives tips on how you can drive more eco-
nomically.
05. VOICE RECOGNITION
Here you can find the various commands/phrases you can use with the car's voice recognition system.
06. SPECIAL TEXTS
Warning, important and note texts, which must be read.
All options and accessories, known at the time of publication, are marked with an asterisk: *.

01

GETTING STARTED
To get started with using your Volvo in the best possible way there are
several functions, terms and tips that can be useful to know about.
Volvo ID
Volvo ID is a personal ID that gives you access to a range of services
with a single username and password. Some examples are Volvo On
Call*, map services*, a personal login at volvocars.com, and the option to
book service and repair. You can create a Volvo ID via volvocars.com,
the Volvo On Call app or directly in your car.
Sensus
Sensus is the car's intelligent interface and covers all solutions in the
car associated with entertainment, Internet connection, navigation* and
information services. It is Sensus that makes possible the communica-
tion between you, the car and the outside world.
Volvo On Call*
Volvo On Call provides direct contact to the car and additional comfort
and assistance 24 hours a day. The Volvo On Call app makes it possi-
ble e.g. to see whether bulbs need to be replaced or whether washer
fluid needs to be topped up. You can lock and unlock the car, check
fuel level and show the closest petrol station. Preconditioning can also
be adjusted and started via the car's parking climate control or the
remote vehicle start
1
function. Download the Volvo On Call app to get
started.
Volvo On Call also includes roadside assistance, other security services
and emergency assistance via the ON CALL and SOS buttons in the
car's roof console.
Driver profiles
Many of the settings made in the car can be adapted according to the
driver's personal preferences and can then be saved in one or more
driver profiles. Each key can be linked to a driver profile. See the sec-
tion Top view in this Quick Guide for more information on driver profiles.
1
Available in certain markets and models.
01

01

OVERVIEW, EXTERIOR
Checking and storage of tyre pressure (ITPMS)* is performed
via TPMS in the Car Status app in the centre display's app view. In
the event of low tyre pressure, the
symbol illuminates with a
constant glow in the driver display. In the event of low tyre pressure,
check and adjust the tyre pressure in all four tyres and press Store
Pressure to store a new tyre pressure.
Checking the engine oil level is performed from the Car Status
app. Here you can also see status messages and book service and
repair*.
Rearview mirrors can be angled down automatically* when
reverse gear is selected. When the car is locked/unlocked using
the remote control key, the rearview mirrors can be folded in/out
automatically. activate these functions under
Settings My Car
Mirrors and Convenience in the centre display's top view.
Keyless locking/unlocking* means that you simply need to have
the remote control key with you in a pocket, for example, in order to
lock or unlock the car. The remote control key must be within a
range of approx. 1 metre (3 feet) of the car.
Grip a door handle or press the tailgate's rubberised pressure plate
to unlock the car. To lock the car, press gently on one of the door
handle recesses. Avoid touching both pressure surfaces at the
same time.
Panoramic roof* has an opening glass window with sun blind, and
is operated by a control above the rearview mirror when the car is in
at least ignition position I. Open to ventilation position by pressing
the control upward, and close by pulling the control downward. To
fully open the panoramic roof, pull the control backward twice.
Close by pulling the control downward twice.
The power operated tailgate* can be opened using the foot
operated tailgate function* by means of a slow forward kicking
motion under the left-hand part of the rear bumper. Close and lock
the tailgate using the button on its lower edge. Or close the
tailgate with a slow kicking motion. The car must be equipped with
keyless locking/unlocking* to make it possible to unlock the tail-
gate with foot movement. The remote control key must be within
approx. 1 metre (3 feet) behind the car when opening and closing
with foot movement.
In order to prevent the tailgate from e.g. hitting the ceiling in a
garage, it is possible to program maximum opening. Set maximum
opening by opening the tailgate and stopping it in the desired
opening position. Then push
for at least 3 seconds to save
the position.
01

01

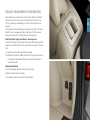
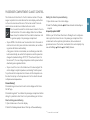
LOCKING/UNLOCKING
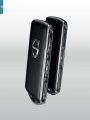
Remote control key
One short press locks doors, tailgate and fuel filler flap and arms
the alarm*.
A long press closes the panoramic roof* and all side windows
simultaneously.
One short press unlocks doors, tailgate and fuel filler flap and dis-
arms the alarm*.
A long press opens all side windows simultaneously.
One short press unlocks and disarms the alarm for the tailgate only.
A long press opens or closes the power operated* tailgate.
The panic function activates the direction indicators and the horn to
attract attention when required. Press and hold the button for at
least 3 seconds or press the button twice within 3 seconds to acti-
vate. The function can be deactivated using the same button after it
has been activated for at least 5 seconds. Otherwise it is deacti-
vated automatically after 3 minutes.
Private locking
Private locking locks the tailgate, which can be practical when,
for example, the car is taken in for service or at a hotel.
–
In the centre display's function view, tap on Private
Locking to activate/deactivate the function.
A pop-up window is shown for activation/deactivation. A
four-digit code is selected each time locking is used. An
extra security code must be selected the first time the
function is used.
Locking* the glovebox is performed manually using the enclosed key
which is located inside the glovebox.
01

01

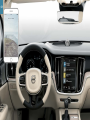
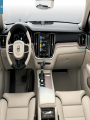
OVERVIEW, INTERIOR
Centre display is used to control many of the car's main functions,
e.g. media, navigation*, climate control, driver support systems and
in-car apps.
The driver display shows information on the drive, e.g. speed,
engine speed, navigation* and active driver support. It is possible to
choose what is to be shown in the driver display via the app menu,
which you open using the right-hand keypad on the steering wheel.
Settings can also be made via
Settings My Car Displays in
the centre display's top view.
Head-up display* is a complement to the car's driver display and
projects information on the windscreen. It is activated via the centre
display's function view.
Start knob is used to start the car. Turn clockwise and release for
ignition position I. Hold the brake pedal depressed and turn the
start knob clockwise to start the car. For cars with manual gear
changing, the clutch pedal must also be depressed. For cars with
automatic gear changing, gear position P or N must be selected.
Switch off the car by turning the start knob clockwise.
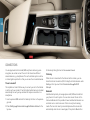
Driving modes* are set using the control on the tunnel console.
The car always starts in Comfort mode. Press in the control and roll
it to select between Comfort, Eco, Off Road, Dynamic and
Individual in the centre display. Confirm by pressing the control.
With Individual you can adapt a driving mode according to your
preferred driving characteristics. The individual driving mode is acti-
vated in
Settings My Car Individual Drive Mode in the cen-
tre display's top view.
Parking brake is activated when you pull the control upwards,
at which point a symbol in the driver display illuminates. Release it
manually by pushing down on the control and depressing the brake
pedal at the same time. Using automatic braking when stationary
(
), the brake pedal can be released while maintaining braking
effect when the car has stopped, e.g. at traffic lights.
Remember that both Automatic braking when stationary and Auto-
matic application of the parking brake must be deactivated for an
automatic car wash. Automatic parking brake application is deacti-
vated in the centre display's top view under
Settings My Car
Parking Brake and Suspension.
Switch for passenger airbag* is located on the end face of the
instrument panel on the passenger side and can be accessed when
the door is open. Pull the switch out and turn to ON/OFF in order
to activate/deactivate the airbag function.
01

01

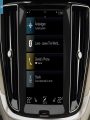
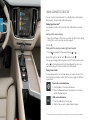
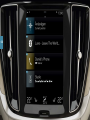
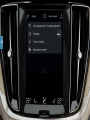
CENTRE DISPLAY
You can make settings and control most of the functions in the centre
display. The centre display has three main views: home view, function
view and app view. You can reach the function view and app view from
the home view by swiping right or left. There is also a top view that you
access by dragging down the top part of the display.
Change the appearance in the centre display and in the driver
display by selecting a theme in
Settings My Car Displays in the
top view. Here you can also select a dark or a light background for the
centre display.
Return to the home view from another view by means of a short
press on the physical home button under the display. The last mode
used for the home view will then be shown. A further short press on the
home button sets all of the home view's tiles in standard mode.
For cleaning the centre display, lock the touch function with a long
press on the physical home button under the display. Reactivate the
display with a short press on the home button.
Status bar at the top of the display shows the activities in the car.
Shown on the left is network and connection information, with media-
related information, the time and background activity indicator shown
on the right.
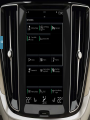
In the climate row at the bottom you can set temperature and seat
comfort by tapping on the respective icon. Open the climate view by
tapping on the centre button in the climate row.
01

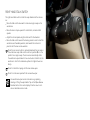
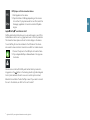
POWER* FRONT SEATS
Use the controls on the outer side of the seat to adjust e.g. the seat
position and lumbar support*. The two controls shaped like a seat are
used to adjust the position of the seat. The third, multifunction control*
is used to adjust the various comfort functions, e.g. massage*.
The seat-shaped controls
Adjust the seat cushion or move the whole seat using the lower control.
Adjust the angle of the backrest using the rear control.
Multi-function control
2
Settings for massage*, side support*, lumbar support* and seat cushion
extension* are linked to the multi-function control.
1. Activate seat setting in the centre display by turning the control up/
down.
2. Toggle between the different functions in the centre display by turn-
ing the control up/down.
3. Change the setting of the selected function by pressing in the
upper/lower/front/rear part of the control.
Store positions
1.
Set the seat, door mirrors and head-up display* to the desired posi-
tion and press the M button on the door panel. The light indicator in
the button illuminates.
2.
Within 3 seconds, press the memory button 1 or 2. An acoustic sig-
nal sounds and the light indicator in the M button extinguishes.
To use your stored position:
With the door open - push and release one of the memory buttons.
With the door closed - hold one of the memory buttons pressed in until
the stored position is reached.
2
On cars with four-way lumbar support*
02

FOLDING THE BACKRESTS IN THE REAR SEAT
When folding down the rear seat, ensure that the backrest and head
restraint do not come into contact with the back of the seat in front.
The front seats may need adjusting in order for the backrests to be
lowered.
The backrests can be folded using the handle on the tops of the outer
seats. If the car is equipped with electronic folding* of the rear seat,
there are also buttons for folding located in the cargo area.
Fold the backrest using the buttons in the cargo area
To allow the folding of the rear seat, the car must be stationary and the
tailgate open. Ensure that there are no occupants or objects in the rear
seat.
1. Lower the centre seat's head restraint manually.
2.
Hold down the button L or R to fold the left or right backrest section.
> The backrests and head restraints are lowered automatically to
horizontal position.
Raising the backrests
1. Move the backrest up/back until it locks in position.
2. Raise the head restraint manually.
3. If necessary, raise the centre seat's head restraint.
02

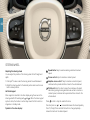
STEERING WHEEL
Adjusting the steering wheel
You can adjust the position of the steering wheel for both height and
depth.
1. Push/pull
3
the lever under the steering wheel forward/backward.
2. Adjust the steering wheel to the desired position and move the lever
back to locked position.
Left-hand keypad
Driver support is selected in the driver display using the arrows in the
steering wheel's left-hand keypad (
and ). When the driver support
symbol is white, the function is active. Grey means that the function is
stopped or in standby mode.
Symbols in the driver display:
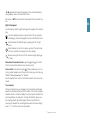
Speed limiter helps to avoid exceeding a selected maximum
speed.
Cruise control helps to maintain a constant speed.
Adaptive cruise control* helps to maintain a constant speed,
combined with a preselected time interval to the vehicle ahead.
Pilot Assist helps the driver to keep the car between the lane's
side markings using steering assistance as well as to maintain a
constant speed, combined with a preselected time interval to the
vehicle ahead.
Press
to start or stop the selected function.
One short press on
/ increases/decreases the stored speed by
5 km/h (5 mph). Press and hold the button to change steplessly -
release the button at the desired speed.
02

/ decreases/increases the distance to the vehicle ahead when
using Adaptive cruise control and Pilot Assist.
One press on
also resumes the stored speed for the selected func-
tion.
Right-hand keypad
Use the steering wheel's right-hand keypad to navigate in the diver dis-
play.
The driver display's app menu opens/closes. The trip computer,
media player, phone and navigation* can be controlled from here.
Scroll between the different apps by pressing the left or right
arrow.
Select, deselect or confirm an option, e.g. select the trip comput-
er's menu or delete a message in the driver display.
Browse among the functions for the selected app by tapping up
or down.
Raise/lower the media volume by pressing and . If no other
function is active these buttons act as volume control.
Voice control is activated using the button and allows you to con-
trol e.g. media, navigation and climate control using your voice. Say e.g.
"Radio", "Raise temperature" or "Cancel".
See the chapter Voice control in this Quick Guide for more voice com-
mands.
Trip computer
The trip computer shows e.g. mileage, fuel consumption and average
speed. It is possible to select which information from the trip computer
should be shown in the driver display. The trip computer calculates the
remaining distance to empty tank. To show the different options, use
the steering wheel's right-hand keypad. There is insufficient fuel
remaining to calculate the remaining distance when the driver display
shows "----". Fuel the car as soon as possible.
3
Depending on market.
02

LEFT-HAND STALK SWITCH
Headlamp functions are controlled using the left-hand stalk switch.
In AUTO mode, the car detects when it is dark/light and adapts the
lighting accordingly, e.g. when evening falls or when you drive into a
tunnel. Turn the stalk switch thumbwheel to
for main beam that
automatically dims for oncoming traffic. Move the stalk switch towards
the steering wheel to activate main beam manually and towards the
instrument panel to deactivate.
Active bending lights* are designed to provide maximum lighting in
bends and at junctions by means of the light following steering wheel
movements. The function is activated automatically when the car is
started and can be deactivated in the centre display's function view,
.
Approach lighting switches on the outside lighting when you unlock
the car with the key, and helps you to reach the car safely in the dark.
Home safe lighting lights up part of the exterior lighting after you
have locked the car in order to give you some light in the dark. Activate
the function after you have switched off the car by moving the left stalk
switch towards the instrument panel and then releasing it. The time for
how long the home safe lighting should remain switched on can be set
via the centre display.
Resetting the trip meter
Reset all information in the manual trip meter (TM) with a long press on
the RESET button. A short press only resets the mileage. Trip meter,
automatic (TA), is reset automatically when the car has not been used
for 4 hours.
02

RIGHT-HAND STALK SWITCH
The right-hand stalk switch controls the wiper blades and the rain sen-
sor.
–
Move the stalk switch downward to make one single sweep on the
windscreen.
–
Move the lever in steps upwards for intermittent, normal and fast
speeds.
–
Adjust the interval speed using the stalk switch's thumbwheel.
–
Move the stalk switch towards the steering wheel in order to start the
windscreen and headlamp washers, and towards the instrument
panel to start the rear window washers.
Press the rain sensor button to activate/deactivate the rain sensor.
The windscreen wiper stalk switch must be in position 0, or in the
position for a single sweep. The rain sensor automatically starts
the windscreen wipers based on how much water it detects on the
windscreen. Turn the thumbwheel up/down for higher/lower sen-
sitivity.
Press for intermittent wiping with the rear window wiper.
Press for continuous speed with the rear window wiper.
Use windscreen wiper service mode when e.g. replacing,
cleaning or lifting the wiper blades. Tap on the
Wiper Service
Position button in the centre display's function view to acti-
vate or deactivate service mode.
02

02
Page is loading ...
Page is loading ...
Page is loading ...
Page is loading ...
Page is loading ...
Page is loading ...
Page is loading ...
Page is loading ...
Page is loading ...
Page is loading ...
Page is loading ...
Page is loading ...
Page is loading ...
Page is loading ...
Page is loading ...
Page is loading ...
Page is loading ...
Page is loading ...
Page is loading ...
Page is loading ...
Page is loading ...
Page is loading ...
-
 1
1
-
 2
2
-
 3
3
-
 4
4
-
 5
5
-
 6
6
-
 7
7
-
 8
8
-
 9
9
-
 10
10
-
 11
11
-
 12
12
-
 13
13
-
 14
14
-
 15
15
-
 16
16
-
 17
17
-
 18
18
-
 19
19
-
 20
20
-
 21
21
-
 22
22
-
 23
23
-
 24
24
-
 25
25
-
 26
26
-
 27
27
-
 28
28
-
 29
29
-
 30
30
-
 31
31
-
 32
32
-
 33
33
-
 34
34
-
 35
35
-
 36
36
-
 37
37
-
 38
38
-
 39
39
-
 40
40
-
 41
41
-
 42
42


Volvo 2020 Quick start guide
- Type
- Quick start guide
- This manual is also suitable for
Ask a question and I''ll find the answer in the document
Finding information in a document is now easier with AI
Related papers
-
Volvo 2020 Late Quick start guide
-
Volvo 2020 Early Quick start guide
-
-
Volvo 2021 Late Quick start guide
-
-
Volvo V60 Quick start guide
-
Volvo 2020 Late Quick start guide
-
-
-
Volvo 2019 Late Quick start guide