
Always follow OEM procedures | For ordering information, contact your 3M Sales Representative
2
Standard Operating Procedures
Product List
Windshield Repair
3M
™
Precision Masking
Tape, 2 in. width,
PN 06528
3M
™
Single Step Primer,
30mL can, PN 08682
3M
™
Urethane Primer
Daubers, PN 08688
3M
™
Glass Cleaner,
19 oz. aerosol, PN 08888
3M
™
Fast Cure Auto
Glass Urethane, 450mL
Flex Pack, PN 08689;
10.5 fl. oz. cartridge,
PN 08690
3M
™
Flex Pack
Heavy Duty 450mL
Applicator Gun,
PN 08991
3M
™
Specialty
Adhesive Remover,
1 qt. can, PN 38984;
15 oz. aerosol, PN 38987
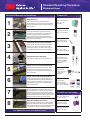
Windshield Removal and Installation
1
Glass Removal
Apply interior surface protection. Remove
wiper blades and cowl panel. Remove windshield
molding. Cut urethane with the appropriate tool.
Remove glass.
2
Dry Set Glass
Clean the pinchweld area of all loose pieces
of urethane. Dry fit the glass. Use masking tape
to mark proper alignment by applying two
pieces of tape along the top edge of the glass,
perpendicular to the pinchweld. Cut the masking
tape and remove the glass.
3
Pinchweld Inspection & Preparation
Close-cut the old urethane down to a thickness
of 1mm–2mm. Clean with water and a clean
cloth. Apply primer to any bare metal scratches
if necessary and allow to dry for 5–10 minutes.
4
Clean and Prepare the Glass
Clean glass with glass cleaner and a clean cloth.
5
Apply Primer to the New Windshield
Check the expiration date on the primer. Shake
the primer can well. Apply a continuous layer
of primer to the new windshield and allow to dry
for 5–10 minutes.
6
Apply Urethane & Install Windshield
Check expiration date on urethane. Cut nozzle
to desired width and shape. Apply a bead of new
urethane to the old urethane on the pinchweld
at an application angle of 90°. Paddle all joints/
gaps in one direction.
7
Tape Removal
Remove all tape before delivering the vehicle. For
best results remove it in a slow, uniform motion.
Remove it in the direction of the painted surface
to the windshield, and remove the tape at an angle
of approximately 135° to the surface. Tape removal
works best if the temperature is above 60°F.
8
Reinstall Moldings and Panels
Reinstall moldings and interior panels as needed.
Reconnect electronics. Remove excess urethane.
Keep vehicle out of service until the urethane builds
strength per manufacturer recommendations.
Visit 3MCollision.com for more SOPs and videos
Think About Your Health
3M
™
E-A-R
™
Skull Screws
™
Ear Plug, PN P1300
3M
™
Virtua
™
Protective
Eyewear, PN 11326
3M
™
Half Facepiece
Respirator, PN 07182

Individual Product Instruction and Safety Information
For individual product instructions and applicable precautions see product labels
and associated literature for the individual product at 3MCollision.com
For product material safety data sheets see 3MCollision.com
3M, Accuspray, Cubitron, E-A-R, Hookit, Perfect-It, Platinum, PPS, Roloc, Scotch, Scotchblok,
Scotch-Brite, Skull Screws, SUN GUN, Trizact, Versao and Virtua are trademarks of 3M.
All other trademarks are property of their respective owners.
Please recycle. Printed in U.S.A. © 3M 2019. All rights reserved. Rev 7/19. 60-4402-8017-4
3M Automotive Aftermarket Division
3M Center, Building 223-6S-07
St. Paul, MN 55144-1000
U.S.A.
Web 3MCollision.com
Technical Information: The technical information, guidance, and other statements contained in this document or otherwise provided by
3M are based upon records, tests, or experience that 3M believes to be reliable, but the accuracy, completeness, and representative nature
of such information is not guaranteed. Such information is intended for people with knowledge and technical skills sucient to assess and apply
their own informed judgment to the information. No license under any 3M or third party intellectual property rights is granted or implied with
this information.
Product Selection and Use: Many factors beyond 3M’s control and uniquely within user’s knowledge and control can aect the use and
performance of a 3M product in a particular application. As a result, customer is solely responsible for evaluating the product and determining
whether it is appropriate and suitable for customer’s application, including conducting a workplace hazard assessment and reviewing all
applicable regulations and standards (e.g., OSHA, ANSI, etc.). Failure to properly evaluate, select, and use a 3M product and appropriate safety
products, or to meet all applicable safety regulations, may result in injury, sickness, death, and/or harm to property.
Warranty, Limited Remedy, and Disclaimer: Unless a dierent warranty is specically stated on the applicable 3M product packaging or
product literature (in which case such warranty governs), 3M warrants that each 3M product meets the applicable 3M product specication
at the time 3M ships the product. 3M MAKES NO OTHER WARRANTIES OR CONDITIONS, EXPRESS OR IMPLIED, INCLUDING, BUT NOT
LIMITED TO, ANY IMPLIED WARRANTY OR CONDITION OF MERCHANTABILITY, FITNESS FOR A PARTICULAR PURPOSE, OR ARISING OUT
OF A COURSE OF DEALING, CUSTOM, OR USAGE OF TRADE. If a 3M product does not conform to this warranty, then the sole and exclusive
remedy is, at 3M’s option, replacement of the 3M product or refund of the purchase price.
Limitation of Liability: Except for the limited remedy stated above, and except to the extent prohibited by law, 3M will not be liable for any loss
or damage arising from or related to the 3M product, whether direct, indirect, special, incidental, or consequential (including, but not limited
to, lost prots or business opportunity), regardless of the legal or equitable theory asserted, including, but not limited to, warranty, contract,
negligence, or strict liability.
-
 1
1
-
 2
2


3M Specialty Adhesive Remover User guide
- Type
- User guide
- This manual is also suitable for
Ask a question and I''ll find the answer in the document
Finding information in a document is now easier with AI
Related papers
-
3M Fast Cure Auto Glass Urethane User guide
-
-
3M High Performance Welding Drape User guide
-
-
-
-
-
3M Hookit™ Purple Clean Sanding Abrasive Disc 334U User guide
-
-