2
Install the Fixture
1A
©2021 Tech Lighting, L.L.C. All rights reserved. The Tech Lighting logo is a registered trademark of Tech Lighting.
Tech Lighting reserves the right to change specifications for product improvements without notification.
7400 Linder Ave., Skokie, IL 60077
T 847.410.4400 | F 847.410.4500
www.techlighting.com
2
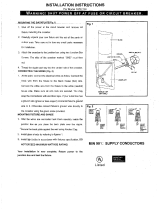
1Separate the mounting plate from the fixture by removing the knurled nuts.
Install the mounting plate to the junction box with the provided #8-32 screws.
Connect the fixture to a suitable ground in accordance with local electrical codes.
Connect the white fixture wire to the neutral power line with a wire nut.
Connect the black fixture wire to the hot power line with a wire nut.
Properly place the wires and wire nut connections into the junction box and install the fixture base by aligning the
holes to the mounting studs on the mounting plate. Secure it place with the knurled nuts.
Install the shade onto the fixture base and secure it place with the set screws and provided Allen wrench.
4
3
6
5
7
SHADE
SHADE SCREW
AND ALLEN WRENCH
MOUNTING PLATE
SCREW
45
3
MOUNTING PLATE
FIXTURE BASE
7
2
6
KNURLED NUTS
MOUNTING STUD