Hotpoint NVLR223EH4WO Owner's manual
- Category
- Tumble dryers
- Type
- Owner's manual

Hotpoint.com
Safety Instructions ........ 2-4
Operating Instructions
Control Panel ................... S
Control Settings ................. 6
Features ........................ 7
Loading and Using
the Drger .................... 9, 10
Reversing the Door .............. 8
Venting the Drger .............. 10
Troubleshooting Tips ... 11, 12
Consumer Support
Consumer Support ..... Back Cover
Warrants ..................... 1S
NBXR333
NVLR223
NWXR483
Write the model and serial
numbers here:
Model #
Serial #
Youcan find them ona label on the
front of the dryer behind the door,
175D1807P568 59-90300-1 II-06JR

IMPORTANT SAFETY INFORMATION.
READ ALL INSTRUCTIONS BEFORE USING.
WARNING!
For your safety, the information in this manual must be followed to minimize the risk
of fire or explosion, electric shock, or to prevent property damage, personal injury, or
death.
[] Do not store or use gasoline or other
flammable vapors and liquidsin the
vicinity of this or any other appliance.
[] Installation and service must be
performed by a qualified installer,
service agency or the gas supplier.
WHAT TO DO IF YOU SMELL GAS:
[] Do not try to light a match, or cigarette,
or turn on any gas or electrical
appliance.
[] Do not touch any electrical switch; do
not use any phone in your building.
[] Clear the room, building or area of all
occupants.
[_] lmmediatelg call your gas supplier from
a neighbor's phone. Follow the gas
supplier's instructions carefully.
[] If you cannot reach your gas supplier,
call the fire department.
California Safe Drinking Water and Toxic Enforcement Act
Thisact requiresthe governorof Californiato publisha list of substancesknown to the stateto causecancer,
birth defects or other reproductive harm and requiresbusinessesto warn customers of potential exposure
to such substances.
Gasappliances can cause minor exposure to four of thesesubstances, namely benzene,carbon monoxide,
formaldehyde and soot, caused primarily by the incomplete combustion of natural gasor LPfuels.
Properlyadjusted dryers will minimize incomplete combustion. Exposureto these substances can be
minimizedfurther by properly venting the drger to the outdoors.
%
PROPERINSTALLATION
This dryer must be properly installed and located in accordance with the Installation Instructions
before it is used. If you did not receive an Installation Instructions sheet, you can receive one by
visiting Hotpoint.com, or by coiling 800.GE.CARES (800.432.2737).
[] Properlyground dryer to conform with all
governing codes and ordinances.Follow details
in Installation Instructions.
[] Installor store where itwill not be exposed
to temperatures below freezing or exposed
to the weather, which could cause permanent
damage and invalidate the warranty.
[] Connectto a properly rated, protected and sized
power supply circuit to avoid electrical overload.
[] Removeall sharp packing items and disposeof
all shipping materials properly.
Exhaust/Ducting:
]Gas dryers MUST be exhausted to the outside.
]Use only rigid metal 4" diameter ductwork
insidethe dryer cabinet. Useonly rigidmetal
or flexible metal 4" diameter ductwork for
exhausting to the outside.USEOFPLASTICOR
OTHERCOMBUSTIBLEDUCTWORKCANCAUSE
A FIRE.PUNCTUREDDUCTWORKCANCAUSEA
FIREIF ITCOLLAPSESORBECOMESOTHERWISE
RESTRICTEDIN USEORDURINGINSTALLATION.
Forcomplete details,follow the Installation
Instructions.

Hotpoint.com
WARNING!
YOUR LAUNDRY AREA
• Keepthe areaunderneath and around your
appliances free of combustible materials (lint,
paper,rags,etc.),gasoline,chemicals and other
flammable vapors and liquids.
• Keepthe floor around your appliancesclean and
dry to reduce the possibility of slipping.
• Closesupervisionis necessary ifthis appliance is
used by or near children. Do not allow children to
play on,with or insidethis or any other appliance.
• Keepall laundry aids(suchas detergents, bleaches,
etc.)out of the reach of children, preferably ina
locked cabinet. Observeall warnings on container
labelsto avoid injury.
• Neverclimb on or stand on the dryer top.
WHEN USING YOUR DRYER
• Neverreach into the dryer while the drum is •
moving. Beforeloading, unloading or adding
clothes,wait until the drum has completely
stopped.
• Cleanthe lint filter before each load to prevent lint •
accumulation insidethe dryer or in the room. DO
NOTOPERATETHEDRYERWITHOUTTHELINT
FILTERIN PLACE.
• Do not wash ordry articles that have been
cleaned in,washed in,soaked in or spotted
with combustible or explosivesubstances (suchas
wax, oil,paint, gasoline, degreasers,dry-cleaning
solvents,kerosene,etc.).Thesesubstances give
off vapors that may ignite or explode. Donot add
these substancesto the wash water Do not use
or placethese substancesaround your washer
or dryer during operation.
• Do not place items exposedto cooking oilsin your
dryen Items contaminated with cooking oilsmay
contribute to a chemical reactionthat could cause
a clothes load to catch fire.
Any article on which you have used a cleaning
solvent or that contains flammable materials (such
as cleaning cloths, mops,towels usedin beauty
salons,restaurants,or barber shops,etc.)must
not be placed in or nearthe dryer until solventsor
flammable materials have been removed.There
are many highly flammable items usedin homes
such as acetone,denatured alcohol,gasoline,
kerosene,some household cleaners,some spot
removers,turpentines, waxes,wax removers
and products containing petroleum distillates.
The laundry processcan reduce the flame
retardancy of fabrics. Toavoid such a result,
carefully follow the garment manufacturer's
care instructions.
Do not dry articles containing rubber,plastic
or similar materials such as padded bras,tennis
shoes,galoshes,bath mats, rugs,bibs, baby pants,
plastic bags, pillows,etc.that may melt or burn.
Somerubber materials, when heated,can under
certain circumstances producefire by spontaneous
combustion.
• Do not store plastic,paper or clothing that may
burn or melt on top of the dryer during operation.
• Garments labeledDry Away from Heot or DoNot
TumbleDry (suchas lifejackets containing Kapok)
must not be put in your dryen
• Do not dry fiberglass articles inyour dryer
Skinirritation could result from the remaining
particles that may be picked up by clothing
during subsequent dryer uses.
• To minimizethe possibility of electric shock,unplug
this appliance from the power supply or disconnect
the dryer at the householddistribution panel by
removing the fuse or switching off the circuit
breaker before attempting any maintenance or
cleaning (exceptthe removal and cleaning of the
lint filter).NOTE:Tuming the CycleSelectorknob
to an off position or pressing PAUSEdoes NOT
disconnect the appliance from the power supply.

IMPORTANT SAFETY INFORMATION.
READ ALL INSTRUCTIONS BEFORE USING.
WARNING!
WHEN USING YOUR DRYER(cont.)
• Neverattempt to operate this appliance ifit is
damaged, malfunctioning, partially disassembled,or
has missingor broken parts, including a damaged
cord or plug.
• The interior of the machine and the exhaust duct
connection insidethe dryer should becleaned at
least once a year by a qualified technician. See
the Loading and Usingthe Dryer section.
• If yoursisa gas dryer,it is equipped with an
automatic electric ignition and does not have
a pilot light. DO NOTATTEHPTTOLIGHTWITHA
HATCH.Burnsmag result from having gour hand
in the vicinitg of the burner when the automatic
ignition turns on.
• Youmay wish to soften your laundered fabrics
or reducethe static electricity in them by using
a drger-applied fabric softener or an anti-static
conditioneEWe recommend you useeither a
fabric softener in the wash cycle, according to the
manufacturer's instructions for those products, or
try a dryer-added product for which the
manufacturer gives written assurance onthe
package that their product can be safely used
in your dryer Serviceor performance problems
caused by useof these products are the
responsibility ofthe manufacturers of those
products and are not covered under the
warranty to this appliance.
WHEN NOT USING YOUR DRYER
• Graspthe plug firmly when disconnecting this
appliance to avoid damage to the cord while
pulling. Placethe cord awag from traffic areas
so itwill not be stepped on,tripped overor
subjected to damage.
• Do not attempt to repairor replaceany part
of this applianceor attempt ang servicingunless
specificallyrecommended in thisOwner's Manual
or in publisheduser-repairinstructions that gou
understand and havethe skillsto carrg out.
• Beforediscarding a dryer, or removing it from
service,remove the drger door to preventchildren
from hiding inside.
• Do not tamper with controls.
_\_4___ READAND FOLLOWTHISSAFETYINFORMATIONCAREFULLY.
/ 0_01_ SAVETHESEINSTRUCTIONS
4

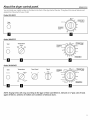
About the drger control panel. ,otpo,.t.com
Youcan locate gour model number on the label on the front of the dryer behind the doo_ Throughout this manual, features and
appearance may vary from your model.
Model NVLR223
OFF 80_in
Start
Push to Start
©
Model NBXR333
OFF
la
Start Temperature
Wrinkle Free
medium
©
40 50
-m Igl IH
Model NWXR483
Start Temperature PressGuard Signal _ P,.,,G.a,_O_F_o,o0_,,o,_[wrinkle Freel
Medium Automatic t CooJDown Automatic
Cottons Wrinkle Free ff_\\l_//_L Optimunl De/ _ressGuard
Push to Start regular n_dium Off On O oud
Fluff Knifs]Delicates 70
no heat low Dewr nke 20
Damp Dr/30 60 J Tim_ r)_v j
NOTE: Drying times will vary according to the type of heat used (Electric, Natural or LP gas), size of load,
types of fabrics, wetness of clothes and condition of exhaust ducts.

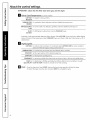
About the control settings.
IMPORTANT: Clean the lint filter each time you use the dryer.
H Fabric Care/Temperature (on some models)
COTTONS For regular to heavy cottons.
REGULAR
WRINKLEFREE Forsynthetics, blends,delicatesand items labeled permanent press.
MEDIUM
KNITS/DELICATESOnsome models.Fordelicates,synthetics and items labeled tumble drg low
LOW
FLUFF Forfluffing items without heat. Usethe TIMEDDRYcycle.
NO HEAT
Automatic cycles automatically determine fabric dryness. Select LESSDRY if you want your clothes slightly
damp at the end of the drying cycle. Select MORE DRY if you want them to feel drien Timed cycles run for a
selected time.
F_ Drging Cycles
COTTONS
WRINKLE FREE
TIMED DRY
DAMP DRY
DEWRINKLE
FLUFF or
QUICK FLUFF
Forcottons and most linens.Formost loadsselect OPTIMUMDRY(on some models)or
selectthe PreferredRegularSetting markedwith an *
Forwrinkle-free, permanent pressand delicate items, and knits.
Setthe Cycle Selectorat the desireddrying time.
Forleavingitems partially damp.
Forremoving wrinkles from items that are clean and dry or that are very lightly damp.
Forfreshening or fluffing up already dry clothing, fabrics, linensand pillows.Usewith
FLUFFNOHEAT.Provides10 minutes of no heat tumbling.
Start- Closethe dryer dooESelectSTART.Opening the door during operation will stop the dryeE
Torestart the dryer,close the door and selectSTARTto complete the cycle.
6

About the dryer features. ,otpoint.com
PRESS GUARD
Off ON
Press Guard Option (on some models)
Use this option to minimize the wrinkles
in clothes. It provides approximately
15 minutes of no-heat tumbling after
the clothes are dry,
This option can only be used with the
COTTONS and WRINKLE FREE cycles.
If you are using the SIGNAL knob and you
select the PRESSGUARD option, a signal will
sound at the end of the drying time and
several times during the PRESSGUARD cycle.
This will remind you that it is time to remove
the clothes.
If PRESSGUARD is not on, the dryer will stop
once the timer reaches the PRESSGUARD
mark on the cycle dial.
SIGNAL
MEDIUM
Cycle Signal Option (onsomemodels)
This signal will sound just before the end
of the cycle to remind you to remove the
clothes. On some models, the signal sound
level cannot be adjusted.
If you selected the PRESSGUARD option,
the signal will sound at the end of the
drying time and will sound several times
during the PRESSGUARD cycle. This will
remind you that it is time to remove the
clothes.
NOTE:
• Remove garments promptly at the
sound of the signal. Place clothes on
hangers so wrinkles won't set in.
• Use the Cycle Signal especially when
drying fabrics like polyester knits and
permanent press. These fabrics should
be removed so wrinkles won't set in.
Drum Lamp (onsomemodels)
Before replacing the light bulb, be sure to
unplug the dryer power cord or disconnect
the dryer at the household distribution panel
by removing the fuse or switching offthe
circuit breaker Reach above dryer opening
from inside the drum. Remove the bulb and
replace with the same size bulb.

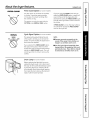
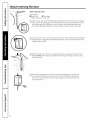
About reversing the door.
Reversing the Door
Toolsneeded:
[] Standard#2 [] Tope-tipped
Phillipsscrewdriver puttg knife
F_ Openthe door and remove the filler plugsopposite the hinges.With the door completely
open,remove the bottom screw from each hingeon the dryer face. Insertthese screws
about halfwag into the TOPholes,for each hinge,on the opposite side{whereyou
removed the filler plugs).Apply firm pressureto get the screw started in new holes.
J_JLoosentop screw from each hingeon the dryer face halfway. With one hand holding the
top of the door and the other hand holding the bottom, remove the doorfrom the dryer
by lifting it UPand OUT.
[_ Rotatethe door 180°. Insertit on the opposite sideof the opening by moving the door
IN and DOWN until the top hinge and the bottom hinge are resting on the top screws
inserted in step 1.
[_ Removethe remaining screws from the sideof the opening from which the door
was removed.With these screws,secureeach hinge at the bottom.Tighten the
2 top screwsof each hinge.Reinsertthe plastic plugson the sidefrom which the
door was removed.
8

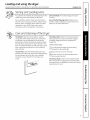
Loading and using the dryer.
Always follow the fabric manufacturer's care label when laundering. Hotpoint.com
Sorting and Loading Hints
Asa general rule,if clothesare sorted properlg for the
washer,they are sorted properlg for the dryer
Donot odd fabricsoftener sheetsoncethe load has
become worm. They may causefabric softenerstains.
Bounce® FabricConditioner Dr_terSheetshovebeen
approved for usein all GEDr_lerswhen usedin
accordancewith themanufacturer's instructions.
Do not overload. Thiswastes energ_land causes
wrinkling.
Do not dry the following items:fiberglassitems,
woolens,rubber-coated items,plastics,items with
plastic trim and foam-filled items.
Careand Cleaningof the Dryer
TheExterior: Wipe or dust any spillsorwashing
compounds with a damp cloth. Drgercontrol panel
and finishes mag be damaged bg some laundrg
pretreatment soiland stain remover products.Applg
these products awag from the dryer Thefabric mag
then be washed and dried normallg. Damage to sour
drger caused bg these products is not covered bg
gout warrantg.
TheLint Filter: Cleanthe lint filter beforeeach use.
Moisten gour fingers and reach into the filter opening.
Rungour fingers acrossthefilter.Havea qualified
technician vacuum the lint from the drger once
a gear
TheExhaust Duct: Inspectand clean the exhaust
ducting at leastonce a gear to prevent clogging.
A partiallg clogged exhaust can lengthenthe
drging time.
Follow these steps:
[_ Turn off electricalsupply bg disconnecting
the plug from the wall socket.
[_J Disconnectthe duct from the drge_
[_] Vacuum the ductwith the hose attachment
and reconnect the duct.
TheExhaust Hood: Checkfrom the outsidethat the
flaps of the hood move freelgwhen operating. Hake
surethat thereisno wildlife (birds,insects,etc.)nesting
insidethe duct or hood.

Loading and using the dryer. A_woysfo_owthefabricmanufacturer'scarelabelwhenlaundering,
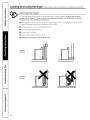
Venting the Dryer
For the best drging performance, the drger needs to be properlg vented. The dryer will use more
energg and run longer if it is not vented to the below specifications. Carefullg follow the details
on Exhausting in the Installation Instructions.
[] Use onlg rigid metal 4" diameter ductwork inside the drger cabinet. Use onlg rigid metal or flexible
metal 4" diameter ductwork for exhausting to the outside.
[] Do not use plastic or other combustible ductwork.
[] Use the shortest length possible.
[] Do not crush or collapse.
[] Avoid resting the duct on sharp objects.
[] Venting must conform to local building codes.
Correct
Venting
(
I
Incorrect
Venting
10

Before gee call for service... .otpointcom
Troubleshooting Tips
Save time and money! Review the charts on the following
pages, or visit Hotpoint.com. You meg not need to coil for
service.
Problem Possible Causes What: To Do
Dryer doesn't start Dryer is unplugged • Make sure the dryer plug is pushed completely into
the outlet.
Fuse is blown/circuit breaker • Check the house fuse/circuit breaker box and replace
istripped fuse or reset breakeE NOTE: Electric dryers use two fuses
or breakers.
Dryer doesn't heat Fuse is blownlcircuit breaker • Check the house fuse/circuit breaker box and replace
is tripped, the dryer may both fuses or reset both breakers. Your dryer may tumble
tumble but not heat if only one fuse is blown or one breaker tripped.
Gas service is off • Make sure gas shutoff at dryer and main shutoff are
fully open.
LP gas supply tank is empty • Refill or replace tank. Dryer should heat when
or there has been a utility utility service is restored.
interruption of natural gas
(gas models)
Dryer shakes or Some shaking/noise is normal. • Hove dryer to an even floor space, or adjust leveling legs
makes noise Dryer may be sitting unevenly as necessary until even.
Greasy spots on clothes Improper use of fabric softener • Follow directions on fabric softener package.
Drying dirty items with • Use your dryer to dry only clean items. Dirty items can
clean ones stain clean items and the dryeE
Clothes were not • Sometimes stains which cannot be seen when the
completely clean clothes are wet appear after drying. Use proper
washing procedures before drying.
Lint on clothes Lint filter is full • Clean lint screen before each load.
Improper sorting • Sort lint producers (like chenille) from lint collectors
(like corduroy).
Static electricitg can attract lint • See suggestions in this section under STATIC
Overloading • Separate large loads into smaller ones.
Paper, tissue, etc. left in pockets • Empty all pockets before laundering clothes.
Static occurs No fabric softener was used • Try a fabric softeneE
• Bounce ® Fabric Conditioner Dryer Sheets have been
approved for use in all GEDryers when used in
accordance with the manufacturer's instructions.
Overdrging • Try a fabric softener
• Adjust setting to LESSDRY or DAMP DRY
Synthetics, permanent press • Try a fabric softener.
and blends can cause static
Inconsistent drying times Type of heat • Automatic drying times will vary according to the type
of heat used (electric, natural or LP gas), size of load,
types of fabrics, wetness of clothes and condition of
exhaust ducts.
11

Before you call for service...
R
Troubleshooting Tips
Problem Possible Causes What To Do
Clothes take too long Improper sorting
to dry
Large loads of heavg fabrics
{like beach towels)
Controls improperlg set
Lint filter is full
Improper or obstructed ducting
, Separate heavy items from lightweight items (generally,
a well-sorted washer load isa well-sorted dryer load).
, Large,heavy fabrics contain more moisture and take
longer to dry. Separatelarge, heavy fabrics into smaller
loadsto speed drying time.
Match control settings to the load you aredrying.
Clean lintfilter before every load.
Checkinstallation instructions for proper
ductingiventing.
Makesure ducting isclean, freeof kinksand
unobstructed.
Checkto seeif outside wall damper operateseasily.
Checkthe Installation Instructionsto make surethe
dryer venting iscorrect.
Blown fuses or tripped . Replacefusesor reset circuit breakers.Sincemost dryers
circuitbreaker usetwo fuses/breakers,make sure both are operating.
Overloading/combining loads , Donot put more than onewasher load in the dryer
at a time.
Underloading , If you are drying only one or two items, add a few items
to ensure propertumbling.
Clothes are wrinkled Overdrying . Selecta shorter drying time.
. Removeitems while they still holda slight amount of
moisture.Select a LESSDRYor DAMPDRYsetting.
Letting items sit in dryer after . Removeitems when cycle ends andfold or hang
cycle ends immediately.
Overloading . Separate large loads into smaller ones.
Clothes shrink Somefabrics will naturally shrink . Toavoid shrinkage,follow garment care labelsexactly.
when washed. Others can be . Some items may be pressed backinto shape after drying.
safelg washed, but will shrink
in the dryer . If you are concerned about shrinkage in a particular
item, do not machine wash or tumble dry it.
12

N o _ s, Hotpoint.com
Q
Q
o
Q
Q
Q
O
Q
13

0
15
0
0
v
0
Q.
E
0
L_
Notes.
14

Hotpoint Dryer Warranty.
All warranty service provided by our Factory Service Centers,
or an authorized Customer Cord _technician. Toschedule
service, on-line, 24 hours a dog, visit us at Hotpoint.com, or call
800.GE.CARES(800.432.2737). Please have serial number and
model number available when calling for service.
Staple your receipt here.
Proof of the original pumhase
date is needed to obtain service
under the warranty.
For The Period Of: We Will Replace:
OneYear Any part of the drger which fails due to a defect in materials or workmanship. Duringthis
Fromthe date of the limited one-year warranty, we will also provide,free of charge, all labor and related servicecosts
originalpurchase to replacethe defectivepart.
What Is Not Covered:
[] Service trips to gout home to teach SOUhow to use
the product.
[] Improper installation (including improper venting},
deJiverg or maintenance.
[] Failure of the product if it is abused, misused, or used for
other then the intended purpose or used commemiallg.
[] Replacement of the light bulb.
[] Products which are not defective or broken, or which are
working as described in the Owner's Manual.
[] Replacement of house fuses or resetting of circuit
breakers.
[] Damage to the product caused bg accident, fire, floods
or acts of God.
[] Incidental or consequential damage caused bg possible
defects with this appliance.
[] Defects or damage dueto operation in freezing
temperatures.
[] Damage caused after deliverg.
[] Product not accessible to provide required service.
EXCLUSION OF IMPLIED WARRANTIES--Vour sole and exclusive remedy is product repair as provided in this
Limited Warranty. Any implied warranties, including the implied warranties of merchantability or fitness for
a particular purpose, ore limited to one year or the shortest period allowed by law.
I
This warranty is extended to the original purchaser and ang succeeding owner for products purchased for
home use within the USA. If the product is located in an area where service by a GE Authorized Servicer is not
available, you may be responsible for a trip charge or you may be required to bring the product to an Authorized
GE Service location. In Alaska, the warranty excludes the cost of shipping or service calls to your home.
Some states do not allow the exclusion or limitation of incidental or consequential damages. This warranty
gives you specific lega! rights, and you may also have other rights which vary from state to state. To know
what your legal rights are, consult your local or state consumer affairs office or your state's Attorney General.
Warrantor: General Electric Company. Louisville, KV 40225
15

Consumer Support.
q Hotpoint Website Hotpoint.com
Have a question or need assistancewith gour appliance?Trg the Hotpoint Website 24 hours a dog,
ang dag of the gear! Youcan also shopfor more great Hotpoint products andtake advantage of
all of our on-line support servicesdesignedfor gour convenience.
Schedule Service Hotpoint.com
Expert Hotpoint repair serviceisonlg one step awag from gour door.Geton-line and schedule gour service
at gour convenience 24 hours ang dog of the gear! Or call 800.GECARES(800,432.2737)during normal business
hours.
RealLife Design Studio go.corn
GEsupports the UniversalDesignconcept-products, services and environments that can be usedbg
people of all ages, sizesand capabilities.We recognizethe need to design for a wide range of phgsical and
mental abilities and impairments. Fordetails of GE'sUniversalDesignapplications, including kitchen designideas
for peoplewith disabilities,checkout our Website todag. Forthe hearing impaired, pleasecall 800.TDDGEAC
(800.833.4322).
Extended Warranties
Purchasea Hotpoint extended warrantg and learn about special discountsthat are availablewhile gour
warrantg is stillin effect. Youcan purchase iton-line angtime, or call800.626.2224 during normal business
hours. Hotpoint ConsumerHome Serviceswill still bethere after gour warrantg expires.
ge.com
Ports and Accessories Hotpoint.com
Individualsqualified to service their own appliances can have partsor accessoriessent directlg to their homes
(VISA,HasterCard and Discovercards are accepted).Orderon-line todag, 24 hours everg dag or bg phone at
800.626.2002during normal businesshours.
Instructions contained in this manual cover procedures to beperformed by any user. Other servicing
generally should be referred to qualified service personnel Caution must be exercised, sinceimproper
servicing may cause unsafe operation.
Contact Us Hotpoint.com
If gou are not satisfiedwith the service gou receivefrom Hotpoint, contact uson our Website with allthe details
including gour phone number, or write to: General Hanager, CustomerRelations
Hotpoint, Appliance Park
Louisville,KY40225
Register YourAppliance Hotpoint.com
Register gour new appliance on-line--at gour convenience! Timelg product registration will allow for
enhanced communication and prompt service under the terms of gourwarrantg, should the need arise.
Youmag also mailin the pre-printed registration card included in the packing material.
Printed in Canada
-
 1
1
-
 2
2
-
 3
3
-
 4
4
-
 5
5
-
 6
6
-
 7
7
-
 8
8
-
 9
9
-
 10
10
-
 11
11
-
 12
12
-
 13
13
-
 14
14
-
 15
15
-
 16
16


Hotpoint NVLR223EH4WO Owner's manual
- Category
- Tumble dryers
- Type
- Owner's manual
Ask a question and I''ll find the answer in the document
Finding information in a document is now easier with AI
Related papers
-
GE NBXR453GVWW User manual
-
Hotpoint NVLR333GT0WB User manual
-
-
-
GE NVLR333GVWW Owner's manual
-
-
-
-
-
Hotpoint VBSR3100DCWW Owner's manual