EMU Australia SHORTboard 49 User manual

Category
MIDI keyboards
Type
User manual

This manual is also suitable for

User’s Guide 1
61-key Professional Performance Instrument
49-key Professional Performance Instrument
2 LONGboard
61
SHORTboard
49
User’s Guide
© 2010 E-MU Systems
All Rights Reserved
Version: B
E-MU World Headquarters
E-MU Systems
1500 Green Hills Road
Scotts Valley, CA 95066
USA
Europe
Creative Labs (Ireland) Ltd.
Ballycoolin Business Park
Blanchardstown Dublin 15
IRELAND
Japan
Creative Media K.K.
Kanda Eight Bldg. 3F
4-6-7 Soto-Kanda
Chiyoda-ku, Tokyo 101-0021
JAPAN
User’s Guide 1
Contents
Introduction ..................................... 3
Features: . . . . . . . . . . . . . . . . . . . . . . . . . . . . . . . . . . . . . . . . . . 4
What is included? . . . . . . . . . . . . . . . . . . . . . . . . . . . . . . . . . . . 4
Start Playing . . . . . . . . . . . . . . . . . . . . . . . . . . . . . . . . . . . . 5
Powering Up . . . . . . . . . . . . . . . . . . . . . . . . . . . . . . . . . . . . 6
Standalone Operation . . . . . . . . . . . . . . . . . . . . . . . . . . . . . . . . 6
USB Powered Operation . . . . . . . . . . . . . . . . . . . . . . . . . . . . . 6
Basic Hardware Connections ....................... 7
MIDI Routing . . . . . . . . . . . . . . . . . . . . . . . . . . . . . . . . . . . . 8
MIDI Path when a Computer is Connected via USB .........8
MIDI Path when a Computer is NOT Connected ........ 9
Wireless Audio Connection with E-MU PIPEline . . . . . . 10
Setting Up Your Computer for MIDI ................. 13
Front Panel Controls ............................. 14
Program Selection ..................................14
Banks and Groups ..................................14
2 LONGboard
61
SHORTboard
49
Rear Panel . . . . . . . . . . . . . . . . . . . . . . . . . . . . . . . . . . . . . 23
Control and Power . . . . . . . . . . . . . . . . . . . . . . . . . . . . . . . . . 23
Digital Connections . . . . . . . . . . . . . . . . . . . . . . . . . . . . . . . . . 25
Appendix . . . . . . . . . . . . . . . . . . . . . . . . . . . . . . . . . . . . . . 28
Troubleshooting ....................................28
E-MU Keys Program Chart ...........................30
General MIDI Program Chart ..........................31
General MIDI - Channel 10 Percussion ..................33
General MIDI Drum Map . . . . . . . . . . . . . . . . . . . . . . . . . . . . . 34
Specifications . . . . . . . . . . . . . . . . . . . . . . . . . . . . . . . . . . 35
Safety Information ............................... 36
Regulatory Information ........................... 37
Notice for the USA ..................................37
California Proposition 65 Statement ....................38
WEEE Directive 2006/66/EC ..........................39
WEEE Directive 2002/96/EC ..........................40
User’s Guide 3
INTRODUCTION
Congratulations on your purchase of the E-MU LONGboard 61 or
SHORTboard 49. You’ve just purchased an outstanding MIDI controller
keyboard united with a 16-part multitimbral, 128-voice professional sample-
based instrument and a custom 64MB sound set.
LONGboard 61 or SHORTboard 49 are professional USB/MIDI instru-
ment with unmatched playability, real-time control and programmability in
portable 49 key, and 61 key packages.
The LONGboard 61 features a 61-note premium semi-weighted keyboard,
while the SHORTboard 49 features a compact 49-note semi-weighted
keyboard. Both models feature full-size velocity-sensitive keys with after-
touch, pitch and modulation wheels, and 6 controller knobs.
The keyboards are ideal for either studio or stage use, since they can be used
as stand-alone MIDI controllers, or with a USB equipped PC or Macintosh
computer. The MIDI input and output can also serve as a computer MIDI
interface when connected via USB.
As an added bonus, the LONGboard 61 and SHORTboard 49 contain a
built-in wireless audio transmitter, which links to the E-MU PIPELINE
receiver giving you a 49 foot (15 meter) range of wireless freedom.
Now, read on to learn all about your new favorite keyboard.
4 LONGboard
61
SHORTboard
49
Features:
Velocity sensitivity and channel aftertouch•
128-voice polyphony•
16-part multitimbral synthesizer•
64 MB sound bank with 64 custom E-MU Keys programs and 128 •
General MIDI (GM) compatible programs
Built-in wireless E-MU PIPEline transmitter•
Synthesizer controller kno• bs (double as MIDI controllers)
Reverb and Chorus eects•
User-denable split keyboard • (for playing two sounds at once)
Pitch and Mod Wheels•
Octave transpose buttons•
MIDI Input and Output jacks •
(the MIDI jacks can also function as a MIDI interface for your computer)
Dual 1/4” headphone jacks•
Can be powered via DC adapter, USB bus power, or batteries•
What is included?
LONGboard •
61
or SHORTboard
49
5V DC Power Supply•
USB Cable•
Quick Start Manual•
Read-me le•
User’s Guide 5
START PLAYING
Your keyboard has been designed to be easy to use. Simply connect the
power supply, connect headphones or your mixer/sound system, turn it on
and start playing.
5VDC
Adapter
Two sets of stereo headphones can be connected.
Power Switch
Power to the keyboard is controlled using a three-position slide switch.
Center � � � � � � Turns the keyboard O
USB Power � � � Use when connected to your computer via USB
DC 5V/Battery Use when not connected to the computer. The
keyboard can be powered via the 5V DC adapter or
(6) D batteries. (Please refer to the following page.)
Note: The 5V DC Adapter takes precedence if batteries are installed and
DC power is applied.
DC 5V
BATTERY
USB
POWER
OFF
6 LONGboard
61
SHORTboard
49
POWERING UP
Standalone Operation
The keyboard can be powered using any of the following methods:
Via USB when connected to a computer•
The included 5V @ 500mA power supply•
With a USB type power supply • (not included)
(6) D-size batteries•
USB Powered Operation
The keyboard can receive power through the USB cable when connected to
a PC or Mac. The USB connection can also transmit and receive MIDI data
to and from the computer. Audio is not transmitted or received over
USB.
Important: Always connect to the USB jack on the computer itself
and NOT to a low-power USB connection that may be present on your
computer keyboard or other USB peripheral.
TIP: • If the keyboard doesn’t work when powered via USB, try discon-
necting the USB cable and using the AC adapter for power.
(Your computer may not be supplying enough power through the USB port.)
Battery Installation
The battery compartment is located on the bottom panel of the unit. Press
the two tabs to open. Install the batteries as labelled on the bottom of the
battery compartment with the + aligned with the + side of the batteries.
User’s Guide 7
BASIC HARDWARE CONNECTIONS
CONNECT
CHANNEL
SELECT
OFF
CH1 CH2
CH3
USB
SUSTAIN
SWITCH
VOLUME
PEDAL
RIGHT
OUT
LEFT
OUT
MIDI OUT MIDI IN
DC IN 5V
DC 5V
BATTERY
USB
POWER
OFF
K
Rear Panel
Mac or PC
5VDC
Adapter
(Use if not connected
to computer via USB)
USB Cable
(carrys MIDI data
& power)
Connect the audio outputs to an audio mixer or integrated amp and •
speakers (such as your home stereo).
The USB cable carries MIDI data and power. This connection allows •
you to record and play back your keyboard performance using a MIDI
sequencer and your computer. The keyboard can also be powered via
USB.
8 LONGboard
61
SHORTboard
49
MIDI ROUTING
LONGboard and SHORTboard automatically switch their MIDI connec-
tions when a computer is connected to the USB port.
With a computer connected there are two MIDI ports (USB Audio Devices 1
& 2 ) available on your computer. The keyboard connects to Port 1 Out and
the internal sound engine. Port 1 In from the computer can also control the
internal sound engine.
Port 2 (USB Audio Device 2) connects directly to the MIDI input and output
jacks functioning as a computer MIDI interface.
MIDI Path when a Computer is Connected via USB
Sound
Engine
Computer sees two
MIDI devices/ports
MIDI
In
A
B
Port 2Port 1
MIDI
USB
Out
In
Keyboard
LONGboard /
SHORTboard
Mac or PC
User’s Guide 9
MIDI Path when a Computer is NOT Connected
With no computer connected to USB, the keyboard connects to MIDI Out
and the internal sound engine.
MIDI In connects to the internal sound engine.
Sound
Engine
MIDI
In
A
B
Port 2Port 1 USB
MIDI
Out
In
Keyboard
LONGboard /
SHORTboard
10 LONGboard
61
SHORTboard
49
WIRELESS AUDIO CONNECTION WITH E-MU
PIPEline
LONGboard and SHORTboard have a built-in wireless audio transmitter
compatible with the E-MU PIPEline wireless stereo audio transmitter/
receiver system. The keyboard’s transmitter operates in “paired” mode by
default. Paired mode allows you to link your keyboard with one (and only
one) PIPEline. Here’s how to link your keyboard to a PIPEline in Paired
mode. Paired and Broadcast modes will be described later.
To Mixer
Inputs
Aux Inputs
Male RCA to Mono 1/4” phone
Back of LONGboard/SHORTboard
Male RCA to Male RCA
Integrated
Amp & Speakers
Mixer &
Powered Speakers
or...
Power
Outlet
Power Adapter
Channel SelectorConnect Button
CONNECT
CHANNEL
SELECT
OFF
CH1 CH2
CH3
USB
Connect the Audio
Set up the PIPEline audio outputs to headphones; an audio mixer; or •
integrated amp and speakers.
On the Rear Panel of the Keyboard
Use the • Channel Select Knob to set the Channel Number.
On the PIPEline Receiver
Set the 1. CH switch to Ch1, Ch2, or Ch3 to match the keyboard
Channel Selector.
User’s Guide 11
Set the 2. B/P switch to the (+) position (Paired mode).
Set the 3. R/T switch to the (-) position (Receive).
Set the 4. D/A switch to the (+) position (Analog).
(LONGboard and SHORTboard don’t support digital mode.)
Link Procedure
On the Rear Panel of your Keyboard
Press the 5. Connect button.
On the PIPEline
Press the 6. Link/Connect button. The white LED will stop ashing
when connected.
Play the keyboard. 7. You will hear audio from the PIPEline!
If you change channels, the keyboard and PIPEline will automatically •
re-link. (Of course, the keyboard and PIPEline channels must match!)
If you turn o the keyboard, PIPEline, or both; they will automatically •
re-link when you turn them back on.
You only have to perform the Link procedure again if you decide to link to a •
dierent PIPEline, or if you decide to change Paired/Broadcasting modes.
Selecting Paired and Broadcasting Modes
The keyboard’s wireless transmitter operates in “paired” mode by default.
Paired mode allows you to link your keyboard with one (and only one)
PIPEline. Broadcasting Mode allows you to link your keyboard to one or
more PIPElines. Please refer to the PIPEline User’s Guide for a detailed
description of these modes. The PIPEline User’s Guide is available at the
E-MU web site: www.emu.com.
To Switch between Paired and Broadcasting modes:
Important:1. First set the keyboard Channel Select knob to OFF.
To select Broadcasting mode2. , blip* the Keyboard Link button 7
times.
To select Paired mode,3. blip* the Keyboard Link button 3 times.
* A “blip” is a quick press/release of the button.
12 LONGboard
61
SHORTboard
49
Linking in Broadcasting Mode
Here’s how to link your Keyboard to one or more PIPElines in Broadcasting
mode.
Turn on your Keyboard. Turn on your PIPEline(s), the white LED will 1.
blink.
Setup Procedure
Connect the Audio
Set up the PIPEline audio outputs to headphones; an audio mixer; or •
integrated amp and speakers.
On the Rear Panel of your Keyboard
Use the Channel Select Knob to set the Channel Number.•
On each PIPEline
Set the CH switch to Ch1, Ch2, or Ch3 to match the Keyboard 2.
Channel Selector.
Set the B/P switch to the (-) position (Broadcasting mode).3.
Set the R/T switch to the (-) position (Receive).4.
Set the D/A switch to the (+) position (Analog).5.
Link Procedure
On the Rear Panel of your Keyboard
Press the Connect button.•
On each PIPEline
Press the Link/Connect button. The white LED will stop ashing 6.
when connected.
Repeat the Link Procedure for each PIPEline.7.
Play your Keyboard. You will hear audio from each PIPEline linked to 8.
your Keyboard.
If you change channels, the Keyboard and PIPEline will automatically •
re-link. (Of course, the Keyboard and PIPEline channels must match!)
If you turn o the Keyboard, PIPEline, or both; they will automatically •
re-link when you turn them back on.
You only have to perform the Link procedure again if you decide to link •
to a dierent PIPEline, or if you change Paired/Broadcast modes.
User’s Guide 13
SETTING UP YOUR COMPUTER FOR MIDI
The USB cable functions as a bidirectional MIDI cable, allowing you to
record and playback your performance using MIDI sequencing software (not
included).
MIDI is a protocol consisting of data messages that are used to control
synthesizers, sound modules, keyboards, or software “virtual instruments.
MIDI messages contain instructions such as what note to play, when to play
it, and which sound to play.
When connected to your computer via USB, the Keyboard MIDI ports
will appear in the “MIDI Devices” (Mac) or “Sounds and Audio Devices”
(PC), indicating that a valid connection has been made. Refer to your MIDI
sequencing software manual to learn how to record and play back MIDI
sequences.
The USB cable functions as a bidirectional MIDI cable. The MIDI Input allows you to
use other MIDI controllers such as another keyboard, extra knobs or drum pads.
The MIDI Output sends data from the keyboard, wheels and knobs.
The MIDI Input and Output jacks also function as a MIDI interface, allowing other
MIDI devices to be connected to your computer.
U
S
B
C
a
b
l
e
(
i
n
c
l
u
d
e
d
)
14 LONGboard
61
SHORTboard
49
FRONT PANEL CONTROLS
GM KEYS
Row
Select
Column
Select
Press & Hold to Select
General MIDI Bank (Bank 0)
Press & Hold to Select
E-MU Keys Bank (Bank 7)
Press & Hold to Select
Different Groups
Group 4
Group 3
Group 2
Group 1
Brite Piano
Honky Tonk
Piano Strings Pulse Piano
Solina Strings
Brass Section
Sax Section
String Section
TB 303/Rhodes
Synth Bass/Lead
Slap/Horns
Synthestring
Program Selection
Each Program contains a dierent sound. To Select a Program, press a row
and/or a column button. The program at the intersection of the column
and row buttons is selected and the selected program number ashes in the
display (1-128).
Note: The program names on the front panel refer to Bank 7, Group 1.
Banks and Groups
A Bank may contain up to 128 programs, arranged in 4 Groups of 32
programs.
To Select Another Group: Press and Hold one of the Row Select buttons
for 2 seconds to select another group of 32 programs. The LED above the
slider ashes the selected Group number, i.e. gp 2 (group 2).
To Select Another Bank: Press and Hold either the Left or Right column
button for 2 seconds to switch between program banks 0 and 7 (and transmit
a MIDI Bank Select message on CC00). Press and Hold the column button
marked KEYS for 2 seconds to switch back to bank 7. The LED above the
slider ashes the selected bank number, i.e. bn 7.
User’s Guide 15
Bank 7, Group 2 Programs
Press and hold Group 2 button (when in E-MU Keys Bank)
General MIDI Bank (128 General MIDI Programs)
See the General MIDI Program Chart for a numerical listing.
General MIDI, Group 1 Programs
Press and hold Group 1 button while in General MIDI Bank.
General MIDI, Group 2 Programs
Press and hold Group 2 button while in General MIDI Bank.
Piano 1
Celesta
Organ 1
Nylon Guitar
Piano 2
Glockenspiel
Organ 2
Steel Guitar
Piano 3
Music Box
Organ 3
Jazz Guitar
Honky Tonk
Vibraphone
Church Organ
Clean Guitar
Electric
Piano 1
Marimba
Reed Organ
Guitar Mutes
Electric
Piano 2
Xylophone
Accordian
Overdrive
Guitar
Harpsichord
Tubular Bells
Harmonica
Distortion
Guitar
Clavinet
Dulcimer
Bandoneon
Guitar
Harmonics
Group 1
Press & Hold
Acoustic
Bass
Violin
Strings
Trumpet
Fingered
Bass
Viola
Slow Strings
Trombone
Picked
Bass
Cello
Synth Strings
1
Tuba
Fretless
Bass
Contrabass
Synth Strings
2
Mute Trumpet
Slap Bass
1
Tremolo
Strings
Choir Ahhs
French Horns
Slap Bass
2
Pizzacato
Voice Oohs
Brass
Synth Bass
1
Harp
Synth Vox
Synth Brass
1
Synth Bass
2
Timpani
Orchestra
Hit
Synth Brass
2
Group 2
Press & Hold
16 LONGboard
61
SHORTboard
49
General MIDI, Group 3 Programs
Press and hold Group 3 button while in General MIDI Bank.
General MIDI, Group 4 Programs
Press and hold Group 4 button while in General MIDI Bank.
Soprano
Sax
Piccolo
Square
Wave
Fantasia
Alto Sax
Flute
Saw Wave
Warm Pad
Tenor Sax
Recorder
Synth
Calliope
Poly Synth
Baritone
Sax
Pan Flute
Chiffer
Lead
Space Voice
Oboe
Bottle Chiff
Charang
Bowed
Glass
English Horn
Shakuhachi
Solo Vox
Metal Pad
Bassoon
Whistle
5th Square
Wave
Halo Pad
Clarinet
Ocarina
Bass
& Lead
Sweep Pad
Group 3
Press & Hold
Ice Rain
Sitar
Tinker Bell
Fret Noise
Soundtrack
Banjo
Agogo
Breath Noize
Crystal
Shamisen
Steel Drum
Seashore
Atmosphere
Koto
Wood Block
Bird
Brightness
Kalimba
Taiko Drum
Telephone
Goblin
Bagpipe
Melodic
T o m
Helicopter
Echo Drops
Fiddle
Synth Drum
Applause
Star Therme
Shenai
Reverse
Cymbal
Gun Shot
Group 4
Press & Hold
User’s Guide 17
Data Slider & Numeric Display
This control is used to enter values while editing and as a
performance controller while playing. You can change the
function of this control by changing the CC Assign number.
Octave Buttons
The octave buttons transpose the
keyboard up or down one octave.
When the transpose buttons are
pressed, the octave transpose
amount appears in the numeric
display, i.e. -2.
Whenever the data slider is used for editing, the octave •
buttons function as increment/decrement buttons, allowing
you to change values one unit at a time.
Pressing both octave buttons simultaneously turns o any “stuck notes” •
and clears all controllers, functioning as a MIDI Panic Button. The display
ashes, PAn.
In split mode, the octave buttons control the currently selected range of •
the keyboard.
Select
Program
Change
MIDI
Channel
Velocity
Curve
System
18 LONGboard
61
SHORTboard
49
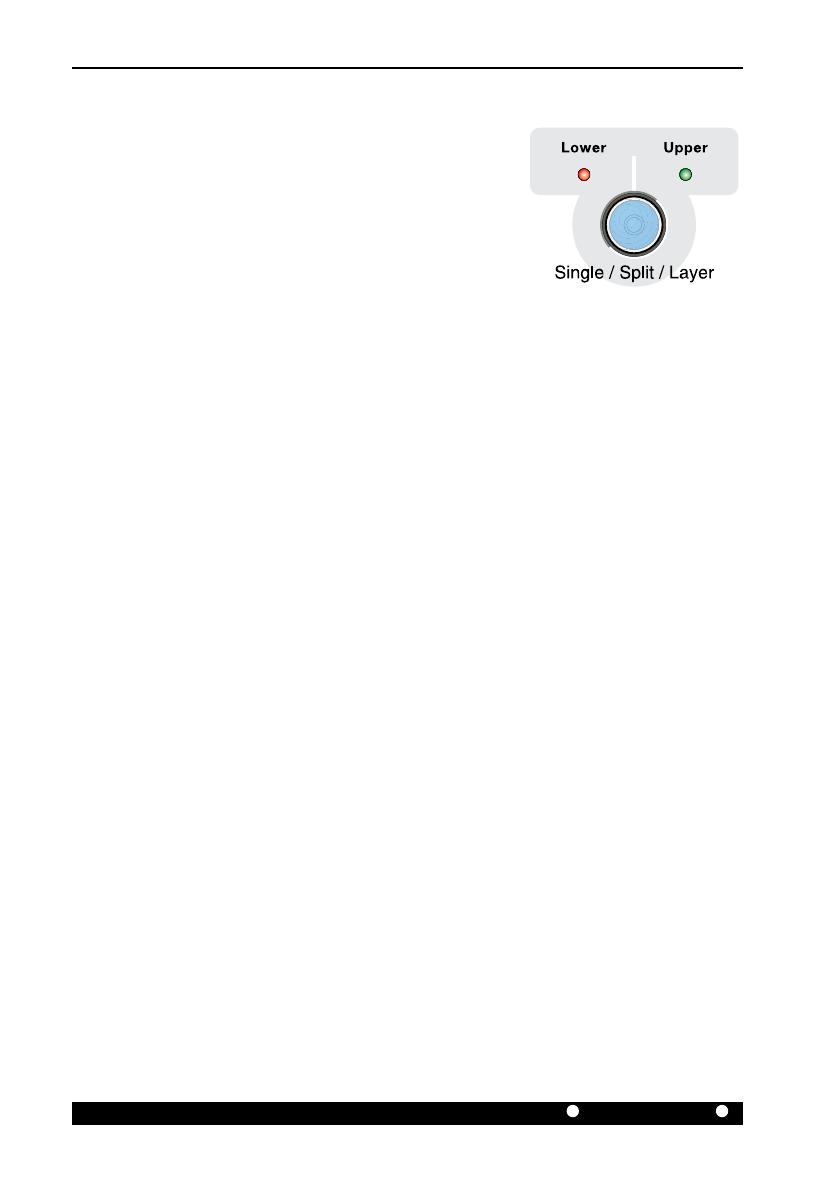
Single/Split/Layer Button
The keyboard can be “split” at any note to
play one program on the lower section and a
completely dierent programs on the upper
section. Two sounds can also be “layered” over
the entire keyboard.
To Set the Keyboard Split Point:
Press and Hold the Split button and press a
keyboard key to split the keyboard at a specic key.
Split Mode:
Press the Split button again to switch between upper and lower sections
or both (Layer mode). When Split mode is active, the front panel knobs,
slider, octave buttons, program select buttons, wheels, and pedal all
aect whichever keyboard section is currently selected.
With the Lower LED on, change the lower program, edit a synth control to
edit the lower program, or change the MIDI channel for the lower section.
Select “Upper” then change the upper program, edit a synth control on the
upper program, or change the MIDI channal for the upper section.
Layer Mode:
When the Upper and Lower LEDs are both lit, Layer Mode is in eect
and both the upper and lower programs will be heard when you play the
keyboard.
Changing a program when in Layer mode will change the “Upper” program.
The settings of the Lower program remain in eect when you go back to
Normal mode.
When in Layer mode, the Data Slider functions as a balance control between
the upper and lower layers.
Note: Splits and Layers cannot be saved with the program. The Split Point,
however, is retained in memory until you power o the keyboard.
  • Page 1 1
  • Page 2 2
  • Page 3 3
  • Page 4 4
  • Page 5 5
  • Page 6 6
  • Page 7 7
  • Page 8 8
  • Page 9 9
  • Page 10 10
  • Page 11 11
  • Page 12 12
  • Page 13 13
  • Page 14 14
  • Page 15 15
  • Page 16 16
  • Page 17 17
  • Page 18 18
  • Page 19 19
  • Page 20 20
  • Page 21 21
  • Page 22 22
  • Page 23 23
  • Page 24 24
  • Page 25 25
  • Page 26 26
  • Page 27 27
  • Page 28 28
  • Page 29 29
  • Page 30 30
  • Page 31 31
  • Page 32 32
  • Page 33 33
  • Page 34 34
  • Page 35 35
  • Page 36 36
  • Page 37 37
  • Page 38 38
  • Page 39 39
  • Page 40 40
  • Page 41 41
  • Page 42 42

EMU Australia SHORTboard 49 User manual

Category
MIDI keyboards
Type
User manual
This manual is also suitable for

Ask a question and I''ll find the answer in the document

Finding information in a document is now easier with AI