Page is loading ...

SONOMA SMOKER USER MANUAL


Sonoma Smoker By Lynx™ Care & Use P/N 35948 Page 3
WARNINGS
WARNING
READ THIS MANUAL CAREFULLY and completely before using your smoker to reduce the risk of:
1. Fire
2. Burn hazard, personal injury or property damage
3. Ruined steaks or other unpleasant cooking experiences
4. Unapproved installaon or servicing.
THIS PRODUCT IS DESIGNED FOR OUTDOOR USE ONLY. Improper installaon, adjustment, alteraon, service
or maintenance can cause property damage, injury or death.
Read this manual thoroughly before installaon, use, or servicing of this product.
DANGER
IF YOU SMELL GAS:
1. Shut o all gas supply lines to the smoker.
2. Exnguish any open ames.
3. Carefully open the lid. Remember, it may be
extremely hot!
4. If odor connues, keep everyone away from
the
smoker and immediately call your gas sup-
plier or
your re department.
AVERTISSMENT
S’IL Y A UNE ODEUR DE GAZ:
1. Coupez l’admission de gaz de l’appareil.
2. Éteindre toute amme nue.
3. Ouvrir le couvercle. Rappelez-vous qu'il peut
être extrêmement chaude.
4. Si l’odeur persiste, éloignez-vous de
l’appareil et appelez immédiatement le
fournisseur de gaz ou le service d’incendie.
WARNING
DO NOT store or use gasoline or other
ammable vapors and liquids in the vicinity of
this
or any other appliance.
A liquid propane cylinder not connected for
use
shall not be stored in the vicinity of this or
any
other appliance.
AVERTISSMENT
Ne pas entreposer ni uliser de l’essence ni
d’autres vapeurs ou liquides inammables
dans
le voisinage de l’appareil, ni de tout
autre
appareil.
Une bouteille de propane qui n’est pas
raccordée en vue de son ulisaon, ne doit
pas
être entreposée dans le voisinage de cet
appareil ou de tout autre appareil.
WARNING! CALIFORNIA PROPOSITION 65
The burning of gas cooking fuel generates some by-products which are on the list of substances which are
known by the State of California to cause cancer or reproducve harm.
California law requires businesses to warn customers of potenal exposure to such substances. To minimize
exposure to the substances, always operate this unit according to the use and care instrucons found in this
manual. Be certain to provide adequate venlaon when cooking.

Sonoma Smoker By Lynx™ Care & Use P/N 35948 Page 4
STEP #1—REQUIREMENTS
Smart device (phone or tablet)
110 volt GFIC outlet at the Smoker
Proper gas supply
Home network name (SSID) & password
Name:
Password:
Sonoma Smoker by Lynx™ serial number/PIN*
Serial number:
PIN:
Located on the touch pad containment box
QUICK START POWER CONNECTIVITY & WI-FI SET UP PROCESS*
iPhone 5 or greater or
iPad version
2.0 or greater
Android 4.4 or greater
STEP #2—SETUP YOUR SMOKER
Locate the antenna in the white box inside the smoker and screw
into the back of
the Sonoma Smoker.
Plug the power cable from the Sonoma Smoker into a 110v GFIC
electrical outlet.
STEP #3—DOWNLOAD AND SETUP THE SONOMA SMOKER APP ON
YOUR
PHONE OR TABLET AND CREATE YOUR ACCOUNT
Go to the App Store or Google Play and download “Sonoma Smoker by Lynx” and install
Open the Sonoma Smoker App and click Create Account then enter your smoker serial number and PIN
then click
Connue
.
Enter your email address, password and your registraon informaon and click
Create Account. You will get a conrmaon email.
Open the conrmaon email and follow instrucons to acvate your account.
Now login to the Sonoma Smoker app by entering your email and password.
*For most current version of the Quick Start Guide, please refer to your app or our website at www.lynxgrills.com

Sonoma Smoker By Lynx™ Care & Use P/N 35948 Page 5
STEP #4—SETUP Wi-Fi CONNECTIVITY
On your Phone or Tablet, verify that you have at least 60% wireless signal at your Sonoma Smoker. If
you cannot achieve at least 60% signal, we suggest you use a Wi-Fi extender, or booster. These are
available at your local electronics store.
On your Sonoma Smoker, press the power buon and wait about 5 seconds for the smoker to display the Lynx Logo and
mer buons.
Push the green or yellow Wi-Fi icon in the upper le of the control panel.
Push the “conrm wireless reset” buon
On your phone or tablet, switch to your Wi-Fi sengs and locate the wireless network called Smoker xxxx (xxxx is the
last
four digits of your serial number) and connect to it.
QUICK START POWER CONNECTIVITY & WI-FI SET UP PROCESS*

Sonoma Smoker By Lynx™ Care & Use P/N 35948 Page 6
Now go back to your Sonoma Smoker App and go to the Resources icon, then My Smoker, then Smoker Wi-Fi setup.
Wait 10-20 seconds for the Wi-Fi setup menu
Click on the SSID and enter the password for your home network (informaon in STEP #1—REQUIREMENTS) then select
DONE. Aer 20-60 seconds, your Sonoma Smoker Wi-Fi icon will turn green to indicate that it is connected to the internet”,
and your wireless conguraon is complete. Now just power the Sonoma Smoker o, then back on. Aer 5 seconds the
Smoker will display the main control panel. On the Smoker app click on the Smoker icon and now your Sonoma Smoker is
connected and ready to smoke.
STEP #5—START USING YOUR SMOKER
To try out a recipe, go back to your Smoker App and go to the Recipe icon.
Select a recipe from the recipe list and click Cook Now to send the recipe to your Smoker. Follow the
prompts and place food on the smoker, turn food over, remove food from smoker). Please note that it could take several
minutes for your Smoker
to warm up and give you the command to place food on smoker.
Need more help? Please refer to your detailed instrucon manual or call our customer support team at 888-289-5969
and choose opon #5.
QUICK START POWER CONNECTIVITY & WI-FI SET UP PROCESS*

Sonoma Smoker By Lynx™ Care & Use P/N 35948 Page 7
WARNING
Never use dented, rusty or damaged propane cylinders. Never store addional or empty propane cylinders
in
the smoker cabinet or in the vicinity of this or any other appliance. Do not store propane cylinders indoors or
on their sides.
Children should never be le alone or unaended in an area where a smoker is located. Place your smoker
well
away from areas where children play. Do not store items that may interest children in or around the
smoker, in
the cart, or in the masonry enclosure.
Never move the smoker when hot. When in use, porons of the smoker are hot enough to cause severe burns.
Always maintain the required clearances from combusbles as detailed. The smoker is designed for outdoor
use
only. Never use in a garage, building, shed, breezeway, or other enclosed area. Do not use this smoker un-
der
any unprotected combusble construcon.
Gas smokers are not designed or cered for and are not to be installed in or on recreaonal vehicles, porta-
ble
trailers, boats or any other moving installaon.
Always have an ABC Fire Exnguisher accessible — never aempt to exnguish a grease re with water or
other liquids.
Storing your smoker: Store your smoker in a well-venlated area. If stored indoors, detach and leave L.P.
cylinder
outdoors in a well-venlated area away from heat and away from where children may tamper with it.
Keep any electrical supply cord and the fuel supply hose away from any heated surfaces. Electrical cords
should be placed away from walkways to avoid tripping hazard.
Do not repair or replace any part of the smoker unless specically recommended in this manual. Other ser-
vice
should be performed by a qualied technician.
If the smoker is installed by a professional installer or technician, be sure that he/she shows you where your gas
supply shut-o is located. All gas lines must have a shut-o that is readily and easily accessible. If you smell
gas,
check for gas leaks immediately. Check only with a soap and water soluon. (See INDEX: “Leak Tesng”
for
further details.) Never check for gas leaks with an open ame.
Inspect the liquid propane gas supply hose prior to each use of the smoker. If there is evidence of exces-
sive abrasion or wear, or if the hose is cut, it must be replaced before using the smoker.
Never remove the grounding prong from the plug or use this product with an ungrounded, 2-prong adapter.
Keep your smoker area clear and free of combusble materials, gasoline and other ammable vapors and liquids.
Never block the ow of combuson and venlaon air.
THIS MANUAL MUST REMAIN WITH THE PRODUCT OWNER FOR FUTURE REFERENCE.
To obtain replacement parts or service contact:
Lynx Grills
7300 Flores Street
Downey, CA 90242
888-289-5969
www.lynxgrills.com
This product complies with ANSI standard
Z21.89-2013/CSA 1.18 2013
latest edion,
UL 62368-1 Issue:2014/12/01 Ed:2 and
has been tested
and approved by Intertek.
WARNINGS

Sonoma Smoker By Lynx™ Care & Use P/N 35948 Page 8
A MESSAGE FROM LYNX
This use & care manual covers the Lynx Smoker models listed below. Some features and opons will vary based upon
the
model that you purchased.
USE & CARE GUIDELINES
BUILT-IN
FREESTANDING SMOKER CHIPS
LSMK LSMKF LCSA (Apple)
LSMKM LSCH (Hickory)
LSCM (Mesquite)
LSCP (Pecan)
LSCF (4 Pack)
Thank you for your purchase of a Sonoma Smoker by Lynx™. You’ve just entered the future of smoking, a world of
amateur and professional chefs who are taking the world of outdoor cooking to new levels through technology.
Your Sonoma Smoker by Lynx™ has been designed to the same exacng standards and meculous aenon to detail
every
Lynx product enjoys. In addion to that, you’re about to enjoy a high-performance stainless steel Smoker that
incorporates patented MyChef™ technology, an interacve, innovave and chef-friendly system designed to elevate
your cooking to
new heights.
To get the maximum performance out of your Smoker, we recommend carefully reading through this enre manual
before
your rst smoking. It contains important informaon on how to properly set up your Sonoma Smoker by Lynx™
and ulize the MyC h ef ™ technology along with important safety ps and hints and tricks that will enhance your
Smoking experience. Keep
it handy for easy reference and should your Lynx Sonoma Smoker by Lynx™ change
ownership, please make sure the new owner receives this manual. With proper use and care, your Lynx Sonoma
Smoker by Lynx™ will provide years of trouble-free service.
Thank you again for joining the community of Lynx chefs. We love hearing about your experiences with our products.
Please check us out on the Web and social media to let us know how you and your Sonoma Smoker by Lynx™ are
doing.
Web: hp://www.lynxgrills.com/
Facebook: hps://www.facebook.com/LynxProfessionalGrills
Twier: @LynxGrills
We wish you many years of happy smoking!
LYNX GRILLS
SONOMA SMOKER BY LYNX™ MODELS
Woodchip blends also available.

Sonoma Smoker By Lynx™ Care & Use P/N 35948 Page 9
WARNINGS
STATE OF MASSACHUSETTS
1.
Massachuses requires all gas be installed using a plumber or gas er carrying the appropriate
Massachuses license.
2.
All permanently-installed natural gas or propane installaons require a “T” handle type manual gas valve be
installed in the gas supply line to this appliance.
3.
This does not apply to portable propane installaons using a 20 pound cylinder.
WARNING
1.
Do not open the touch pad containment box as there are no user-serviceable parts inside, and doing so will
void all warranes. All other services should be performed by a qualied technician.
2.
All gas lines must have a gas shut-o valve that is readily and easily accessible. Be sure you know where the
shut-o is located. If you smell gas, check for gas leaks immediately. Check only with a soap and water
soluon. Never check for gas leaks with an open ame. (See INDEX: “Leak Tesng” for further details)
WARNING
1.
The outdoor cooking gas appliance and its individual shuto valve must be disconnected from the gas supply
piping system during any pressure tesng of that system at test pressures in excess of 0.5 psi (3.5 kPa).
2.
The outdoor cooking gas appliance must be isolated from the gas supply piping system by closing its
individual
manual shuto valve during any pressure tesng of the gas supply piping system at test pressures equal to or
less than 1/2 psi (3.5 kPa).
1.
Avoid wearing loose-ng garments or long sleeves
while smoking. They could ignite.
2.
Never touch the smoker racks, hood or immediate
surrounding metal surfaces with your bare hands while smoking.
3.
Use an insulated glove or mi when opening and operang the smoker. Always open the smoker lid
slowly to
allow heat and smoke to escape before fully opening.
4.
The smoker hood must be fully opened while lighng the smoker. Releasing fuel into a closed smoker
before lighng
will not make it light sooner or more eciently. It will
only risk explosion and personal injury
or death. Never
lean over a hot smoker surface or look directly into the smoker
when aempng to light.
IMPORTANT SAFETY PRECAUTIONS

Sonoma Smoker By Lynx™ Care & Use P/N 35948 Page 10
IMPORTANT SAFETY PRECAUTIONS…(Connued)
5. Do not heat unopened food containers as pressure build-up will cause the container to explode.
6. Never use charcoal or any other solid fuel anywhere outside of the smoker chip tray.
7. Cooking excessively fay meats and oils will cause are ups. Internal res or damage caused by doing so or by the smok-
er being le unaended while cooking are not covered under the terms and condions of our warranty.
8. Never smoke without the drip pan in place. Always ensure the drip pan is under the food. Hot grease can leak downward
and produce a re or explosion.
9. Grease is extremely ammable. Let hot grease cool down before aempng to handle or dispose of it. The drip tray and
boom of the rebox should be cleaned of grease on a regular basis.
10. Do not use the smoker unless a leak check has been performed on all gas connecons. (See INDEX: “Leak Test Proce-
dure” for further details.)
11. Never operate the smoker while under the inuence of alcohol or drugs.
12. Do not lean on side shelves and never place a load weighing more than 25 pounds on a side shelf.
13. If the burner does not light or goes out during operaon, wait ve (5) minutes before aempng to re-light.
14. Portable LP cylinders: Always shut o the main valve on the LP cylinder aer each use.
15. Spiders and insects like to nest in the burner, venturis, valves and orices of a smoker, disrupng the gas ow. This very
dangerous condion can cause a re behind the control panel, damaging the smoker and risking personal injury. If your
smoker has been unused for a long me, inspect and clean the burner, venturis, valves and orices. (See INDEX:
“Cleaning your Lynx Smoker” for further details.)
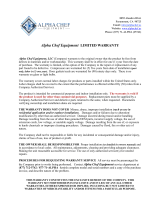
Touch Pad Containment Box
Interior Light
Cooking Grates
Smoker Burner
Power
Adapter
connector
(boom rear
le side)
Meat Thermometer
Close up of meat thermometer socket

Sonoma Smoker By Lynx™ Care & Use P/N 35948 Page 11
BEFORE YOU START
WARNING
Never locate the smoker under a roof
or over-
hang, in a building, garage, shed or other
such
enclosed area. Regardless of combusble or not.
Installaon must conform with local codes or,
in the absence of local codes, with either the
Naonal Fuel Gas Code, AN-SIZ223.1/NFPA
54,
Natural gas and Propane Installaon
Code, CSA
B149.1, or Propane Storage and
Handling Code,
B149.2, in Canada.
VISIBLE LOSS OR DAMAGE
Be certain any visible damage to the carton is noted on
freight bill or express receipt and signed by the person
making delivery.
FILE CLAIM FOR DAMAGES IMMEDIATELY, regardless of
extent of damage.
CONCEALED LOSS OR DAMAGE
If damage is unnoced unl the smoker is unpacked, nofy
the transportaon company or carrier immediately and le
a
“concealed damage” claim with them. This should be
done
within (15) days of the date delivery is made to you.
Be
sure to hold on to the container for inspecon. We can-
not
assume responsibility for damage or loss incurred in
transit.
(See Page 32: “Obtaining Service from Lynx” for
further
details.)
Shipping receipts should be signed “not inspected for
concealed damage” if you did not open and inspect the
product before the delivery driver leaves.
Should your touch pad containment box be damaged
during shipment, please contact Lynx Customer Care
immediately.
How to Remove the Carton
Cut the main strap holding the cart to the pallet.
Remove the staples at the boom of the carton.
Li o the carton.
With assistance, remove the smoker cart from the
pallet and place into desired locaon.
IMPORTANT! Do not remove staples around the
top of the carton. These staples hold a wooden
pallet in place inside the carton that protects the
unit from damage.
Removing these staples may
cause the pallet to fall on
top of the smoker and
damage the internal mechanisms that
power the
Sonoma Smoker by Lynx™ ’s computer core.
IF SHIPMENT ARRIVES DAMAGED
Under no circumstances should you open
the touch pad
containment box. There are no user serviceable
parts inside and doing so will void all warranes.
The smoker arrives nearly ready to use and requires only
minor assembly.
By carefully following the uncrang and unpacking steps,
you’ll be up and smoking on your Sonoma Smoker by
Lynx™
in no me!
SHIPPING WEIGHT IS APPROX. 125 POUNDS AND CART
UNITS MAY WEIGH OVER 175 POUNDS.
UNPACKING & ASSEMBLY
Smoker cart will
not slide directly
o pallet
On a freestanding smoker the wheels sit down in the
gaps of the shipping crate so that the smoker can sit
safely and solidly on the crate during shipping.
The smoker cannot be slid directly o of the pallet.
WARNING:
EXCESSIVE WEIGHT HAZARD!
Use two or more people to move or install this unit.
Failure to follow this instrucon can result in
back or other personal injuries as well as
potenal
damage to your Sonoma Smoker
by Lynx™.
CRATE & CARTON
DAMAGE TO TOUCH PAD CONTAINMENT BOX

Sonoma Smoker By Lynx™ Care & Use P/N 35948 Page 12
BEFORE YOU START…(Connued)
Lynx uses sturdy e-down cables and straps to ensure
your smoker arrives at your home in the same condion
that it le our factory. BE SURE YOU HAVE REMOVED ALL
TIE DOWNS BEFORE USING YOUR SMOKER.
Remove any loose items from the packaging, rebox,
and drip tray.
Ensure that the burner is properly seated on the
orice, level with the oor and rmly secure in the
retaining bracket.
The Sonoma Smoker by Lynx™ built-in smoker is designed
for easy installaon into masonry enclosures.
NOTE: Lynx built-in Sonoma Smokers are intended either
for installaon in a built-in enclosure constructed of non-
combusble material or for an installaon to a built-in
enclosure constructed of combusble material .
The smoker drops into the opening shown in the cutout
detail drawing (See Page 14: “Gas Connecons”) and hangs
from its counter-top trim. A deck is not required to support
it from the boom.
Pay special aenon to the provisions shown for gas-line
hookup
The enclosure should have venlaon holes to prevent gas
build-up in the event of a leak. The deck ledges and counter
should be at and level. (refer to local codes).
Keep the venlaon openings of the cylinder enclosure free
and clear from debris.
This smoker requires that a 120-volt, 60 hertz, 15 amp GFI-
INTERIOR PACKING
CLEARANCE TO COMBUSTIBLE/NON COMBUSTIBLE
MATERIALS
BUILT-IN INSTALLATIONS
Either materials may make direct contact with the edges of the
rebox body up to the top surface of the rebox. Below the
counter top surface the non-combusbles should not encroach
on the cutout dimensions dened in this manual for both t,
access to service and airow.
Above the counter top a minimum clearance of 6” to rear
combusbles, and 5” on the le side of the smoker.
For non-combusble installaons a 4” clearance is required
immediately behind the smoker to allow the front hood to
open. The smoker exhausts combuson products and cooking
greases to the back of the unit. Never locate the smoker where
this residue will be dicult to clean.
24” Clearance
On the right side 24” clearance is required to allow the
smoker chip tray to be removed.
CLEARANCE FOR SMOKER CHIP TRAY
When pushing, liing, or pulling a freestanding Smoker
across gravel, grass, pavers, brick, stone, imperfecons in
the surface, or wood slaed decks be cauous and move
slowly or use a carpet dolly. Failure to do so may damage
the structure of the cart which will not be covered under
warranty.
One way to safely move the smoker o of the pallet is by
liing one end of the smoker high enough to place a ramp
under the wheel and then li the other end while rolling
the smoker o of the pallet.
The enclosure should have venlaon holes to prevent gas
build-up in the event of a leak. The deck ledges and counter
should be at and level. (refer to local codes).

Sonoma Smoker By Lynx™ Care & Use P/N 35948 Page 13
BEFORE YOU START…(Connued)
A 4” clearance is required behind the smoker to provide
unobstructed opening of the hood.
The smoker exhausts combuson products and cooking
greases to the back. Never locate the smoker where
this exhaust will be dicult to clean.
The guides, measurements and dimensions detailed below
are designed to assist you with planning your outdoor
kitchen.
NOTE: Due to connuing product innovaon, specicaons
are subject to change without noce.
IMPORTANT: Please reference this Care & Use/Installaon
manual for details on gas plumbing requirements,
electrical specicaons and the proper installaon of your
Lynx outdoor kitchen equipment. An electronic copy of this
manual can be downloaded from the Lynx Web site at
www.lynxgrills.com.
HOW LONG IS YOUR RUN?
Keep all gas supply lines as short as possible. Gas lines lose
pressure over distance and with each elbow and tee that is
added. This drop in pressure aects the smoker’s
performance. (See INDEX: “Gas Supply Line Runs” for
further details.)
BE SURE YOUR SMOKER IS LEVEL
Proper levelling during installaon is crical to the smooth
operaon of your Sonoma Smoker by Lynx™. A smoker that
is out of level will cause errac burner combuson and
inecient, uneven heang. A carpenter’s spirit level should
be used to level the smoker both front-to-back and
side-to-side.
If the oor is uneven or has a pronounced slope, re-leveling
may be required each me you move a freestanding
Sonoma Smoker by Lynx™.
4” min
REAR HOOD CLEARANCE
SPECIFICATIONS AND INSTALLATION
IMPORTANT INSTALLATION NOTES
Smoker Exhaust

Sonoma Smoker By Lynx™ Care & Use P/N 35948 Page 14
CUTOUT SPECIFICATIONS
The guides, measurements and dimensions detailed below are designated to assist you with planning your outdoor kitchen.
NOTE: Due to connuing product innovaon, specicaons are subject to change without noce.
IMPORTANT: Please reference this Care & Use / Installaon manual for details on gas plumbing requirements, electrical
specicaons and the proper installaon of your Lynx outdoor kitchen equipment. This manual can be downloaded from the Lynx
website at www.lynxgrills.com

Sonoma Smoker By Lynx™ Care & Use P/N 35948 Page 15
GAS CONNECTIONS
WARNING
NEVER CONNECT A GAS LINE DIRECTLY TO THE SONOMA SMOKER BY LYNX™. A PRESSURE REGULATOR MUST BE INSTALLED ON ALL
GAS EQUIPMENT. ALL LOCAL CODES REQUIRE IT AND LYNX GRILLS SUPPLIES THE CORRECT REGULATOR FOR USE WITH YOUR
SMOKER. REMOVING OR FAILING TO INSTALL THE PRESSURE REGULATOR CAN RESULT IN FIRE AND SERIOUS PERSONAL INJURY
AND WILL VOID THE WARRANTY.
The Sonoma Smoker by Lynx™ is factory set to use
either liquid propane or natural gas. It is crical that
the gas you use matches that for which the smoker
was set up. You can verify this by checking the rang
plate.
The rang plate lists serial numbers, model numbers and gas
type and is located in one or more of the following places:
On the back of the Care & Use manual
On the touch pad containment box
Ensure that the gas supplied meets with the minimum
pressure requirements. Do not operate the smoker with any
gas other than that for which the smoker has been set.
Water Column Requirements:
Lynx Grills recommends that only qualied professionals
perform the required plumbing on this product.
To ensure sasfactory performance, the gas supply line must
be sized to accommodate the total BTU requirements of all
the gas-red equipment that will be connected to that line.
In no case should pipe less than 3/4” inside diameter or 1”
outside diameter ever be used to connect this product.
Calculate the total BTU output of all equipment and
refer to “INDEX: Gas Supply Line Runs” for allowable run
distances for ¾ inch pipe. Failure to meet these minimum
requirements may reduce performance of the smoker
and any other appliances running on that supply line.
Always keep supply line runs as short as possible. (See
INDEX: “BTU Output” for specic model outputs)
A gas shut-o valve must be installed in an easily
accessible locaon by a qualied plumber.
Keep threading compound o of the rst two pipe
threads to avoid having any small pieces of compound
break loose and clog a burner valve or orice. Do not use
threading compound on any are ngs.
For built-in installaons, it is required that a metal ex hose
cered for gas use be used. (See INDEX: “Gas Connecons”
for typical permanent hook up.) Please ensure all
installaons conform to local codes.
Both the regulator and the manifold orices have been
tuned for the type of gas specied on the rang plate.
Gas conversion kits are available from Lynx grills to allow the
Sonoma Smoker by Lynx™ to operate on either natural gas or
liquid propane gas. These kits should be installed by a qualied
technician.
The kits come with complete installaon instrucons. These
instrucons should be read completely and fully.
All installaon and all installaon parts must conform to local
codes with the Naonal Electrical Code, ANSI Z223.1/NFPA 70
latest edion and the Naonal Fuel Gas Code, ANSI Z223.1/
NFPA 54 in the U.S. and CGA-B149.1/.2 in Canada.
Canadian installaons must conform to CGA-B149.1/.2 natural
gas/propane installaon code. (Canada)
NATURAL GAS
GAS CONVERSION KITS
For freestanding units using natural gas, Lynx recommends
using a mobile ex gas line.
This is available at your local hardware store or from your
dealer.
Connect to regulator
(NG/Hard pipe LP)
Keep last two
threads clean

Sonoma Smoker By Lynx™ Care & Use P/N 35948 Page 16
Always check for leaks aer every liquid propane cylinder
change. (See INDEX: “Leak Test” for further details.)
Always shut o the liquid propane gas supply at the cylinder
when the Sonoma Smoker is not in use.
Cylinders must be stored outdoors in a well- venlated area out
of the reach of children. If Your smoker is stored indoors, the
liquid propane cylinder must be stored outside.
LP cylinder with
type 1 valve
connecon
GAS CONNECTIONS…(connued)
Smokers set up for liquid propane gas come equipped
with a liquid propane hose/ regulator assembly for
connecon to a standard 20 lb. Liquid propane cylinder
(Type 1). All ngs necessary to aach the assembly to
the smoker are included.
Permanently plumbed liquid propane connecons, such as
those in line with a bulk cylinder, require a 4/11 regulator
(Lynx P/N 30781) which is available at no charge from Lynx.
When using the 4/11 regulator, you must ensure that it is
set for the proper fuel type. This is done by removing the
regulator cap and gasket and looking at the boom of the
plunger to see what fuel type is visible. This is the regulator
fuel seng. NAT is for natural gas and LP is for propane
gas. The LP seng can be further idened by the large
diameter disk on the boom of the plunger. To change
from one gas to the other, simply push the plunger to the
side to snap it out of the cap, turn the plunger so it reads
the desired gas type on the boom, and push the plunger
unl it snaps back into place in the cap and then replace
the cap into the regulator.
NEVER CONNECT AN UNREGULATED GAS LINE TO THE SMOKER.
Liquid Propane Cylinder Requirements
The LP cylinder must be constructed and marked in accordance
with the specicaons for LP gas cylinders of the U.S. Depart-
ment of Transportaon (DOT) and designed for use with a Type 1
system only.
Cylinders of free standing smokers must be secured using the
provided cylinder retenon system to avoid accidental
movement. Make sure the hose between the smoker and the
propane bole does not touch the back or boom of the rebox.
WARNING
Do not change the regulator/hose assembly or use any other
assembly than the one supplied with your Lynx Sonoma Smoker
by Lynx™.
Do not aempt to use a 5LP-A equipped regulator/hose
assembly with a standard 510 POL cylinder/valve assembly.
Do not store a spare LP-gas cylinder under or near this
appliance.
Never ll the cylinder beyond 80 percent full.
If the informaon above is not followed exactly, a re causing
death or serious injury may occur.
LP GAS REGULATOR INFORMATION
When exchanging your cylinder for a rell, exchange only
for a Type 1 20lb cylinder with an over-ll protecon
device.
Never use a cylinder with a damaged valve.
A dented or rusty LP cylinder may be hazardous and should
be avoided. If in doubt, have it checked by your liquid
propane supplier.

Sonoma Smoker By Lynx™ Care & Use P/N 35948 Page 17
GAS CONNECTIONS…(connued)
Always leak test the connecon aer relling or exchanging
liquid propane cylinders. (See INDEX: “Leak Test” for further
details.)
ELECTRICAL CONNECTIONS
WARNING: ELECTRICAL GROUNDING
Product installaon must meet local electrical codes, or in the absence of local codes, the latest edion of the Naonal Electrical
Code ANSI/NFPA No. 70 or the Canadian Electrical Code CSA C22.1.
Use only a Ground Fault Interrupter (GFI) protected circuit with this outdoor cooking gas appliance.
Do not use this outdoor cooking appliance if it has been submerged underwater without a thorough inspecon by a qualied
technician.
This smoker is equipped with a three-prong (grounded) electric plug for your protecon against shock hazard and must be
plugged directly into a properly grounded three-prong outlet. Never cut or remove the grounding prong from this plug.
Use only extension cords with a three-prong grounding plug, rated for the power of the equipment and approved for outdoor use
with a “W-A” marking.
To protect against electric shock, do not immerse any part of the power cord, an extension cord, or any plugs in water or other
liquid.
Unplug the product before thorough cleaning. Allow it to cool before pung on or taking o parts.
Do not let the cord hang over the edge of a table or touch hot surfaces.
Do not use an outdoor cooking gas appliance for purposes other than intended.
Do not operate any outdoor cooking gas appliance with a damaged cord, plug, or aer the appliance malfuncons or has been
damaged in any manner. Contact Lynx for repair.
Gas Line Purging
You should purge the gas line of air before aempng to light the
oven.
Make sure all oven controls are in the “OFF” posion.
Disconnect the line from the manifold. Slowly turn on the
main gas supply.
As soon as you smell gas, shut o the supply
Reconnect the line, and test for leakage.
Turn the supply back on slowly.
Wait at least 5 minutes before aempng to light the burner.
Liquid Propane Connecons
Make sure the liquid propane cylinder valve is completely
closed. It is possible for the valve to be opened without
releasing gas, but as soon as you start connecng the regulator,
gas can ow from the connecon.
Insert the regulator inlet into the cylinder valve and turn the
black coupler clockwise unl the coupler is hand ght. Do not
over-ghten this connecon.
To disconnect the coupler, rst make sure the main cylinder
valve is turned o. Grasp the coupler and turn counter-
clockwise. The inlet will then disengage.
Liquid Propane regulator
for a portable tank
Connects to
portable tank
Connects to
manifold

Sonoma Smoker By Lynx™ Care & Use P/N 35948 Page 18
Installaon requires an outdoor 120VAC 15A GFI (Ground Fault Interrupter)
electrical outlet adjacent to the Sonoma Smoker by Lynx™.
The GFI outlet features an internal break that reduces shock hazard. This
type of outlet should be installed by a qualied electrician either inside the
island enclosure for built-in units, or near the locaon where a free standing
unit will be used.
If the electrical system fails to operate, a connecon may have come loose
in shipping or the GFI may have tripped requiring a re-set. See the Trouble-
shoong secon for more details.
Ask your dealer or call Lynx at 888-289-5969 for more informaon.
CONNECTION TO AC POWER
ELECTRICAL CONNECTIONS...connued
Kent Rathburn
Iron Chef Restaurateur

Sonoma Smoker By Lynx™ Care & Use P/N 35948 Page 19
FINAL CHECKS
DANGER!
To prevent re or explosion hazard, DO NOT smoke or
allow any potenal source of ignion (sparks, electrical
arcing, etc) in the area while performing a leak test.
Leak tests should be conducted outdoors only. Never
conduct a leak test using re or ame.
Leak Test Procedure:
Create a soapy soluon of 1 part soap and 3 parts water.
Conrm that all control dials are in the o posion.
Turn on the fuel supply. For natural gas, turn the valve handle 1/4
turn to align with the gas ow.
For L.P., turn the cylinder valve dial counter clockwise one full
rotaon.
Apply the soap soluon generously by paint brush or squirt bole
on all connecons and ngs.
If bubbles appear to “grow” on any of the connecons, you have
a gas leak. IMMEDIATELY turn o the gas supply.
Fixing a Gas Leak:
Shut o the gas supply
Turn all smoker controls to the “ON” posion to purge the smok-
er of any gas build-up, then turn the controls back “OFF”.
Wash o the soapy soluon with cold water and dry.
Tighten the loose joint, or replace the faulty part with
manufacturer-recommended replacement parts.
DO NOT aempt to repair the L.P. cylinder valve if it is damaged.
The only way to safely resolve a damaged cylinder is to REPLACE
IT.
Repeat the leak test to ensure that no leaks are present.
IMPORTANT:
Make sure you know where the main gas supply shut-
o valve is located.
Finally, for safety and for proper use and care, you must
have this manual. Please keep it somewhere safe for
future reference.
For technical support and customer service, call:
Lynx Customer Care Department
7300 Flores Street
Downey, CA 90242
Ph.: 562-299-6900
Toll Free: 888-289-5969
Fax: 562-299-6978
LEAK TESTING FINAL CHECK

Sonoma Smoker By Lynx™ Care & Use P/N 35948 Page 20
Shut down the Sengs app
Acvate the Sonoma Smoker by Lynx™ app
If this is the rst me you’ve acvated your Sonoma
Smoker by Lynx™ app, you will be asked to input the
serial number then the PIN number for the smoker.
The PIN and serial numbers assigned to the smoker can
be found on the control panel tray.
Open the Sonoma Smoker App and click Create Account
then enter your smoker serial number and PIN then click
Connue.
Enter your email address, password and your registraon
informaon and click Create Account. You will get a
conrmaon email.
Open the conrmaon email and follow instrucons to
acvate your account.
Once the app has been connected to the Sonoma
Smoker by Lynx™, open the app to the “Smoker Status”
page.
Click the “Resources” icon at the boom of the
screen.
Click “Wi-Fi” sengs
You will see a list of networks available for your
Sonoma Smoker by Lynx™. Choose your home network.
Depending on your security sengs, you may need to
enter your home network’s password to allow the
Sonoma Smoker by Lynx™ access.
Once the Sonoma Smoker by Lynx™ has successfully
accessed your home network, you will receive a
“Success” message.
Aer you have successfully connected the Sonoma
Smoker by Lynx™ to your home network, you may have
to return to your device’s “Sengs” app and reconnect
with your home network.
Click the “App Store” icon on your iPhone or iPad
Ennsure that your have iOS 7.0 or above (check
Sengs>General>About>Version to see what version of
iOS you’re running.)
In the Search box, type in “Sonoma Smoker by Lynx” to nd
the app.
Click to download and follow the guided instrucons.
Click the “Google Play” icon on your Android phone
or device. (This is typically under the Sengs tab.)
Ensure that you have Android 2.1 or above. (Check
Sengs>About Phone and look for “Android Version” or
“Firmware Version.”)
In the Search box, type in “Sonoma Smoker by Lynx” to nd
the app.
Click to Download and follow the guided instrucons.
GETTING STARTED...connued
DOWNLOADING IN YOUR SONOMA SMOKER BY
LYNX™ FOR IOS DEVICES
DOWNLOADING YOUR SONOMA SMOKER
BY LYNX™ APP FOR ANDROID DEVICES
/