
Benutzer-
information
Kühlschrank
Notice
d'utilisation
Réfrigérateur
Gebruiks-
aanwijzing
Koelkast
User manual
Refrigerator
ZBA3230A
Page is loading ...
Page is loading ...
Page is loading ...
Page is loading ...
Page is loading ...
Page is loading ...
Page is loading ...
Page is loading ...
Page is loading ...
Page is loading ...
Page is loading ...
Page is loading ...
Page is loading ...
Page is loading ...
Page is loading ...
Page is loading ...
Page is loading ...
Page is loading ...
Page is loading ...
Page is loading ...
Page is loading ...
Page is loading ...
Page is loading ...
Page is loading ...
Page is loading ...
Page is loading ...
Page is loading ...
Page is loading ...
Page is loading ...
Page is loading ...

Ha
Hc
Duw onderdeel Hc op on-
derdeel Ha.
Ha
Hb
8 mm
Zet de deur van het appa-
raat en de deur van het
keukenmeubel open in
een hoek van 90°.
Plaats het kleine vierkan-
tje (Hb) in de geleider
(Ha).
Zet de deur van het appa-
raat en de deur van het
keukenmeubel tegen elk-
aar en markeer de gaten.
Ha
K
8 mm
Verwijder de haken en
markeer een afstand van
8 mm vanaf de buitenrand
van de deur waar de nagel
moet worden vastge-
maakt (K).
Hb
Plaats het kleine vierkan-
tje op de geleider terug en
maakt het goed met de
meegeleverde schroeven
vast.
Lijn de deur van het keu-
kenmeubel en de deur
van het apparaat uit met
de speling in de gleuven
van het onderdeel Hb.
Hb
Hd
Duw onderdeel Hd op on-
derdeel Hb.
Controleer goed en verzeker u ervan dat:
• alle schroeven zijn aangehaald.
• de magnetische afdichtstrip goed bevestigd is aan
de kast.
Belangrijk! Als de omgevingstemperatuur laag is (bijv.
in de winter), kan de omvang van de pakking kleiner
worden. De omvang van de pakking neemt toe als de
omgevingstemperatuur toeneemt. U kunt ook gebruik
maken van een föhn om de omvang van de pakking te
vergroten.
Het milieu
Het symbool op het product of op de verpakking
wijst erop dat dit product niet als huishoudafval mag
worden behandeld, maar moet worden afgegeven bij
een verzamelpunt waar elektrische en elektronische
apparatuur wordt gerecycled. Als u ervoor zorgt dat dit
product op de juiste manier wordt verwijderd, voorkomt
u mogelijke negatieve gevolgen voor mens en milieu
die zich zouden kunnen voordoen in geval van
verkeerde afvalverwerking. Voor gedetailleerdere
informatie over het recyclen van dit product, kunt u
contact opnemen met de gemeente, de
gemeentereiniging of de winkel waar u het product hebt
gekocht.
32

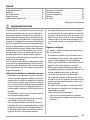
Contents
Safety information _ _ _ _ _ _ _ _ _ _ _ _ _ _ _ _ 33
Operation _ _ _ _ _ _ _ _ _ _ _ _ _ _ _ _ _ _ _ _ _ 35
First use _ _ _ _ _ _ _ _ _ _ _ _ _ _ _ _ _ _ _ _ _ 35
Daily use _ _ _ _ _ _ _ _ _ _ _ _ _ _ _ _ _ _ _ _ _ 35
Helpful hints and tips _ _ _ _ _ _ _ _ _ _ _ _ _ _ _ 36
Care and Cleaning _ _ _ _ _ _ _ _ _ _ _ _ _ _ _ _ 36
What to do if… _ _ _ _ _ _ _ _ _ _ _ _ _ _ _ _ _ _ 37
Technical data _ _ _ _ _ _ _ _ _ _ _ _ _ _ _ _ _ _ 39
Installation _ _ _ _ _ _ _ _ _ _ _ _ _ _ _ _ _ _ _ _ 39
Environmental concerns _ _ _ _ _ _ _ _ _ _ _ _ _ 42
Subject to change without notice
Safety information
In the interest of your safety and to ensure the correct
use, before installing and first using the appliance, read
this user manual carefully, including its hints and warn-
ings. To avoid unnecessary mistakes and accidents, it
is important to ensure that all people using the appli-
ance are thoroughly familiar with its operation and
safety features. Save these instructions and make sure
that they remain with the appliance if it is moved or sold,
so that everyone using it through its life will be properly
informed on appliance use and safety.
For the safety of life and property keep the precautions
of these user's instructions as the manufacturer is not
responsible for damages caused by omission.
Children and vulnerable people safety
• This appliance is not intended for use by persons
(including children) with reduced physical, sensory
or mental capabilities, or lack of experience and
knowledge, unless they have been given supervi-
sion or instruction concerning use of the appliance
by a person responsible for their safety.
Children should be supervised to ensure that they
do not play with the appliance.
• Keep all packaging well away from children. There
is risk of suffocation.
• If you are discarding the appliance pull the plug out
of the socket, cut the connection cable (as close to
the appliance as you can) and remove the door to
prevent playing children to suffer electric shock or to
close themselves into it.
• If this appliance featuring magnetic door seals is to
replace an older appliance having a spring lock
(latch) on the door or lid, be sure to make that spring
lock unusable before you discard the old appliance.
This will prevent it from becoming a death trap for a
child.
General safety
Caution! Keep ventilation openings clear of
obstruction.
• The appliance is intended for keeping foodstuff and/
or beverages in a normal household as explained in
this instruction booklet.
• Do not use a mechanical device or any artificial
means to speed up the thawing process.
• Do not use other electrical appliances (such as ice
cream makers) inside of refrigerating appliances,
unless they are approved for this purpose by the
manufacturer.
• Do not damage the refrigerant circuit.
• The refrigerant isobutane (R600a) is contained with-
in the refrigerant circuit of the appliance, a natural
gas with a high level of environmental compatibility,
which is nevertheless flammable.
During transportation and installation of the appli-
ance, be certain that none of the components of the
refrigerant circuit become damaged.
If the refrigerant circuit should become damaged:
– avoid open flames and sources of ignition
– thoroughly ventilate the room in which the appli-
ance is situated
33

• It is dangerous to alter the specifications or modify
this product in any way. Any damage to the cord may
cause a short-circuit, fire and/or electric shock.
Warning! Any electrical component (power cord,
plug, compressor) must be replaced by a certified
service agent or qualified service personnel.
1. Power cord must not be lengthened.
2. Make sure that the power plug is not squashed
or damaged by the back of the appliance. A
squashed or damaged power plug may over-
heat and cause a fire.
3. Make sure that you can come to the mains plug
of the appliance.
4. Do not pull the mains cable.
5. If the power plug socket is loose, do not insert
the power plug. There is a risk of electric shock
or fire.
6. You must not operate the appliance without the
lamp cover
10)
of interior lighting.
• This appliance is heavy. Care should be taken when
moving it.
• Do not remove nor touch items from the freezer
compartment if your hands are damp/wet, as this
could cause skin abrasions or frost/freezer burns.
• Avoid prolonged exposure of the appliance to direct
sunlight.
Daily use
• Do not put hot pot on the plastic parts in the appli-
ance.
• Do not store flammable gas and liquid in the appli-
ance, because they may explode.
• Appliance's manufacturers storage recommenda-
tions should be strictly adhered to. Refer to relevant
instructions.
Care and cleaning
• Before maintenance, switch off the appliance and
disconnect the mains plug from the mains socket. If
you cannot come to the mains socket, interrupt the
power supply.
• Do not clean the appliance with metal objects.
• Regularly examine the drain in the refrigerator for
defrosted water. If necessary, clean the drain. If the
drain is blocked, water will collect in the bottom of
the appliance.
Installation
Important! For electrical connection carefully follow
the instructions given in specific paragraphs.
• Unpack the appliance and check if there are dam-
ages on it. Do not connect the appliance if it is dam-
aged. Report possible damages immediately to the
place you bought it. In that case retain packing.
• It is advisable to wait at least four hours before con-
necting the appliance to allow the oil to flow back in
the compressor.
• Adequate air circulation should be around the ap-
pliance, lacking this leads to overheating. To ach-
ieve sufficient ventilation follow the instructions rel-
evant to installation.
• Wherever possible the back of the product should
be against a wall to avoid touching or catching warm
parts (compressor, condenser) to prevent possible
burn.
• The appliance must not be located close to radiators
or cookers.
• Make sure that the mains plug is accessible after the
installation of the appliance.
•
Connect to potable water supply only.
11)
Service
• Any electrical work required to do the servicing of
the appliance should be carried out by a qualified
electrician or competent person.
• This product must be serviced by an authorized
Service Centre, and only genuine spare parts must
be used.
10) If the lamp cover is foreseen
11) If a water connection is foreseen
34

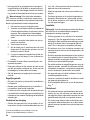
Environment Protection
This appliance does not contain gasses which
could damage the ozone layer, in either its refrig-
erant circuit or insulation materials. The appliance shall
not be discarded together with the urban refuse and
rubbish. The insulation foam contains flammable
gases: the appliance shall be disposed according to the
applicable regulations to obtain from your local author-
ities. Avoid damaging the cooling unit, especially at the
rear near the heat exchanger. The materials used on
this appliance marked by the symbol
are recyclable.
Operation
Switching on
Insert the plug into the wall socket.
Turn the Temperature regulator clockwise to a medium
setting.
Switching off
To turn off the appliance, turn the Temperature regu-
lator to the "O" position.
Temperature regulation
The temperature is automatically regulated.
To operate the appliance, proceed as follows:
• turn the Temperature regulator toward lower set-
tings to obtain the minimum coldness.
• turn the Temperature regulator toward higher set-
tings to obtain the maximum coldness.
A medium setting is generally the most suitable.
However, the exact setting should be chosen keeping
in mind that the temperature inside the appliance de-
pends on:
• room temperature
• how often the door is opened
• the quantity of food stored
• the location of the appliance.
Important! If the ambient temperature is high or the
appliance is fully loaded, and the appliance is set to the
lowest temperatures, it may run continuously causing
frost to form on the rear wall. In this case the dial must
be set to a higher temperature to allow automatic
defrosting and therefore reduced energy consumption.
First use
Cleaning the interior
Before using the appliance for the first time, wash the
interior and all internal accessories with lukewarm wa-
ter and some neutral soap so as to remove the typical
smell of a brand-new product, then dry thoroughly.
Important! Do not use detergents or abrasive pow-
ders, as these will damage the finish.
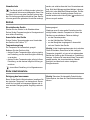
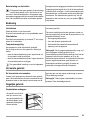
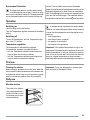
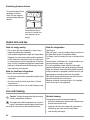
Daily use
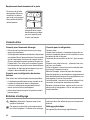
Movable shelves
The walls of the refriger-
ator are equipped with a
series of runners so that
the shelves can be posi-
tioned as desired.
35

Positioning the door shelves
To permit storage of food
packages of various
sizes, the door shelves
can be placed at different
heights.
Gradually pull the shelf in
the direction of the ar-
rows until it comes free,
then reposition as re-
quired.
Helpful hints and tips
Hints for energy saving
• Do not open the door frequently or leave it open
longer than absolutely necessary.
• If the ambient temperature is high, the Temperature
Regulator is on the higher setting and the appliance
is fully loaded, the compressor may run continuous-
ly, causing frost or ice on the evaporator. If this hap-
pens, turn the Temperature Regulator toward lower
settings to allow automatic defrosting and so a sav-
ing in electricity consumption.
Hints for fresh food refrigeration
To obtain the best performance:
• do not store warm food or evaporating liquids in the
refrigerator
• do cover or wrap the food, particularly if it has a
strong flavour
• position food so that air can circulate freely around
it
Hints for refrigeration
Useful hints:
Meat (all types) : wrap in polythene bags and place on
the glass shelf above the vegetable drawer.
For safety, store in this way only one or two days at the
most.
Cooked foods, cold dishes, etc..: these should be cov-
ered and may be placed on any shelf.
Fruit and vegetables: these should be thoroughly
cleaned and placed in the special drawer(s) provided.
Butter and cheese: these should be placed in special
airtight containers or wrapped in aluminium foil or pol-
ythene bags to exclude as much air as possible.
Milk bottles: these should have a cap and should be
stored in the bottle rack on the door.
Bananas, potatoes, onions and garlic, if not packed,
must not be kept in the refrigerator.
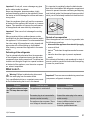
Care and Cleaning
Caution! Unplug the appliance before carrying
out any maintenance operation.
This appliance contains hydrocarbons in its cool-
ing unit; maintenance and recharging must there-
fore only be carried out by authorized technicians.
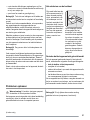
Periodic cleaning
The equipment has to be cleaned regularly:
• clean the inside and accessories with lukewarm wa-
ter and some neutral soap.
• regularly check the door seals and wipe clean to
ensure they are clean and free from debris.
• rinse and dry thoroughly.
36

Important! Do not pull, move or damage any pipes
and/or cables inside the cabinet.
Never use detergents, abrasive powders, highly
perfumed cleaning products or wax polishes to clean
the interior as this will damage the surface and leave a
strong odour.
Clean the condenser (black grill) and the compressor
at the back of the appliance with a brush or a vacuum
cleaner. This operation will improve the performance
of the appliance and save electricity consumption.
Important! Take care of not to damage the cooling
system.
Many proprietary kitchen surface cleaners contain
chemicals that can attack/damage the plastics used in
this appliance. For this reason it is recommended that
the outer casing of this appliance is only cleaned with
warm water with a little washing-up liquid added.
After cleaning, reconnect the equipment to the mains
supply.
Defrosting of the refrigerator
Frost is automatically eliminated from the evaporator
of the refrigerator compartment every time the motor
compressor stops, during normal use. The defrost wa-
ter drains out through a trough into a special container
at the back of the appliance, over the motor compres-
sor, where it evaporates.
It is important to periodically clean the defrost water
drain hole in the middle of the refrigerator compartment
channel to prevent the water overflowing and dripping
onto the food inside. Use the special cleaner provided,
which you will find already inserted into the drain hole.
Periods of non-operation
When the appliance is not in use for long periods, take
the following precautions:
•
disconnect the appliance from electricity supply
• remove all food
•
defrost
12)
and clean the appliance and all accesso-
ries
• leave the door/doors ajar to prevent unpleasant
smells.
If the cabinet will be kept on, ask somebody to check it
once in a while to prevent the food inside from spoiling
in case of a power failure.
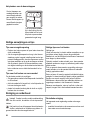
What to do if…
Warning! Before troubleshooting, disconnect
the mains plug from the mains socket.
Only a qualified electrician or competent person must
do the troubleshooting that is not in this manual.
Important! There are some sounds during normal use
(compressor, refrigerant circulation).
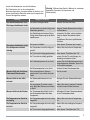
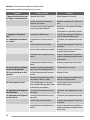
Problem Possible cause Solution
The appliance does not oper-
ate. The lamp does not oper-
ate.
The appliance is switched off. Switch on the appliance.
The mains plug is not connected to
the mains socket correctly.
Connect the mains plug to the mains
socket correctly.
The appliance has no power. There
is no voltage in the mains socket.
Connect a different electrical appli-
ance to the mains socket.
Contact a qualified electrician.
12) If foreseen.
37

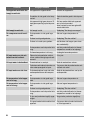
Problem Possible cause Solution
The lamp does not work.
The lamp is defective. Refer to "Replacing the lamp".
The compressor operates
continually.
The temperature is not set correctly. Set a higher temperature.
The door is not closed correctly. Refer to "Closing the door".
The door has been opened too fre-
quently.
Do not keep the door open longer than
necessary.
The product temperature is too high. Let the product temperature decrease
to room temperature before storage.
The room temperature is too high. Decrease the room temperature.
Water flows on the rear plate
of the refrigerator.
During the automatic defrosting
process, frost defrosts on the rear
plate.
This is correct.
Water flows into the refriger-
ator.
The water outlet is clogged. Clean the water outlet.
Products prevent that water flows in-
to the water collector.
Make sure that products do not touch
the rear plate.
Water flows on the ground.
The melting water outlet does not
flow in the evaporative tray above the
compressor.
Attach the melting water outlet to the
evaporative tray.
The temperature in the appli-
ance is too low.
The temperature regulator is not set
correctly.
Set a higher temperature.
The temperature in the appli-
ance is too high.
The temperature regulator is not set
correctly.
Set a lower temperature.
The door is not closed correctly. Refer to "Closing the door".
The product temperature is too high. Let the product temperature decrease
to room temperature before storage.
Many products are stored at the
same time.
Store less products at the same time.
There is no cold air circulation in the
appliance.
Make sure that there is cold air circu-
lation in the appliance.
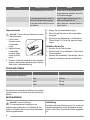
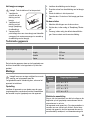
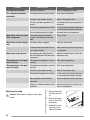
Replacing the lamp
Caution! Disconnect the plug from the mains
socket.
1. Remove the screw
from the lamp cov-
er.
2. Remove the lamp
cover (refer to the
illustration).
3. Replace the used
lamp with a new
lamp of the same
38

power (the maximum power is shown on the lamp
cover).
4. Install the lamp cover.
5. Tighten the screw to the lamp cover.
6. Connect the plug to the mains socket.
7. Open the door. Make sure that the light comes on.
Closing the door
1. Clean the door gaskets.
2. If necessary, adjust the door. Refer to "Installation".
3. If necessary, replace the defective door gaskets.
Contact the Service Force Center.
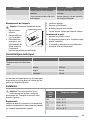
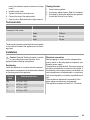
Technical data
Dimension of the recess
Height 1225 mm
Width 560 mm
Depth 550 mm
The technical information are situated in the rating plate
on the internal left side of the appliance and in the en-
ergy label.
Installation
Caution! Read the "Safety Information" carefully
for your safety and correct operation of the
appliance before installing the appliance.
Positioning
Install this appliance at a location where the ambient
temperature corresponds to the climate class indicated
on the rating plate of the appliance:
Climate
class
Ambient temperature
SN +10°C to + 32°C
N +16°C to + 32°C
ST +16°C to + 38°C
T +16°C to + 43°C
Electrical connection
Before plugging in, ensure that the voltage and fre-
quency shown on the rating plate correspond to your
domestic power supply.
The appliance must be earthed. The power supply ca-
ble plug is provided with a contact for this purpose. If
the domestic power supply socket is not earthed, con-
nect the appliance to a separate earth in compliance
with current regulations, consulting a qualified electri-
cian.
The manufacturer declines all responsibility if the
above safety precautions are not observed.
This appliance complies with the E.E.C. Directives.
39

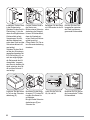
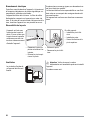
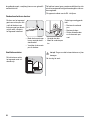
Door reversibility
The door of the appliance
opens to the right. If you
want to open the door to
the left, do these steps be-
fore you install the appli-
ance:
• Loosen the upper pin
and remove the
spacer.
• Remove the upper pin
and the door.
• Remove the door.
• Loosen the lower pin.
On the opposite side:
• Install the lower pin.
• Install the door.
• Tighten the spacer and
tighten the upper pin.
Ventilation requirements
The airflow behind the
appliance must be suffi-
cient.
50 mm
min.
200 cm
2
min.
200 cm
2
Caution! Make sure that the mains cable can
move freely.
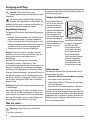
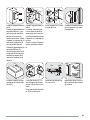
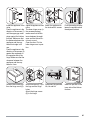
Do the following steps:
40

1
2
Install the appliance in the
niche.
Push the appliance in the
direction of the arrows (1)
until the upper gap cover
stops against the kitchen
furniture. Make sure that
the distance between the
appliance and the cup-
board front-edge is 44
mm.
Push the appliance in the
direction of the arrows (2)
against the cupboard on
the opposite side of the
hinge. Make sure that the
clearance between the
appliance and the cup-
board is 4 mm.
44mm
4mm
Adjust the appliance in the
niche.
The lower hinge cover (in
the accessories bag)
makes sure that the dis-
tance between the appli-
ance and the kitchen fur-
niture is correct.
Open the door. Put the
lower hinge cover in posi-
tion.
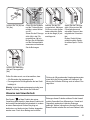
I
I
Attach the appliance to
the niche with 4 screws.
Push the sealing strip be-
tween the appliance and
the adjacent cabinet.
Remove the correct part
from the hinge cover (E).
E
E
D
C
Attach the covers (C, D) to
the lugs and the hinge
holes.
Attach the hinge covers
(E) to the hinge.
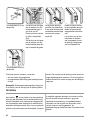
Ha
Hb
Hc
Hd
Disconnect the parts Ha,
Hb, Hc and Hd
ca. 50 mm
ca. 50 mm
21 mm
90°
21 mm
90°
Install the part Ha on the
inner side of the kitchen
furniture.
41

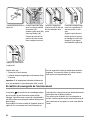
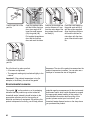
Ha
Hc
Push the part Hc on the
part Ha.
Ha
Hb
8 mm
Open the appliance door
and the kitchen furniture
door at an angle of 90°.
Insert the small square
(Hb) into guide (Ha).
Put together the appliance
door and the furniture
door and mark the holes.
Ha
K
8 mm
Remove the brackets and
mark a distance of 8 mm
from the outer edge of the
door where the nail must
be fitted (K).
Hb
Place the small square on
the guide again and fix it
with the screws supplied.
Align the kitchen furniture
door and the kitchen fur-
niture door with the clear-
ance of the slots in the part
Hb.
Hb
Hd
Press the part Hd on the
part Hb.
Do a final check to make sure that:
• All screws are tightened.
• The magnetic sealing strip is attached tightly to the
cabinet.
Important! If the ambient temperature is low (for
example, in the Winter), the size of the gasket
decreases. The size of the gasket increases when the
ambient temperature increases. You can also use a
hairdryer to increase the size of the gasket.
Environmental concerns
The symbol on the product or on its packaging
indicates that this product may not be treated as
household waste. Instead it should be taken to the
appropriate collection point for the recycling of
electrical and electronic equipment. By ensuring this
product is disposed of correctly, you will help prevent
potential negative consequences for the environment
and human health, which could otherwise be caused
by inappropriate waste handling of this product. For
more detailed information about recycling of this
product, please contact your local council, your
household waste disposal service or the shop where
you purchased the product.
42
Page is loading ...

www.electrolux.com
Benötigen Sie Zubehör, Verbrauchsmaterial und Ersatzteile? Dann besuchen Sie bitte unseren
Onlineshop unter: www.zanussi.de
Vous pouvez commander des accessoires, consommables et pièces détachées via notre magasin
online sur: www.zanussi.be
U kan toebehoren, verbruiksprodukten en onderdelen bestellen via onze webwinkel op:
www.zanussi.be
222350721-00-112008
-
 1
1
-
 2
2
-
 3
3
-
 4
4
-
 5
5
-
 6
6
-
 7
7
-
 8
8
-
 9
9
-
 10
10
-
 11
11
-
 12
12
-
 13
13
-
 14
14
-
 15
15
-
 16
16
-
 17
17
-
 18
18
-
 19
19
-
 20
20
-
 21
21
-
 22
22
-
 23
23
-
 24
24
-
 25
25
-
 26
26
-
 27
27
-
 28
28
-
 29
29
-
 30
30
-
 31
31
-
 32
32
-
 33
33
-
 34
34
-
 35
35
-
 36
36
-
 37
37
-
 38
38
-
 39
39
-
 40
40
-
 41
41
-
 42
42
-
 43
43
-
 44
44


Zanussi ZBA3230A Owner's manual
- Type
- Owner's manual
- This manual is also suitable for
Ask a question and I''ll find the answer in the document
Finding information in a document is now easier with AI
in other languages
- français: Zanussi ZBA3230A Le manuel du propriétaire
- Deutsch: Zanussi ZBA3230A Bedienungsanleitung
- Nederlands: Zanussi ZBA3230A de handleiding
Related papers
Other documents
-
Electrolux ERN15510 User manual
-
 Küppersbusch IKE187-9 User manual
-
ZANKER ZKK8423 User manual
-
Aeg-Electrolux SK41200-6I User manual
-
Aeg-Electrolux SK71003-6I User manual
-
Aeg-Electrolux SD41240-6I User manual
-
-
Aeg-Electrolux SK71243-7I User manual
-
