GE PYE22KMKES Owner's manual

Category
Fridges
Type
Owner's manual
Refrigerators
Bottom Freezer
239D4106P022 49-60748 02-16 GE
Write the model and serial
numbers here:
Model # ____________________
Serial # ____________________
Find these numbers on a label
on the left side, near the middle
of the refrigerator compartment.
GE and GE Profilemodels
Models that start with PFE, GFE, DFE, PFH,
and GNE are Standard Depth Models (SD)
Models that start with DYE, GYE, PYE and
PWE are Counter Depth Models (CD)
Owner’s Manual and
Installation Instructions
*Select Models Only
Modèles GE et GE Profile
Manuel d’utilisation
et instructions
d’installation
Les numéros de modèle commençant par PFE, GFE,
DFE, PFH, et GNE sont des modèles
de profondeur normale (PN).
Les numéros de modèle commençant par DYE, GYE,
PYE et PWE sont des modèles de profondeur
de comptoir (PC).
Réfrigérateurs
GE y GE Profilemodelos
Manual del Propietario e
Instrucciones de Instalación
Los modelos que comienzan con las letras
DFE, PFE, GFE, DFE, PFH, y GNE son Modelos
con Profundidad Estándar (SD)
Los modelos que comienzan con las
letras GYE, PYE y PWE son Modelos con
Profundidad de Mesada (CD)
Refrigeradores
Safety Instructions ............2, 4
Operating Instructions
Features ..........................5, 6
Controls ........................7–10
Dispenser* .........................11
Autofill* ............................12
Single Serve Brewer* ...............13
About Appliance Communication . . .14
Water Filter ........................15
Fresh Food Storage Options .....16,17
Climate Zone & Temperature
Controlled Drawer ...............18,19
Freezer ............................20
Automatic Ice maker ...............21
Care and Cleaning ................ 22
Replacing the Lights ................23
Installation Instructions
Preparing to Install the
Refrigerator .................24, 25
Installing the Refrigerator .......26-37
Installing the Water Line ........38-40
Troubleshooting Tips ......42-44
Normal Operating Conditions .......41
Truth or Myth ...................45 46
Consumer Support
Warranty ..........................47
RPWFE Water Filter Cartridge Limited
Warranty .........................48
Performance Data Sheet ...........49
Consumer Support .................50
IMPORTANT SAFETY INFORMATION.
READ ALL INSTRUCTIONS BEFORE USING.
2
GE Appliances website
For more information on your refrigerator’s operation, visit
www.GEAppliances.com
This is the safety alert symbol. This symbol alerts you to potential hazards that can kill or hurt you and others. All safety
messages will follow the safety alert symbol and the word “DANGER”, “WARNING”, or “CAUTION”. These words are defined as:
Indicates a hazardous situation which, if not avoided, will result in death or serious injury.
Indicates a hazardous situation which, if not avoided, could result in death or serious injury.
Indicates a hazardous situation which, if not avoided, could result in minor or moderate injury.
REFRIGERATOR SAFETY INFORMATION
SAFETY
WARNING
DANGER
CAUTION
IMPORTANT SAFETY INSTRUCTIONS
To reduce the risk of fire, explosion, electric shock, or injury when using your
refrigerator follow these basic safety precautions:
WARNING
Do not clean glass shelves or covers with warm water when
they are cold. Glass shelves and covers may break if exposed
to sudden temperature changes or impact, such as bumping
or dropping. Tempered glass is designed to shatter into many
small pieces if it breaks.
Keep fingers out of the “pinch point” areas; clearances
between the doors and between the doors and cabinet are
necessarily small. Be careful closing doors when children are in
the area.
Do not touch the cold surfaces in the freezer compartment
when hands are damp or wet, skin may stick to these
extremely cold surfaces.
Do not refreeze frozen foods which have thawed completely.
In refrigerators with automatic icemakers, avoid contact with
the moving parts of the ejector mechanism, or with the heating
element that releases the cubes. Do not place fingers or hands
on the automatic ice making mechanism while the refrigerator
is plugged in.
To reduce the risk of injury when using your refrigerator, follow these basic
safety precautions.
This refrigerator must be properly installed and located in
accordance with the Installation Instructions before it is used.
Unplug the refrigerator before making repairs, replacing a light
bulb, or cleaning.
Note: Power to the refrigerator cannot be disconnected by any
setting on the control panel.
Note: Repairs must be performed by a qualified service
professional.
Replace all parts and panels before operating.
Do not store or use gasoline or other flammable vapors and
liquids in the vicinity of this or any other appliance.
Because of potential safety hazards under certain conditions,
we strongly recommend against the use of an extension cord.
However, if you must use an extension cord, it is absolutely
necessary that it be a UL-listed (in the United States) or a CSA
certified (in Canada), 3-wire grounding type appliance extension
cord having a grounding type plug and outlet and that the electrical
rating of the cord be 15 amperes (minimum) and 120 volts.
To prevent suffocation and entrapment hazards to children,
remove the fresh food and freezer doors from any refrigerator
before disposing of it or discontinuing its use.
Do not allow children to climb, stand or hang on the door
handles or the shelves in the refrigerator. They could seriously
injure themselves.
CAUTION
3
GEAppliances.com
Do not, under any circumstances, cut or remove the third (ground) prong from the power cord.
For personal safety, this appliance must be properly grounded.
The power cord of this appliance is equipped with
a 3-prong (grounding) plug which mates with a
standard 3-prong (grounding) wall outlet to minimize
the possibility of electric shock hazard from this
appliance.
Have the wall outlet and circuit checked by a
qualified electrician to make sure the outlet is
properly grounded.
Where a standard 2-prong wall outlet is encountered,
it is your personal responsibility and obligation to
have it replaced with a properly grounded 3-prong
wall outlet. Do not use an adapter.
The refrigerator should always be plugged into its
own individual electrical outlet which has a voltage
rating that matches the rating plate.
A 115 Volt AC, 60 Hz, 15- or 20-amp fused, grounded
electrical supply is required. This provides the best
performance and also prevents overloading house
wiring circuits which could cause a fire hazard from
overheated wires.
Never unplug your refrigerator by pulling on the
power cord. Always grip plug firmly and pull straight
out from the outlet.
Repair or replace immediately all power cords that
have become frayed or otherwise damaged. Do not
use a cord that shows cracks or abrasion damage
along its length or at either end.
When moving the refrigerator away from the wall, be
careful not to roll over or damage the power cord.
CONNECTING ELECTRICITY
WARNING
Electrical Shock Hazard.
Plug into a grounded 3-prong outlet
Do not remove the ground prong
Do not use an adapter
Failure to follow these instructions can result in death, fire, or electrical shock.
WARNING
Explosion Hazard.
Keep flammable materials and vapors, such as gasoline, away from refrigerator. Failure to do so can
result in fire, explosion, or death.
INSTALLATION
SAFETY (CONT.)
WARNING
Tip Over Hazard.
Built-in style models (model PYE, CYE, GYE, DYE, PWE, CWE, and ZWE) are top heavy, especially
with any doors open. These models must be secured with the anti-tip floor bracket to prevent
tipping forward, which could result in death or serious injury. Read and follow the entire installation
instructions for installing the anti-tip floor bracket packed with your refrigerator.
WARNING
Scalding Hazard.
The hot water dispenser is capable of heating water to a temperature of approximately 185°F (85°C).
Water temperatures above 125°F (52°C) can cause severe burns or death from scalding. Children, the
disabled, and the elderly are at highest risk of being scalded.
Use this appliance only for its intended purpose as described in this Owner’s Manual. To reduce the risk of severe burns,
scald injuries, or death when using your hot water dispenser, the instructions below must be followed:
HOT WATER DISPENSER
Do not permit children to use the hot water dispenser.
The water coming from the dispenser is very hot. Use
extreme caution when dispensing and drinking water. Allow
water to cool to a drinkable temperature before drinking.
When dispensing water below 125ÛF, always test the
temperature of the water before drinking.
When dispensing hot water, the container can become
very hot. Use a temperature insulating container, such as
ceramic or foam. Using container materials such as paper
or plastic may result in a burn while holding the cup. Do
not use glass containers, as thermal shock can cause the
container to break and may result in scalding or lacerations.
Do not use with water that is microbiologically unsafe or of
unknown quality.
Your container should be close to the dispensing point to
minimize the splashing of hot water.
A newly installed water filter cartridge will cause water to
spurt from the dispenser. Run 2 gallons of water through
the cold water dispenser (about 5 minutes) to remove air
from the system. Until this air is removed from the system
through the cold water dispenser, DO NOT use the hot
water dispenser as it may result in spurting of hot water and
lead to hot water scalding.
The first time the hot water feature is used, confirm if
you live above 5000 feet (high altitude). This limits the
temperature of the hot water system to avoid boiling. To
access the high altitude selection, press Fridge and Door
Alarm and control will cycle from Hi AL to Lo AL (high
altitude to low altitude).
The hot water dispenser is designed to only dispense water.
Do not attempt to heat or dispense anything other than
water. Do not attempt to disassemble or clean the tank.
The hot water dispensing tank is a non-pressurized tank,
with a vent on the tank and a dispenser tube outlet. Do
not modify the system, close or block the dispense tube, or
connect any other type of device to the tank or dispense
tube. Doing so may lead to rupture of the tank and hot
water scalding.
IMPORTANT SAFETY INFORMATION.
READ ALL INSTRUCTIONS BEFORE USING.
4
SAFETY
READ AND FOLLOW THIS SAFETY INFORMATION CAREFULLY.
SAVE THESE INSTRUCTIONS
WARNING
Suffocation and child entrapment hazard.
Remove fresh-food and freezer doors from the refrigerator, prior to disposal. Failure to do so can
result in child entrapment which can lead to death or brain damage.
Child entrapment and suffocation are not problems
of the past. Junked or abandoned refrigerators are
still dangerous even if they will sit for “just a few
days.” If you are getting rid of your old refrigerator,
please follow the instructions below to help prevent
accidents.
Before You Throw Away Your Old Refrigerator or
Freezer:
Take off the fresh food and freezer doors.
Leave the shelves in place so that children may
not easily climb inside.
Refrigerants
All refrigeration products contain refrigerants,
which under federal law must be removed prior
to product disposal. If you are getting rid of an old
refrigeration product, check with the company
handling the disposal about what to do.
PROPER DISPOSAL OF YOUR OLD REFRIGERATOR
IMPORTANT:
Space-saving ice maker*
Ice maker and bin are located on the door creating
more usable storage space.
Showcase LED lighting
LED lighting is positioned throughout the interior to
spotlight areas in the refrigerator. LEDs are located
under the fresh food door to light the freezer when
opened.
Drop-down tray*
Allows for extra door storage when you need it and
tucks away when you don’t.
Full-width temperature controlled drawer*
Adjustable temperature control bin that can
accommodate larger items.
Dairy bin*
Separate compartment for your items.
Freezer ice maker/Ice bin*
An ice maker in both compartments gives you more
ice whenever you need it. Available on Non-Dispense
models, also available as a kit for some models.
QuickSpace™ shelf*
Functions as a normal full-sized shelf when needed
and easily slides back to store tall items below.
Spillproof shelves
Designed to capture your spills for easier clean up.
Anti-slip Mat*
Liner that captures spills, keeps containers from
shifting when the door is opened and is easily
removable for cleaning.
Removable door bin
Can be removed for those with a wall limiting the door
opening.
Climate zone bin
Separate bins for produce storage.
Water filter
Filters water & Ice
5
About the features. * GEAppliances.com
*Select Models Only
6
Door ice bin*
1. Open left fresh food door.
2. Pull down latch to release bin door.
3. Using handhold lift ice bucket up
and out to clear locators in bottom
of bin.
4. To replace the ice bucket, set it on
the guide brackets and push until
the ice bucket seats properly.
5. If bucket cannot be replaced,
rotate the Ice Bucket Fork 1/4 turn
clockwise.
Drop down dairy bin*
1. Open right fresh food
2. Depress both buttons on lower sides
and bin will drop down.
3. Reverse to reinstall.
Ice/water filter
Remove filter/bypass plug
Push the indent on the cover and pull
open filter door fully. Rotate the filter/
bypass plug as far as it will go and pull
the filter/bypass plug toward you to
remove.
Installing the filter cartridge
Push the new filter/bypass plug straight
in aligning the lugs with the notches
in cabinet and rotate the filter/bypass
plug into the recess in the cabinet. Make
sure the front of the filter is toward the
interior of the refrigerator.
Close the cover making sure the indent
snaps into position.
Drop down tray
(tray open)
Ice bucket
Latch
About the features.*
*Select Models Only
Push in and
pull open
Swing
Push \ Pull
1
2
WARNING
Scalding Hazard.*
Use of the hot water dispenser prior to purging
air from the system may result in spurting of hot
water and lead to hot water scalding. Follow the
instructions for “Water Filter - Step 3” on page
15 to purge all air from the system through the
cold water dispenser prior to using the hot water
dispenser.
The first time the hot water feature is used,
confirm if you live above 5000 feet (high
altitude). This limits the temperature of the
hot water system to avoid boiling. To access
the high altitude selection, see About the
controls-features.
Filter Bypass Plug
To reduce the risk of property damage due to
water leakage, you MUST use the filter bypass
plug when a replacement filter cartridge is not
available. The dispenser and icemaker will not
operate without either the filter or bypass plug
installed. The bypass plug is installed in the same
way as a filter cartridge.
About the controls with temperature settings. GEAppliances.com
The temperature controls are preset in the factory at 37°F for the refrigerator compartment and 0°F for the freezer
compartment. Allow 24 hours for the temperature to stabilize to the preset recommended settings.
Control Style D: The temperature controls can display both the SET temperature as well as the actual temperature in the
refrigerator and freezer. The actual temperature may vary slightly from the SET temperature based on usage and operating
environment (PWE23 and GNE29 only).
NOTE: The refrigerator is shipped with protective film covering the temperature controls.
If this film was not removed during installation, remove it now.
PFE28P, PYE22P Control Style A, Single Serve Models
PFH28, PFE28K, DFE28, PYE22K, DYE22 Control Style B,
AutoFill Models
GFE28, GFE26, GYE22 Control Style C, GE Models
GNE29, PWE23 Control Style D, Non-Dispense Control
Refrigerator
Hold 3 Sec for °F/°C
Hold 3 Seconds
Hold 3 Seconds
Recommended: 37 °F
Actual Set
Freezer
Door Alarm
Ice Maker
Lock Controls
Reset Filter
Recommended: 0°F
F
7
Ice
Error
Complete
Sensing
Cubed
Crushed
8
About the controls with temperature settings.
NOTE: For optimal temperature performance, we recommend to avoid placing food items directly at the air flow vents of the
fresh food air tower and thus blocking the air flow.
Changing the Temperature for Control Style A
To Change the Refrigerator Temperature:
Press the Fridge button and current set temperature will
display. Pressing and releasing the button will cycle through
the available temperature settings. Press and hold button for
Turbo Cool feature. The display will show tC.
To Change the Freezer Temperature:
Press the Freezer button and current set temperature will
display. Pressing and releasing the button will cycle through
the available temperature settings. Press and hold button for
Turbo Freeze feature. The display will show tF.
Cooling system can be turned off by pressing and holding
Freezer and Start Heating. OFF will be displayed. To turn on,
press Fridge or Freezer. ON will be displayed.
Turning the cooling system off stops the cooling to the
refrigerator, but it does not shut off the electrical power.
Changing the Temperature for Control Styles B and C
To change the temperature, press and release the Freezer
or Fridge pad. The display will show the set temperature. To
change the temperature, press either the Freezer or Fridge
pad until the desired temperature is displayed. Press and
hold button for Turbo Cool feature. The display will show tC.
Press and hold button for Turbo Freeze feature. The display
will show tF.
To turn off the cooling system press and hold the Fridge and
Ice Maker buttons. To turn on, press Fridge or Freezer.
Turning the cooling system off stops the cooling to the
refrigerator, but it does not shut off the electrical power.
Changing Temp. for Control Style D
Temperature Display is located on inside of left-hand
refrigerator door. To change the temperature, press and
release the REFRIGERATOR or FREEZER pad. The ACTUAL
TEMP light will come on and the display will show the
actual temperature. To change the temperature, tap
either the REFRIGERATOR or FREEZER pad until the desired
temperature is displayed.
To turn OFF cooling system, press and hold the
REFRIGERATOR and FREEZER pads simultaneously for
3 seconds. When cooling system is OFF the display
should read OF. To turn ON cooling system, press either
REFRIGERATOR or FREEZER pad. The display will show the
preset temperature settings of 37°F for refrigerator and 0°F
for freezer.
Turning the cooling system off stops the cooling to
refrigerator, but it does not shut off the electrical power.
Ice
9
Hands-free Autofill*
Hands-free Autofill uses sensors to monitor container height
to automatically dispense filtered water without having to
activate the paddle.
Start Heating*
The Start Heating button is used to initiate the water heating
for the Single Serve feature. To abort the Start Heating
feature, press and hold the Start Heat button for 3 seconds.
Freezer temp control
Adjust freezer compartment temperature.
Fresh food temp control
Adjust fresh food compartment temperature.
TurboFreeze™ setting
Activate TurboFreeze to quickly restore freezer temperatures
after frequent door openings.
TurboCool™ setting
Activate TurboCool to quickly restore fresh food temperature
after frequent door openings.
Lock Controls
Control Style A - Press and hold the Door Alarm pad for 3
seconds to lock out ice and water dispenser and all feature
and temperature buttons.
Control Styles B & C -
Press Lock pad and hold 3 seconds
to lock out ice and water dispenser and all feature and
temperature buttons.
Dispenser light
Lighting that can be turned on/off to light your dispenser.
Door Alarm
Sounds to alert when the freezer or fresh food doors have
been left open. Press and hold Door Alarm pad and it will
toggle the sound between low, high, and off.
Brew Size*
The Brew Size button is used to select the desired cup size
for single serve. Press and hold the button for 3 seconds to
toggle the brew type between Coffee and Cocoa.
Ice maker setting
Turn your ice makers on/off.
Cooling system On/Off
Control Style A - Press and hold Freezer and Start Heating
simultaneously to turn cooling system off. To turn cooling
system on press either the Fridge or Freezer.
Control Style B & C - Press and hold Fridge and Ice Maker
simultaneously for 3 seconds to turn the cooling system off.
To turn cooling system on press either the Fridge or Freezer.
Brew Dispense
Press and hold Brew Dispense button for 3 seconds, but no
longer than 6 seconds, to dispense coffee or cocoa.
F°/C°
Control Style A - Press and hold Freezer and Brew Size to
switch between F°/C°.
Control Style B & C - Press and hold Ice Maker and Door
Alarm simultaneously for 3 seconds to switch between F°/C°.
Sound Control for pad chimes
Control Style A - Press and hold the Light pad: Once for High
to Off, twice for Off to Low and three times for Low to High.
Control Styles B & C - Press and hold the Door Alarm pad:
Once for High to Off, twice for Off to Low and three times for
Low to High.
High Altitude
Control Style A (PYE and PFE only) - Press and hold Fridge
and Door Alarm for to toggle between Hi Al and Lo AL for
high altitude and low altitude.
Additional settings:
Connected Home ready* (PFE28P, PYE22P, PFH only)
Water Filter* - An indicator will illuminate when the filter needs
to be replaced. When a new filter is installed the indicator will go
off.
Additional Mode:
Sabbath Mode
Control Style A - Press and hold Alarm and Light
simultaneously for 3 seconds to enter/exit Sabbath mode.
Control Style B & C - Press and hold Lock and Light
simultaneously for 3 seconds to enter/exit Sabbath mode.
Activate Sabbath Mode to turn off interior lights, temperature
control and advanced features. Compressor will run on a timed
defrost when in Sabbath mode.
Control Style A, External Controls
PFE28P,
PYE22P
About the controls - features. GEAppliances.com
Control Style B, External Controls
PFH28, PFE28K, DFE28,
PYE22K, DYE22
Control Style C, External Controls
GFE28, GFE26,
GYE22
*Select Models Only
Error
Complete
Sensing
Cubed
Crushed
10
About the controls - features.
Refrigerator
Hold 3 Sec for °F/°C
Hold 3 Seconds
Hold 3 Seconds
Recommended: 37 °F
Actual Set
Freezer
Door Alarm
Ice Maker
Lock Controls
Reset Filter
Recommended: 0°F
F
Controls Style D, Internal Controls
GNE29, PWE23
Door Alarm
Sounds to alert when the freezer or fresh food doors
have been left open.
Reset Filter
Hold for 3 seconds after replacing filter.
Lock Controls
Press and hold 3 seconds to lock out ice and water dis-
penser and all feature and temperature buttons.
Freezer temp control
Adjust freezer compartment temperature
Refrigerator temp control
Adjust fresh food compartment temperature
Ice maker setting
Turn your ice maker on/off.
11
About the dispenser.* GEAppliances.com
Dispenser tray
Important Facts About Your Dispenser
Do not add ice from trays or bags to the door ice maker
bucket. It may not crush or dispense.
Avoid overfilling glass with ice and use of narrow glasses.
Backed-up ice can jam the chute or cause the door in the
chute to freeze shut. If ice is blocking the chute remove the ice
bucket, poke it through with a wooden spoon.
Beverages and foods should not be quick-chilled in the
door ice maker bin. Cans, bottles or food packages in the
storage drawer may cause the ice maker or auger to jam.
To keep dispensed ice from missing the glass, put the glass
close to, but not touching, the dispenser opening.
Some crushed ice may be dispensed even though you
selected CUBED ICE. This happens occasionally when a few
cubes accidentally get directed to the crusher.
After crushed ice is dispensed, some water may drip from the
chute.
Sometimes a small mound of snow will form on the door in the
ice chute. This condition is normal and usually occurs when you
have dispensed crushed ice repeatedly. The snow will eventually
evaporate.
If no water is dispensed when the refrigerator is first installed,
there may be air in the water line system. Press the dispenser
paddle for at least five minutes to remove trapped air from the
water line and to fill the water system. To flush out impurities in
the water line, throw away the first six full glasses of water.
To remove Dispenser Tray (Type A and B Only)
Pull Dispenser Tray out until it stops.
Locate tab in the center on the bottom and push up.
Pull Dispenser Tray assembly out.
Lift Dispenser Tray out at center notch to clean.
To remove Dispenser Tray (Type C Only)
Grasp Dispenser Tray and pull firmly until it comes out.
To reinstall Dispenser Tray (Type A and B Only)
Place the Dispenser Tray cover on top of catch tray and
position under the two plastic retainers on either side.
Center Dispenser tray, and align with center guides.
Push in until it locks firmly in place.
To reinstall Dispenser Tray (Type C Only)
Line up the guide on tray bottom with track on dispenser and
slide it in until it stops against the back of the dispenser.
Water & Ice Dispenser
(See About the controls
with temperature settings &
About the control features)
To Use the Internal Water Dispenser*
The water dispenser is located on the
left wall inside the refrigerator compart-
ment.
To dispense water:
Hold the glass against the recess.
Push the water dispenser button.
Hold the glass underneath the
dispenser for 2–3 seconds after
releasing the dispenser button. Water
may continue to dispense after the
button is released.
If no water is dispensed when the refrigerator is first installed,
there may be air in the water line system. Press the dispenser
button for at least 5 minutes to remove trapped air from the
water line and to fill the water system. During this process,
the dispenser noise may be loud as the air is purged from the
water line system. To flush out impurities in the water line,
throw away the first 6 glassfuls of water.
NOTE: To avoid water deposits, the dispenser should be
cleaned periodically by wiping with a clean cloth or sponge.
WARNING
Laceration Hazard
Never put fingers or any other object into ice crusher
discharge opening. Doing so can result in contacting the ice
crushing blades and lead to serious injury or amputation
Use a sturdy glass when dispensing ice. A delicate glass may
break and result in personal injury.
*Select Models Only
To Use HANDS FREE AUTOFILL:
Center container on Recess Dispenser Tray as far back as
possible without activating paddle and remove hand from
container
• Press AUTOFILL
To Stop AUTOFILL
Press AUTOFILL to stop.
Important Facts about AUTOFILL
For optimum results, use a uniform container between
4-8” tall and 2-6” wide.
Fill level and functionality may vary on containers taller
than 8” or wider than 6”.
Container volumes may vary, if error message “Not Found”
is given, try a different container.
AUTOFILL will time out.
Handles, straws, and garnishes on the rim of the container
my cause overfilling or variation in fill volumes.
Splashing may occur depending on the location of the
container, water flow rate, container shape, and ice cubes.
Keep sensors clean with a clean damp cloth, and do not
spray liquid or cleaners directly on sensors
AUTOFILL works best with household water pressure of 60
to 100 psi.
Ice in container may affect fill volume. If issues are
experienced, use less ice.
12
About Autofill.*
Sensors
*Select Models Only
About the K-Cup Brewing System.*
WARNING
Scalding Hazard.
The water coming from the dispenser is very hot and can
cause scalds or burns. Read all warnings on page 4 prior
to use.
Do not permit children to use the brewer.
Always use a container that is suitable for hot liquids
(ceramic, foam, etc.)
Do not brew into a mug made of glass. Doing so may
cause the glass to crack or break.
If you live above 5000 feet, press Fridge and Door Alarm
and control will cycle from Low Altitude (Lo AL) to High
Altitude (Hi AL).
DO NOT use the hot water dispenser immediately after
installing a new water filter as it may result in spurting
of hot water. Dispense cold water for about 5 minutes to
purge air from the system prior to dispensing hot water.
Important Facts about HOT WATER
*Select Models Only
About the K-Cup Brewing System.* (Cont)
GEAppliances.com
13
Push to
open
1
2
3
Load the K-Cup Brewer
Insert a Keurig K-Cup pod into the brewer and press down
firmly (you will hear a popping sound).
Two Ways To Brew
1. Press the Start Heating button.
OR
2. Initiate heating with the GE Kitchen App. Download the App
“GE Kitchen”. Visit www.GEAppliances.com/connect for
more information.**
CAUTION
Cut/Puncture Hazard.
There are two sharp needles located inside the
K-Cup brewer. To avoid risk of injury, do not put
your fingers inside the brewer. Use caution when
cleaning.
Keep the K-Cup brewer out of the reach of children,
as they may be injured in using the K-Cup brewer
incorrectly.
4
Dispense
Once the heating process is complete, the Dispense light on the display will flash.
To dispense, slide the brewer into the rails. Make sure the brewer is pushed all the way into the bracket. Place your
mug on the drip tray mug icon, under the red brew spout. Press and hold Brew Dispense for 3 seconds until you
hear the dispenser engage.
Cleaning the brewer
The K-Cup brewer is top rack dishwasher safe.
It is recommended to rinse it thoroughly after washing to remove all soap residue.
Periodic cleaning of dispenser recess area is recommended as staining may occur with usage of the
K-Cup brewer.
K-Cup
Close the
brewer.
Lid will
click when
secure.
Change Brew Size
Press the Brew Size button any time during the heating cycle to
choose 6, 8, or 10 oz. The default size is 8 oz. Ensure the mug being
used is large enough for the size selected.
NOTE: Press and hold the Brew Size button for 3 seconds to toggle
between Coffee and Cocoa. The default is Coffee.
NOTE: To abort the heating cycle, press and hold the Start
Heating button for 3 seconds. To abort the brew dispense cycle,
press and hold the Start Heating button for 3 seconds, press the
paddle, press any button on the display besides Brew Size or Brew
Dispense, or open the right fresh food door.
Red brew
spout for mug
alignment
Mug icon for
placement
Rails for
the brewer
** For US and US Territories Only.
14
Appliance Communication
GE WiFi Connect (for customers in the United States)
GE WiFi Connect Enabled* (PFE28P PYE22P, PFH models only)
Y
If your refrigerator has a Connected Appliance information label located on
the inside as shown, your refrigerator can be connected to your WiFi network,
allowing it to communicate with your smart phone for remote monitoring, control
and notifications. Depending on the refrigerator model you have, you either have
a WiFi communication card built into the product, or a port for an external WiFi
ConnectPlus Module (sold separately). Please visit www.GEAppliances.com/
connect to learn more about connected appliance features, and to learn what
connected appliance apps will work with your Smart Phone.**
To use your WiFi, press Water and Light on the control panel.
REGULATORY INFORMATION
FCC/IC Compliance Statement:
This device complies with Part 15 of the FCC Rules. Operation is subject to the following two conditions:
1. This device may not cause harmful interference.
2. This device must accept any interference received, including interference that may cause undesired operation.
This equipment has been tested and found to comply with the limits for a Class B digital device, pursuant to Part 15 of
the FCC Rules. These limits are designed to provide reasonable protection against harmful interference in a residential
installation. This equipment generates uses and can radiate radio frequency energy and, if not installed and used in
accordance with the instructions, may cause harmful interference to radio communications. However, there is no
guarantee that interference will not occur in a particular installation. If this equipment does cause harmful interference to
radio or television reception, which can be determined by turning the equipment off and on, the user is encouraged to try
to correct the interference by one or more of the following measures:
• Reorient or relocate the receiving antenna.
• Increase the separation between the equipment and receiver.
• Connect the equipment into an outlet on a circuit different from that to which the receiver is connected.
• Consult the dealer or an experienced radio/television technician for help.
Labelling: Changes or modifications to this unit not expressly approved by the manufacturer could void the user’s authority
to operate the equipment.
ConnectPlus module only (or similar communication module)
RF Exposure - This device is only authorized for use in a mobile application. At least 20 cm of separation distance between
the ConnectPlus device and the user’s body must be maintained at all times.
*Select Models Only
GE WiFi Connect Optional *
You refrigerator is GE WiFi Connect compatible using the GE ConnectPlus module that is provided with your
refrigerator. To connect this appliance to the internet you will need to attach the module to your appliance through
the communication port in the appliance. The GE ConnectPlus will allow your appliance to communicate with your
smart phone for remote appliance monitoring, control and notifications. Please visit www.GEAppliances.com/
connect to learn more about connected appliance features, to learn what connected appliance App’s will work with
your Smart Phone and to learn where you can purchase a GE ConnectPlus.**
WiFi Connectivity: For assistance with the appliance or the ConnectPlus network connectivity (for models that are WiFi
enabled or WiFi optional), please call 1-800-220-6899.
** For US and US Territories Only.
15
*Select Models Only
About the GE
®
RPWFE water filter cartridge. GEAppliances.com
Water Filter Cartridge
The water filter cartridge is located in the fresh food interior
on the left side wall, near the top.
This product uses radio frequency identification (RFID) to
detect leaks and monitor filter status. The RFID technology is
certified by the FCC.
When to replace the filter cartridge
The filter cartridge should be replaced every six months or
earlier if 170 gallons of water has been dispensed or the flow of
water to the dispenser or icemaker decreases.
Touch Screen Models: A filter status message will appear on
the screen when the water filter needs to be replaced. The filter
status will automatically update when the filter is replaced.
Non-touch Screen Models: A filter indicator light will illuminate
on the screen when the water filter needs to be replaced.
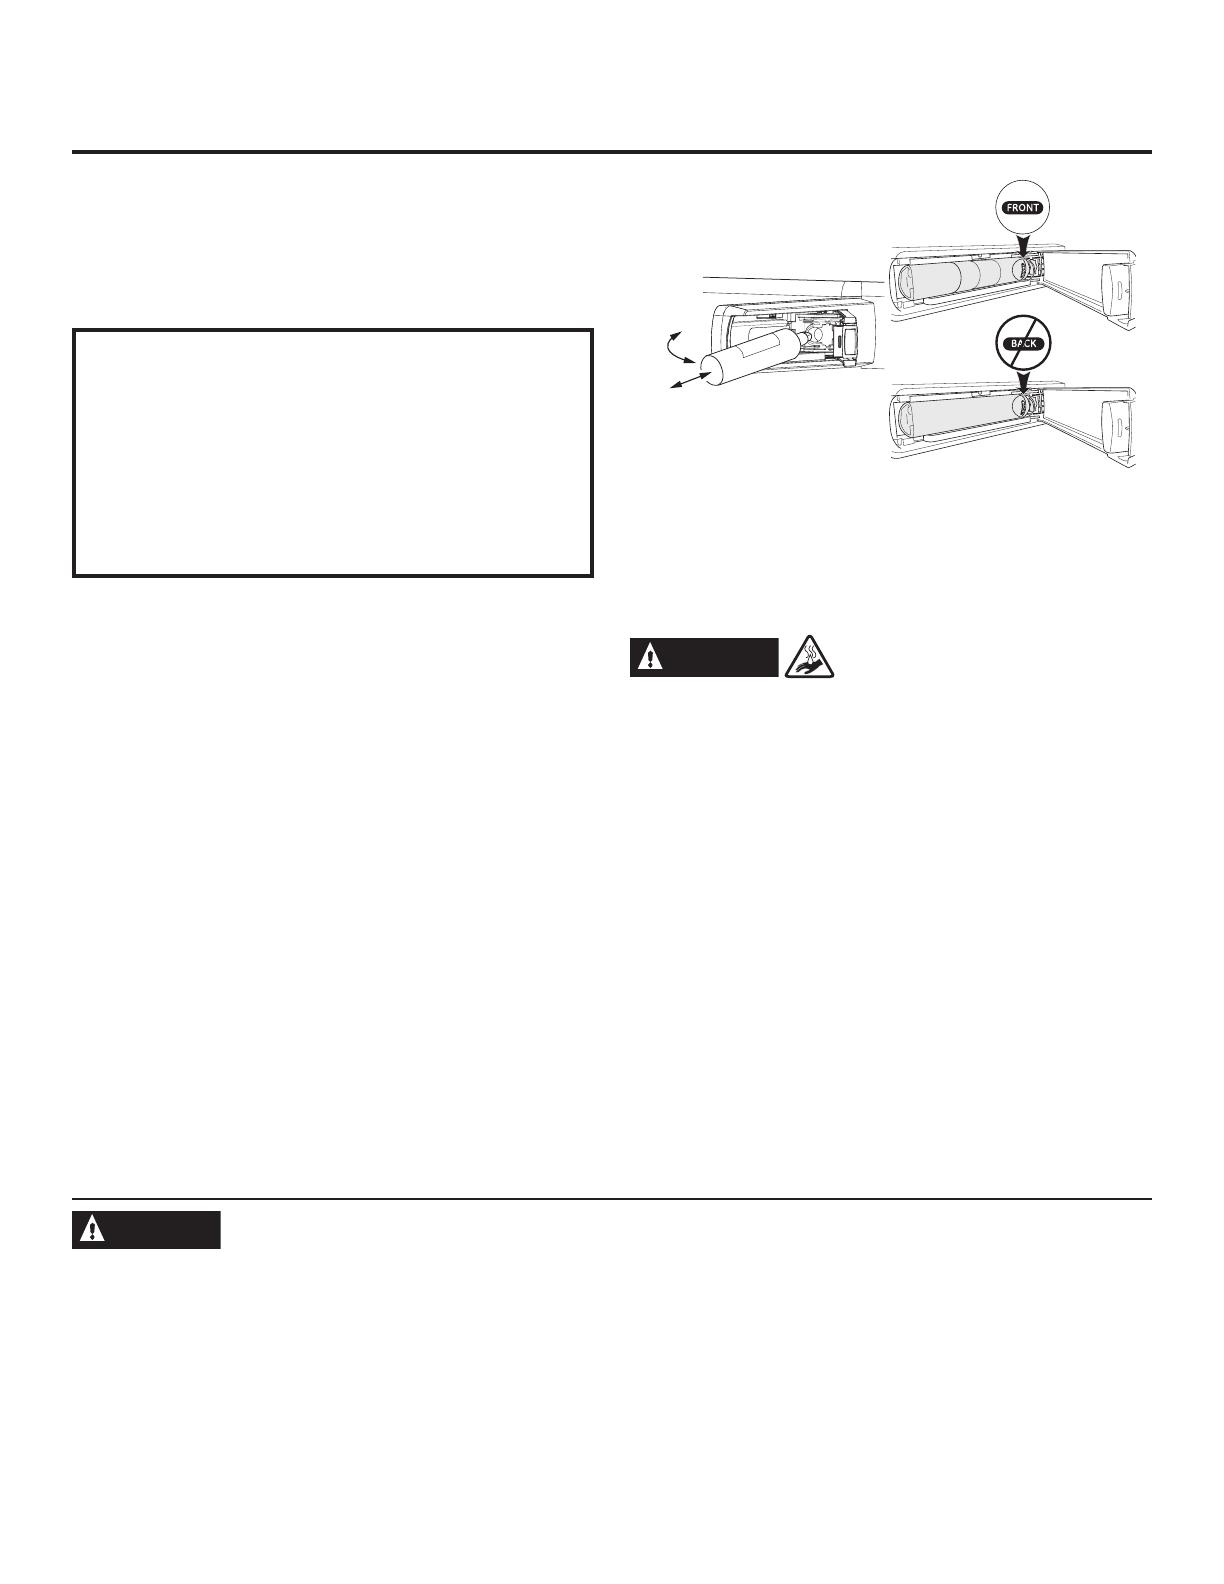
Removing the filter cartridge
To replace the filter, first remove the old cartridge by opening
the filter door and pulling on the bottom of the cartridge to allow
it to swing outward. When the cartridge can no longer swing,
gently pull to unseat it from the cartridge holder. DO NOT TWIST
CARTRIDGE. A small amount of water may drip out.
Installing the Filter Cartridge
1. Align top of filter cartridge with cartridge holder with the word
FRONT” facing outward then push the cartridge toward
the rear of the unit until it is fully seated. DO NOT TWIST THE
FILTER CARTRIDGE!
2. While continuing to ensure cartridge is fully seated in the
holder, gently swing the filter inward until it is in position. If
filter will not swing easily, check to ensure filter is properly
aligned and fully seated within the cartridge holder. Close the
filter door.
3. Run two gallons of water through the cold water dispenser
(about 5 minutes) to remove air from the system. A newly
installed filter cartridge will cause water to spurt from the
dispenser. Use a large pitcher or sports bottle to catch the
water spray. DO NOT use hands-free auto-fill (some models)
until all air is removed from the system.
4. Reset Filter Status message (non-touch screen models).
WARNING
Scalding Hazard.*
Use of the hot water dispenser prior to purging air from the
system may result in spurting of hot water and lead to hot water
scalding. Follow the instructions above to purge all air from the
system through the cold water dispenser prior to using the hot
water dispenser.
Note: It is normal for water to appear discolored during the initial
system flush. Water color will return to normal after first few
minutes of dispensing.
Filter Bypass Plug
To reduce the risk of property damage due to water leakage,
you MUST use the filter bypass plug when a replacement filter
cartridge is not available. The dispenser and icemaker will not
operate without either the filter or bypass plug installed. The
bypass plug is installed in the same way as a filter cartridge.
FCCID: ZKJ-EBX1532P001 ICID: 10229A-EBX1532P001
“This device complies with part 15 of the FCC Rules. Operation is
subject to the following two conditions: (1) This device may not
cause harmful interference, and (2) this device must accept any
interference received, including interference that may cause
undesired operation.
“This device complies with Industry Canada licence-exempt
RSS standard(s). Operation is subject to the following two
conditions: (1) this device may not cause interference, and (2)
this device must accept any interference, including interference
that may cause undesired operation of the device.
WARNING
To reduce the risk associated with choking, do not allow children under 3 years of age to have access to small parts
during the installation of this product. The disposable filter cartridge should be replaced every 6 months at the rated capacity,
or sooner if a noticeable reduction in flow rate occurs.
For the maximum benefit of your filtration system, GE recommends the use of GE-branded filters only. Using GE-branded filters
in GE and Hotpoint
®
refrigerators provides optimal performance and reliability. GE filters meet rigorous industry NSF standards
for safety and quality that are important for products that are filtering your water. GE has not qualified non-GE-branded filters
for use in GE and Hotpoint refrigerators and there is no assurance that non-GE-branded filters meet GE’s standards for quality,
performance and reliability.
If you have questions, or to order additional filter cartridges, visit our website at www.geapplianceparts.com or call GE
Parts and Accessories, 800.626.2002.
Customers in Canada should consult the yellow pages for the nearest Camco Service Center.
Swing
Push \ Pull
16
Rearranging the Shelves
To remove:
Remove all items from the shelf.
Tilt the shelf up at the front.
Lift the shelf up at the back and bring the
shelf out.
To replace:
While tilting the shelf up, insert the top hook
at the back of the shelf in a slot on the
track.
Lower the front of the shelf until the bottom
of the shelf locks into place.
Spillproof Shelves
Spillproof shelves have special edges to help
prevent spills from dripping to lower shelves.
Shelves in the refrigerator compartment are adjustable.
Quick Space Shelf *
This shelf splits in half and slides under itself for
storage of tall items on the shelf below.
This shelf can be removed and replaced or
relocated (just like spillproof shelves).
NOTE: The location of the upper Quick Space
Shelf is not adjustable.
About the fresh food storage options.
*Select Models Only
17
GEAppliances.com
Non-Adjustable Bins on the Door (Dispenser Models - Left Hand Door)
To remove: Lift the bin straight up, then pull out.
To replace: Engage the bin in the molded
supports on the door and push down. It will lock
in place.
The ice maker door bins are not
interchangeable, note the location upon
removal and replace the bin in its proper
location.
Adjustable Bins on the Door
Adjustable bins can easily be carried from
refrigerator to work area.
To remove: Lift bin straight up, then pull out.
To replace or relocate: Slide in the bin just
above the molded door supports, and push
down. The bin will lock in place. See page 36.
Drop down tray *
(tray open)
1. Open right fresh food
door
2. Depress both buttons
on lower sides of bin
and bin will drop down.
3. Reverse to reinstall.
Non-Adjustable Dairy Bin*
To remove: Lift the dairy bin straight up,
then pull out.
To replace: Engage the bin in the molded door
supports and push down. The bin will lock in
place. See page 36.
Non-Dispense Models
(Left Hand Door)
*Select Models Only
ClimateZone
Temperature Controlled Drawer*
The Temperature Controlled Drawer is a
full-width drawer with adjustable temperature
control. This drawer can be used for large
miscellaneous items.
To change setting, press select button.
Keep fruits and vegetables organized in separate
compartments for easy access.
Excess water that may accumulate in the bottom
of the drawers or under the drawers should be
wiped dry.
18
C
Fruits Vegetables
F
C
M
E
AT
DELI
P
R
O
DU
C
E
CH
E
E
SE
C
IT
R
U
S
SEL
E
C
T
ClimateZone
Fruits Vegetables
Fruits Vege
D
*Select Models Only
32° 34° 36°
Note: Temperatures indicate the appropriate tem-
peratures for the food and actual temperatures may
vary based on normal operation and other factors
such as door openings and fresh food set point.
CAUTION
Laceration Hazard.
Do not store glass bottles at this setting. If
they are frozen, they can break and result
in personal injury.
Meat Beverage Deli
Select
About the climate zone and temperature
controlled drawer.
GEAppliances.com
To remove:
Pull the drawer out to the stop position.
Lift the front of the drawer up and out.
To replace:
Pull left and right slides until fully
extended.
Place drawer back in first and rotate
drawer front down to seat on slide.
Push the drawer in to closed position.
How to Remove and Replace the Adjustable Deli/Produce Drawer
To remove:
Pull the drawer out to the stop position.
Raise the front side of the divider
to unhook it from the rear wall of
the drawer.
To replace:
Hook the back of the divider over the
rear wall of the drawer.
Push the divider down.
How to Remove and Replace Drawer Divider*
19
Divider
*Select Models Only
20
About the freezer.
Freezer Basket and Drawer
Basket.
Drawer
Ice Bucket * (Available on
Non-Dispense models only.
Available as a IM Kit on some
models)
Non-Adjustable Bin in the Freezer*
To remove: push in plastic tab on either left
or right side
To replace: slide bin into location until it
locks into place.
Basket Removal
To remove, standard depth models only:
Open freezer door to the stop position.
Remove freezer door bin by pushing
plastic tab on either left or right side
to release bin hinge pin.
Remove freezer basket by lifting up
the rear of the basket and moving
basket rearward until the front of the
basket can be rotated upward and
out.
Lift it out to remove.
To remove, counter depth models only:
Open fresh food doors.
Open freezer door to the stop position.
Remove freezer basket by lifting up
the rear of the basket and rotate it
upward.
Lift it out to remove.
To replace:
Reverse step 1 through 4 to replace.
*Select Models Only
  • Page 1 1
  • Page 2 2
  • Page 3 3
  • Page 4 4
  • Page 5 5
  • Page 6 6
  • Page 7 7
  • Page 8 8
  • Page 9 9
  • Page 10 10
  • Page 11 11
  • Page 12 12
  • Page 13 13
  • Page 14 14
  • Page 15 15
  • Page 16 16
  • Page 17 17
  • Page 18 18
  • Page 19 19
  • Page 20 20
  • Page 21 21
  • Page 22 22
  • Page 23 23
  • Page 24 24
  • Page 25 25
  • Page 26 26
  • Page 27 27
  • Page 28 28
  • Page 29 29
  • Page 30 30
  • Page 31 31
  • Page 32 32
  • Page 33 33
  • Page 34 34
  • Page 35 35
  • Page 36 36
  • Page 37 37
  • Page 38 38
  • Page 39 39
  • Page 40 40
  • Page 41 41
  • Page 42 42
  • Page 43 43
  • Page 44 44
  • Page 45 45
  • Page 46 46
  • Page 47 47
  • Page 48 48
  • Page 49 49
  • Page 50 50
  • Page 51 51
  • Page 52 52
  • Page 53 53
  • Page 54 54
  • Page 55 55
  • Page 56 56
  • Page 57 57
  • Page 58 58
  • Page 59 59
  • Page 60 60
  • Page 61 61
  • Page 62 62
  • Page 63 63
  • Page 64 64
  • Page 65 65
  • Page 66 66
  • Page 67 67
  • Page 68 68
  • Page 69 69
  • Page 70 70
  • Page 71 71
  • Page 72 72
  • Page 73 73
  • Page 74 74
  • Page 75 75
  • Page 76 76
  • Page 77 77
  • Page 78 78
  • Page 79 79
  • Page 80 80
  • Page 81 81
  • Page 82 82
  • Page 83 83
  • Page 84 84
  • Page 85 85
  • Page 86 86
  • Page 87 87
  • Page 88 88
  • Page 89 89
  • Page 90 90
  • Page 91 91
  • Page 92 92
  • Page 93 93
  • Page 94 94
  • Page 95 95
  • Page 96 96
  • Page 97 97
  • Page 98 98
  • Page 99 99
  • Page 100 100
  • Page 101 101
  • Page 102 102
  • Page 103 103
  • Page 104 104
  • Page 105 105
  • Page 106 106
  • Page 107 107
  • Page 108 108
  • Page 109 109
  • Page 110 110
  • Page 111 111
  • Page 112 112
  • Page 113 113
  • Page 114 114
  • Page 115 115
  • Page 116 116
  • Page 117 117
  • Page 118 118
  • Page 119 119
  • Page 120 120
  • Page 121 121
  • Page 122 122
  • Page 123 123
  • Page 124 124
  • Page 125 125
  • Page 126 126
  • Page 127 127
  • Page 128 128
  • Page 129 129
  • Page 130 130
  • Page 131 131
  • Page 132 132
  • Page 133 133
  • Page 134 134
  • Page 135 135
  • Page 136 136
  • Page 137 137
  • Page 138 138
  • Page 139 139
  • Page 140 140
  • Page 141 141
  • Page 142 142
  • Page 143 143
  • Page 144 144
  • Page 145 145
  • Page 146 146
  • Page 147 147
  • Page 148 148
  • Page 149 149
  • Page 150 150
  • Page 151 151
  • Page 152 152

GE PYE22KMKES Owner's manual

Category
Fridges
Type
Owner's manual

Ask a question and I''ll find the answer in the document

Finding information in a document is now easier with AI