Samsung RF28HMEDBBC/AA-06 Owner's manual
- Category
- Fridges
- Type
- Owner's manual

user manual
100 % '
Recycled Paper
- /
This manual is reade with 100 % recycled paper.
the possibilities
Thank you foJ"purchasing this Samsung pl'oduct.
R'ee Standing Appliance

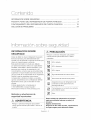
oont nt
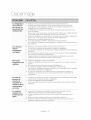
SAFETY iNFORMATiON .................................................................................... 2
SETTING UP YOUR FRENCH DOOR REFRIGERATOR .......................................... 9
OPERATING YOUR FRENCH DOOR REFRIGERATOR .......................................... 18
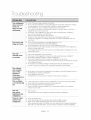
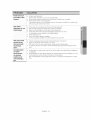
TROUBLESHOOTING .................................................................................... 34
nforrn ton
SAFETY INFORMATION
Before using your new Samsung French Door
Refrigerator, please read this manual thoroughly to
ensure that you know how to operate the features
and functions that your new appliance offers safely
and efficiently.
This appliance is not intended for use by persons
(including children) with reduced physical,
sensory, or mental capabilities, or those who lack
experience and knowledge, unless they have been
given supervision or instruction concerning the
use of the appliance by a person responsible for
their safety.
Because the following instructions cover various
models, the characteristics of your refrigerator
may differ slightly from the refrigerator described
in this manual.
If you have any question, contact us
at 1-800-SAMSUNG or find help and
information online at www.samsung.com.
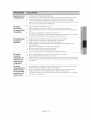
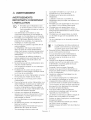
Important safety symbols and
precautions:
Z_ WARNING
Hazards or unsafe practices that may result in
severe personal injury or death.
CAUTION
Hazards or unsafe practices that may result in
minor personal injury or property damage.
Do NOT attempt.
Do NOT disassemble.
_ Do NOT touch.
Follow directions carefully.
Unplug the power plug from the wall
socket.
Make sure the refrigerator is grounded
to prevent electric shock.
Call the contact center for help.
Note.
These warning symbols are here to prevent
injury to you and others.
Please follow them carefuUy.
After reading this section, keep it in a safe
place for future reference.
Englsh - 2

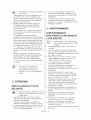
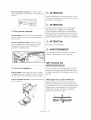
iK WARNING
CRITICAL INSTALLATION
WARNINGS
(_ • Do not install the refrigerator in a damp
location or place where it may come in
contact with water.
Deteriorated insulation on electrical parts may
cause an electric shock or fire.
• Do not place this refrigerator in direct sunlight
or expose it to the heat from stoves, room
heaters, or other appliances.
• Do not plug several appliances into the same
multiple power strip.
The refrigerator should always be plugged into
its own individual electrical outlet which has a
voltage rating that matches the voltage listed
on the refrigerator's rating plate.
This provides the best performance and
also prevents overloading of house wiring
circuits, which could cause a fire hazard from
overheated wires.
• Ifthe wall socket is loose, do not insert the
power plug.
There is a risk of electric shock of fire.
,, Do not use a power cord that has cracks or
abrasion damage along its length or at either
end.
• Do not bend the power cord excessively or
place heavy objects on it.
• Do not twist or tie the power cord.
• Do not hook the power cord over a metal
object, place a heavy object on the power
cord, insert the power cord between objects,
or push the power cord into the space behind
the appliance.
• When moving the refrigerator, be careful not to
roll over or damage the power cord.
This may result in an electric shock or fire.
• Never unplug your refrigerator by pulling on the
power cord.
Always grip the plug firmly and pull straight out
from the outlet.
Damage to the cord may cause a short-circuit,
fire, and/or electric shock.
• Do not use aerosols near the refrigerator.
Using aerosols near the refrigerator may cause
an explosion or fire.
• Do not install this appliance near a heater or
inflammable material.
• Do not install this appliance in a humid, oily,
or dusty location, or in a location exposed to
Engl sh -
direct sunlight or water (rain, etc.).
Do not install this appliance in a location where
gas may leak.
This may result in an electric shock or fire.
• This refrigerator must be properly
located and installed in accordance
with the instructions in this manual
before you use it.
• Connect the power plug in the proper position
with the cord hanging down.
Ifyou connect the power plug upside down,
the wire can get cut off and cause a fire or
electric shock.
• When moving the refrigerator, be careful not to
roll over or damage the power cord.
This constitutes a fire hazard.
• Make sure that the power plug is not crushed
or damaged by the back of the refrigerator.
• Keep the packing materials out of reach of
children.
There is a risk of death from suffocation if a child
puts the packing materials on his or her head.
• The appliance must be positioned so that the
plug is accessible after installation.
Failing to do so may result in an electric shock
or fire due to electric leakage.
• You need to remove all the protective plastic
film before you initially plug the product in.
• Children should be supervised to ensure that
they do not play with the fastener.
There is a risk of death from suffocation if a
child swallows the fastener.
Pay special attention to children because it can
be dangerous.
Keep the fastener out of reach of children.
• The refrigerator must be safely
grounded.
Always make sure that you have grounded the
refrigerator before attempting to investigate or
repair any part of the appliance.
Power leakages can cause severe electric
shock.
Never use gas pipes, telephone lines, or other
potential lightning attractors as an electrical
ground.
Improper use of the grounding plug can result
in a risk of electric shock.
If it is necessary to use an extension cord,
use only a 3-wire extension cord that has a
3-blade grounding plug and a 3-slot receptacle
that will accept the plug on the appliance.
The marked rating of the extension cord
3

shouldbeAC115-120V,10A,ormore.
Ifagroundingadapterisused,makesurethe
receptacleboxisfullygrounded.
Plugthepowerplugintothewallsocketfirmly.
Donotuseadamagedpowerplug,damaged
powercord,orloosewallsocket.
Thismayresultinanelectricshockorfire.
Ifthepowercordisdamaged,
haveitreplacedimmediatelybythe
manufactureroroneofitsservice
agent.
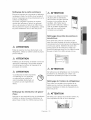
/N CAUTION
INSTALLATION CAUTIONS
o
o
(_} • Allow sufficient space around the
refrigerator and install it on a flat
surface.
If your refrigerator is not level, cooling efficiency
and durability can be declined.
Keep the ventilation space in the appliance
enclosure or mounting structure clear of
obstructions.
Allow the appliance to stand for 2 hours before
loading foods after installation and turning on.
We strongly recommend you have a qualified
technician or service company install the
refrigerator.
Failing to do so may result in an electric shock,
fire, explosion, problems with the product, or
injury.
A WARNING
CRITICAL USAGE WARNINGS
• Do not insert the power plug into a
wall socket with wet hands.
Do not store articles on the top of the
appliance.
When you open or close the door, the articles
may fall and cause personal injury and/or
material damage.
• Do not insert hands, feet or metal objects
(such as knives, etc.) into the bottom or the
back of the refrigerator.
This may result in an electric shock or injury.
Any sharp edges may cause a personal injury
• Do not put a container filled with water on the
refrigerator.
If spilled, there is a risk of fire or electric shock.
• Children should be supervised to ensure that
they do not play with the appliance.
Keep fingers out of "pinch point" areas.
Clearances between the doors and cabinet are
necessarily small. Be careful when you open
the doors if children are in the area.
• Do not let children hang on the door.
A serious injury may occur.
• Do not let children go inside the refrigerator.
They could become trapped.
• Do not insert your hands into the bottom area
under the appliance.
Any sharp edges may cause personal injury.
• Do not let children step on a drawer cover.
The drawer may break and cause them to slip.
• Do not overfill the refrigerator with food.
When you open the door, an item may fall out
and cause personal injury or material damage.
• Do not touch the inside walls of the freezer or
products stored inthe freezer with wet hands.
This may cause frostbite.
• Never put fingers or other objects into the
water dispenser hole, ice chute, or ice maker
bucket.
It may cause personal injury or material
damage.
• Do not use or place any substances sensitive
to temperature such as inflammable sprays,
inflammable objects, dry ice, medicine, or
chemicals near or inside of the refrigerator.
• Do not keep volatile or inflammable objects
or substances (benzene, thinner, propane
gas, alcohol, ether, LP gas, and other such
products) inthe refrigerator.
Englsh - 4

Thisrefrigeratorisforstoringfoodonly.
Thismayresultinfireorexplosion.
• Donotstorepharmaceuticalproducts,
scientificmaterials,ortemperaturesensitive
productsintherefrigerator.
Productsthatrequirestricttemperature
controlsmustnotbestoredintherefrigerator.
• Donotplaceoruseanelectricalappliance
insidetherefrigerator,unlessitisofatype
recommendedbythemanufacturer.
• Donotstandontopoftheapplianceorplace
objects(suchaslaundry,lightedcandles,
lightedcigarettes,dishes,chemicals,metal
objects,etc.)ontheappliance.
Thismayresultinanelectricshock,fire,
problemswiththeproduct,orinjury.
Donotputacontainerfilledwithwateronthe
appliance.
Ifspilled,thereisariskoffireorelectricshock.
• Donotusemechanicaldevicesoranyother
meanstoacceleratethedefrostingprocess,
otherthanthoserecommendedbythe
manufacturer.
• Donotdamagetherefrigerantcircuit.
• Donotsprayvolatilematerialsuchas
insecticideontothesurfaceoftheappliance.
Aswellasbeingharmfultohumans,it
mayalsoresultinanelectricshock,fire,or
problemswiththeproduct.
• NeverstaredirectlyattheUVLEDlampfor
longperiodsoftime.
Thismayresultineyestrainduetothe
ultravioletrays.
• Donotattempttorepair,disassemble,
ormodifytheapplianceyourself.
Donotuseanyfuse(suchascooper,steel
wire,etc.)otherthanastandardfuse.
Ifyourapplianceneedstoberepairedor
reinstalled,contactyournearestservicecenter.
Failingtodosomayresultinanelectricshock,
fire,problemswiththeproduct,orinjury.
IftheinteriororexteriorLEDlamphasgone
out,pleasecontactyournearestservice
center.
• Childrenshouldbesupervisedto
ensurethattheydonotplaywiththe
appliance.
• Keepfingersoutof"pinchpoint"areas.
Clearancesbetweenthedoorsandcabinetare
necessarilysmall.
Becarefulwhenyouopenthedoorsifchildren
areinthearea.
• Donotletchildrenhangonthedoor.
Aseriousinjurymayoccur.
• Donotletchildrengoinsidetherefrigerator.
Theycouldbecometrapped.
• Bottlesshouldbestoredtightlytogetherso
thattheydonotfallout.
• Thisproductisintendedonlyforthestorageof
foodinadomesticenvironment.
• Ifagasleakisdetected,avoidanynaked
flamesorpotentialsourcesofignition,andair
theroominwhichtheapplianceisstandingfor
severalminutes.
Donottouchtheapplianceorpowercord.
Donotuseaventilatingfan.
Asparkmayresultinexplosionorfire.
UseonlytheLEDLampsprovidedbythe
manufactureroritsserviceagents.
• Iftherefrigeratoremitsaburningsmell
orsmoke,unplugtherefrigerator
immediatelyandcontactyour
SamsungElectronicsservicecenter.
Ifyouexperiencedifficultychanginganon-LED
light,contactaSamsungserviceenergy.
• IftheproductisequippedwithLEDLamps,do
notdisassembletheLampCoversandLED
Lampsyourself.
Pleasecontactyourserviceagents.
• Ifdustorwaterenterstherefrigerator,unplug
therefrigeratorandcontactyourSamsung
Electronicsservicecenter.
Thereisariskoffire.
/ik CAUTION
USAGE CAUTIONS
• Do not re-freeze frozen foods that
have thawed completely.
Do not place carbonated or fizzy
drinks in the freezer compartment.
Do not put bottles or glass containers
in the freezer.
When the contents freeze, the glass may break
and cause personal injury.
• Use only the ice maker provided with the
refrigerator.
Have the refrigerator's water supply connected
only to a potable water supply.
To operate the ice maker properly, water
Engl sh- 5

pressureof20- 125psi(138- 862kPa)is
required.
Ifyouwillbeawayfromhomeforalongperiod
oftime(onvacation,forexample)andwon't
beusingthewateroricedispensers,closethe
watervalve.
Otherwise,waterleakagemayoccur.
Ifyouwon'tbeusingtherefrigeratorfora
verylongperiodoftime,(3weeksormore)
therefrigeratorincludingicebucket,unplugit,
closethewatervalve,wipeexcessmoisture
fromtheinsidewalls,andleavethedoors
opentopreventodorsandmold.
o
Service Warranty and Modification.
Any changes or modifications
performed by a 3rd party on this
finished appliance are not covered
under Samsung warranty service, nor
is Samsung responsible for safety
issues that result from 3rd party
modifications.
Do not block the air vents inside the
refrigerator.
If the air vents are blocked, especially with
a plastic bag, the refrigerator can be over
cooled. Ifthis cooling period lasts too long,
the water filter may break and cause water
leakage.
If the refrigerator is disconnected from the
power supply, you should wait for at least five
minutes before plugging it back in.
If you have a long vacation planned or do
not intend to use the refrigerator for a long
period of time, (3 weeks or more) empty the
refrigerator including ice bucket, pull out the
power plug, close the water valve, wipe excess
moisture from the inside walls, and leave the
doors open to prevent odors and mold.
To get the best performance from the product:
Do not place food too close to the vents at the
rear of the appliance as it can obstruct free air
circulation in the refrigerator compartment.
Wrap food up properly or place it in airtight
containers before putting it into the refrigerator.
Do not place glass bottles or carbonated
beverages into the freezer.
They can freeze and break. Broken beverage
containers can cause injury.
Please observe maximum storage times and
expiration dates of frozen goods.
There is no need to disconnect the refrigerator
from the power supply if you will be away for
less than three weeks.
However, if you will be away for more than
three weeks, remove all the food and ice in
the ice bucket, unplug the refrigerator, close
the water valve, wipe excess moisture from
the inside walls, and leave the doors open to
prevent odors and mold.
Fillthe water tank and ice cube trays with
potable water only (tap water, mineral water, or
purified water).
Do not fill the tank with tea or a Sports drink.
This may damage the refrigerator.
Do not strike or apply excessive force to any
glass surface.
Broken glass may result in a personal injury
and/or property damage.
• Ifthe product is flooded, make sure to
contact your nearest service center.
There is a risk of electric shock or fire.
/K CAUTION
CLEANING CAUTIONS
• Do not spray water directly on the
inside or outside the refrigerator.
There is a risk of fire or electric shock.
• Do not use a hair dryer to dry the inside of the
refrigerator.
• Do not place a lighted candle in the refrigerator
to remove bad odors.
This may result in an electric shock or fire.
• Use a clean, dry cloth to remove any
foreign matter or dust from the power
plug blades. Do not use a wet or
damp cloth when cleaning the plug.
Otherwise, there is a risk of fire or electric
shock.
• Before cleaning or performing
maintenance, unplug the appliance
from the wall socket.
Failing to do so may result in an electric shock
or fire.
Englsh - 6

Z_ WARNING
• This product contains chemicals known to
the State of California to cause cancer and
reproductive toxicity.
/K WARNING
CRITICAL DISPOSAL
WARNINGS
• DANGER : Risk of child entrapment.
Before you throw away your old
refrigerator or freezer:
Take off the doors and door latch.
Leave the shelves in place so that children
cannot easily climb inside.
Children trapped inside a refrigerator can hurt
themselves or suffocate to death.
• Please dispose of the packaging material from
this product in an environmentally friendly
manner.
• Ensure that none of the pipes on the back of
the appliance are damaged prior to disposal.
• R-600a or R-134a is used as a refrigerant.
Check the compressor label on the rear of
the appliance or the rating label inside the
fridge to see which refrigerant is used for your
refrigerator.
Ifthis product contains flammable gas
(Refrigerant R-600a), contact your local
authority in regard to safe disposal of this
product.
• When disposing of this refrigerator, remove the
door/door seals and door latch so that small
children or animals cannot become trapped
inside.
Children should be supervised to ensure that
they do not play with the appliance.
Iftrapped inside, the child may get hurt or
suffocate to death.
• Cyclopentane is used in the insulation. The
gases in the insulation material require a
special disposal procedure. Please contact
your local authorities in regard to the
environmentally safe disposal of this product.
• Keep all packaging materials well out of the
reach of children, as packaging materials can
be dangerous to children.
Ifa child places a bag over his or her head, the
child could suffocate.
Engl sh- 7
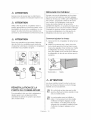
ADDITIONAL TIPS FOR
PROPER USAGE
• Inthe event of a power failure, call the local
office of your Electricity Company and ask how
long it is going to last.
Most power failures that are corrected in an
hour or two will not affect your refrigerator
temperatures. However, you should minimize
the number of door openings while the power
is off.
Should the power failure last more than 24
hours, remove and discard all frozen food.
• The appliance might not operate consistently
(frozen contents can thaw or temperatures
can become too warm in the frozen food
compartment) when sited for an extended
period of time in a location where ambient
air temperatures are constantly below the
temperatures for which the appliance is
designed.
• In case of particular foods, keeping it under
refrigeration can have a bad effect on
preservation due to its properties.
• Your appliance is frost free, which means there
is no need to manually defrost your appliance.
This will be carried out automatically.
• Temperature rise during defrosting complies
with ISO requirements.
But Ifyou want to prevent an undue rise in the
temperature of frozen food while the appliance
defrosts, wrap the frozen food in several layers
of newspaper.
• Do not re-freeze frozen foods that have thawed
completely.

Saving Energy Tips
Install the appliance in a cool, dry room with
adequate ventilation.
Ensure that it is not exposed to direct sunlight
and never put it near a direct source of heat (a
radiator, for example).
Not to block any vents and grilles is
recommended for energy efficiency.
Allow warm food to cool down before placing
it in the appliance.
Put frozen food in the refrigerator to thaw.
You can then use the low temperatures of the
frozen products to cool food in the refrigerator.
Do not keep the door of the appliance open
for too long when putting food in or taking
food out.
The shorter the time the door is open, the less
frost build-up you'll have in the freezer.
It is recommended to install the refrigerator
with clearance to the back and sides. This will
help reduce power consumption and keep
your energy bills lower.

GETTING READY TO INSTALL
THE REFRIGERATOR
Congratulations on your purchase of the Samsung
refrigerator. We hope you enjoy the state-of-art
features and efficiencies that this new appliance
offers.
Selecting the best location for the
refrigerator
Choose:
• A location with easy access to a water supply.
• A location without direct exposure to sunlight.
• A location with level (or nearly level) flooring.
• A location with enough space for the
refrigerator doors to open easily.
• A location that allows sufficient space to the
right, left, back, and top for air circulation. If
the refrigerator does not have enough space,
it can cause the bad influence to refrigeration
efficiency and power consumption.
• A location that allows you to move the
refrigerator easily if it needs maintenance or
service.
• Do not install the refrigerator in locations where
the temperature is over 110 °F (43 °C) or
below 50 °F (10 °C ).
If the refrigerator does not have enough space,
the internal cooling system may not work properly.
If your refrigerator has an ice maker, allow extra
space at the back for the water line connections.
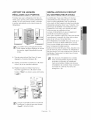
When you install the refrigerator next to a fixed
wall, you need a minimum clearance of 3 3_,,
(95 mm) between the refrigerator and wall to allow
the door to swing open.
important: Make sure that you can easily move
your refrigerator to its final location by measuring
doorways (both width and height), thresholds,
ceilings, stairways, etc.
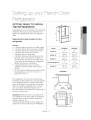
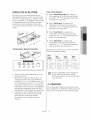
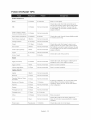
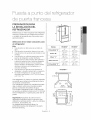
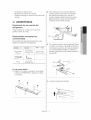
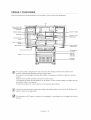
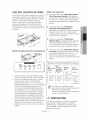
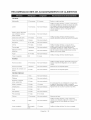
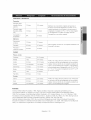
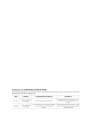
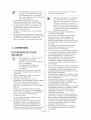
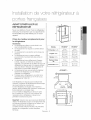
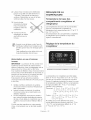
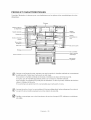
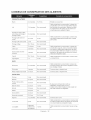
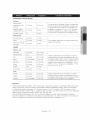
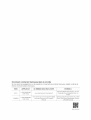
The following chart details the exact height and
depth of this Samsung French Door Refrigerator.
French Door
D
Model RF28HM** RF25HM**
34" 34"
Depth "A"
(864 mm) (863 mm)
35 6/8" 32 3/4"
Width "B"
(908 mm) (830 mm)
68 7/8" 68 7/8"
Height "C"
(1749 mm) (1749 mm)
70" 70"
Overall Height "D" (1777 mm) (1777 mm)
36 1/2" 36 1/2"
Depth "E" (926 mm) (925 mm)
<RF28HM**>
,2;qX%,
62 1/8" I 13 2/8'_
(1578 mm) (335mn_
I_ 35 3/4" (908 ram) '1
_o 46/8"(122mm)_ _ ._-
co/ / 2 3/8" (61 mm)_- E
Engl sh- 9

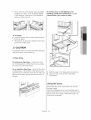
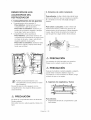
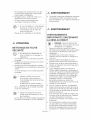
<RF25HM**>
j, -
56 1/4" I 11 8/8'H'
, (1430 mm) (300mn_)
I'-32 3/4" (830 ram) *1
Each measurement based on the design
dimension, so it may differ depending on
the measuring method.
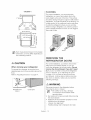
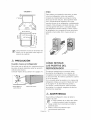
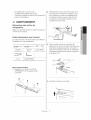
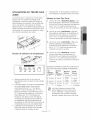
/_ CAUTION
When moving your refrigerator
To prevent floor damage, be sure the front
adjusting legs are in the up position (above the
floor).
Refer to 'Adjusting the doors' on page 14.
Flat-blade screw Control Lever
driver(-)
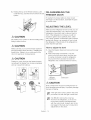
FLOORING
For proper installation, you must place this
refrigerator on a level, hard surface that is the
same height as the rest of the floor. This surface
should be strong enough to support a fully loaded
refrigerator. To protect the finish of the flooring, cut
a large section of the cardboard carton and place
it under the refrigerator where you are working.
When moving a refrigerator, you need to pull and
push it straight forwards or back. Do not wiggle it
from side to side.
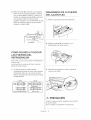
REMOVING THE
REFRIGERATOR DOORS
For some installations, you need to remove the
fridge doors and freezer drawer so you can
move the refrigerator to its final location. Do not
remove the doors/drawers if you don't need
to. Ifyou do not need to remove the refrigerator
doors or drawers, go to 'Adjusting the Level'
on page 14. Ifyou need to remove the doors
and drawers, continue below. Before removing
the doors or drawers, make sure you read the
following warnings:
A WARNING
Disconnect power to the refrigerator before
removing the door or drawer.
• Be careful not to drop, damage,
or scratch the doors/drawer while
removing them.
• Be careful not to injure yourself while removing
the doors/drawer.
• Reattach the doors/drawer properly to avoid:
Moisture from air leakage.
Uneven door alignment.
Wasting energy due to improper door seal.
Engl sh - 10

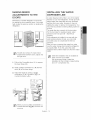
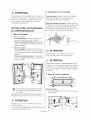
iK WARNING
Disassembling the refrigerator doors
Be careful not to drop and scratch the doors while
removing them.
Required Tools (Not provided)
You need the following tools to complete the
installation of your refrigerator:
Philips Flat-blade Socketwrench
screwdriver(+) screwdriver(-) (13/32") (10 mm)
Allenwrench
Pliers
(3/16")(5mm)
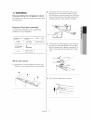
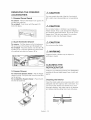
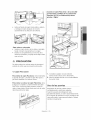
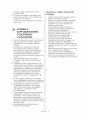
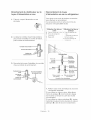
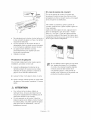
With the door opened
1. Remove the 3 screws holding down the TOP
TABLE ( 1 ) and separate the connected wires.
T
2. Disconnect the two connectors ( 2 ) on the
left side door. To remove the water coupler
from the hinge, twist and pull it from the hinge.
Remove the water line ( 3 ) while pressing the
marked part ( 4 ) of the water line coupler.
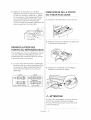
3. Pull and remove the hinge lever ( 5 ). Remove
the ground screw ( 6 ) attached to the upper
left door hinges with a philips screwdriver (+).
Remove the upper left and right door hinges
(7).
4. Lift the door straight up to remove.
Engl sh - 11

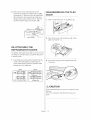
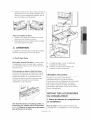
5.Removethescrew(8)attachedtothe
lowerleftandrightdoorhingeswithaphilips
screwdriver(+).Removethe2hexheadbolts
(9)attachedtothelowerleftandrightdoor
hingeswithanallenwrench(3/16").Remove
thelowerleftandrightdoorhinges(10).
RE-ATTACHING TH E
REFRIGERATOR DOORS
To reattach the fridge doors after you have moved
the fridge to its final location, assemble the parts
in reverse order.
1. The Water Line must be fully inserted into the
center of the transparent coupler (Type A)
or the Guide Lines (Type B) to prevent water
leakage from the dispenser.
Type A Type B
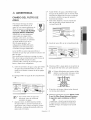
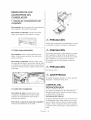
DISASSEMBLING THE FLEX
DOOR
1. Take out the Flex Zone ( 1 ) by lifting it up.
2. Take off the cover ( 2 ) w/harness with a flat-
blade screwdriver (-).
3. Press the locking tab and separate the Wire
Connector.
,_ CAUTION
When reassembling it, be sure to connect the wire
harness.
If it is not connected, the Flex Room does not
work.
Engl sh - 12

4.Remove1hexheadboltfromeachsidewitha
socketwrench(10mm).
5.LiftuptheFlexdoorfromtherails.
RE-ASSEMBLING THE FLEX
DOOR
To reattach the flex doors, assemble parts in
reverse order.
CAUTION
Be sure to connect the Flex Door Wire Connector.
If it is not connected, the Flex Room does not
work.
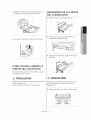
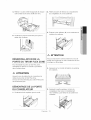
DISASSEMBLING THE
FREEZER DOOR
1. Take out the upper drawer by lifting it up.
2. Remove the freeze room guard ( 1 ) by lifting
the guard up.
3o Take out the lower basket ( 2 ) by lifting the
basket up from the rail system.
Z_ CAUTION
You can scratch the side of the bin if you twist it
left or right when disassembling or re-assembling
it.
4. Press the fixing hook of the rail system.
Engl sh - 13

5.HoldingthetopoftheFreezerDrawer,pullit
outalltheway,andthenremoveitfromtherail
system.
z_ CAUTION
Be careful not to scratch or dent the sliding rail by
letting it strike the floor.
,/K CAUTION
Make sure that you mount the freezer basket in
the right position when removing / installing the
freezer door. Failing to do so may result in the
door not opening or closing properly.
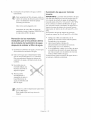
/K CAUTION
Putting too much food into the freezer drawers
can prevent the freezer from closing completely
and can cause frost build-up.
0 X
RE-ASSEMBLING THE
FREEZER DOOR
To reattach the drawer after you have moved
the fridge to its final location, assemble the parts
in reverse order.
ADJUSTING THE LEVEL
Make sure the refrigerator is level so that you can
make final adjustments. Use a level to test if the
refrigerator is level both side to side and back to
front. Ifthe refrigerator is not level, you will not
be able to get the doors perfectly even, which
may cause moisture condensation and increased
energy bills. Below is an example of how to level
the refrigerator if the left side of the refrigerator is
lower than the right side.
How to adjust the level
1. Open the freezer drawer and remove the lower
basket.
2. Insert a flat-blade screwdriver (-)into the
notch on the left control lever, and then turn
it counter-clockwise to level the refrigerator.
(Youturn the lever clockwise to lower the
refrigerator and counterclockwise to raise it.)
flat-blade Control Lever
screwdriver {-)
z_ CAUTION
Both control levers must be touching the floor to
avoid possible personal injury or property damage
because of tipping.
(_ f the right side is lower, perform the same
procedure, but with the right control lever.
(_ It is difficult to remove the cover leg
front from the refrigerator, so we do not
recommend making small adjustments
with the control lever. Instead, refer to the
next page for the best way to make minor
adjustments to the doors.
Engl sh - 14

MAKING MINOR
ADJUSTMENTS TO THE
DOORS
Remember, a leveled refrigerator is necessary
for getting the doors perfectly even. Ifyou need
help, review the previous section on leveling the
refrigerator.
ustment
3_rt
The left door is fixed. To make minor
adjustments between doors, adjust only
the right door.
1. Pullout the Convertible door ( 1 ) to expose
the lower hinge ( 2 ).
2. Insert a philips screwdriver (+)( 3 ) into the
shaft ( 4 ) of the lower hinge.
3. Adjust the height by turning a philips
screwdriver (+) ( 3 ) clockwise ( ._o_ ) or
counterclockwise (_).
When you turn a philips screwdriver (+)
counterclockwise ( ), the door will
move up
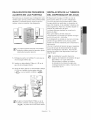
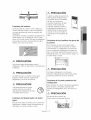
INSTALLING THE WATER
DISPENSER LINE
A water dispenser with a filter is one of the helpful
features on your new refrigerator. To help promote
better health, the water filter removes unwanted
particles from your water. However, it does not
sterilize the water or destroy microorganisms. You
may need to purchase a water purifying system to
do that.
The water line also connects to the ice maker.
For the ice maker to operate properly, water
pressure of 20-125 psi (138 - 862 kPa) is
required.
Ifthe refrigerator is installed in an area with low
water pressure (below 20 psi), you can install
a booster pump to compensate for the low
pressure.
After you have connected the water line, make
sure the water storage tank inside the refrigerator
is properly filled. To do this, press the water
dispenser lever until the water runs from the water
outlet.
(_ ater line installation kits are available at
extra cost from your dealer.
We recommend using a water line
installation kit that contains copper tubing
and a 1A"compression nut.
Engl sh - 15

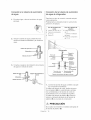
Connecting to the water supply line
1. First, shut off the main water supply•
2. Locate the nearest cold water drinking line and
install the pipe clamp and shut off valve.
Cold water line
Pipe clamp
Shut off valve
3. Connect the water line installation kit to the
shut off valve•
Pipe clamp --
Water line installation kit
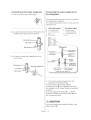
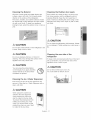
Connecting the water supply line to
the refrigerator.
There are several items that you need to purchase
to complete this connection.
You may find these items sold as a kit at your local
hardware store.
Use Copper Tubing Use Plastic Tubing
¼" copper tubing * _," plastic tubing
¼" compression nut _ Molded end(Bulb)
(1pc) * _/4"compression nut
Ferrule (2pc) (1pc)
Refrigerator
Dompression _ --
Nut (1/4")-
(Assembled)
Ferrule
(Not supplied)
Copper tubing or
(Not supplied)
Plastic Tubing
(Assembled)
Compression
-- Fitting
(Assembled)
Molded
end(Bulb)
Compression
nut (B) (1/4")
• (Not supplied)
Plastic tubing (B)
(Not supplied)
Household water supply line
1. Connect the household water line to the
assembled compression fitting.
Ifyou are using copper tubing, slip the
compression nut ( B ) (not supplied) and ferrule
(not supplied) on the copper tubing (not supplied)
as shown.
Ifyou are using plastic tubing ( B ), insert the
molded end (Bulb) of the plastic tubing ( B ) into
the compression fitting.
z_ CAUTION
Do not use without the molded end (Bulb) of the
plastic tubing ( B ).
Engl sh - 16

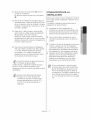
2.Tightenthecompressionnut(B)ontothe
compressionfitting.
Donotover-tightenthecompressionnut(B).
3oTurnthewateronandcheckforanyleakage.
Ifyoufindwaterdropsorleakageinthe
connectionareas,turnoffthemainwater
supply.Checktheconnectionsand,if
necessary,tighten.
4.Flush1gallonofwaterthroughthefilter
beforedrinkingorusingthewaterfromthe
refrigerator.(Flushapproximately6minutes.)
Toflush,pressalargeglassorcupagainstthe
waterdispenserlever.Filltheglass,emptyit
intothekitchensinkafteritisfilled,andthen
repeat.
5.Afteryouturnontherefrigerator,lettheice
makermakeicefor1to2days.Overthat
periodoftime,throwoutthefirst1or2
bucketsoficethefreezermakestoensureall
impuritieshavebeenremovedfromthewater
line.
Onlyconnectthewaterlinetoadrinkable
watersource.
Ifyouhavetorepairordisassemblethewaterline,
cutoff1/4"oftheplastictubingtomakesureyou
getasnug,leak-freeconnection.
[_ oucantestthewaterlinequicklyusinga
papercup.Undernormalconditions,the
waterdispensercanfilla5.75oz.(170cc)
cupinabout10seconds.
COMPLETING THE SET UP
Now that you have your new refrigerator installed
in place, you are ready to set up and enjoy the
features and functions of the appliance.
By completing the following steps, your refrigerator
should be fully operational.
1.
Make sure your refrigerator is in an appropriate
location with reasonable clearance between it
and the wall. Refer to installation instructions in
this manual.
2. Once the refrigerator is plugged in, make sure
the interior light comes on when you open the
doors.
3o Set the Temperature control to the coldest
temperature and wait for an hour. The freezer
will get slightly chilled and the motor will run
smoothly. Reset the refrigerator and freezer to
the temperatures you want.
4. After you plug the refrigerator in, it will
take a few hours to reach the appropriate
temperature. You can store food and drinks
in the refrigerator after the temperature is
sufficiently cool.
If condensation or water drops appear
on both sides of the fridge door's central
part, turn the Energy Saver mode off after
removing the condensation. (See the
explanation of the Energy Saver button in
"Using the Control Panel" on page 18.)
Engl sh - 17

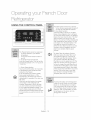
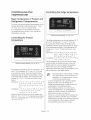
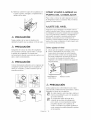
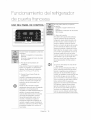
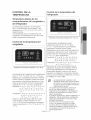
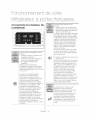
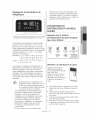
®
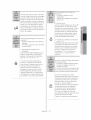
The Freezer button serves two purposes:
To set the Freezer to your desired
temperature.
To turn the Power Freeze function on
and off.
)To set the Freezer temperature,
touch the Freezer button. You can set the
temperature between 5 °F (-15 °C) and -8
°F (-23 °C).
1) Power Freeze function
Touch and hold this button for 3 seconds
to decrease the time needed to freeze
products in the Freezer.
It carl be helpful ifyou need to quickly
freeze easily spoiled items or ifthe
temperature in the Ireezer has warmed
dramatically ([::or example, if the door was
lelt open).
When you use this function, the energy
consumption of the refrigeralor will
increase. Remember to turn it off when
you don't need it and return the freezer
to your original temperature setting. If you
need to freeze a large amount of food,
activate the Power Freeze Iunction at least
24 hours before you put the feed into the
freezer.
renoh Door
The Alarm button serves two purposes:
To turn the door open alarm on and off
To reset the water filter life indicator.
Door Alarm Function
If the door alarm is set to On, an alarm
beeps ilany refrigeralor door is left open
for more than three minutes. The beeping
stops when you close the door. The door
alarm Iunction is pre-set to On in the
factory. You carl turn it off by pressing and
then releasing the Alarm button. You can
turn it back on in the same fashion. The
icon lights up when the function is on.
When the Door Alarm function is on and
the alarm sound is triggered, the Door
Alarm Icon will blink while the alarm
sounds.
2) Water Filter Life Indicator Function
After you replace the water filter, touch
and hold this button for 3 seconds to
reset the waler filter life indicator. When
you reset the water filter life indicator,
the Filter icon on the panel turns OFF.The
Filter icon will turn red to let you know it
is time to change the water filter after six
months (about 300 gallons). Some areas
have large amounts of lime in their water,
which causes the water filter to clog more
quickly. Ifthis is the case in your area,
you will have to change the filter more
frequently than every six months.
Touching this button turns Energy Saver
mode on and off. When you turn Energy
Saver on, the Energy Saver icon lights.
rum Energy Saver off and the icon goes
oft. The Energy Saver function's Iactory
setting is "ON". II condensation or water
drops appear on the doors, turn the
Energy Saver mode off.
Engl sh - 18

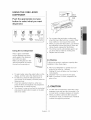
_i_i!_i_i_i_i_i_ii_i_i_ii_i_iii_iiii_!_!_i_ii!_!_!_!_!_!_!_!_!!!!!!!!_
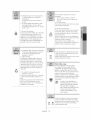
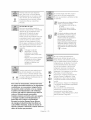
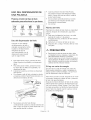
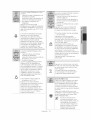
The Fridge butters serves two purposes:
to set the Fridge to your desired
temperature.
to turn the Power Cool function ors
and off.
) to set the Fridge temperature, press
the Fridge button. You can set the
temperature between 44 °F (7 °C) and
34 °F (1 °C).
2) Power Cool function
touch and hold this button for 3 seconds
to decrease the time needed to cool
products in the Refrigerator. it carl be
helpful if you need to quickly cool easily
spoiled items or if the temperature in
the fridge has warmed dramatically (for
example, ifthe door was left open).
iiii_iiiiii_ii_iiiiiiiiiiii_!i!!i:_!_!i_!_i!i_i_i_i_i_i_i_i!_i!_!_!!!ii!ii!ii!iii_!i_i
iiiiiiiiii_¸¸¸¸i¢_!!!i_!'i_i_!i!iiiiii!
,,.o,.
The Lighting button serves two purposes:
to turn the dispenser light on and off
to switch the temperature units
between °C and °F
) Light Function
fbuching the Lighting button turns on
the Dispenser LED lamp in continuous
mode so thai it stays on continuously.
The butlon also lights up. Ifyou want the
Dispenser lamp to come on only when
some one uses the dispenser, press the
Lighting button to turn the continuous
mode off.
2) to switch the temperature units
between °C and °F
touch and hold this button k)r 3 seconds
to select the temperature display you
want.
Each time you press and hold the butters,
the °C and °F temperature modes
alternate and the °C or°F icon lights up,
indicating your selection.
The Ice Maker OFFbutton serves two
purposes:
to turn the Ice maker orsand off
to turn the Control Lock Function on
and off.
Ice OFFFunction
If you don't want to make more ice, press
the Ice Maker OFFbutters.
2) Control Lock Function
Touch and hold this butters for 3 seconds
to lock the display, the Flex Zone panel,
and the dispenser buttons so the buttons
carl not be used.
When Control Lock is ors, the refrigerator
does net dispense ice or water, even if the
Dispenser Lever is pressed.
The Control Lock icors lights up to
indicate you've activated the Control Lock
function. Press 3 seconds to unlock.
Water
Touch this button to dispense water. This
mode can not be used with the Ice f_/pe
mode simultaneously.
Water mode shuts off when you touch the
Cubed/Crushed ce button.
Water filter usage
This icon lightsup when you need
to change the filter, usually after the
refrigerator has dispensed about 300
gallons of water (alter about 6 months).
The icon will blink red for several seconds
when you open or close the door.
After you install the new water filter, reset
the filter indicator by touching and holding
the Hold 3sec for Filter Reset butters for
3 seconds.
- If water is not dispensing or
dispensing slowly, you need to
replace the water filter because
the water filter is clogged.
- Some areas have large amounts
of lime in their water, which
causes the water filter to clog
more quickly.
I
lee Type
lee:: ype Tbuch this button to select your desired
ice type. Cubed and crushed ice modes
I alternate when you press the button. This
\_/ mode can not be used with the Water
Cubed _rushed mode s mu taneousy.
Engl sh - 19

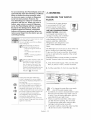
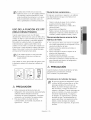
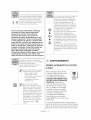
Tosaveelectricity, the Panel Display turns off
automatically under the foUowing conditions:
When no button has been pressed, when
no doors are open, or when no Dispenser
Lever has been pushed. However, the
icon indicating your cubed or crushed ice
selection, will stay on. When you press a
button, open a door, or push a Dispenser
Lever, the Panel Display will turn on again.
Except for the Energy Saver, Water, and
Cubed/Crushed ice buttons, all function
buttons will become operational after you
remove your finger from the button you are
currently pressing.
i{i!ii!iiiililililiiiiiiiii!ii!!ii{i!i!i_iliiiiii!i!iiiii!iiiiiiiiiiiii!i!iiii
If you don't want to make more ice, touch
the Ice Maker OFFbutton.
The icon will light up and the Ice-Maker
stops making ice.
We recommend you stop ice
making if the following occur:
- There is enough ice in the ice
bucket,
- You want to save wafer and
energy,
- Water is not being supplied to
the refrigerator,
®
Ifthe ice maker function is ON, and
the water line is not connected,
there will be a water valve noise
from the back of the unit, If this
occurs, press the Ice Maker OFF
(Control Lock(3sec)) button for less
than 3 seconds until the Ice OFF
Indicator ( _ ) illuminates,
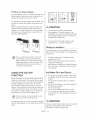
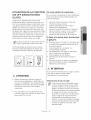
/K WARNING
CHANGING THE WATER
FILTER
To reduce risk of water damage
to your property DO NOT use
generic brands of water filters
in your SAMSUNG Refrigerator.
USE ONLY SAMSUNG BRAND (Red)
WATER FILTERS. SAMSUNG
is not legally responsible for any
damage, including, but not limited
to, property damage caused by
water leakage from the use of a
generic water filter. SAMSUNG
Refrigerators are designed to work
ONLY WITH SAMSUNG Water
Filters.
The Filter light turns red to let you know when it is
time to change your water filter cartridge.
To give you time to get a new filter, the red light
comes on just before the capacity of the current
filter runs out.
Changing the filter on time provides you with the
freshest, cleanest water from your refrigerator.
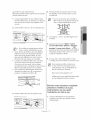
1. Shut off the water supply. Then, turn the water
filter ( 1 ) about 1/4 turn, counter-clockwise.
2. Pull the water filter ( 1 ) from the case filter ( 2 ).
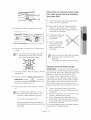
CoolingOFFmode(also called Shop
®
÷
Eq )
÷
mode), is designed for use by retailers
when they are displaying refrigerators on
the shop floor.
In Cooling OFFmode, the refrigerator's
fan motor and lights work normally, but
the compressors do not run, and the
refrigerator and freezer do not get cold,
To start Cooling OFFmode, touch and hold
the Freezer, Fridge and Alarm buttons for
5 seconds during normal operation,
The refrigerator chime sounds and the
temperature display flashes OFR
to cancel Cooling OFFmode, touch and
hold the Freezer, Fridge and Alarm buttons
again for 5 seconds.
,_ To change the water filter more easily,
shut off the water supply valve.
,_ Sometimes, it is hard to disassemble the water
filter because impurities in the water cause it
to stick. If you are having difficulties, grip the
water filter firmly and pull it hard.
,_ When you pull the water filter, a little water
can leak from the opening. This is normal.
To minimize the water leaks, keep the filter
cartridge horizontal when you pull it.
,_ To prevent overflow, empty the water tray filter
( 3 ) and dry around of case filter ( 2 ).
Engl sh - 20
Page is loading ...
Page is loading ...
Page is loading ...
Page is loading ...
Page is loading ...
Page is loading ...
Page is loading ...
Page is loading ...
Page is loading ...
Page is loading ...
Page is loading ...
Page is loading ...
Page is loading ...
Page is loading ...
Page is loading ...
Page is loading ...
Page is loading ...
Page is loading ...
Page is loading ...
Page is loading ...
Page is loading ...
Page is loading ...
Page is loading ...
Page is loading ...
Page is loading ...
Page is loading ...
Page is loading ...
Page is loading ...
Page is loading ...
Page is loading ...
Page is loading ...
Page is loading ...
Page is loading ...
Page is loading ...
Page is loading ...
Page is loading ...
Page is loading ...
Page is loading ...
Page is loading ...
Page is loading ...
Page is loading ...
Page is loading ...
Page is loading ...
Page is loading ...
Page is loading ...
Page is loading ...
Page is loading ...
Page is loading ...
Page is loading ...
Page is loading ...
Page is loading ...
Page is loading ...
Page is loading ...
Page is loading ...
Page is loading ...
Page is loading ...
Page is loading ...
Page is loading ...
Page is loading ...
Page is loading ...
Page is loading ...
Page is loading ...
Page is loading ...
Page is loading ...
Page is loading ...
Page is loading ...
Page is loading ...
Page is loading ...
Page is loading ...
Page is loading ...
Page is loading ...
Page is loading ...
Page is loading ...
Page is loading ...
Page is loading ...
Page is loading ...
Page is loading ...
Page is loading ...
Page is loading ...
Page is loading ...
Page is loading ...
Page is loading ...
Page is loading ...
Page is loading ...
Page is loading ...
Page is loading ...
Page is loading ...
Page is loading ...
Page is loading ...
Page is loading ...
Page is loading ...
Page is loading ...
Page is loading ...
Page is loading ...
Page is loading ...
Page is loading ...
-
 1
1
-
 2
2
-
 3
3
-
 4
4
-
 5
5
-
 6
6
-
 7
7
-
 8
8
-
 9
9
-
 10
10
-
 11
11
-
 12
12
-
 13
13
-
 14
14
-
 15
15
-
 16
16
-
 17
17
-
 18
18
-
 19
19
-
 20
20
-
 21
21
-
 22
22
-
 23
23
-
 24
24
-
 25
25
-
 26
26
-
 27
27
-
 28
28
-
 29
29
-
 30
30
-
 31
31
-
 32
32
-
 33
33
-
 34
34
-
 35
35
-
 36
36
-
 37
37
-
 38
38
-
 39
39
-
 40
40
-
 41
41
-
 42
42
-
 43
43
-
 44
44
-
 45
45
-
 46
46
-
 47
47
-
 48
48
-
 49
49
-
 50
50
-
 51
51
-
 52
52
-
 53
53
-
 54
54
-
 55
55
-
 56
56
-
 57
57
-
 58
58
-
 59
59
-
 60
60
-
 61
61
-
 62
62
-
 63
63
-
 64
64
-
 65
65
-
 66
66
-
 67
67
-
 68
68
-
 69
69
-
 70
70
-
 71
71
-
 72
72
-
 73
73
-
 74
74
-
 75
75
-
 76
76
-
 77
77
-
 78
78
-
 79
79
-
 80
80
-
 81
81
-
 82
82
-
 83
83
-
 84
84
-
 85
85
-
 86
86
-
 87
87
-
 88
88
-
 89
89
-
 90
90
-
 91
91
-
 92
92
-
 93
93
-
 94
94
-
 95
95
-
 96
96
-
 97
97
-
 98
98
-
 99
99
-
 100
100
-
 101
101
-
 102
102
-
 103
103
-
 104
104
-
 105
105
-
 106
106
-
 107
107
-
 108
108
-
 109
109
-
 110
110
-
 111
111
-
 112
112
-
 113
113
-
 114
114
-
 115
115
-
 116
116


Samsung RF28HMEDBBC/AA-06 Owner's manual
- Category
- Fridges
- Type
- Owner's manual
Ask a question and I''ll find the answer in the document
Finding information in a document is now easier with AI
in other languages
Related papers
-
Samsung RF23HT Serie Owner's manual
-
Samsung RF23HCEDBWW/AA-09 Owner's manual
-
Samsung RF30HDEDTSR/AA-05 Owner's manual
-
-
-
Samsung RS22HDHPNWW/AA-00 Owner's manual
-
-
Samsung RS25H5111SR/AA-02 Owner's manual
-
-
Other documents
-
Hisense HQD20058SV User manual
-
Electrolux EI23BC51IW1 Installation guide
-
LG LFX25973SW/00 Owner's manual
-
LG LFX31925SB/04 Owner's manual
-
-
-
LG LFX29945ST/00 Owner's manual
-
Crosley CRT185HPB2 Owner's manual
-
LG LFX32945ST/02 Owner's manual
-
 Kenmore Elite 79572052113 Owner's manual
