Distributed by:
AUSTRALIA
BRITAX CHILDCARE PTY.LTD.
A Britax International company.
(Incorporated in Victoria)
A.B.N. 55 006 773 600
99 Derby Road, Sunshine,
Victoria 3020, Australia
Phone: (03) 9288 7288
Fax: (03) 9311 5798
Due to our continuing program of development, Britax reserves the right to alter the specifications,
colour or design without any further notice.
The Steelcraft trademark is the property of Britax Childcare Pty. Ltd-Australia.
The Britax trademark is the property of Britax Excelsior Limited - UK.
Visit the Britax website at: http:/www.britax.com.au or email us at [email protected]
Due to the variations in the style and design of our products the illustrations used in this instruction
booklet are generic.
12/06 c 2006 Copyright Britax Childcare Pty. Ltd. Australia.
NEW ZEALAND
BRITAX CHILDCARE NZ. Limited.
A Britax International company.
101 Diana Drive, Glenfield,
Auckland 9, New Zealand.
Phone: (09) 443 0102
Fax: (09) 443 0120
08
....think of your child’s comfort and safety
KEEP INSTRUCTIONS FOR FUTURE REFERENCE
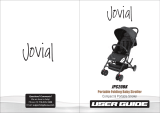
ACCLAIM Reverse Handle
series S400
....think of your child’s comfort and safety
Each Steelcraft unit is thoroughly inspected in our Quality Assurance
department prior to delivery. In the unlikely case that you find any
material or workmanship that affects the units normal operation,
we will repair the unit free of charge within 12 months of purchase. You
are required to present your receipt as proof of purchase.
For all concerns with your product please contact our Customer Service
team.
CUSTOMER SERVICE
1300 303 330 - Australia
0508 688 822 - New Zealand
Please read all the information carefully before using this product.
This warranty does not apply to failure due to improper care,
or normal wear and tear caused by product use. We reserve the
right to inspect the unit. You may be charged for repairs if the product
has been damaged accidentally.
Warranty
....think of your child’s comfort and safety
4000815

02 07
READ ALL INSTRUCTIONS CAREFULLY BEFORE ASSEMBLY AND USE OF THE STROLLER.
ALWAYS FOLLOW THE INSTRUCTIONS. THE CORRECT USE AND MAINTENANCE OF THIS
PRODUCT IS ESSENTIAL.
WARNINGS
. Do not leave children unattended.
. Follow the manufacturers instructions.
. Ensure your child is secured with a correctly adjusted safety harness.
. Do not carry additional children on the stroller.
. Do not allow children to stand on the seat.
. Do not hang bags or goods from the handle as this could cause the stroller to
tip over.
. Do not place more than 4kg in the basket and 1kg in the canopy pocket
(if supplied).
. The weight of the child using this product should not exceed 17kg.
. Do not use accessories other than those supplied and approved by Britax.
. When making adjustments to the stroller, ensure that your child’s body is clear
of any moving parts on the stroller.
. Always apply all of the brakes when parking the stroller.
. Check that all safety locks are engaged before placing a child in the stroller.
. Always raise the leg support to its highest position when transporting a baby.
This will reduce the risk of the baby falling out through the front of the stroller.
. Remove the child from the stroller before going up or down stairs and escalators.
. To prevent the risk of the stroller catching fire, do not park it near a radiator, an
open fire or barbecue.
. Do not run while using this product.
. Do not lift the stroller by the bumper bar. It may disengage.
. Always lock the front swivel wheels when on uneven surfaces to minimize wheel
wobble.
RECOMMENDATION
Some strollers have backrests adjustable between an upright and reclined position. The
upright positions are not suitable for use with children less than six months old. As a guide,
the lowest recline position should be used to transport babies, the backrest can be adjusted
to a more upright position as the child grows older and
is able to support its head without assistance.
SAFETY WARNING
The sun is very strong. DO NOT LEAVE YOUR CHILD EXPOSED TO THE SUN.
The canopy or hood on this product will not give your child total protection from the
harmful rays of the sun.
A Move the handle to the rear of the stroller (when
standing behind your child). Close the canopy,
remove the boot cover, storm cover, mesh cover
(if fitted), lock all brakes, and swivel wheels (with
brake levers facing forward). Put the backrest
into the fully reclined position.
B Release the handle folding locks by pushing button
B1. On the top of handle and pressing lever
B2. On the under side of the handle.
C Depress the safety lock located on the rear leg.
Close the stroller fully until frame storage lock
engages.
A
14. TO FOLD THE STROLLER
CARE AND MAINTENACNCE
To prolong the life of your nursery product keep it clean and do not leave it in the direct sunlight
for extended periods of time.
Removable fabric covers and trims may be cleaned using warn water with a household soap or
a mild detergent. Allow it to dry fully, preferable away from direct sunlight.
HELPFUL HINTS
If the wheels squeak - use a silicon based spray ensuring it penetrates the wheel axle assembly.
When using your stroller at the beach - completely clean your stroller afterwards to remove the
sand and salt from the mechanisms and wheel assembly.
If there are compression marks on the tyres - use a domestic hair dryer to gently warm tyre and
the compression marks should slowly disappear. (DO NOT OVERHEAT).
DO NOT DRY CLEAN, OR USE BLEACH
Do not machine wash, tumble or spin dry, unless the care labeling on the product permits these
methods.
Non removable fabric covers and trims may be cleaned using a damp sponge with soap or mild
detergent. Allow it to dry completely before folding or storing it away.
In some climates the covers and trims may be affected by mould and mildew. To help prevent
this occurring, do not fold or store the product if it is damp or wet. Always store the product in a
well ventilated area.
Always check parts regularly for tightness of screws, nuts and other fasteners -tighten if
required. To maintain the safety of your nursery product, seek prompt repairs for bent, torn,
worn or broken parts. Use only those parts and accessories approved by Britax.
THIS PRODUCT IS NOT INTENDED FOR COMMERCIAL USE
B
CC
www.britax.com.au www.britax.com.au

06 03
A Release the storage lock (located on the rear leg) by
depressing the lock.
B Lift the handle up until the stroller locks into the fully
upright position.
2. TO INSTALL THE WHEELS
A Align a swivel wheel assembly to either the front or
rear leg and push it down firmly until a click is heard.
B Check to make sure it’s securely engaged by pulling
against it.
C Repeat this process for the other swivel wheels.
3. TO SECURE YOUR CHILD IN HARNESS
WARNING: Use this harness at all times.
A five-point harness is provided to restrain your child. To
secure the child in the harness, push buckle (A) and (B) into
the buckle housing (C) until the buckle prongs snap into
position. Carefully adjust the harness by pulling the slider
(D) until the desired fit is achieved in the lap, shoulder and
crotch straps. Always adjust the harness when changing the
seating position of the child. To release the buckle, squeeze
the top and bottom prongs.
4. TO ADJUST THE BACKREST
A To fully recline the backrest squeeze the adjusting
bar up and lower the backrest down.
B To raise the backrest to the fully upright position,
hold the fabric on the side of the seat clear and lift
the backrest up until it locks into place.
A Raise the leg support and place the boot cover
over the front of the leg support and the bumper
bar.
B Attach the upper straps to the canopy frame
support tubes.
12. TO FIT THE STORM COVER
A Unlock the handle position so it moves freely from
either locked position on the frame.
B Pull the storm cover over extended canopy,
position large hole in storm cover over the rear
handle lock. Storm cover needs to be on the
inside of the handle.
C Position the small hole in the front handle lock.
D Attach the Velcro at underside of storm cover. The
handle is now free to move and lock into either
position.
13. TO FIT THE MESH COVER
A Zip the mesh cover to front of the canopy.
B Place the elastic front over the bumper bar. Do not
cover the handle lock with the mesh to prevent
tearing.
C Loop the elastic attachments over the rear handle
lock.
1. TO OPEN THE STROLLER
11. TO FIT THE BOOT COVER
A
C
D
A
B
www.britax.com.au www.britax.com.au

04 05
5. TO ADJUST THE BUMPER BAR 8. TO REVERSE THE HANDLE
A Lift the finger grips on each side of the handle to
release it for forward or reverse positioning.
Ensure that both sides are fully locked before using
the stroller.
9. TO ADJUST THE CANOPY
A Adjust the canopy studs to the attachments on the
seat back. Open the canopy by pulling the canopy
forward or close it by pushing the canopy back.
10. TO ADJUST THE LEG SUPPORT
A Lower the leg support by pressing the release
latches located on both sides of the leg support.
Then push the leg support down to the desired
position.
B Raise the leg support by lifting it up until latches
lock into the desired position.
A Fully depress the side armrest buttons and slide
the bumper bar out for easy access into stroller,
or in to install it.
NOTE: It is recommended that the bumper bar be used
at all times.
6. TO USE THE SWIVEL WHEELS
A There are four sets of swivel wheels on this
product, however only use 2 sets in the unlocked
swivel position. The wheels closest to your feet /
handle should always be in the locked position
with the brake lever facing you.
B To lock the swivel wheels lift the locking clip up,
to unlock push down.
NOTE: Lock all swivel wheels whenever on uneven
surfaces.
7. TO USE THE BRAKE (Front and Rear)
A Push each brake lever down to lock the brakes.
B Lift each brake lever up to release the brakes.
NOTE: Always apply the front and rear brakes
whenever you park the stroller. A
B
A B
www.britax.com.au www.britax.com.au
/