Chicco 4-in-1 Ride On Car Owner's manual
- Category
- Car seat
- Type
- Owner's manual
This manual is also suitable for

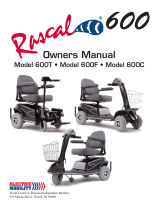
4-in-1 Ride On Car
Owner's Manual
IS0062.3ESF ©2011 Artsana USA, INC. 01/12
Read all instructions BEFORE
assembly and USE of product.
KEEP INSTRUCTIONS FOR
FUTURE USE.

2
• PLEASE READ THESE INSTRUCTIONS
CAREFULLY TO ENSURE THE SAFETY
OF YOUR CHILD.
• ALWAYS PROVIDE THE
SUPERVISION NECESSARY FOR
THE CONTINUED SAFETY OF
YOUR CHILD. NEVER LEAVE CHILD
UNATTENDED.
• Adult assembly required.
• The un-assembled toy and shipping
box may contain items with
potentially hazardous sharp edges
or sharp points, and/or small parts
that are a choking hazard to young
children - Please keep them out of
reach of children.
• Suffocation Hazard: Plastic bags
can be dangerous. To avoid danger
of suffocation, keep bag away from
babies and children. Properly dispose
of any plastic bags or any other
packaging materials.
• ALWAYS keep child in view when
they are using this toy.
• This product is intended for children
9 months of age, or able to sit up
unassisted.
• Before each use, check this product
for damaged, loose fitting, or missing
parts. Make sure that all fasteners
are properly tightened and that the
components are securely attached.
DO NOT use this product if any parts
are missing, damaged, or broken.
Contact Chicco for replacement parts
and instructional literature if needed.
DO NOT substitute parts.
• Only use this toy on flat surfaces
without any obstacles. Never use
this toy in roadways, near motor
vehicles, on or near steep inclines
or steps, swimming pools or other
bodies of water.
• Avoid serious injury from falling or
sliding out. Make sure the armrests
are securely fastened in the ROCKER
and PUSH ‘N GO modes. To avoid
tipping, Never use the toy in the Push
and Walk and/or Sit ‘n’ Ride modes
with the armrests assembled.
• Make sure the child wears properly
secured shoes.
• Never allow more than one child to
use this toy at one time.
• Each of these modes requires a
different level of ability to be able to
avoid falls or collisions - Make sure
your child's development allows
them to safely use this toy.
Failure to follow these warnings and the instructions could result in
serious injury or death
WARNING

3
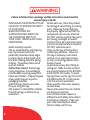
4 in 1 Ride on toy – Ages 9 - 36 months.
Maximum child’s weight: 44 lbs/20 Kg
This product is designed to adjust to your
child’s growth:
1. Rocker (9 – 12 months)
2. Push ‘N Go (9 – 18 months)
3. Push ‘N Walk (12 – 18 months)
4. Sit ‘N Ride (18 – 36 months)
4 in 1 Modes
1.
2.
3.
4.

4
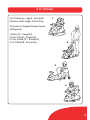
A. - Car Body
B. - Steering Wheel
C. - Backrest/handle for child
D. - Seat
A.
B.
C.
D.
Parts List

5
E.
F.
G.
H.
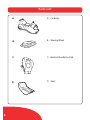
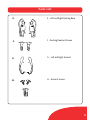
Parts List
E. - Left and Right Rocking Base
F. - Rocking/Footrest Screws
G. - Left and Right Armrest
H. - Armrest Screws

6
I.
I. - Activity Center
J. - Left and Right Footrest
K. - Parent Handle
L. - Extension Bars
J.
K.
L.
Parts List

7
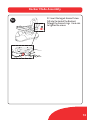
“CLICK!”
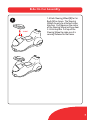
1. Attach Steering Wheel (B) to Car
Body (A) as shown. The Steering
Wheel can only be attached in one
direction. Push down on the center
of the Steering Wheel until you hear
it click into place. Pull up on the
Steering Wheel to make sure it is
securely fastened to the frame.
1
Ride On Car Assembly

8
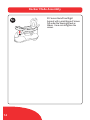
2
2. Line up the Backrest/handle for
Child (C) to the Car Body as shown
and push down until you hear it click
into place. Pull up on the Backrest to
make sure that it is securely attached
to the frame.
“CLICK!”
Ride On Car Assembly

9
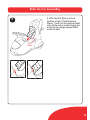
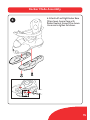
3
3. With the Seat (D) in a vertical
position, attach it to the frame as
shown. It will click into place on both
sides of the seat to create a hinge, for
access to the storage compartment
under the Seat.
“CLICK!”
Ride On Car Assembly

10
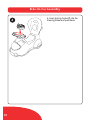
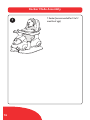
4
4. Insert Activity Center (I) into the
Steering Wheel and press down.
Ride On Car Assembly

11
5A. Attach the Right Armrest (G) first,
fit the ring into the back of the
Backrest and onto the Steering
Wheel.
Right Armrest
Left Armrest
5A
Rocker Mode Assembly

12
5B
5B. Attach the Left Side Armrest (G),
fit the ring on top of the Right Side
Armrest ring at the back of the
Backrest and onto the Steering
Wheel.
Rocker Mode Assembly

13
5C
5C. Insert the largest Armrest Screw
(H) into the back of the Backrest,
through the Armrest rings. Use a coin
to tighten the screws.
Rocker Mode Assembly

14
5D. Secure the Left and Right
Armrest with a small Armrest Screws
(H) under the Steering Wheel as
shown. Use a coin to tighten the
screws.
5D
Rocker Mode Assembly

15
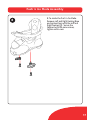
6. Attach Left and Right Rocker Base
(E) as shown. Secure them with
Rocker/Footrest Screws (F) as shown.
Use a coin to tighten the screws.
6
Rocker Mode Assembly

16
7
7. Rocker (recommended for 9 to 12
months of age)
Rocker Mode Assembly

17
8. To create the Push 'n Go Mode:
Remove Left and Right Rocking Base
and replace them with the Left and
Right Footrest (J). Secure the
Footrest with the same screws,
tighten with a coin.
8
Push 'n Go Mode Assembly

18
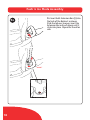
9A. Insert both Extension Bars (L) into
the back of the Backrest as shown.
Slide the tab over to open, insert the
Extension Bar and push down until it
clicks into place. Repeat for the other
side.
“CLICK!”
9A
Push 'n Go Mode Assembly

19
9B. Attach the Parent Handle (K) to
the Extension bars. Line up the bars
and push down until they click into
place.
9B
“CLICK!”
“CLICK!”
Push 'n Go Mode Assembly

20
9C
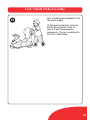
9C. Push 'n Go (recommended for 9
to 18 months of age)
Push 'n Go Mode Assembly
Page is loading ...
Page is loading ...
Page is loading ...
Page is loading ...
Page is loading ...
Page is loading ...
-
 1
1
-
 2
2
-
 3
3
-
 4
4
-
 5
5
-
 6
6
-
 7
7
-
 8
8
-
 9
9
-
 10
10
-
 11
11
-
 12
12
-
 13
13
-
 14
14
-
 15
15
-
 16
16
-
 17
17
-
 18
18
-
 19
19
-
 20
20
-
 21
21
-
 22
22
-
 23
23
-
 24
24
-
 25
25
-
 26
26


Chicco 4-in-1 Ride On Car Owner's manual
- Category
- Car seat
- Type
- Owner's manual
- This manual is also suitable for
Ask a question and I''ll find the answer in the document
Finding information in a document is now easier with AI
Related papers
Other documents
-
GEM Wooden Kitchen Set White Operating instructions
-
Chipolino Musical ride on car Operating instructions
-
 Rascal Balance 600 B Owner's manual
-
 Rascal Rascal 600T Owner's manual
-
-
Combi 9725 User manual
-
 Rascal Vecta Sport Owners Manual & Service Record
-
 Zooper SL800E/F User manual
-
 Zooper SL808 User manual
-
Days Verb User manual


