Page is loading ...

Printed in ChinaAB1331
MAGNUM SECURITY
SCREEN DOOR
PACKAGE CONTENTS
A
PART
PART
A
AA
BB
CC
DESCRIPTION
DESCRIPTION
Security Door
QUANTITY
QUANTITY
1
1
1
Styles may vary
HARDWARE CONTENTS
8
4 in. one-way screws
Top bar
Locking side bar
AA
BB
CC
NOTE: All parts not shown at actual size.
PREPARATION
Tools Recommended for Assembly (not included)
One-way screw tool, drill 3/16 in. bit, level or string plumb, measuring tape and pencil.
IMPORTANT: Read all instructions carefully before starting installation.
Questions, problems,missing parts?
Before returning to your retailer, call our customer service department at 1-877-442-8347, 8 a.m.-8 p.m., EST, Monday-Friday.
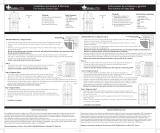
ASSEMBLY INSTRUCTIONS
1.Identify which way the security
door is to open.
2.Install the lockset (sold separately)
with 2-3/8 in. Backset. Then, fully
extend the lock bolts into the “ locked”
position.
3.Place security door in front of opening
at desired height, making sure that
the security door is vertical (plumb).
Determine where to drill by marking
through the pre-drilled holes on the
hinge-side jamb with pencil.
4.Drill holes. Using screws (AA), fasten
door to house.
Tighten screws (AA) only halfway
at this time in case repositioning the
door is required later.
1. Security doors are finished with a heavy-duty powder coat finish. In order to maintain your finish, it is recommended
to clean and wax the security door 2 times per year, preferably in late fall and early spring. Doors directly subjected to the sun,
salt-air or moisture may require more maintenance.
2. Any scratches or abrasions to the door finish should be immediately touched up with enamel or rust protective paint.
3. To keep your door looking like new, any signs of rust should be sanded with mild sandpaper and touched up immediately
with enamel or rust protective paint.
4. Hinges and lockset (sold separately) should be oiled and lubricated regularly to reduce friction wear.
5. Make sure any sprinklers near your new door are directed away.
6. Do not allow vegetation on your security door. This will lead to extra maintenance.
7. Make sure to keep your weed eater and lawn mower away from your security door. It may create unwanted chips to your
door finish.
CARE AND MAINTENANCE
WARRANTY
In the event that our products or any parts thereof should prove to be defective in material or workmanship, under normal use and service, and
such defects are reported to us within one (1) year from the date of purchase, at our option, we will repair or replace the door. Replacement items
may vary in style due to changes in suppliers and product. In addition, the paint finish is warranted not to blister, crack, or fade for one year from
the purchase date. Damage due to rust is excluded from this warranty. Screens, glass and hardware are also excluded from this warranty. This
warranty does not cover damage caused by vandals, break-ins, or attempted break-ins. This warranty is voided if the products is modified in any
way. We assume no responsibility for incidental or consequential damages arising from defective products; nor do we assume any responsibility
for failures, breakage or cost which result from abuse, abnormal use, misuse, negligence, accident, exposure to corrosive fumes, condensates,
fire or damage as a result of improper installation. Except as stated above, we make no warranties, either expressed or implied, as to any matter
whatever, including without limitation, the condition of our products ,their merchantability or fitness for any particular purpose. We assume no other
expense such as labor costs of any kind for removal, replacement or parts, repairs or reinstallation.
2
1
3
4
5
7
6
ITEM #0442644/#0442645/#0442646
#0442647/#0442648/#0442649
#0442650/#0442651/#0442652
MODEL: 3256-30”-WHT/3256-30”-BLK/3256-30”-ALM
3256-32”-WHT/3256-32”-BLK/3256-32”-ALM
3256-36”-WHT/3256-36”-BLK/3256-36”-ALM
5.Align the lock bolt holes in the locking
side bar (CC) with the extended lock
bolts, making sure the locking side bar
(CC) is vertically true (plumb).
6.Mount the locking side bar (CC) to door
frame jamb. Drill holes. Fasten the locking
side bar (CC) to the house using the
screws (AA). Tighten screws (AA) only
halfway at this time. When you are
satisfied with the position and operation
of the security door, tighten screws (AA)
securely to the house.
7.Mount top bar (BB) at top of door
using remaining 2 screws (AA).
Leave approximately 1/8 in. space
between top bar (BB) and top of
door frame.
Impreso en China
PUERTA DE SEGURIDAD
CON MALLA MAGNUM
CONTENIDO DEL PAQUETE
A
PIEZA
PIEZA
A
AA
BB
CC
DESCRIPCIÓN
DESCRIPCIÓN
Security Door
CANTIDAD
CANTIDAD
1
1
1
Los estilos pueden variar
ADITAMENTOS
8
Tornillos de una vía de 4”
Barra superior
Barra de bloqueo lateral
AA
BB
CC
NOTA: Todas las piezas no se muestran en tamaño real.
PREPARACIÓN
Herramientas recomendadas para el ensamblaje (no se incluyen):
Destornillador de una vía, taladro y broca para taladro de 3/16”, nivel o cuerda del plomo, cinta métrica y lápiz.
INSTRUCCIONES DE ENSAMBLAJE
1.Identifique hacia que lado abrirá
la puerta de seguridad.
2.Instale la cerradura (se vende por
separado) con el seguro de 2-3/8”.
Luego, extienda por completo los
pernos del seguro a la posición de
bloqueo.
3.Coloque la puerta de seguridad frente
a la abertura a la altura deseada,
asegurándose de que la puerta de
seguridad esté vertical (a plomo).
Determine donde taladrar marcando
a través de los orificios pretaladrados
en el lado de las bisagras de la jamba
con un lápiz
4.Taladre los orificios.
Fije la puerta a la casa con los tornillos
(AA). Apriete los tornillos (AA) solo
hasta la mitad en este momento, en
caso de que requiera cambiar la
posición de la puerta más adelante.
1. Las puertas de seguridad cuentan con un acabado de capa granulada para trabajo pesado.
Para mantener su acabado, se recomienda limpiar y encerar la puerta de seguridad 2 veces al año, preferiblemente a fines
de otoño y principios de primavera. Las puertas que estén en contacto directo con el sol, aire salino o humedad podrían
requerir más mantenimiento.
2. Cualquier rayón o abrasión en el acabado de la puerta debe retocarse de inmediato con esmalte o una pintura protectora
contra el óxido.
3. Para mantener su puerta como nueva, cualquier rastro de óxido debe lijarse con un papel de lija suave y retocarse de
inmediato con esmalte o una pintura protectora contra el óxido.
4. Las bisagras y cerraduras (se venden por separado) deben aceitarse y lubricarse a menudo para disminuir el desgaste
por fricción.
5. Asegúrese de que los regadores cerca de su puerta no apunten hacia esta.
6. No permita que crezca vegetación en su puerta de seguridad. Esto significará más mantenimiento
7. Asegúrese de mantener su orilladora y podadora de césped alejadas de su puerta de seguridad. Podría provocar
desportilladuras indeseadas en el acabado de su puerta.
CUIDADO Y MANTENIMIENTO
GARANTÍA
En el caso de que se demuestre que nuestros productos o piezas estén defectuosos en el material o la mano de obra, bajo un uso y servicio normales,
y que dichos defectos se nos informen dentro de un (1) año a contar de la fecha de compra, según nuestro criterio, repararemos o reemplazaremos la
puerta. Los artículos de repuesto pueden variar en el estilo debido a cambios de proveedores y de productos.
Además, está garantizado que el acabado de la pintura no formará burbujas, agrietará ni decolorará por un año desde la fecha de compra. El daño
debido al óxido está excluido de esta garantía. Mallas, vidrios y aditamentos también están excluidos de esta garantía. Esta garantía no cubre daños
producidos por vándalos, entradas forzadas o intentos de entradas forzadas. Esta garantía se anula si el producto se modifica de alguna manera
No asumimos ninguna responsabilidad por daños accidentales o resultantes que surjan de productos defectuosos, ni tampoco asumimos ninguna
responsabilidad por fallas, roturas o costos que resulten del abuso, uso anormal, uso indebido, negligencia, accidentes, exposición a vapores
corrosivos, condensados, fuego o daño como resultado de una instalación inadecuada.
A excepción de lo mencionado anteriormente, no establecemos ninguna garantía, sea expresa o implícita, por cualquier asunto de cualquier índole,
incluyendo, entre otros, la condición de nuestros productos, su comerciabilidad o idoneidad para cualquier propósito en particular.
No asumimos ningún otro gasto como costos de mano de obra de cualquier tipo por el retiro, reemplazo o piezas, reparaciones o reinstalación
2
1
3
4
5
7
6
ARTÍCULO #0442644/#0442645/#0442646
#0442647/#0442648/#0442649
#0442650/#0442651/#0442652
MODELO: 3256-30”-WHT/3256-30”-BLK/3256-30”-ALM
3256-32”-WHT/3256-32”-BLK/3256-32”-ALM
3256-36”-WHT/3256-36”-BLK/3256-36”-ALM
5.Alinee los orificios de los pernos del
seguro en la barra de bloqueo lateral
(CC) con los pernos de bloqueo
extendidos, asegurándose de que la
barra de bloqueo lateral (CC) vertical
(a plomo).
6.Monte la barra de bloqueo lateral (CC) en
la jamba del marco de la puerta.Fije la
barra de bloqueo lateral (CC) a la casa
con los tornillos (AA). Apriete los tornillos
(AA) solo hasta la mitad en este momento.
Cuando esté conforme con la posición y
el funcionamiento de la puerta de seguridad,
apriete bien los tornillos (AA) a la casa.
7.Monte la barra superior (BB) en la parte
superior de la puerta con los 2 tornillos
(AA) restantes. Deje un espacio de
aproximadamente 3,18 mm entre la barra
superior (BB) y la parte superior del marco
de la puerta.
IMPORTANTE: Lea con atención todas las instrucciones antes de comenzar la instalación.
¿Preguntas, problemas, piezas faltantes?
Antes de volver a la tienda, llame a nuestro Departamento de Servicio al Cliente al 1-877-442-8347, de lunes a viernes, de 8 a.m. a 8 p.m., hora estándar del Este.
/