Wood Barn Door
Assembly
Inspect all parts and read instructions thoroughly before beginning.
It is required that you complete the desired look and finish to your door
after it is fully assembled. For the best finishing results, lightly sand the
door first with very fine sandpaper and wipe with a clean cloth. Vari-
ations in color and small scratches and nicks are a natural part of the
wood and are not defects.
A large sturdy workbench is recommended.
Tools Needed
Phillips Screwdriver
Rubber
Mallet
Hammer
4 Clamps
Drill
Measuring Tape
Parts Included
9 door panels , 8 splines, 16 spacers, 1 pre-drilled top rail board,
1 pre-drilled bottom rail board, 2 pre-drilled side rail boards and
48 screws. Tools: 1 1/8” Drill Bit and 1 Phillips Head Drill Bit.
Exploded View
Side Board
Top Board
Bottom
Board
Spacer
Splines
Door Panels
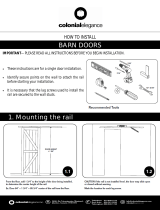
1.
Assemble Door Panels
Place one door panel flat on your work surface, making sure the
groove side of the panel is to the inside and the smooth side to
the outside (this is an end panel. You will have two panels like
this, one for the top and one for the bottom). Take one of the thin
wooden splines and place it evenly into the panel groove. Do not
hammer the splines. Place 2 spacers onto the spline (one towards
the top and one towards the bottom). This ensures even alignment
of the panels. Insert the next panel into the first spline. Repeat the
spline and spacer steps with the remaining panels. Make sure all
panels are aligned top and bottom as you go. Panels should be
evenly spaced and snug. The last panel will also be an end panel
with a smooth outer edge.
Make sure the door is
square by measuring
diagonally from both
directions. These
measurements must be
equal. Using the
mallet or hammer,
adjust the boards until
equal. Do not hit
the splines.
Remove the spacers.
2.
Top and Bottom Rail Boards
Place the top and bottom rail boards onto the assembled door
panels with the pre-drilled recessed opening side up. Make sure
both Rail Boards are flush with the door edges on top and bottom.
There should not be any overhang. Panels should be evenly
spaced and snug. Do not insert any of
the screws at
this point.
Safety Glasses
1/8” Drill bit
Side Board
Back View