
EasyScope User Manual
Version No:1.0
I

Copyright Information
1. My company all rights reserved.
2. My company reserves all rights of the EasyScope software.
II

Introduction
EasyScope Software introduces a family of windows 95/98/XP/2000(Intel)/NT
4.0(Intel) applications that connect your oscilloscopes to your PC desktop by USB
serial interface,RS-232 interface and Ethernet interface. The software provide the
display area to display captured waveforms data、 measurements data、waveforms and
the LCD waveform interface. Waveforms can refresh automatically, which is help to
users analyzing and researching data further; Meanwhile, the software can
upload/download setups of the oscilloscope; Further, the software also have control
panel setup function, save and print measurements and sampling data functions.
III

Preface
This manual is the user guide for the EasyScope software, and it contains three
chapters.
Chapter1: Accidence
This chapter guides you install or uninstall the software and introduces you the
interface,
Chapter 2: Operating the EasyScope
This chapter introduces how to use mostly function of the EasyScope software.
Chapter 3: Troubleshooting
This chapter introduces ways to solve frequently encountered problems.
IV

Catalogue
Introduction..................................................................................................................III
Preface..........................................................................................................................IV
Catalogue ......................................................................................................................V
Chapter1 Accidence .......................................................................................................1
1.1 Install and Uninstall ..........................................................................................1
1.2 Software Interface...........................................................................................12
1.2.1 Menu Bar ..............................................................................................12
1.2.2 Toolbar ..................................................................................................16
1.2.3 Link state display .................................................................................17
1.2.4 Base Control Panel................................................................................18
1.2.5 Data、Graph display area.....................................................................19
1.2.6 Status Bar ..............................................................................................20
Chapter 2 Operating the EasyScope ............................................................................21
2.1 Graph、Data control operate..........................................................................21
2.1.1 Graph control ........................................................................................21
2.1.2 Data control...........................................................................................27
2.2 Device Setting operate ....................................................................................31
2.3 Virtual panel operation....................................................................................32
Chapter 3 Troubleshooting...........................................................................................34
V

Chapter1 Accidence
1.1 Install and Uninstall
This section describes how to install EasyScope software on your computer.
To install EasyScope, follow these steps:
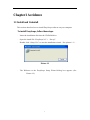
. Insert the installation disk into the CD-ROM drive.
. Open the install file “EasyScope3.0”→ “Set up”.
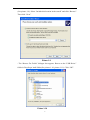
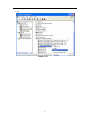
. Double click “Setup. Exe” to start the installation wizard(See picture 1-1).
Picture 1-1
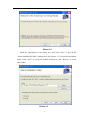
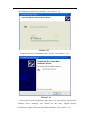
. The Welcome to the EasyScope Setup Wizard dialog box appears (See
Picture1-2)
1

Picture 1-2
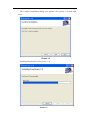
. Read the information in the dialog box, and click “Next” to pop up the
“Select Installation Folder” dialogue box (See picture 1-3). Select the installation
folder, click “Next” to accept the default location or click “Browse” to select
other folder.
Picture 1-3
2

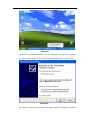
. The Confirm Installation dialog box appears (See picture 1-4) and click
“Next”.
Picture 1-4
. Installing EasyScope3.0 (See picture 1-5)
Picture 1-5
3

. After all the files have been installed, the installation complete and click
“Close”. (See picture 1-6)
Picture 1-6
If you connect EasyScope3.0 software to the oscilloscope by USB interface,
you need to install USB driver; If you connect them by Ethernet or RS-232,
you will need not to install it.
Installing the USB driver
. Connect the oscilloscope (now you should make sure the oscilloscope is
working) to your computer using the included USB cable.
. The windows device manager automatically detects the system and will
display “Find new hardware”.(See picture 1-7)
4

Picture1-7
. The welcome to found new hardware wizard dialogue box appears (see picture
1-8), select “Install from a list or specific location (Advanced)”. Click “Next”.
Picture1-8
. The “Please choose your search and installation options” dialogue box appears
5

(See picture 1-9). Select “Include this location in the search” and click “Browse”.
Then click “Next”.
Picture 1-9
. The “Browse For Folder” dialogue box appears. Browse to the “USB Driver”
folder in EasyScope intall folder(See picture 1-10, picture 1-11). Click “OK”.
Picture 1-10
6

Picture 1-11
. Now you have chosen your search and installation options, Click “ok” in
dialogue box 1-12:
Picture 1-12
7

. The USB driver will now be installed. (See picture 1-13)
Picture 1-13
. Complete the driver installation, click “Finish”. (See picture 1-14)
Picture 1-14
. You can check if the installation of the driver was successful by checking the
windows device manager. You should see the entry “Digital Storage
Oscilloscope” under‘Universal Serial Bus controllers”.(See picture 1-15)
8

Picture 1-15
Uninstall
After you install the software, you can find “EasyScope3.0” from the
“Add/Remove program” in the Microsoft Windows Control Panel and click
“Remove”(See picture1-16). You also can run “Setup.exe” again and remove
EasyScope3.0 (See picture1-17). Of course, please check original installation
path, if you are not delete the software completely, please manual delete it.(After
you install the software, once you add the new file to the path in the course of
using the software, you will not delete the software completely when you delete
it.)
9

Picture1-16
Picture1-17
. Remove USB driver, please follow next steps: Right-Click “My computer”→
“Manager”→ “Device Manager” →“Universal Serial Bus controllers” →“Digital
oscilloscope” →Right-click “Digital oscilloscope” →click “Uninstall”.(See picture
10

1-18)
Picture 1-18
11

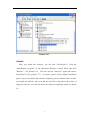
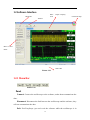
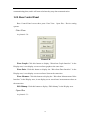
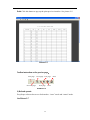
1.2 Software Interface
Data 、 Graph Display
Area Link state lampMenu Bar
Toolbar
Base Control
Panel
Picture 1-19
Status Bar
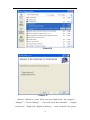
1.2.1 Menu Bar
Picture 1-20
Panel
Connect: Connect the oscilloscope to the software, make them communicate the
data .
Disconnect: Disconnect the link between the oscilloscope and the software, they
will not communicate the data
Exit: Exit EasyScope (you can’t exit the software while the oscilloscope is in
12

data communication with the software.)
View
Toolbar: Turn the toolbar on and off
Status Bar: Turn the status bar on and off
Base Control Panel: Turn the Base Control panel on and off
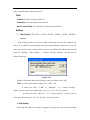
Setting
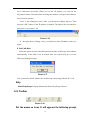
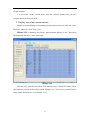
1. Time Setting→0.5s\12s、1s\15s、2s\18s、3s\20s、5s\22s、10s\24s、
custom.
“Time Setting” option is used to set auto refresh time interval. For example, Set
time to 0.5s, which is to say that the waveforms automatically refresh once every 0.5s
when you choose “auto” refresh mode; you can also define the refresh time interval
yourself: “Setting→ Time Setting → Custom” and the interface will pop up the
follow dialog box:
Picture 1-21
Define refresh time interval according to your need, then click “OK”.
Note: 1) custom time interval range: 100~9999(ms).
2) when you select “USB”or “Ethernet” in “Connect Setting”
option, you can select auto refresh time as 0.5s, 1s, 2s, 3s, 5s, 10s, custom.
3) when you select “RS-232” in “Connect Setting” option, you can
select auto refresh time as 12s, 15s, 18s, 20s, 22s, 24s, custom.
2. Path Setting
Select the file path to save data or graphs by this option, you can select default
13

file path or custom file path through “Browse”, see the follow dialog box:
Picture 1-22
3. Operate file
Select this option to save the operation to the software to the selected files,
Default setup is in unchecked state.
4. Default setting
Select this option can make setup recover to the default setup.
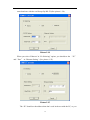
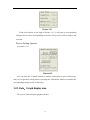
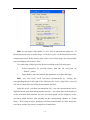
5. Connect Setting
You can connect your oscilloscopes to your PC desktop by USB serial interface ,
Ethernet interface and RS-232 interface. And the default setting is by USB. See
picture 1-23
Picture 1-23
When you select ‘RS-232’ in “IO Selecting” option, You should set up the
14

same baud rate with the oscillscope By RS-232(See picture 1-24).
Picture 1-24
When you select ‘Ethernet’ in “IO Selecting” option, you should set the “IP”
and“Port” in ‘Ethernet Setting’ . (See picture 1-25).
Picture 1-25
The “IP” should set the address that don’t used in the net with the PC, or you
15
Page is loading ...
Page is loading ...
Page is loading ...
Page is loading ...
Page is loading ...
Page is loading ...
Page is loading ...
Page is loading ...
Page is loading ...
Page is loading ...
Page is loading ...
Page is loading ...
Page is loading ...
Page is loading ...
Page is loading ...
Page is loading ...
Page is loading ...
Page is loading ...
Page is loading ...
-
 1
1
-
 2
2
-
 3
3
-
 4
4
-
 5
5
-
 6
6
-
 7
7
-
 8
8
-
 9
9
-
 10
10
-
 11
11
-
 12
12
-
 13
13
-
 14
14
-
 15
15
-
 16
16
-
 17
17
-
 18
18
-
 19
19
-
 20
20
-
 21
21
-
 22
22
-
 23
23
-
 24
24
-
 25
25
-
 26
26
-
 27
27
-
 28
28
-
 29
29
-
 30
30
-
 31
31
-
 32
32
-
 33
33
-
 34
34
-
 35
35
-
 36
36
-
 37
37
-
 38
38
-
 39
39


Aktakom ADS-2102M Installation guide
- Type
- Installation guide
Ask a question and I''ll find the answer in the document
Finding information in a document is now easier with AI
Related papers
Other documents
-
SIGLENT SDS1000CFL Series Digital Storage Oscilloscope User manual
-
SIGLENT SDS1000CNL+ Series Digital Storage Oscilloscope User manual
-
-
-
-
-
-
VOLTCRAFT DSO-6102 WIFI User manual
-
-
UNI-T UTD2102CEM User manual