Page is loading ...

Skylighter™
Brand
Fluorescent
Strobe Lighting
Operator’s Manual
Skylighter CFF2
Skylighter CFF4
Skylighter CFF8

OPERATOR MANUAL FOR SKYLIGHTER
Skylighter CFF2
Skylighter CFF4
Skylighter CFF8
Thank you for selecting the Photogenic Professional
Skylighter CFF series. The CFF series incorporates the
newest electronic components, lamps, reflectors, and diffusion
panels providing improved lighting distribution and control.
These products are built for the demanding operational needs
of the professional photographer and it is our expectation that
your Skylighter CFF will provide you with years of
dependable service.
INTRODUCTION
The Skylighter CFF series are an extremely diffused light head
and require an external power supply. They have one, two, or
four professional, plug-in, linear flashtubes, and one, two, or
four non-adjustable, linear, fluorescent modeling lamps. The
Skylighter CFF series are stand mounted on a strong, rotating
yoke, but may be ceiling hung, as required.
Before using your new Skylighter CFF for the first time,
please read this manual carefully and acquaint yourself with
the controls and features. In this way, you can quickly get the
greatest benefit from your new unit and maintain an efficient
and safe operation.
SAFETY PRECAUTIONS
Despite the measures that have been taken to make electronic flash equipment safe,
it must be recognized that high voltages and high temperatures do exist within the
power supply / lighting unit. Certain precautions must be observed in handling the
unit. Contact with internal high voltage may result in severe injury or death.

1. Before installing or removing the flashtubes and modeling lamps, be sure this
appliance is turned off, cooled and unplugged from AC power source and
external power supply.
2. Do not operate this appliance with a frayed or damaged cable
3. Do not attempt to use this appliance if it has been dropped or damaged, until a
qualified service person has serviced it.
4. Do not operate the unit with a damaged or broken flashtube or modeling lamp.
Do not use flashtubes with broken, cracked or missing glass envelopes. To
prevent damage always use Photogenic specified replacements for the
flashtubes and modeling lamps.
5. Perform no internal service work on this unit. Refer all such service to a
qualified service person or return to the factory. This will provide you safety
and continuation of your warranty.
6. Do not operate when water is present and from extreme temperature shifts. If
the unit is stored in hot or below freezing temperatures, allow at least one hour
at room temperatures before using.
PREPARATION AND BASICS
Unpacking and Setup:
Unpack all units carefully to remove all parts from the carton(s). Do not discard or
destroy the packing material until the equipment has been inspected, assembled,
and all parts accounted for.
After unpacking, all parts should be examined for any damage, which may have
been caused by rough handling during shipment. If any damage is detected,
contact the delivering carrier at once. Claim for damage should be made to the
delivering carrier before destroying packing cartons.
Unpacking and Setup:
The unit is shipped with the modeling lamps and flashtubes not installed. While
installing the modeling lamps and flashtubes (with glove or clean cloth to protect
the hand) be sure they are properly inserted and tight to avoid arcing and failure of
the socket contacts during operation. Always use a clean cloth or wear gloves to
protect your hand from glass breakage and heat. Place the unit on a stable flat
surface, face up.
The diffusion panel is held in place with an “L” bracket and thumbscrews. Remove
the thumbscrews and “L” bracket. Slide out the diffuser panel. The paper
protective sheet must be peeled off the diffusion panel. Use finger nails to start
peeling at two corners and continue carefully peeling protective sheet until it is all
removed. Do not use razor blade or other mechanical scrapers.
The fluorescent lamps have no polarity. Remove any plastic film from reflector.
Install by inserting the glass body into the clear support bracket, and then insert the
pins into the top of the socket holes and press base down to snap pins into contacts.

[Removal is accomplished by first lifting the lamp base to release pins from
contacts.]
The flash tubes are polarized. Their base has two large pins and two small
pins. It will only insert one way. Place end of flash tube into spring
support, then insert base pins into socket. Please insert carefully to avoid
damage or injury.
With all lamps and flash tubes securely installed, replace diffusion panel (it
doesn’t really matter which side is in or out.) Panel may catch on lip of
frame. If required, turn unit on face to insert panel. Replace “L” bracket
and thumbscrews.
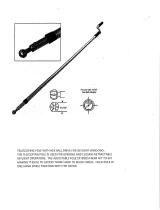
To set up the unit, first mount and secure it on a suitable stand. The Skylighter
stand adapter allows the unit to be mounted on a stand with a 3/8” to 5/8” post. Be
sure to use a stand that is stable and will not tip easily.
With power switch OFF, attach the cable to the circular input connector,
located on the back of the Skylighter, and connect the other end to the
purchased PowerLight power supply. See PowerLight instructions for
installation and operation. PowerLight modeling light controls must be
set to FULL ON for Skylighter fluorescent modeling lamps to
function. Only then turn on the Skylighter power switch. THE
FLUORESCENT MODELING LAMPS ARE NOT ADJUSTABLE.
ANY ADJUSTMENT BY THE POWERLIGHT MODELING WILL
DAMAGE THE SKYLIGHTER INTERNAL BALLAST (S).
Power Input:
The power required to operate the Skylighter fluorescent lamps is 105 to 125 volts
AC, 60 Hz and this power comes from the PowerLight, through its’ line cord
Circuit Protection:
All circuit protection for the Skylighter is provided by the PowerLight power
supply.
Power switch:
The power switch controls only the modeling lamps.
Flash Power:
See the PowerLight power supply instructions. The Skylighter flash power is fully
controlled by all features and functions of the PowerLight power supply, to which
it is attached.

SPECIFICATIONS
Skylighter CFF2
Skylighter CFF4
Skylighter CFF8
General:
CFF2 CFF4 CFF8
Flash Power 1000 ws max 1000 ws max 1000 ws max
Modeling Light
Power
55 watt
(300 w incad)
110 watt
(600 w incad)
220 watt
(1200 w incad)
Modeling Light
Control
FULL ON FULL ON FULL ON
Flash Overload
Protection
15 amp power
supply fuse
15 amp power
supply fuse
15 amp power
supply fuse
Modeling
Overload
Protection
5 amp power
supply fuse,
internal
5 amp power
supply fuse,
internal
5 amp power
supply fuse,
internal
Packaging Aluminum case Aluminum case Aluminum case
Weight 11 lbs. 16 lbs. 28 lbs.
Dimensions Box only
23”W x 9”H
With yoke
26”W x 14”H
Box only
23”W x 17”H
With yoke
26”W x 21.5”H
Box only
23”W x 33”H
With yoke
26”W x 37.5”H
Flashtube 1 each
Plug-in style,
use only
Photogenic’s
Standard L4-6
2 each
Plug-in style,
use only
Photogenic’s
Standard L4-6
4 each
Plug-in style,
use only
Photogenic’s
Standard L4-6
Modeling Lamp 1 each
Plug-in style,
use only
Photogenic’s
Standard F56
2 each
Plug-in style,
use only
Photogenic’s
Standard F56
4 each
Plug-in style,
use only
Photogenic’s
Standard F56

Exposure Information: Given as f-stop measurements made on a wall
grid of 1 ft. by 1 ft. squares, with the light source centered on the grid
center, and placed a fixed distance from the wall. The center number is the
actual meter reading. The other numbers are the relative change in
readings, with meter position, always at grid crossings. [Minolta Flash
Meter V, time = 1/125 sec, iso = 125]
CFF2 at 5 ft. from wall (Fluorescent lamp only)
-0.9 -0.7 -0.6 -0.6 -0.6 -0.6 -0.7 -0.9
-0.9 -0.5 -0.4 -0.4 -0.4 -0.4 -0.5 -0.9
-0.7 -0.2 -0.2 -0.2 -0.2 -0.1 -0.2 -0.7
-0.9 -0.6 -0.1 -0.0 0.7.9 0.0 -0.1 -0.6 -0.9
-0.9 -0.6 -0.2 -0.1 -0.1 -0.1 -0.2 -0.6 -0.9
-0.8 -0.4 -0.2 -0.3 -0.2 -0.4 -0.8
-0.6 -0.5 -0.6 -0.5 -0.6

CFF2 at 5 ft. from wall (Fluorescent lamp and Flash, 31ws & 125ws)
-1.1
-1.2
-0.9
-0.9
-0.5
-0.6
-0.4
-0.5
-0.5
-0.6
-0.4
-0.5
-0.5
-0.6
-0.9
-0.9
-1.1
-1.2
-1.0
-1.1
-0.7
-0.8
-0.2
-0.3
-0.2
-0.2
-0.2
-0.3
-0.2
-0.2
-0.2
-0.3
-0.7
-0.8
-1.0
-1.1
-0.9
-1.0
-0.5
-0.6
-0.1
-0.2
-0.0
-0.0
-0.0
-0.1
-0.0
-0.0
-0.1
-0.2
-0.5
-0.6
-0.9
-1.0
-0.8
-1.0
-0.5
-0.6
-0.0
-0.1
-0.0
-0.0
4.0.4
1.4.9
+0.1
-0.0
-0.0
-0.1
-0.5
-0.6
-0.8
-1.0
-0.8
-0.9
-0.6
-0.7
-0.1
-0.2
-0.0
-0.0
-0.1
-0.2
-0.0
-0.0
-0.1
-0.2
-0.6
-0.7
-0.8
-0.9
-1.0
-1.1
-0.8
-0.8
-0.3
-0.4
-0.1
-0.2
-0.3
-0.4
-0.1
-0.2
-0.3
-0.4
-0.8
-0.8
-1.0
-1.1
-1.2
-1.3
-1.0
-1.2
-0.6
-0.6
-0.5
-0.6
-0.6
-0.7
-0.5
-0.6
-0.6
-0.6
-1.0
-1.2
-1.2
-1.3

CFF2 at 5 ft. from wall (Fluorescent lamp and Flash, 250, 500, 1000ws)
-1.1 -0.9 -0.5 -0.4 -0.5 -0.4 -0.5 -0.9 -1.1
-1.1
-0.8
-0.3
-0.2
-0.3
-0.2
-0.3
-0.8
-1.1
-1.0
-0.6
-0.2
-0.0
-0.1
-0.0
-0.2
-0.6
-1.0
-0.9
-0.6
-0.1
-0.0
11.8
8.0.7
5.6.6
-0.0
-0.1
-0.6
-0.9
-0.8 -0.6 -0.1 -0.0 -0.1 -0.0 -0.1 -0.6 -0.8
-1.0 -0.8 -0.3 -0.1 -0.3 -0.1 -0.3 -0.8 -1.0
-1.2 -1.0 -0.6 -0.5 -0.6 -0.5 -0.6 -1.0 -1.2

CFF4 at 5 ft. from wall (Fluorescent lamps only)
-1.1 -1.0 -0.7 -0.6 -0.6 -0.6 -0.7 -1.0 -1.1
-1.0
-0.8
-0.5
-0.4
-0.3
-0.4
-0.5
-0.8
-1.0
-0.9
-0.6
-0.3
-0.1
-0.0
-0.1
-0.3
-0.6 -0.9
-0.7
-0.5
-0.3
-0.1
1.4.2
-0.1
-0.3
-0.5
-0.7
-0.9 -0.6 -0.3 -0.1 -0.1 -0.1 -0.3 -0.6 -0.9
-1.0 -0.8 -0.5 -0.3 -0.3 -0.3 -0.5 -0.8 -1.0
-1.1 -1.0 -0.5 -0.5 -0.5 -0.5 -0.7 -1.0 -1.1

CFF4 at 5 ft. from wall (Fluorescent lamp and Flash, 31, 63, 125, 250,
500, 1000ws)
-1.0 -0.9 -0.6 -0.6 -0.6 -0.6 -0.6 -0.9 -1.0
-0.9
-0.7
-0.5
-0.3
-0.3
-0.3
-0.5
-0.7
-0.9
-0.8
-0.6
-0.2
-0.1
-0.1
-0.1
-0.3
-0.6
-0.8
-0.8
-0.6
-0.1
-0.0
11.7
8.0.6
5.6.5
4.0.4
2.8.1
2.0.0
-0.0
-0.1
-0.6
-0.8
-0.8 -0.6 -0.2 -0.0 -0.0 -0.0 -0.2 -0.6 -0.8
-0.9 -0.8 -0.4 -0.2 -0.3 -0.2 -0.4 -0.8 -0.9
-1.1 -1.0 -0.6 -0.5 -0.4 -0.5 -0.6 -1.0 -1.1

CFF4 at 10 ft. from wall (Fluorescent only and Flash, 31, 125, 1000ws)
-0.3 -0.1 -0.3
-0.1
-0.1
-0.1
-0.1
-0.0
-0.1
-0.3
-0.2
-0.1
-0.0
8.0.1
2.0.8
1.0.6
0.7.9
-0.0
-0.1
-0.2
-0.3
-0.1 -0.1 -0.1
-0.2 -0.2 -0.2
0.5 -0.2 -0.5

CFF8 at 5 ft. from wall (Fluorescent lamp and Flash, 31, 63, 125, 250, 500,
1000ws)
-0.9 -0.5 -0.9
-0.5
-0.3
-0.5
-0.1
-0.1
-0.1
-0.9
-0.5
-0.2
-0.0
11.4
8.0.3
5.6.2
4.0.1
2.0.9
2.0.3
2.0.0
-0.0
-0.2
-0.5
-0.9
-0.1 -0.1 -0.1
-0.5 -0.3 -0.5
-0.9 -0.5 -0.9

CFF8 at 10 ft. from wall (Fluorescent lamp and Flash, 31, 125, 250,
1000ws)
-0.1
-0.0
-0.0
-0.3
-0.1
-0.0
-0.0
5.6.8
2.8.6
2.0.6
1.0.9
1.0.5
-0.0
-0.0
-0.1
-0.3
-0.0
-0.0
-0.1

SERVICE
The photographer should not attempt to make repairs.
Consult a dealer for an authorized Photogenic Professional Lighting service agent.
This will provide you safety, insure proper operational functions and provide
continuation of your warranty.
For replacing the flashtube or modeling lamp, follow the directions and
specifications given earlier in this manual in the setup section.
Before removing the old tubes or installing new tubes, always unplug
your Skylighter and PowerLight generator and discharge the stored energy
by pressing the “test” button. Unplug the cable connecting the Skylighter
to the PowerLight generator. It is now safe to change the lamps in the
Skylighter.
General Trouble Shooting
COMMON PROBLEMS AND CAUSES
Unit does not flash.
Probable causes:
a. No power. (Check cable connections and PowerLight generator
status.)
b. One or more tubes not flashing. (Flash tube jarred loose or broken
from rough transport. Check.)
Modeling light does not turn on.
Probable causes:
a. Switch OFF. (Turn ON.)
b. No power. (Check that PowerLight generator is set to FULL ON.)
c. Lamp burned out. (Inspect and replace, when cool. See
SERVICE section of this manual)

Limited PowerLight Warranty
Photogenic warranties the “standard line” products are free from defects in
material and workmanship of the PL2 series of PowerLights for a period of
three years. At our choice, we will repair or replace any PL2 series light
that is deemed to be defective. This warranty does not cover damages
caused by shipping, product abuse or use other than the intended
photographic applications.
Any product modifications will render this warranty void. Use of
other manufacture’s accessories, which restrict normal or intended
operation (especially venting airflow), may cause damage and will void
this warranty.

Photogenic Professional Lighting
1268 Humbracht Circle, Bartlett, Illinois 60103
www.Photogenicpro.com
Telephone: 630-830-2500 Fax: 630-830-2525
MANUAL PART NO. 016341-00V3-05
/