
A
Hardware Review
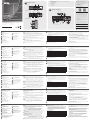
Front View
1
Video Output Pushbuttons
2
Video Input LEDs
3
Audio Output Pushbutton
4
Audio Input LEDs
Rear View
1
Cable Tie Slot
2
Grounding Terminal
3
Power Jack
4
Cable Lock Screw for ATEN LockPro™
5
HDMI Output Ports
6
HDMI Input Ports
7
Stereo Audio Out Port
8
Stereo Line Out Port
9
Audio Channel Switch
10
IR Receiver Port
11
Firmware Upgrade Port
12
RS-232 Serial Port
IR Remote Control
1
Power On/Off
2
Video Output Pushbuttons 1-2
3
Video Input Pushbuttons 1-2
B
Hardware Installation
Follow the following steps to safely install the VM0202HB.
1
Use a grounding wire to ground the unit by connecting one end to the
grounding terminal, and the other end to a suitable grounded object.
Note: Do not omit this step. Proper grounding helps prevent damage to
the unit from power surges or static electricity.
2
Connect the unit to up to two HDMI sources using HDMI cables. Optionally
secure the cables with ATEN LockPro™.
3
Connect the unit to up to two HDMI-enabled displays using HDMI cables.
Optionally secure the cables with ATEN LockPro™.
4
(Optional) To extract HDMI audio, connect a speaker to the Stereo Audio
Out or Stereo Line Out port.
Note: For better audio quality, ATEN recommends setting the Audio
Channel Switch to CH2 to receive 2-channel audio.
5
(Optional) To switch sources using IR remote control, connect the supplied
IR receiver to the IR Receiver Port.
6
(Optional) To perform system control using a serial device via RS-232, follow
the steps below.
(a) Connect the serial controller to the RS-232 Serial Port on the
VM0202HB using a 9-wire straight cable, with only pin 2 to pin 2, pin 3
to pin 3, and pin 5 to pin 5 connected.
(b) Confi gure the serial controller’s control port to the following:
RS-232 Protocol
Baud Rate 19200
Data Bits 8
Parity None
Stop Bits 1
Flow Control None
7
Plug the power adapter to an appropriate AC source, and the adapter cable
into the Power Jack on the VM0202HB.
8
Power on all the connected devices.
VM0202HB 2 x 2 True 4K HDMI Matrix Switch with Audio De-Embedder
www.aten.com
Operation
You can operate the VM0202HB locally using the front panel or IR remote
control; remotely using a serial controller via the RS-232.
Front-panel Pushbuttons/IR Remote Control Unit
• To switch video input, press the Video Output Pushbutton to cycle through
video source 1 and 2. The Video Input LED of the selected input lights green.
• To turn off video on a particular display, press and hold the corresponding
Video Output Pushbutton for 3 seconds. To turn on the video output,
press the Video Output Pushbutton.
• To extract audio source, press the Audio Output Pushbutton to select the
source for de-embedding. The Audio Input LED of the selected source lights
green.
RS-232 Serial Interface
You can use a serial controller to perform system control. Refer to the user
manual for details on commands.
B
Hardware Installation
© Copyright 2020 ATEN
®
International Co., Ltd.
ATEN and the ATEN logo are trademarks of ATEN International Co., Ltd. All rights reserved.
All other trademarks are the property of their respective owners.
Part No. PAPE-1223-U40G Printing Date: 06/2020
2 x 2 True 4K HDMI Matrix Switch
with Audio De-Embedder
Quick Start Guide
VM0202HB
Package Contents
1 VM0202HB 2 x 2 True 4K HDMI Matrix Switch with Audio De-Embedder
1 3-pole Terminal Block
1 Power Adapter
1 IR Remote Control
1 IR Receiver
1 User Instructions
A
Hardware Review
Front View
IR Remote Control
Rear View
1
2
3
HDMI Display Devices
HDMI Source Devices
Hardware / Software
Controller
6
4
1
5
7
3
2
2 4
3
1
62 3
1
4
5
10
11 12
7
8 9
ATEN VanCryst
™
이 기기는 업무용(A급) 전자파적합기기로서 판매자 또는 사용자는 이 점을
주의하시기 바라며, 가정외의 지역에서 사용하는 것을 목적으로 합니다.
EMC Information
FEDERAL COMMUNICATIONS COMMISSION INTERFERENCE
STATEMENT:
This equipment has been tested and found to comply with the limits
for a Class A digital device, pursuant to Part 15 of the FCC Rules.
These limits are designed to provide reasonable protection against
harmful interference when the equipment is operated in a commercial
environment. This equipment generates, uses, and can radiate radio
frequency energy and, if not installed and used in accordance with
the instruction manual, may cause harmful interference to radio
communications. Operation of this equipment in a residential area
is likely to cause harmful interference in which case the user will be
required to correct the interference at his own expense.
FCC Caution: Any changes or modifi cations not expressly approved by
the party responsible for compliance could void the user's authority to
operate this equipment.
Warning: Operation of this equipment in a residential environment
could cause radio interference.
Suggestion: Shielded twisted pair (STP) cables must be used with the
unit to ensure compliance with FCC & CE standards.
This device complies with Part 15 of the FCC Rules. Operation is subject
to the following two conditions:(1) this device mat not cause harmful
interference, and(2) this device must accept any interference received,
including interference that may cause undesired operation.
Important. Before proceeding, download the Installation and
Operation Manual by visiting the website, www.aten.com and
navigating to the product page. The manual includes important
warnings, loading specifi cations and grounding instructions.
Achtung: Der Gebrauch dieses Geräts in Wohnumgebung kann
Funkstörungen verursachen.
S
upport and Documentation Notice
All information, documentation, fi rmware, software utilities,
and specifi cations contained in this package are subject to
change without prior notifi cation by the manufacturer.
To reduce the environmental impact of our products, ATEN
documentation and software can be found online at
http://www.aten.com/download/
Technical Support
www.aten.com/support
Scan for more information
ATEN Website User Manual
A
Description de l’appareil
Vue de face
1
Boutons-poussoirs de sortie vidéo
2
Voyants d’entrée vidéo
3
Boutons-poussoirs de sortie audio
4
Voyants d’entrée audio
Vue de dos
1
Collier de serrage de câble
2
Prise terre
3
Prise d’alimentation
4
Vis de blocage de câble pour ATEN
LockPro™
5
Ports de sortie HDMI
6
Ports d’entrée HDMI
7
Port de sortie audio stéréo
8
Port de sortie de ligne stéréo
9
Commutateur de canal audio
10
Port de récepteur IR
11
Port de mise à niveau du
micrologiciel
12
Port série RS-232
Télécommande infrarouge
1
Marche/arrêt
2
Boutons-poussoirs de sortie vidéo 1 et 2
3
Boutons-poussoirs d’entrée vidéo 1 et 2
B
Installation matérielle
Suivez la procédure suivante pour installer en toute sécurité le VM0202HB.
1
Utilisez un fi l de mise à la terre pour mettre l’appareil à la terre en
connectant une extrémité à la borne de mise à la terre et l’autre extrémité
à un objet approprié mis à la terre.
Remarque : N’ignorez pas cette étape. Une mise à la terre appropriée aide
à éviter que l’appareil ne soit endommagé par des surtensions
ou de l’électricité statique.
2
Branchez l’appareil à deux sources HDMI à l’aide de câbles HDMI. Fixez
éventuellement les câbles à l’aide du système de blocage ATEN LockPro™.
3
Branchez l’appareil à deux écrans dotés de connecteur HDMI à l’aide
de câbles HDMI. Fixez éventuellement les câbles à l’aide du système de
blocage ATEN LockPro™.
4
(Facultatif) Pour extraire l’audio HDMI, branchez une enceinte acoustique
aux ports de sortie de ligne ou de sortie audio stéréo.
Remarque : Pour une qualité audio optimale, ATEN recommande de régler
le commutateur de canal audio sur la source d’entrée audio
2 pour recevoir un signal audio 2 canaux.
5
(Facultatif) Pour sélectionner des sources à l’aide de la télécommande
infrarouge, connectez le récepteur IR fourni au port de récepteur IR.
6
(Facultatif) Pour commander l’appareil à l’aide d’un dispositif série RS-232,
suivez la procédure ci-après.
(a) Branchez le contrôleur série au port série RS-232 du
commutateur VM0202HB à l’aide d’un câble droit à 9 fi ls, en ne
connectant que la broche 2 à la broche 2, la broche 3 à la broche 3 et la
broche 5 à la broche 5.
(b) Confi gurez le port de contrôleur série, comme suit :
Protocole RS-232
Vitesse de transmission 19 200
Bits de données 8
Parité Aucun
Bits de stop 1
Contrôle de fl ux Aucun
7
Branchez l’adaptateur à une source d’alimentation secteur, puis
branchez le câble de l’adaptateur à la prise d’alimentation située sur le
commutateur VM0202HB.
8
Allumez tous les appareils connectés.
Commutateur matriciel HDMI True 4K 2 x 2 à extracteur audio intégré (VM0202HB)
www.aten.com
Fonctionnement
Vous pouvez commander localement le commutateur VM0202HB à l’aide du
panneau avant ou de la télécommande infrarouge, et à distance en utilisant un
contrôleur série RS-232.
Boutons-poussoirs du panneau avant/Télécommande infrarouge
• Pour sélectionner l’entrée vidéo,appuyez sur le bouton-poussoir de sortie
vidéo en choisissant soit la source vidéo 1, soit la source vidéo 2. Le voyant
de l’entrée vidéo sélectionnée s’allumera en vert.
• Pour désactiver la vidéo sur un écran particulier, appuyez et maintenez
enfoncé le bouton-poussoir de sortie vidéo pendant 3 secondes. Pour
activer la sortie vidéo, appuyez sur le bouton-poussoir de sortie vidéo.
• Pour extraire une source audio, appuyez sur le bouton-poussoir de sortie
audio. Le voyant de l’entrée audio sélectionnée s’allumera en vert.
Interface série RS-232
Il est possible d’utiliser un contrôleur série pour commander le système.
Reportez-vous au manuel de l’utilisateur pour les détails sur les commandes.
A
Hardwareübersicht
Ansicht von vorn
1
Videoausgang-Drucktasten
2
Videoeingang-LEDs
3
Audioausgang-Drucktaste
4
Audioeingang-LEDs
Ansicht von hinten
1
Kabelbinderschacht
2
Erdungsklemme
3
Netzadapterbuchse
4
Kabelsicherungsschraube für ATEN
LockPro™
5
HDMI-Ausgangsports
6
HDMI-Eingangsports
7
Stereo-Audioausgangsport
8
Stereo-LINE-Ausgangsport
9
Audiokanalumschalter
10
IR-Empfängerport
11
Firmwareaktualisierungsport
12
Serieller RS-232-Port
IR-Fernbedienung
1
Ein/Aus-Taste
2
Videoausgang-Drucktaste 1 – 2
3
Videoeingang-Drucktaste 1 – 2
B
Installation der Hardware
Folgen Sie den nachstehenden Schritten, um den VM0202HB sicher anzuschließen.
1
Erden Sie das Gerät mit Hilfe einer Erdungsleitung, indem Sie das eine Ende
der Erdungsleitung an der Erdungsklemme anschließen und das andere
Ende mit einem geeigneten geerdeten Gegenstand verbinden.
Hinweis: Überspringen Sie diesen Schritt nicht. Eine ordnungsgemäße
Erdung hilft dabei, Schäden am Gerät durch Überspannung oder
elektrostatische Aufl adung vorzubeugen.
2
Schließen Sie das Gerät mit Hilfe von HDMI-Kabeln an bis zu zwei
HDMI-Quellen an. Optional können Sie die Kabel mit ATEN LockPro™
sichern.
3
Schließen Sie das Gerät mit Hilfe von HDMI-Kabeln an bis zu zwei
HDMI-fähigen Displays an. Optional können Sie die Kabel mit ATEN
LockPro™ sichern.
4
(Optional) Schließen Sie am Stereo-Audio- oder Stereo-LINE-Ausgangsport
einen Lautsprecher an, wenn Sie das HDMI-Audiosignal abgreifen möchten.
Hinweis: Für eine bessere Audioqualität empfi ehlt ATEN, den
Audiokanalumschalter auf „KANAL 2“ zu stellen,
um 2-Kanal-Audio zu empfangen.
5
(Optional) Schließen Sie am IR-Empfängerport den mitgelieferten
IR-Empfänger an, wenn Sie die Quellen mit Hilfe der IR-Fernbedienung
umschalten möchten.
6
(Optional) Folgen Sie für die Steuerung des Systems mit Hilfe eines seriellen
Geräts über RS-232 den nachstehenden Schritten.
(a) Schließen Sie die serielle Steuerung am seriellen RS-232-Port des
VM0202HB mit Hilfe eines 9-adrigen Verbindungskabels an, wobei nur
Pin 2 mit Pin 2, Pin 3 mit Pin 3 und Pin 5 mit Pin 5 verbunden wird.
(b) Konfi gurieren Sie den Steuerausgang der seriellen Steuerung wie folgt:
RS-232-Protokoll
Baudrate 19 200
Datenbits 8
Parität Keine
Stoppbits 1
Flusskontrolle Keine
7
Stecken Sie den Netzadapter in eine geeignete AC-Quelle und dann den
Stecker des Netzadapterkabels in die Netzadapterbuchse des VM0202HB.
8
Schalten Sie nun die verbundenen Geräte ein.
VM0202HB 2-x-2-Matrix-Switch mit 4K-True-HDMI und Audioextraktor
www.aten.com
Bedienung
Sie können den VM0202HB lokal über das Bedienfeld oder die IR-Fernbedienung
sowie Remote mit Hilfe der seriellen Steuerung über RS-232 bedienen.
Bedienfeldtasten/IR-Fernbedienung
• Drücken Sie zum Umschalten zwischen den Videoeingangssignalen der
Videoquellen 1 und 2 die Videoausgang-Drucktaste. Die Videoeingang-
LED des ausgewählten Eingangs leuchtet Grün.
• Halten Sie zum Ausschalten der Videoausgabe an einem bestimmten Display
die entsprechende Videoausgang-Drucktaste 3 Sekunden lang gedrückt.
Drücken Sie zum Einschalten der Videoausgabe die Videoausgang-
Drucktaste.
• Drücken Sie zum Auswählen der Quelle für die Audioextrahierung die
Audioausgang-Drucktaste. Die Audioeingang-LED der ausgewählten
Quelle leuchtet Grün.
Serielle RS-232-Schnittstelle
Für die Steuerung des Systems können Sie eine serielle Steuerung einsetzen.
Schlagen Sie für Einzelheiten zu den Befehlen im Benutzerhandbuch nach.
A
Reseña del hardware
Vista frontal
1
Botones de salida de vídeo
2
Ledes de entrada de vídeo
3
Botón de salida de audio
4
Ledes de entrada de audio
Vista posterior
1
Ranura de amarre para cable
2
Toma de tierra
3
Entrada de alimentación
4
Tornillo de seguridad de cable para
ATEN LockPro™
5
Puertos de salida HDMI
6
Puertos de entrada HDMI
7
Puerto de salida de audio estéreo
8
Puerto de salida de línea estéreo
9
Conmutador de canal de audio
10
Puerto receptor por infrarrojos
11
Puerto de actualización del
fi rmware
12
Puerto serie RS-232
Mando a distancia por infrarrojos
1
Encendido/apagado
2
Botones de salida de vídeo 1-2
3
Botones de entrada de vídeo 1-2
B
Instalación del hardware
Siga los siguientes pasos para instalar con seguridad el VM0202HB.
1
Use un cable a tierra para conectar a tierra la unidad, conectando un extremo
al borne de tierra y el otro extremo a un objeto apropiado conectado a tierra.
Nota: No omita este paso. Una conexión a tierra apropiada evita que
se dañe la unidad debido a sobrecargas eléctricas o electricidad
estática.
2
Conecte la unidad a un máximo de dos fuentes HDMI utilizando cables
HDMI. Opcionalmente, puede asegurar los cables con ATEN LockPro™.
3
Conecte la unidad a un máximo de dos pantallas habilitadas por HDMI utilizando
cables HDMI. Opcionalmente, puede asegurar los cables con ATEN LockPro™.
4
(Opcional) Para extraer audio HDMI, conecte un altavoz al puerto de salida
de línea estéreo o al puerto de salida de audio estéreo.
Nota: Para una mejor calidad de audio, ATEN recomienda confi gurar el
conmutador de canal de audio a la fuente de entrada de audio 2
para recibir audio de 2 canales.
5
(Opcional) Para cambiar las fuentes mediante el mando a distancia por
infrarrojos, conecte el receptor por infrarrojos suministrado al puerto
receptor por infrarrojos.
6
(Opcional) Para controlar el sistema utilizando un dispositivo serie a través
de RS-232, siga los siguientes pasos.
(a) Conecte el controlador serie al puerto serie RS-232 del VM0202HB
utilizando un cable directo de 9 hilos, conectando solo el pin 2 al pin 2,
el pin 3 al pin 3 y el pin 5 al pin 5.
(b) Confi gure el puerto de control del controlador serie de la siguiente
manera:
Protocolo RS-232
Velocidad en baudios 19200
Bits de datos 8
Paridad Ninguna
Bits de parada 1
Control del fl ujo Ninguno
7
Conecte el adaptador de alimentación a una fuente CA adecuada y el cable
del adaptador a la entrada de alimentación del VM0202HB.
8
Encienda todos los dispositivos conectados.
VM0202HB Conmutador de matriz HDMI True 4K 2x2 con extractor de audio
www.aten.com
Funcionamiento
Puede utilizar el VM0202HB localmente mediante el panel frontal o el mando a
distancia por infrarrojos y remotamente mediante un controlador serie a través
de RS-232.
Botones del panel frontal/unidad de mando a distancia por infrarrojos
• Para cambiar la entrada de vídeo, pulse el botón de salida de vídeo para
recorrer las fuentes de vídeo 1 y 2. El led de entrada de vídeo de la entrada
seleccionada se ilumina en verde.
• Para apagar el vídeo de una pantalla en particular, mantenga pulsado el
botón de salida de vídeo correspondiente durante 3 segundos. Para
encender la salida de vídeo, pulse el botón de salida de vídeo.
• Para extraer la fuente de audio, pulse el botón de salida de audio para
seleccionar la fuente para la desincrustación. El led de entrada de audio de la
fuente seleccionada se ilumina en verde.
Conexión serie RS-232
Puede utilizar un controlador serie para controlar el sistema. Consulte el
manual de usuario para obtener más detalles sobre los comandos.
A
Panoramica hardware
Vista anteriore
1
Pulsanti di uscita video
2
LED di ingresso video
3
Pulsante di uscita audio
4
LED di ingressi audio
Vista posteriore
1
Slot fermacavi
2
Terminale di messa a terra
3
Presa di alimentazione
4
Vite di blocco cavi per ATEN
LockPro™
5
Porte di uscita HDMI
6
Porte di ingresso HDMI
7
Porta di uscita audio stereo
8
Porta di uscita linea stereo
9
Switch canale audio
10
Porta ricevitore IR
11
Porta di aggiornamento fi rmware
12
Porta seriale RS-232
Telecomando IR
1
Accensione/Spegnimento
2
Pulsanti di uscita video 1-2
3
Pulsanti di ingresso video 1-2
B
Installazione hardware
Applicando la seguente procedura, è possibile effettuare un'installazione sicura
dell'unità VM0202HB.
1
Usando un apposito cavo, effettuare la messa a terra dell'unità, collegando
un'estremità del cavo al terminale di messa a terra e l'altra a un oggetto
adeguatamente collegato al suolo.
Nota: eseguire sempre questo passo. Un'adeguata messa a terra permette
di evitare danni all'unità dovuti a sovratensioni o elettricità statica.
2
Collegare l'unità a non più di due sorgenti HDMI tramite i cavi HDMI. È
possibile fi ssare i cavi tramite ATEN LockPro™.
3
Collegare l'unità a non più di due display dotati di capacità HDMI tramite i
cavi HDMI. È possibile fi ssare i cavi tramite ATEN LockPro™.
4
(Opzionale) Per estrarre l'audio HDMI, è possibile collegare un altoparlante
alla porta di uscita audio stereo o a quella di uscita linea stereo.
Nota: Per migliorare la qualità dell’audio, ATEN consiglia di impostare lo
Switch di canale audio sulla sorgente di ingresso audio 2 per
ricevere audio a 2 canali.
5
(Opzionale) Per modifi care sorgente usando un telecomando IR, è possibile
collegare il ricevitore IR in dotazione alla porta del ricevitore IR.
6
(Opzionale) Per controllare il sistema usando un dispositivo seriale tramite
RS-232, è possibile applicare la seguente procedura.
(a) Collegare il controller seriale alla porta seriale RS-232 sull'unità VM0202HB,
usando un cavo diritto a 9 fi li e collegando solo i pin 2, 3 e 5.
(b) Confi gurare la porta di controllo del controller seriale nel seguente modo:
Protocollo RS-232
Velocità in baud 19200
Bit di dati 8
Parità Assente
Bit di stop 1
Controllo di fl usso Assente
7
Inserire l'adattatore di alimentazione in un'adeguata sorgente CA e il cavo
dell'adattatore al jack di alimentazione dell'unità VM0202HB.
8
Attivare l'alimentazione di tutti i dispositivi collegati.
Matrice 2 x 2 VM0202HB True 4K HDMI con de-embedder audio
www.aten.com
Funzionamento
L'unità VM0202HB può essere utilizzata in locale, tramite il pannello anteriore
o il telecomando IR, oppure da remoto, con controller seriale tramite interfaccia
RS-232.
Pulsanti del pannello anteriore/telecomando IR
• Premendo il pulsante di uscita video, è possibile cambiare ingresso video,
passando dalla sorgente 1 alla 2. Il LED dell'ingresso video selezionato si
illumina in verde.
• Per spegnere il video su un particolare display, tenere premuto il
corrispondente pulsante di uscita video per 3 secondi. Per accendere
l'uscita video, premere il pulsante di uscita video.
• Per estrarre la sorgente audio, è possibile premere il pulsante di uscita
audio e selezionare la sorgente cui applicare il de-embedding. Il LED
dell'ingresso audio della sorgente selezionata si illumina in verde.
Interfaccia seriale RS-232
Per controllare il sistema, è possibile utilizzare un controller seriale. Per ulteriori
dettagli sui comandi, consultare il manuale d'uso.
A
Обзор оборудованияa
Вид спереди
1
Кнопки видеовыхода
2
Индикаторы видеовхода
3
Кнопка аудиовыхода
4
Индикаторы аудиовхода
Вид сзади
1
Разъем для кабельного хомута
2
Клемма заземления
3
Разъем питания
4
Стопорный винт кабеля для
ATEN LockPro™
5
Порты вывода HDMI
6
Порты ввода HDMI
7
Выходной порт для аудиосигнала
стерео
8
Линейный выходной порт
стерео
9
Переключатель аудиоканала
10
Порт ИК-приемника
11
Порт обновления прошивки
12
Последовательный порт
RS-232
ИК-пульт дистанционного управления
1
Включение/выключение питания
2
Кнопки видеовыхода 1–2
3
Кнопки видеовхода 1–2
B
Подготовка к работе
Для безопасной установки VM0202HB выполните следующие шаги.
1
Заземлите устройство с помощью провода заземления, подключив
его одним концом к клемме заземления, а другим концом — к
подходящему заземленному объекту.
Примечание: Не пропускайте этот шаг. Надлежащее заземление
помогает защитить устройство от перепадов
напряжения и статического электричества.
2
К устройству можно подключить до двух источников HDMI с
помощью кабелей HDMI. Кабели также можно закрепить с помощью
ATEN LockPro™.
3
К устройству можно подключить до двух дисплеев с поддержкой
HDMI с помощью кабелей HDMI. Кабели также можно закрепить с
помощью ATEN LockPro™.
4
(Опционально) Чтобы извлечь аудио из HDMI в стереоформат,
подключите динамик к аудиовыходу стерео или линейному
выходному порту стерео.
Примечание: Для улучшения качества аудио ATEN рекомендует
перевести переключатель аудиоканала на CH2, чтобы
получить 2-канальное аудио.
5
(Опционально) Чтобы переключать источники с помощью ИК-пульта ДУ,
подключите входящий в комплект ИК-приемник к порту ИК-приемника.
6
(Опционально) Чтобы управлять системой с помощью
последовательного устройства через RS-232, выполните
приведенные ниже шаги.
(a) Подключите последовательный контроллер к последовательному
порту RS-232 на устройстве VM0202HB с помощью 9-жильного
кабеля прямого подключения, соединив только контакт 2 с
контактом 2, контакт 3 с контактом 3 и контакт 5 с контактом 5.
(b) Настройте порт управления последовательного контроллера
следующим образом:
Протокол RS-232
Скорость передачи данных 19 200
бит данных 8
Контроль Нет
Стоповые биты 1
Управление потоком Нет
7
Подключите блок питания к соответствующему источнику перем. тока,
а его кабель к разъему питания на устройстве VM0202HB.
8
Включите все подключенные устройства.
Матричный коммутатор
VM0202HB 2 x 2 True 4K HDMI
с функцией извлечения звука
www.aten.com
Эксплуатация
Устройством VM0202HB можно управлять локально через переднюю
панель или ИК-пульт ДУ и удаленно с помощью последовательного
контроллера через RS-232.
Кнопки на передней панели/ИК-пульт дистанционного управления
•
Для переключения источников видео 1 и 2 нажмите кнопку
видеовыхода. Индикатор видеовхода выбранного источника
загорится зеленым цветом.
•
Чтобы выключить видео на определенном дисплее, нажмите
и удерживайте соответствующую кнопку видеовыхода в
течение 3 секунд. Чтобы включить видеовыход, нажмите кнопку
видеовыхода.
•
Чтобы извлечь источник аудио, нажмите кнопку аудиовыхода
и выберите источник для извлечения. Индикатор аудиовхода
выбранного источника загорится зеленым цветом.
Последовательный интерфейс RS-232
Для управления системой можно использовать последовательный
контроллер. Подробнее о командах см. руководство пользователя.
Page is loading ...
-
 1
1
-
 2
2


Ask a question and I''ll find the answer in the document
Finding information in a document is now easier with AI
in other languages
- italiano: ATEN VM0202HB Guida Rapida
- français: ATEN VM0202HB Guide de démarrage rapide
- español: ATEN VM0202HB Guía de inicio rápido
- Deutsch: ATEN VM0202HB Schnellstartanleitung
- русский: ATEN VM0202HB Инструкция по началу работы
- português: ATEN VM0202HB Guia rápido
- polski: ATEN VM0202HB Skrócona instrukcja obsługi
- Türkçe: ATEN VM0202HB Hızlı başlangıç Kılavuzu
- 日本語: ATEN VM0202HB クイックスタートガイド
- română: ATEN VM0202HB Ghid de inițiere rapidă
Related papers
Other documents
-
C2G 40011 Owner's manual
-
Lanberg SWV-HDMI-0005 User manual
-
GTV LD-KONML-MONO Operating instructions
-
-
Audison bit DMI Quick start guide
-
-
-
-
Star Micronics Serial Interface Unit IS-NP192 User manual