Page is loading ...

DO GUIDE
DO Check the Box
QTY PRODUCT COLOR PART NUM.
1 Key 4519804
4 Screw, 06-32 x 3/4", Truss Head, Combo 2009211
4 Screw, M3 x 16 mm, Flat Head, Phillips 2013788
2 Screw, M3.5 x 25 mm, Pan Head, Phillips 2028659
Items for TSS-752-B-S Only
2 Cover, Mounting Plate, Low Prole Black 4520153
1 Plate, Plastic, Wall Mount, 6.27" x 4.21" x 0.38" Black 4519719
Items for TSS-752-W-S Only
2 Cover, Mounting Plate, Low Prole White 4520152
1 Plate, Plastic, Wall Mount, 6.27" x 4.21" x 0.38" White 4519681
3. Carefully position the TSS-752 over the wall mount plate to engage the four screws
protruding from the wall mount plate. Slide the TSS-752 to the left until it clicks into place.
NOTE: In some situations where there may not be enough room to slide the TSS-752 to
the left, the wall mount plate can be installed with the locking tabs on the left side. In such
cases, attach the TSS-752 by sliding it to the right until it clicks into place.
4. Make connections to the TSS-752 using Crestron power supplies for Crestron equipment.
Apply power after all connections have been made.
TSS-752
7" Room Scheduling Touch Screen
DO Install the Touch Screen
The Crestron
®
TSS-752 touch screen installs into a standard 2-gang (or horizontally mounted
1-gang) U.S. electrical box, a 2-gang European electrical box, or a 2-gang U.K. electrical box. It
can also be installed over a small cutout (for Ethernet access) on virtually any mounting surface.
To mount the TSS-752 into an electrical box, use the following procedure:
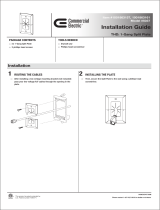
1. Use four of the eight included screws (four 06-32 x 3/4" or four M3 x 16 mm) to attach the
wall mount plate to the electrical box.
NOTE: For U.S.-style installations, use the 06-32 x 3/4" screws and a #2 Phillips
screwdriver. For European-style installations, use the M3 x 16 mm screws and a #1 Phillips
screwdriver or equivalent.
2. Gently snap the two mounting plate covers into place to hide the screws going into the
electrical box.
Wall Mount Plate
Screws (4)
Electrical Box
Wall Mount Plate
Mounting Plate
Covers (2)
TSS-752
Wall Mount Plate
LAN PoE:
10BASE-T / 100BASE-TX
Ethernet to LAN
Reset Button

DO GUIDE
DOC. 7580C (2042274) 05.16
Specications subject to change without notice.
DO Learn More
Visit the website for additional information and the
latest rmware updates. To learn more about this
product, use a QR reader application on your mobile
device to scan the QR image.
Crestron Electronics
15 Volvo Drive, Rockleigh, NJ 07647
888.CRESTRON | www.crestron.com
As of the date of manufacture, the product has been tested and found to comply with specications for CE marking.
Federal Communications Commission (FCC) Compliance Statement
This device complies with part 15 of the FCC Rules. Operation is subject to the following two conditions:
(1) This device may not cause harmful interference, and (2) this device must accept any interference received, including interference
that may cause undesired operation.
Caution: Changes or modications not expressly approved by the manufacturer responsible for compliance could void the user’s
authority to operate the equipment.
Note: This equipment has been tested and found to comply with the limits for a Class B digital device, pursuant to part 15 of the
FCC Rules. These limits are designed to provide reasonable protection against harmful interference in a residential installation.
This equipment generates, uses and can radiate radio frequency energy and, if not installed and used in accordance with the
instructions, may cause harmful interference to radio communications. However, there is no guarantee that interference will not
occur in a particular installation.
If this equipment does cause harmful interference to radio or television reception, which can be determined by turning the
equipment off and on, the user is encouraged to try to correct the interference by one or more of the following measures:
• Reorient or relocate the receiving antenna.
• Increase the separation between the equipment and receiver.
• Connect the equipment into an outlet on a circuit different from that to which the receiver is connected.
• Consult the dealer or an experienced radio/TV technician for help.
Industry Canada (IC) Compliance Statement
CAN ICES-3(B)/NMB-3(B)
Crestron product development software is licensed to Crestron dealers and Crestron Service Providers (CSPs) under a limited non-exclusive, non-transferable Software Development Tools
License Agreement. Crestron product operating system software is licensed to Crestron dealers, CSPs, and end-users under a separate End-User License Agreement. Both of these Agreements
can be found on the Crestron website at www.crestron.com/legal/software_license_agreement.
The specic patents that cover Crestron products are listed at http://www.crestron.com/legal/patents. The product warranty can be found at www.crestron.com/warranty.
Certain Crestron products contain open source software. For specic information, please visit www.crestron.com/opensource.
Crestron, the Crestron logo, and Crestron Fusion are either trademarks or registered trademarks of Crestron Electronics, Inc. in the United States and/or other countries. Other trademarks,
registered trademarks, and trade names may be used in this document to refer to either the entities claiming the marks and names or their products. Crestron disclaims any proprietary interest
in the marks and names of others. Crestron is not responsible for errors in typography or photography.
This document was written by the Technical Publications department at Crestron.
©2016 Crestron Electronics, Inc.
Wall Mount Plate
TSS-752
Key
4
3
2
1
DO Remove the Touch Screen
from the Wall Mount Plate
In the event it becomes necessary to remove the TSS-752 from
the wall mount plate, use the following procedure:
1. On the side of the wall mount plate with the two locking
tabs, insert the included key between the back of the
TSS-752 and the wall mount plate.
2. Gently pull the key so its tines depress the locking tabs on
the wall mount plate. At the same time, slide the TSS-752
to the right about 1/4" (~7 mm) to unlock it from the wall
mount plate.
DO Access the Setup Screens
NOTE: The TSS-752 can take up to 45 seconds to boot.
The setup screens enable basic conguration prior to regular
operation of the TSS-752.
To access the setup screens after the TSS-752 boots to the
Crestron Fusion
®
Cloud software “Ofine” screen, press the
hard keys labeled below as 1, 2, 3, and 4 in sequence, twice
(press 1, 2, 3, 4, 1, 2, 3, 4) within a 5-second period.
NOTE: For details on conguring the TSS-752, refer to Doc.
7602 at www.crestron.com/manuals. For details on scheduling
with Crestron Fusion and the TSS-752, refer to Doc. 7552.
/