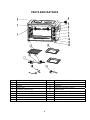
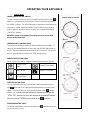
Avanti MKB42B Toaster Oven and Rotisserie is a versatile kitchen appliance that combines the functions of a toaster, oven, and rotisserie. With its dual burners, you can cook a variety of foods simultaneously. The oven offers three cooking modes: bake, broil, and rotisserie, allowing you to prepare a wide range of dishes. The adjustable temperature control and timer ensure precise cooking results. The included accessories, such as the drip pan, oven rack, and rotisserie forks, enhance the oven's functionality.
Avanti MKB42B Toaster Oven and Rotisserie is a versatile kitchen appliance that combines the functions of a toaster, oven, and rotisserie. With its dual burners, you can cook a variety of foods simultaneously. The oven offers three cooking modes: bake, broil, and rotisserie, allowing you to prepare a wide range of dishes. The adjustable temperature control and timer ensure precise cooking results. The included accessories, such as the drip pan, oven rack, and rotisserie forks, enhance the oven's functionality.


-
 1
1
-
 2
2
-
 3
3
-
 4
4
-
 5
5
-
 6
6
-
 7
7
-
 8
8
-
 9
9
-
 10
10
-
 11
11
-
 12
12
-
 13
13
-
 14
14
-
 15
15
-
 16
16
-
 17
17
-
 18
18
-
 19
19
-
 20
20


Avanti MKB42B Toaster Oven and Rotisserie is a versatile kitchen appliance that combines the functions of a toaster, oven, and rotisserie. With its dual burners, you can cook a variety of foods simultaneously. The oven offers three cooking modes: bake, broil, and rotisserie, allowing you to prepare a wide range of dishes. The adjustable temperature control and timer ensure precise cooking results. The included accessories, such as the drip pan, oven rack, and rotisserie forks, enhance the oven's functionality.
Ask a question and I''ll find the answer in the document
Finding information in a document is now easier with AI
in other languages
- español: Avanti MKB42B Manual de usuario
Related papers
Other documents
-
IMUSA GAU-80306 Installation guide
-
Windmere WTO4030C User manual
-
Continental Electric CE23309 User manual
-
Toastmaster TCOV6R User manual
-
-
Emerson TOR35 Owner's manual
-
Infiniton HSM-30N45 Owner's manual
-
-
Oster 119308 User manual
-