Craftsman 580.7524 User manual

Category
High-pressure cleaners
Type
User manual

This manual is also suitable for

Owner's Manual
®
7.0 HORSEPOWER
2800 PSI
2.5 GPM
Model No. 580.752400
CAUTION: Before using this product,
read this manual and follow al Safety
Rules and Operating instructions.
SEARS, ROEBUCK and CO., Hoffman Estates, IL 60179 U.S.A.
Visit our Craftsman website: www.sears.corn/craftsman
Pal_t No. 194052 Dra_ 2 (09,20,2004)
o Safety
o Assembly
o Operation
o Maintenance
o Parts
o EspaSol
0 I
WARRANTY .................................... 2
SAFETY RULES ............................... 2-4
ASSEMBLY ................................... 6-8
OPERATION ................................. 9-12
SPECIFICATIONS ............................... 12
MAINTENANCE .............................. 13-17
STORAGE .................................. 18-19
TROUBLESHOOTING ............................ 20
REPLACEMENT PARTS ....................... 22-27
EMISSION CONTROL WARRANTY .............. 28-29
ESPAI_OL ................................... 30-51
HOW TO ORDER PARTS ................ BACK PAGE
L_M_TED WARRANTY ON CRAFTSMAN PRESSURE WASHER
For one year from the date of purchase, when this Craftsman pressure washer is maintained and operated
according to the instructions in the owner's manual, Sears will repair, free of charge, any defect in material and
workmanship.
if this washer is used for commercial purposes, this warranty applies for only 90 days from the date of
purchase. If this pressure washer is used for rental purposes, this warranty applies for only 30 days after date
of purchase.
This warranty does not cover:
Expendable items such as spark plugs or air filters, which become worn during normal use.
Repairs necessary because of operator abuse or negligence, including damage resulting from no water
being supplied to pump or failure to maintain the equipment according to the instructions contained in the
owner's manual.
Warranty service is available by returning the high pressure washer to the nearest Sears service center or
dealer in the United States.
This warranty gives you specific legal rights and you may also have other rights, which vary from state to state.
Sears, Roebuck and Co., Dept. 817WA, Hoffman Estates, _L 60179
This is the safety alert symbol, it is used to alert you to potential personam injury hazards.
Obey aH safety messages that follow this symbol to avoid possible injury or death.
=K-T-]_Read this manuam carefully and become
i_-LA}]
familiarwithyourpressurewasher.Knowits
applications, its limitations, and any hazards
involved.
The safety alert symbol (,&) is used with a signal
word (DANGER, CAUTION, WARNING), a pictorial
and/or a safety message to alert you to hazards.
DANGER indicates a hazard which, if not avoided, will
result in death or serious injury. WARNING indicates a
hazard which, if not avoided, could result in death or
serious injury. CAUTION indicates a hazard which, if
not avoided, might result in minor or moderate injury.
CAUTION, when used without the alert symbol,
indicates a situation that could result in equipment
damage. Follow safety messages to avoid or reduce
the risk of injury or death.
Hazard Symbols and Meanings
Toxic Fumes
Slippery Surface
Fire
Moving Parts
Electrical Shock
Fal!
Explosion
Flying Objects
Fluid Injection
Hot Surface
Kickback
WARNtNG
The engine exhaust from this product contains
chemicals known to the State of California to cause
cancer, birth defects, or other reproductive harm.
, DANGER
Operate pressure washer ONLY outdoors.
Keep exhaust gas from entering a confined area through
windows, doors, ventilation intakes or other openings.
DO NOT operate pressure washer inside any building or
enclosure,
Use a respirator or mask whenever there is a chance
that vapors may be inhaled.
Read all instructions packed with mask so you are certain
mask will provide necessary protection against inhaling
harmful vapors.
WARNING
Keep spray nozzle between 8 to 24 inches away from
cleaning surface.
Operate this unit on a stable surface.
Cleaning area should have adequate slopes and
drainage to reduce possibility of falls due to slippery
surfaces.
Be extremely careful if you must use pressure washer
from a ladder, scaffolding or any other relatively unstable
location.
Firmly grasp spray gun with both hands when using high
pressure spray to avoid injury if gun kicks back.
WARNING
When starting engine, pull cord slowly until resistance is
felt and then pull rapidly to avoid kickback.
If engine starts and fails to continue to run or if increased
resistance is felt during starting pull attempts, squeeze
trigger on spray gun.
WARNING
WHEN ADDING OR DRAINBNG FUEL
Turn pressure washer OFF and let it cool at least 2
minutes before removing fuel cap. Loosen cap slowly to
relieve pressure in tank.
Fil! or drain fuel tank outdoors.
DO NOT overfill tank. Allow space for fuel expansion.
Keep fue! away from sparks, open flames, pilot lights,
heat, and other ignition sources.
DO NOT light a cigarette or smoke.
VHEN STARTING EQUIPMENT
Ensure spark plug, muffler, fuel cap and air cleaner are
in place.
DO NOT crank engine with spark plug removed.
If fuel spills, wait until it evaporates before starting
engine.
VHEN OPERATmNG EQUIPMENT
* Do not tip engine or equipment at angle which causes
fuel to spill.
DO NOT spray flammable liquids,
WHEN TRANSPORTING OR REPAIRBNG EQUIPMENT
Transport/repair with fuel tank EMPTY or with fuel shutoff
valve OFF.
Disconnect spark plug wire.
WHEN STORING FUEL OR EQUBPMENT WITH FUEL mN
TANK
Store away from furnaces, stoves, water heaters, clothes
dryers or other appliances that have pilot light or other
ignition source because they can ignite fue! vapors.
WARNING
NEVER aim spray gun at people, animals or plants.
DO NOT allow CHILDREN to operate pressure washer.
NEVER repair high pressure hose. Replace it.
Keep high pressure hose connected to pump and spray
gun while system is pressurized.
Squeeze trigger on spray gun to relieve trapped
pressure, every time you stop engine. Engage trigger
lock on spray gun.
WARNING
Keep water spray away from electric wiring or fatal
electric shock may result.
WARNING
DO NOT touch hot surfaces.
Allow equipment to cool before touching.
The pressure washer must be at least 5 feet from
structures having combustible walls and/or other
combustible materials.
Keep at least 3 feet of clearance on all sides of pressure
washer for adequate cooling, maintenance and servicing,
In the State of California a spark arrester is required by law
(Section 4442 of the California Public Resources Code).
Other states may have similar laws. Federal laws apply on
federal lands. If you equip the muffler with a spark arrester,
it must be maintained in effective working order.
WARNING
DO NOT wear loose clothing, jewelry or anything that
may be caught in starter or other rotating parts.
Tie up long hair and remove jewelry.
WARNING
WHEN ADJUSTING OR MAKmNG REPAIRS TO YOUR
PRESSURE WASHER
Disconnect the spark plug wire from the spark plug and
place the wire where it cannot contact spark plug.
WHEN TESTING FOR ENGINE SPARK
Use approved spark plug tester.
DO NOT check for spark with spark plug removed.
WARNING
Always wear eye protection when using equipment or when
in vicinity of equipment in use.
CAUTION
DO NOT tamper with governed speed.
DO NOT operate pressure washer above rated pressure.
CAUTION
DO NOT secure spray gun in open position.
DO NOT leave spray gun unattended while machine is
running.
NEVER use a spray gun which does not have a trigger
lock or trigger guard in place and in working order.
Always be certain spray gun, nozzles and accessories
are correctly attached.
CAUTION
DO NOT point spray gun at glass when in jet spray mode.
NEVER aim spray gun at plants.
CAUTION
If you have questions about intended use, ask dealer or
contact Sears.
NEVER operate units with broken or missing parts, or
without protective housing or covers.
DO NOT by-pass any safety device on this machine.
Before starting pressure washer in cold weather, check
all parts of the equipment to be sure ice has not formed
there.
NEVER move machine by pulling on high pressure hose.
Use handle provided on unit.
Check fuel system for leaks or signs of deterioration,
such as chafed or spongy hose, loose or missing
clamps, or damaged tank or cap, Correct all defects
before operating pressure washer.
This equipment is designed to be used with Sears
authorized parts ONLY. If equipment is used with parts
that DO NOT comply with minimum specifications, user
assumes al! risks and liabilities.
KNOW YOUR PRESSURE WASHER
Read the owner's manual and safety rules before operating your pressure washer.
Compare the illustrations with your pressure washer to familiarize yourself with the locations of various controls
and adjustments. Save this manual for future reference.
Spray Gun
Model Data Decal
Nozzle Extension
High Pressure Hose
Recoil Starter
Fuel Cap
Adjustable Nozzle
Choke Knob
/
/
/
/
/
Oil Fill Cap and Dipstick
Water Inlet
J
Throttle Control Lever
High Pressure Outlet
Air Filter
\
\
\
Pump
Adjustable Nozzle - Always attached to nozzle
extension. Pull back for high pressure or push forward
for low pressure; turn clockwise for narrow spray or
turn counterclockwise for fan spray.
Air Filter = Dry type filter element limits the amount of
dirt and dust that gets in the engine.
Choke Knob =Used to help start a cold engine.
Detergent Pick-Up Tube and Filter = Use to draw
detergent from chemical bottle to the low pressure
water stream.
Fuel Cap = Fill engine with regular unleaded fuel here.
High Pressure Hose = Connect one end to the spray
gun and other end to the high pressure outlet.
High Pressure Outlet = Connection for high pressure
hose.
Detergent Pick=Up
Tube and Filter
Model Data Decal - Provides model and serial number
of pressure washer. Please have these readily available
when calling for assistance.
Nozzle Extension =Attach to spray gun to use
adjustable nozzle.
Oil Fill Cap and Dipstick = Check and fill engine with
oil here. See page 6 for oil recommendations and
filling instructions.
Pump = Develops high pressure water.
Recoit Starter = Used for starting the engine
manually.
Spray Gun = Controls the application of water onto
cleaning surface with trigger device. Includes trigger
lock.
Throttle Control Lever = Sets engine in starting
mode for recoil starter and stops running engine.
Water Inlet = Connection for garden hose.
Yourpressurewasherrequiressomeassemblyandis
readyforuseonlyafterit hasbeenproperlyserviced
withtherecommendedoilandfuel.
if youhaveanyproblemswiththeassemblyof
yourpressurewasher,pleasecallthepressure
washerhelplineat 1-800-222-3136.
iMPORTANT:Anyattempttoruntheenginebeforeit
hasbeenservicedwiththerecommendedoilwillresult
inanenginefailure.
REMOVE PRESSURE WASHER
FROM CARTON
Slice two corners opposite guide handle end of
carton from top to bottom so the panel can be
folded down flat.
Remove fillers, accesodes and parts bag shipped
with your pressure washer.
Roll the pressure washer out the open end of the
carton.
Check carton for additional loose parts.
CARTON CONTENTS
Check all contents. If any parts are missing or damaged,
call the pressure washer helpline at 1-800-222-3136.
The main unit
Handle
Spray gun
High pressure hose
Nozzle extension with Hi/Lo adjustable nozzle
Engine oil
Parts bag (which includes items listed below)
Owner's manual
Registration card
Handle attachment hardware
Become familiar with each piece before assembling
the pressure washer. Check all contents against the
illustration on page 5. If any parts are missing or
damaged, call the pressure washer helpline at
1-800-222-3136.
ASSEMBLING YOUR PRESSURE
WASHER
Your Craftsman high pressure washer was mostly
assembled at the factory. However, you will need to
perform these tasks before you can operate your
pressure washer:
1. Attach handle.
2. Add oil to engine crankcase.
3. Add fuel to fuel tank.
4. Connect pressure hose to spray gun and pump.
5. Connect water supply to pump.
Attach Handme
1. Place handle assembly onto handle supports
connected to main unit. Make sure holes in handle
align with holes on handle supports.
f
/ i
_ // Handle i"
Align Holes,_i '__
_] Handle i
// Supports l
NOTE: It may be necessary to move the handle
supports from side to side in order to align the handle
so it will slide over the handle supports.
2. Insert carriage bolts through holes from outside of
unit and attach a plastic knob from inside of unit.
Tighten by hand.
.
Insert one "L" hooks through hole just under
billboard on left side of handle (viewing from rear
of unit). Hold hook in place and attach plastic knob
from inside of unit. Tighten by hand.
.
I
Hose Hook
Insert other "L" hook through hole just above
billboard on right side of handle (viewing from rear
of unit). Hold hook in place and attach plastic knob
from inside of unit. Tighten by hand.
Add Engine Oil
IMPORTANT: Any attempt to crank or start the engine
before it has been properly serviced with the
recommended oil may result in an engine failure.
NOTE: When adding oil to the engine crankcase, use
only high quality detergent oil rated with API service
classification SF, SG, SH, SJ or higher rated SAE 30
weight. DO NOT use special additives.
1. Choose a viscosity according to table below.
STARTING TEMPERATURE RANGE ANTICIPATED BEFORE NEXT OiL CHANGE
* The use of multi-viscosity oils (5W-30, 10W-30, etc.)
in temperatures above 40°F (4°C) will result in higher
than normal oil consumption. When using a multi-
viscosity oil, check oil more frequently.
** If using SAE 30 oil in temperatures below 40°F
(4°C), it will result in hard starting and possible
engine bore damage due to inadequate lubrication.
2. Place pressure washer on a level surface and
clean area around oil fill.
3. Remove oil dipstick and wipe dipstick with clean
cloth. RepJace and tighten dipstick. Remove and
and check oil level.
.
SJowly pour oiJ into oil fiJJopening. Pause to permit
oil to settle. FiJJto "Fuji" mark on dipstick. DO
NOT OVERFILL. Remove dipstick and check oiJ
level.
NOTE: You may not need to use all the supplied oil.
5. Replace and tighten dipstick.
NOTE: Check oil often during engine break-in.
Add Fuel
WARNING
WHEN ADDING FUEL
Turn pressure washer OFF and let it cool at least 2
minutes before removing fuel cap. Loosen cap slowly to
relieve pressure in tank.
Fil! or drain fuel tank outdoors.
DO NOT overfill tank. Allow space for fuel expansion.
Keep fue! away from sparks, open flames, pilot lights,
heat, and other ignition sources.
DO NOT light a cigarette or smoke.
NOTE: This gasoline engine is certified to operate on
gasoline. Exhaust Emission Control System: EM
(Engine Modifications).
1. Use clean, fresh, regular UNLEADED fuel with a
minimum of 77 octane with equipment. DO NOT
use fuel which contains Methanol. DO NOT mix oil
with fuel.
2. Clean area around fuel fill cap, remove cap.
3. Slowly add regular unleaded fuel to fuel tank. Be
careful not to overfill. Allow about 1.5" of tank
space for fuel expansion, as shown here.
4. Install fuel cap and wipe up any spilled fuel.
CAUTION! Alcohol-blended fuels (called gasohol,
ethanol or methanol) can attract moisture, which leads
to separation and formation of acids during storage.
Acidic gas can damage the fuel system of an engine
while in storage.
To avoid engine problems, the fuel system should be
emptied before storage of 30 days or longer. Drain the
fuel tank, start the engine and let it run until the fuel lines
and carburetor are empty. Use fresh fuel next season.
See "Storage" on pages 18-19 for additional information.
NEVER use engine or carburetor cleaner products in
the fuel tank as permanent damage may occur.
Connect Hose and Water Supply to Pump
IMPORTANT: To avoid pump damage, you must
assemble the nozzle extension to the spray gun and
attach all hoses before you start the engine.
1. Uncoil high pressure hose and attach one end of
hose to base of spray gun. Tighten by hand.
llVIPORTANT: DO NOT siphon standing water for the
water supply. Use ONLY cold water (less than 100°F).
6. Connect garden hose (not to exceed 50 feet in
length) to water inlet. Tighten by hand.
CAUTtON
.
3.
Remove and discard shipping caps from pump
inlet and outlet.
Attach other end of high pressure hose to high
pressure outlet on pump. Tighten by hand.
4. Before connecting garden hose to water inlet,
inspect inlet screen. Clean screen if it contains
debris or have it replaced if damaged. Refer to
section "OzRing Maintenance" if inlet screen is
damaged. DO NOT run pressure washer if inlet
screen is damaged.
5. Run water through garden hose for 30 seconds to
flush it of debris. Turn off water.
inspect inlet
screen. DO
NOT use if
damaged;
clean if dirty.
* Damage to equipment resulting from failure to follow
this instruction will void warranty.
7. Turn ON water and squeeze trigger on spray gun
to purge pump system of air and impurities.
WARNtNG
Always wear eye protection when using this equipment
or in vicinity of where equipment is in use.
Before starting the pressure washer, be sure you are
wearing adequate eye protection.
CHECKUST BEFORE STARTING
Review the assembly to ensure you have performed
alJof the following:
1. Check that oil has been added to proper level in
engine crankcase.
2. Add proper fuel to fuel tank.
3. Check for properly tightened hose connections
(high pressure and water supply) and for tight
connections and that there are no kinks, cuts, or
damage to the high pressure hose.
4. Provide proper water supply (not to exceed
100°F).
5. Be sure to read "Safety Rules" and "Operation"
sections before using the pressure washer.
6. if starting unit after storage, see "Storage" section
on pages 18o19.
HOW TO USE YOUR PRESSURE
WASHER
if you have any problems operating your pressure
washer, please ca+lthe pressure washer helpline at
1-800-222-3136.
Pressure Washer Location
Pressure Washer Clearance
DANGER
Operate pressure washer ONLY outdoors,
Keep exhaust gas from entering a confined area through
windows, doors, ventilation intakes or other openings,
DO NOT operate pressure washer inside any building or
enclosure,
The pressure washer must be at least 5 ft. (152 cm)
from structures having combustible walls and/or other
combustible materials. Leave at least 3 ft. (92 cm) all
around pressure washer including overhead, for 5.
adequate cooling, maintenance and servicing.
Place pressure washer in a wel+ ventilated area, which 6.
will allow for remova+ of deadly exhaust gas. DO NOT
place pressure washer where exhaust gas could
accumulate and enter inside or be drawn into a
potentially occupied building. Ensure exhaust gas is
kept away from any windows, doors, ventilation
intakes or other openings that can allow exhaust gas
to collect in a confined area. Prevailing winds and air
currents should be taken into consideration when 7.
positioning pressure washer.
Exhaust Port
To Start Your Pressure Washer
To start your engine-powered pressure washer for the
first time, follow these instructions step-by-step. This
starting information also applies whenever you start
the engine after you have let the pressure washer sit
idle for at least a day.
1. Place pressure washer near an outside water
source capable of supplying water at a flow rate
greater than 3.5 gal+ons per minute and no less than
20 PSI at pressure washer end of garden hose.
2. Check that high pressure hose is tightly connected
to spray gun and pump. See "Assembling Your
Pressure Washer" for illustrations.
3. Make sure unit is in a level position.
4. Connect garden hose to water inlet on pressure
washer pump. Turn ON water.
CAUTtON
g.
+ Damage to equipment will result from failure to follow
this instruction.
Squeeze trigger on gun to purge pump system of
air and impurities.
Attach nozzle extension to spray gun. Tighten by
hand.
\\
Position nozzle in low pressure mode (slide nozzle
forward) and squeeze trigger on spray gun to
relieve pressure caused by turning ON water.
Water will flow out of gun in a thin stream.
Continue to hold trigger until there is a steady
stream of water and no air remains in system.
Release trigger.
Engage trigger lock to spray gun trigger.
_ Trigger Lock
Move throttle lever to "Fast" position, shown here
as a rabbit.
,\
\
Throttle Lever in
"Fast" Position
10.Movechokeknobto"Choke"position.
NOTE:Forawarmengine,besurethechokeknobis
inthe"Run"position.
11.Grasphandleandpullrecoilstarterlightlyuntilyou
feelsomeresistance,thenpullbriskly.
WARNING
When starting engine, pull cord slowly until resistance is
felt and then pull rapidly to avoid kickback.
If engine starts and fails to continue to run or if increased
resistance is felt during starting pull attempts, squeeze
trigger on spray gun.
12. Return recoil starter slowly. DO NOT let rope
"snap back" against starter.
13. When engine starts, slowly move choke knob to
"Run" position as engine warms. If engine falters,
move choke knob to "Choke" position, then to
"Run" position.
14. if engine fires, but does not continue to run,
squeeze trigger on spray gun to relieve internal
pump pressure. Move choke knob to "Run"
position, and repeat steps 11 through 13.
15. if engine fails to start after six pulls, move choke
knob to "Run" position, and repeat steps
11 through 13.
IMPORTANT: if engine floods, place choke lever in
"Run" position and crank until engine starts.
NOTE: Always keep the throttle lever in the "Fast"
)osition when operating the pressure washer.
WARNING
DO NOT touch hot surfaces.
Allow equipment to cool before touching.
The pressure washer must be at least 5 feet from
structures having combustible walls and/or other
combustible materials.
Keep at least 3 feet of clearance on all sides of pressure
washer for adequate cooling, maintenance and servicing.
In the State of California a spark arrester is required by law
(Section 4442 of the California Public Resources Code).
Other states may have similar laws. Federal laws apply on
federal lands. If you equip the muffler with a spark arrester,
it must be maintained in effective working order.
How to Stop Your Pressure Washer
1. Let engine idle for two minutes.
2. Move throttle lever on engine to "Stop" position.
L O NOT stop engine by moving choke lever to "Choke"position.
3. Squeeze trigger on spray gun to reWeve
trapped pressure in hose to avo{d injury.
NOTE: A small amount of water will squirt out when
3ressure is released.
WARNING
.
Keep high pressure hose connected to pump and spray
gun while system is pressurized.
Squeeze trigger on spray gun to relieve trapped
pressure, every time you stop engine. Engage trigger
lock on spray gun.
Engage trigger lock on spray gun when not in use.
How To Use the Adjustable Nozzle
You now should know how to START your pressure
washer and how to STOP it. The information in this
section will tell you how to adjust the spray pattern
and apply detergent or other cleaning chemicals.
CAUTION
NEVER adjust spray pattern when spraying.
NEVER put hands in front of nozzle to adjust spray pattern.
On the end of your spray gun is an adjustable nozzle
that you can use to adjust the spray pattern and the
spray pressure.
1. SJide nozzJe forward for Jow pressure spray; slide
backward for high pressure spray.
Slide nozzle backward for Slide nozzle forward for low
high pressure mode. pressure mode and
detergent application.
10
2. Pointnozzletowardsahardsurface,disengage
triggerlock,andpresstriggertotestpattern.
3. Twistingnozzleadjustsspraypatternfroma
narrowpatterntoafanpattern.
Twist nozzle counter-
clockwise for fan pattern.
4.
Twist nozzle clockwise for
narrow spray pattern.
For most effective cleaning, keep spray nozzle
from 8 to 24 inches away from cleaning surface.
5. if you get spray nozzle too close, especially using
high pressure mode, you may damage the surface
being cleaned.
6. DO NOT get closer than 6 inches when cleaning
tires.
Appmying Detergent with the Adjustabme
Nozzme
IMPORTANT: Use chemicals designed specifically
for pressure washers. Household detergents could
damage the pump.
CAUTION
Starting the engine without all the hoses connected and
without the water turned ON will damage the pump.
To apply detergent, follow these steps:
1. Review use of adjustable nozzle.
2. Prepare detergent solution as required by job.
3. Place filter end of detergent siphoning tube into
detergent container.
CAUTION
* When inserting the filter into a detergent solution bottle,
route the tube so as to keep it from inadvertently
contacting the hot muffler.
4. Slide adjustable nozzle forward to low pressure
mode. Detergent cannot be applied with nozzle in
high pressure position.
5. Make sure garden hose is connected to water
inlet. Check that high pressure hose is connected
to spray gun and pump. Start engine.
6. Apply detergent to a dry surface, starting from
bottom and working up.
7. Allow detergent to "soak in" for 3=5minutes before
rinsing. Reapply as needed to keep surface wet.
8. For washing, start at lower portion of area to be
washed and work upward, using long, even,
overlapping strokes.
Pressure Washer Rinsing
For Rinsing:
1. Slide nozzle backward to high pressure, press
trigger and wait for detergent to clear.
NOTE: You can also stop detergent flow by removing
detergent siphoning tube from container.
2. Keep spray gun a safe distance from area you
plan to spray.
VVARNING
Keep spray nozzle between 8 to 24 inches away from
cleaning surface.
Operate this unit on a stable surface.
Be extremely careful if you must use the pressure
washer from a ladder, scaffolding or any other relatively
unstable location.
Firmly grasp spray gun with both hands when using high
pressure spray to avoid iniury if gun kicks back.
3. Apply a high pressure spray to a small area, then
check surface for damage. If no damage is found,
it is okay to continue cleaning.
4. Start at top of area to be rinsed, working down
with same overlapping strokes as you used for
washing and applying detergent.
Automatic Cool Down System
(Therma_ Relief)
If you run the engine on your pressure washer for
3=5minutes without pressing the trigger on the spray
gun, circulating water in the pump can reach
temperatures above 125°F. The system engages to
cool the pump by discharging the warm water onto
the ground.
11
ENGtNE TECHNICAL INFORMATION
This is a single cylinder, overhead valve (OHV), air
cooled engine. It is a low emissions engine.
in the State of California, Model Series 120000
engines are certified by the California Air Resources
Board to meet emissions standards for 125 hours.
Such certification does not grant the purchaser, owner
or operator of this engine any additional warranties
with respect to the performance or operational life of
this engine. The engine is warranted solely according
to the product and emissions warranties stated
elsewhere in this manual.
Power Ratings
The power ratings for an individual engine model are
initially developed by starting with SAE (Society of
Automotive Engineers) code J1940 (Small Engine
Power & Torque Rating Procedure) (Revision 2002-
05). Given both the wide array of products on which
our engines are placed, and the variety of
environmental issues applicable to operating the
equipment, it may be that the engine you have
purchased will not develop the rated horsepower when
used in a piece of power equipment (actual "on-site"
power). This difference is due to a variety of factors
including, but not limited to, the following: differences
in altitude, temperature, barometric pressure, humidity,
fuel, engine lubrication, maximum governed engine
speed, individual engine to engine variability, design of
the particular piece of power equipment, the manner in
which the engine is operated, engine run-in to reduce
friction and clean out of combustion chambers,
adjustments to the valves and carburetor, and other
factors. The power ratings may also be adjusted
based on comparisons to other similar engines utilized
in similar applications, and will therefore not
necessarily match the values derived using the
foregoing codes.
PRODUCT SPECIFICATIONS
Pressure Washer Specifications
Pressure .................. 2,800 PSI
Flow Rate ................. 2+5 GPM
Chemical Mix............... Use as directed
Water Supply Temperature .... Not to exceed 100°F
Shipping Weight ............ 74 Ibs+
Engine Specifications
Rated Horsepower ............ 7 at 3600 rpm
Bore ....................... 2.69 in. (68mm)
Stroke ...................... 2.04 in. (52mm)
Displacement ................ 11.58 in. (190 cc)
Spark Plug
Long Life Platinum ......... Champion RC12PYP
Resistor ................. Champion RC12YC
Set Gap To: ............... 0.020inch (0.50mm)
Armature Air Gap: ............ 0.010o0.014 in.
(0.25-0.38mm)
Valve clearance withvalve springs installedand piston 1/4 in.
(8 ram) past top dead center (checkwhen engine iscold).
Intake ...................... 0.004-0.006 in.
(0.!0o0.15 mm)
Exhaust .................... 0.004-0.008 in.
(0.10o0.20 mm)
Fuel Capacity ................ 1.6 Quarts
Oil Type:
Above 40° F ............... SAE 30
Below 40° F ............... SAE 5W-30 or 10W-30
12
OWNER'S RESPONSIBILmES
Follow the hourly or calendar intervals, whichever occurs first.
More frequent service is required when operating in adverse conditions noted below.
MABNTENANCE SCHEDULE
FILL tN DATES AS YOU
COMPLETE REGULAR SERVICE
MAINTENANCE TASK
PRESSURE WASHER
Check/dean water inlet screen
Check high pressure hose
Check detergent hose
Check spray gun and assembly for leaks
Purge pump of air and contaminants
Change pump oil
Prepare pump for storage below 32°F
ENGINE
Before
Each Use
X _
x
x
x
x
SERVICE DATES
Every 25
Hours or
Yearly
Every 50 Every 100
Hours or Hours or
Yeady Year y
×
See Storage on pages 18-19.
Yearty
SERVICE DATES
Check oil level
Clean debris
Change engine oit
Service air cleaner
E
Service spark plug
Service spark arrester
C_ean cooling system
Check valve clearance
Prepare for storage
1
2
x
x
X _
x
x2
If unit is to remain idlefor longerthan 30 days
Clean if clogged. Reptace if perforated or torn.
Change oil after the first (5) operating hours and every 50 hours or yearly thereafter.
Change sooner when operating under dirty or dusty conditions.
RepIace more often under dirty or dusty conditions.
GENERAL RECOMMENDATIONS
Regular maintenance will improve the performance
and extend the life of the pressure washer. See any
authorized Sears dealer for service.
The pressure washer warranty does not cover items
that have been subjected to operator abuse or
negligence. To receive full value from the warranty,
the operator must maintain pressure washer as
instructed in this manual including proper storage as
detailed in "Storage" on pages 18-19.
Some adjustments will need to be made periodically to
properly maintain your pressure washer.
All service and adjustments should be made at least
once each season. Follow the requirements in the
"Maintenance Schedule" chart above.
NOTE: Once a year you should clean or replace the
spark plug and replace the air filter. A new spark plug
and clean air filter assure proper fuel-air mixture and
help your engine run better and last longer.
if equipped with inflatable tires, keep the air pressure
at the value marked on the tire or within 15 and 40 psi.
EMISSION CONTROL
Maintenance, replacement or repair of the emission
control devices and systems may be performed by any
non-road engine repair establishment or individual.
BEFORE EACH USE
1. Check engine oil level.
2. Clean debris.
3. Check water inlet screen for damage.
4. Check in-line filter for debris.
5. Check high pressure hose for leaks.
6. Check chemical filters for damage.
7. Check gun and nozzle extension assembly for
leaks.
8. Purge pump of air and contaminants.
13
PRESSURE WASHER
C_ean Debris
Daily or before use, clean accumulated debris from
pressure washer. Keep linkage, spring and controls
clean. Keep area around and behind muffler free from
any combustible debris.
Pressure washer parts should be kept clean to reduce
the risk of overheating and ignition of accumulated
debris.
CAUTION
DO NOT insert any objects through cooling slots.
Use a damp cloth to wipe exterior surfaces clean.
Use a soft bristle brush to loosen caked on dirt, oil,
etc.
Use a vacuum cleaner to pick up loose dirt and debris.
Use low pressure air (not to exceed 25 psi) to blow
away dirt. inspect cooling air slots and openings on
the pressure washer. These openings must be kept
clean and unobstructed.
Check and C_ean _n_et Screen
Examine garden hose inlet screen. Clean if it is
clogged or replace if it is torn.
Check High Pressure Hose
High pressure hoses can develop leaks from wear,
kinking, or abuse. Inspect hose before each use.
Check for cuts, leaks, abrasions, bulging of cover, or
damage or movement of couplings. If any of these
conditions exist, replace hose immediately.
1
NEVER repair high pressure hose, Replace it,
Replacement hose rating MUST exceed maximum
pressure rating of unit.
Check Gun and Nozzle Extension
Examine hose connection to spray gun and make sure
it is secure. Test trigger by pressing it and making
sure it springs back into place when you release it. Put
trigger lock in UP position and test trigger. You should
not be able to press trigger. Replace spray gun
immediately if it fails any of these tests.
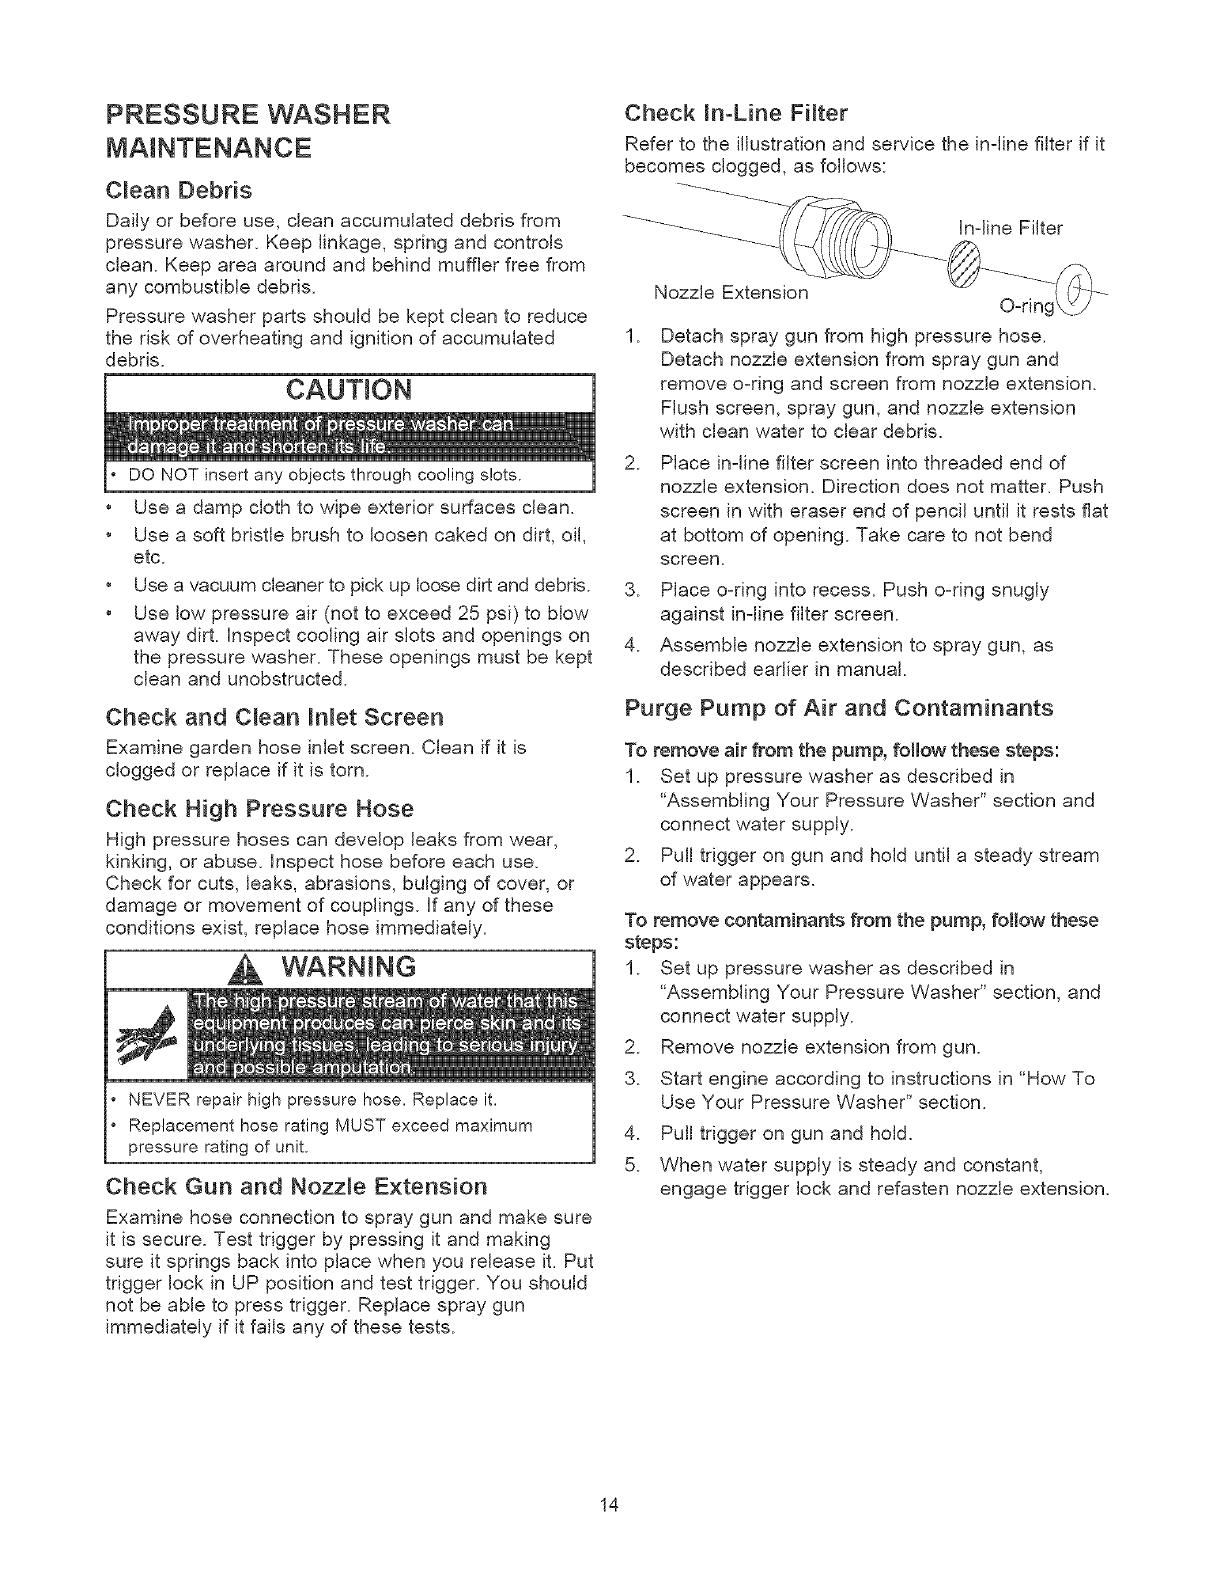
Check _n-Line Fi_ter
Refer to the illustration and service the inqine filter if it
becomes clogged, as follows:
In-line Filter
Nozzle Extension
O-rinc
1. Detach spray gun from high pressure hose.
Detach nozzle extension from spray gun and
remove o-ring and screen from nozzle extension.
Flush screen, spray gun, and nozzle extension
with clean water to clear debris.
2. Place in-line filter screen into threaded end of
nozzle extension. Direction does not matter. Push
screen in with eraser end of pencil until it rests fiat
at bottom of opening. Take care to not bend
screen.
3. Place o-ring into recess. Push o-ring snugly
against in-line filter screen.
4. Assemble nozzle extension to spray gun, as
described earlier in manual.
Purge Pump of Air and Contaminants
To remove air from the pump, follow these steps:
1. Set up pressure washer as described in
"Assembling Your Pressure Washer" section and
connect water supply.
2. Pull trigger on gun and hold until a steady stream
of water appears.
To remove contaminants from the pump, follow these
steps:
1. Set up pressure washer as described in
"Assembling Your Pressure Washer" section, and
connect water supply.
2. Remove nozzle extension from gun.
3. Start engine according to instructions in "How To
Use Your Pressure Washer" section.
4. Pull trigger on gun and hold.
5. When water supply is steady and constant,
engage trigger lock and refasten nozzle extension.
14
Nozzle Maintenance
A pulsing sensation felt while squeezing the spray gun
trigger may be caused by excessive pump pressure.
The principal cause of excessive pump pressure is a
nozzle clogged or restricted with foreign materials,
such as dirt, etc. To correct the problem, immediately
clean the orifice following these instructions:
1. Shut off engine and turn off water supply.
2. Remove orifice from end of nozzle extension.
Separate nozzle extension from spray gun. Twist
nozzle clockwise to stream position. Using a 2mm
(5/64) allen wrench, remove orifice from end of
nozzle extension.
. Remove in-line filter from other end of nozzle
extension.
4. Use a small paper clip to free any foreign material
clogging or restricting orifice.
O-Ring Maintenance
Purchase an O-Ring Repair Kit, item number
71-75116, at your local Sears or by calling
1-800-366-PART or online at ,,m,_A,u.sears.com.it is not
included with the pressure washer. This kit includes
replacement o-rings, rubber washer and water inlet
filter. Refer to the instruction sheet provided in the kit
to service your unit's o-rings.
Pump Maintenance
Changing Pump OH
Change oil every 50 hours or once yearly, whichever
occurs first.
NOTE: You must purchase a premeasured bottle of
pump oil, item number 190585GS, by calling
1-800-366-PART or online at www.sears.com.
Change pump oH as follows:
1. Drain engine oil and fuel from pressure washer.
2. Use a 8mm allen wrench to remove black pump
oil cap between high pressure outlet and garden
hose inlet.
.
Insert wire into orifice and turn back
and forth to clear obstruction.
Using a garden hose, remove additional debris by
back flushing water through nozzle extension.
Back flush between 30 to 60 seconds. Turn
adjustable nozzle extension to stream spray and
move nozzle from low to high while flushing.
"_ Oil Cap
6. Reinstall orifice and indine filter into nozzle
extension. DO NOT overtighten orifice with allen
wrench.
7. Reconnect nozzle extension to spray gun.
8. Reconnect water supply, turn on water, and start
engine.
9. Test pressure washer by operating with nozzle in
high and low positions.
3. Tilt pressure washer to drain oil into an approved
container until it drips slowly from pump.
4. Tilt pressure washer in opposite direction and
empty premeasured pump oil bottle into same
opening (a small funnel may be helpful).
5. Install black pump oil cap and tighten firmly.
6. Set pressure washer in upright position. Add fuel
and engine oil.
15
ENGINE MAINTENANCE
VVARN[NG
WHEN ADJUSTING OR MAKmNGREPAIRS TO YOUR
PRESSURE WASHER
Disconnect the spark plug wire from the spark plug and
place the wire where it cannot contact spark plug.
WHEN TESTBNGFOR ENGINE SPARK
Use approved spark plug tester.
DO NOT check for spark with spark plug removed,
Checking 0+[ Level
Oi[ level should be checked prior to each use or at
least every 5 hours of operation. Keep o+llevel
maintained.
Changing OH
Change engine oil after the first 5 hours and every
50 hours thereafter. If you are using your pressure
washer under extremely dirty or dusty conditions, or in
extremely hot weather, change oil more often.
[ ,A cAu++o.
5. Wipe dipstick clean, insert it into oil fill hole and
tighten securely, remove dipstick. Add
recommended oil up to "Full" mark on dipstick.
Pour slowly. Wipe dipstick clean each time oil
level is checked. DO NOT overfill.
6. [nstail oil fill plug and dipstick, tighten securely.
7. Wipe up any remaining oil.
8. Reconnect spark plug wire to spark plug.
Service Air Cleaner
Your engine will not run properly and may be
damaged if you run it with a dirty air cleaner.
Service the air cleaner once every 25 hours of
operation or once each year, whichever comes first.
Service more often if operating under dirty or dusty
conditions. Replacements are ava+iabie at your local
Sears service center.
To service the air cleaner, follow these steps:
1. Loosen screw and tilt cover down.
Tabs and Slots
Cartridge
Used motor oil has been shown to cause skin cancer in
certain laboratory animals,
Thoroughly wash exposed areas with soap and water,
KEEP OUT OF REACH OF CHILDREN.
DON'T POLLUTE. CONSERVE
RESOURCES. RETURN USED OIL TO
COLLECTION CENTERS.
Change oHwhile engine is still warm from running, as
follows:
1. Drain fuel tank by running pressure washer until
fuel tank is empty.
2. Disconnect spark plug wire and keep it away from
spark plug.
3. Clean area around oil fill, remove oil fill
cap/dipstick. Wipe dipstick clean.
4. Tip your pressure washer to drain oi[ from oi[ fiJ[
into a suitabJe container making sure you tip your
unit away from spark plug. When crankcase is
empty, return pressure washer to upright position.
Base
Screw Cover
2. Carefully remove cartridge assembly.
3. To clean cartridge, gently tap pleated paper side
on a flat surface.
4. Reinstall clean or new cartridge assembly inside
cover.
5. Insert cover's tabs into slots in bottom of base.
6. Tilt cover up and tighten screw securely to base.
NOTE: You can purchase new air filter elements by
ca[i+ng 1-800-366-PART.
16
Service Spark Pmug
Service the spark plug every 100 hours of operation or
yearly, whichever occurs first.
1. Clean area around spark plug.
2. Remove and inspect spark plug.
3. Replace spark plug if electrodes are worn, or if
insulator is cracked or chipped.
4. For replacement use either the standard resistor
spark plug, Champion RC12YC or the long life
platinum spark plug, Champion RC12PYP.
5. Check electrode gap with wire feeler gauge and
set gap at 0.020 inches (0.50mm), if necessary.
_-_ Y ...............
\\
6. Install spark plug, tighten securely.
NOTE: You can purchase a new spark plug by calling
1-800-366-PART.
Carburetor
if you think your carburetor needs adjusting, see your
nearest Sears service center. Engine performance
may be affected at altitudes above 3000 feet. For
operation at higher elevations, contact your nearest
Sears service center.
Spark Arrester Service
Your engine is not factory-equipped with a spark
arrester. In some areas, it is illegal to operate an
engine without a spark arrester. Check local laws and
regulations. A spark attester is available from your
nearest Sears service center. If you need to order a
spark arrester, please call 1-800-366-PART.
The spark arrester must be serviced every 50 hours to
keep it functioning as designed.
If the engine has been running, the muffler will be very
hot. Allow the muffler to cool before servicing the
spark arrester.
Remove spark attester screen for cleaning and
inspection.
Replace if screen is damaged.
VVARNING
DO NOT touch hot surfaces.
Allow equipment to coo! before touching.
The pressure washer must be at least 5 feet from
structures having combustible walls and/or other
combustible materials.
Keep at least 3 feet of clearance on all sides of pressure
washer for adequate cooling, maintenance and servicing.
in the State of California a spark arrester is required by law
(Section 4442 of the California Public Resources Code).
Other states may have similar laws. Federal laws apply on
federal lands. If you equip the muffler with a spark attester,
it must be maintained in effective working order.
Air Coo_ing System
Over time debris may accumulate in cylinder cooling
fins and cannot be observed without partial engine
disassembly. For this reason, we recommend you
have an authorized Sears service dealer clean the
cooling system per recommended intervals (see
"Maintenance Schedule" on page 13). Equally
important is to keep top of engine free from debris.
See "Clean Debris".
17
AFTER EACH USE
Water should not remain in the unit for long periods of
time. Sediments or minerals can deposit on pump
parts and "freeze" pump action. Follow these
procedures after every use:
1. Flush detergent siphoning tube by placing filter
into a pail of clean water while running pressure
washer in low pressure mode (adjustable nozzle in
forward position). Flush for one to two minutes.
2. Shut off engine, let it cool, then remove all hoses.
3. Disconnect spark plug wire from spark plug.
4. Empty pump of all liquids by pulling recoil handle
about 6 times. This should remove most liquid in
pump.
5. if storing for more than 30 days see "Long Term
Storage" on next page.
6. Coil high pressure hose and inspect it for damage.
Cuts in hose or fraying could result in leaks and
loss of pressure. Should any damage be found,
replace hose. DO NOT attempt to repair a
damaged hose. Replace hose with genuine Sears
part.
7. Disconnect hose from spray gun and high
pressure outlet on pump. Drain water from hose,
gun, and nozzle extension. Use a rag to wipe off
the hose.
8. Coil hose and properly hang it on wire support
provided.
9. Reconnect spark plug wire to spark plug.
10. Store unit in a clean, dry area.
WARNING! NEVER store the engine with fuel
in the gas tank indoors or in enclosed, poorly
ventilated areas where fumes may reach an
open flame, a spark, or pilot light.
WINTER STORAGE
CAUTION
* Failure to do so will permanently damage your pump
and render your unit inoperable,
, Freeze damage is not covered under warranty.
To protect the unBtfrom freezing temperatures:
1. Flush detergent siphoning tube by placing filter
into a pail of clean water while running pressure
washer in low pressure mode (adjustable nozzle in
forward position). Flush for one to two minutes.
2. Empty pump of all pumped liquids by pulling recoil
handle about 6 times. This should remove most
liquid in pump.
3. Use pump saver, available at Sears retail item
71-74403, to treat pump. This minimizes freeze
damage and lubricates pistons and seals.
4. If pump saver is not available, connect a 3-foot
section of garden hose to water inlet adapter. Pour
RV-antifreeze (antifreeze without alcohol) into
hose. Pull recoil handle twice. Disconnect 3-foot
hose.
18
LONG TERM STORAGE
if you do not plan to use the pressure washer for more
than 30 days, you must prepare the engine and pump
for long term storage.
it is important to prevent gum deposits from forming in
essential fuel system parts such as the carburetor, fuel
filter, fuel hose or tank during storage. Also,
experience indicates that alcohol-blended fuels (called
gasohol, ethanol or methanol) can attract moisture,
which leads to separation and formation of acids
during storage. Acidic gas can damage the fuel
system of an engine while in storage.
Protect Fuel System
Fuel Additive:
if adding a fuel additive, fill the fuel tank with fresh
fuel. If only partially filled, air in the tank will promote
fuel deterioration during storage. Engine and fue[ can
be stored up to 24 months with additive.
Add fue[ additive following manufacturer's
instructions.
Make sure you have water supply to pump inlet
connected and turned ON.
Run the engine outdoors for 10 minutes to be sure
that treated fuel has replaced the untreated fuel in
the carburetor.
If fuel additive is not used, remove all fuel from tank
and run engine until it stops from lack of fuel.
Change Oil
While engine is still warm, drain oil from crankcase.
Refill with recommended grade. See "Changing Oil" on
page 16.
Oil Cylinder Bore
Remove spark plug. Squirt about 1 tablespoon of
dean engine oil into the cylinder. Cover spark plug
hole with rag. Pull recoil handle slowly to distribute
oil. Avoid spray from spark plug hole.
Instal[ spark plug. DO NOT connect spark plug
wire.
Protect Pump
To protect the pump use Sears pump saver to prevent
freeze damage and lubricate pistons and seals.
NOTE: Sears pump saver, item number 71-74403, is
available as an optional accessory. [t is not included
with the pressure washer.
CAUTION
* Failure to do so will permanently damage your pump
and render your unit inoperable,
, Freeze damage is not covered under warranty.
To use the pump saver:
,_ CAUTION
Always wear eye protection when using PumpSaver.
1. Attach hose on pump saver can to pump inlet.
2. Push in can top to dispense pump saver.
3. When pump saver fluid begins to exit pump outlet,
the pump is protected.
4. Remove pump saver from pump inlet.
OTHER
DO NOT store fuel from one season to another.
If possible, store your unit indoors and cover it to
give protection from dust and dirt. BE SURE TO
EMPTY THE FUEL TANK.
IMPORTANT: NEVER cover your pressure washer
while engine and exhaust area are warm.
19
Problem
Pump has followingproblems:
failuretoproduce pressure,erratic
pressure, chattering, loss of
pressure_ low water volume.
Detergent fails to mix with spray.
Engine runs good at noqoad but
"bogs" when load is added.
Engine wHI not start; or starts and
runs rough.
Cause
1. Nozzle in low pressure mode.
2. Water inlet is blocked.
3. inadequate water supply.
4. inlet hose is kinked or leaking.
5. Clogged inlet hose strainer.
6. Water supply is over 100°F.
7. High pressure hose is blocked
or leaks.
8. Gun leaks.
9. Nozzle is obstructed.
10. Pump is faulty.
1. Detergent siphoning tube is not
submerged.
2. Chemical filter is clogged or
cracked.
3. Dirty in=linefilter.
4. Nozzle is in high pressure
mode.
Engine speed is too slow.
1. Low oil level.
2. Dirty air cleaner.
3. Out of gasoline.
4. Stale gasoline.
5. Spark plug wire not connected
Correction
1. Pull nozzle backward for high
pressure mode.
2. Clear inlet.
3. Provide adequate water flow.
4. Straighten inlet hose, patch
leak.
5. Check and clean inlet hose
strainer.
6. Provide cooler water supply.
7. Clear blocks in outlet hose.
8. Replace gun.
9. Clean nozzle.
10. Contact Sears service facility.
1. insert detergent siphoning tube
into detergent.
2. Clean or replace filter/detergent
siphoning tube.
3. See "Check In=Line Filter".
4. Push nozzle forward for low
pressure mode.
Move throttle control to FAST
position. If engine still "bogs down",
contact Sears service facility.
1. Fill crankcase to proper level.
2. Clean or replace air cleaner.
3. Fill fuel tank.
4. Drain gas tank; fill with fresh
fuel.
5. Connect wire to spark plug.
to spark plug.
6. Bad spark plug.
7. Water in gasoline.
8. Overchoking.
6. Replace spark plug.
7. Drain gas tank; fill with fresh
fuel.
8. Open choke fully and crank
engine.
9. Excessively rich fuel mixture.
10. Intake valve stuck open or
closed.
11. Engine has lost compression.
Out of gasoline.
9. Contact Sears service facility.
10. Contact Sears service facility.
11. Contact Sears service facility.
Engine shuts down during Fill fuel tank.
operation.
Engine lacks power. Dirty air filter.
Choke is opened too soon.Engine "hunts" or falters.
Replace air filter.
Move choke to halfway position until
engine runs smoothly.
2O
  • Page 1 1
  • Page 2 2
  • Page 3 3
  • Page 4 4
  • Page 5 5
  • Page 6 6
  • Page 7 7
  • Page 8 8
  • Page 9 9
  • Page 10 10
  • Page 11 11
  • Page 12 12
  • Page 13 13
  • Page 14 14
  • Page 15 15
  • Page 16 16
  • Page 17 17
  • Page 18 18
  • Page 19 19
  • Page 20 20
  • Page 21 21
  • Page 22 22
  • Page 23 23
  • Page 24 24
  • Page 25 25
  • Page 26 26
  • Page 27 27
  • Page 28 28
  • Page 29 29
  • Page 30 30
  • Page 31 31
  • Page 32 32
  • Page 33 33
  • Page 34 34
  • Page 35 35
  • Page 36 36
  • Page 37 37
  • Page 38 38
  • Page 39 39
  • Page 40 40
  • Page 41 41
  • Page 42 42
  • Page 43 43
  • Page 44 44
  • Page 45 45
  • Page 46 46
  • Page 47 47
  • Page 48 48
  • Page 49 49
  • Page 50 50
  • Page 51 51
  • Page 52 52

Craftsman 580.7524 User manual

Category
High-pressure cleaners
Type
User manual
This manual is also suitable for

Ask a question and I''ll find the answer in the document

Finding information in a document is now easier with AI

in other languages