Maytag MQF1656TEW User manual

Category
Freezers
Type
User manual

This manual is also suitable for

VERTICAL FREEZER
Use & Care Guide
For questions about features, operation/performance, parts, accessories or service, call: 1-800-688-9900, or visit our website at www.maytag.com
In Canada, for assistance or service call: 1-800-807-6777, or visit our website at www.maytag.ca
CONGÉLATEUR VERTICAL
Guide d’utilisation et d’entretien
Au Canada, pour assistance ou service, composer le 1-800-807-6777 ou visitez notre site web à... www.maytag.ca
Table of Contents/Table des matières................................2
W10326798C
2
TABLE OF CONTENTS
FREEZER SAFETY .........................................................................3
Proper Disposal of Your Old Freezer or Refrigerator ..................3
INSTALLATION INSTRUCTIONS..................................................4
Unpacking ....................................................................................4
Location Requirements................................................................4
Electrical Requirements ...............................................................5
Freezer Door.................................................................................5
Adjust the Door ............................................................................8
FREEZER USE................................................................................8
Ensuring Proper Air Circulation....................................................8
Using the Control .........................................................................8
Key Eject Lock .............................................................................8
FREEZER FEATURES....................................................................9
Refrigerated Shelves....................................................................9
Door Bin........................................................................................9
Storage Basket.............................................................................9
Storage Gate ................................................................................9
FREEZER CARE .............................................................................9
Cleaning Your Frost-Free Freezer................................................9
Base Grille ..................................................................................10
Defrosting and Cleaning Your Manual Defrost Freezer.............10
Changing the Light Bulb.............................................................11
Power Interruptions....................................................................11
Moving Care ...............................................................................11
TROUBLESHOOTING ..................................................................11
ASSISTANCE OR SERVICE.........................................................13
In the U.S.A. ...............................................................................13
In Canada ...................................................................................13
Accessories ................................................................................13
WARRANTY ..................................................................................14
TABLE DES MATIÈRES
SÉCURITÉ DU CONGÉLATEUR .................................................15
Mise au rebut appropriée de votre
vieux congélateur ou réfrigérateur .............................................15
INSTRUCTIONS D'INSTALLATION ............................................16
Déballage....................................................................................16
Emplacement d’installation........................................................16
Spécifications électriques..........................................................17
Portes du congélateur................................................................17
Ajustement de porte...................................................................20
UTILISATION DU CONGÉLATEUR.............................................20
Pour s’assurer d’une circulation d’air appropriée .....................20
Utilisation de la commande .......................................................20
Serrure à éjection de clé ............................................................21
CARACTÉRISTIQUES DU CONGÉLATEUR...............................21
Clayettes de réfrigération ...........................................................21
Balconnet de porte.....................................................................21
Panier d'entreposage.................................................................21
Barrière d’entreposage...............................................................21
ENTRETIEN DU CONGÉLATEUR ...............................................22
Nettoyage du congélateur sans givre ........................................22
Grille de la base..........................................................................22
Dégivrage et nettoyage du congélateur à dégivrage manuel....22
Remplacement de l'ampoule d’éclairage ..................................23
Pannes de courant électrique ....................................................24
Déménagement..........................................................................24
DÉPANNAGE.................................................................................24
ASSISTANCE OU SERVICE.........................................................26
Accessoires ................................................................................26
GARANTIE.....................................................................................27
3
FREEZER SAFETY
Proper Disposal of
Your Old Freezer or Refrigerator
IMPORTANT: Child entrapment and suffocation are not problems
of the past. Junked or abandoned freezers or refrigerators are still
dangerous... even if they will sit for “just a few days.” If you are
getting rid of your old refrigerator or freezer, please follow these
instructions to help prevent accidents.
Before You Throw Away Your Old Freezer or Refrigerator:
Take off the doors or lid.
Leave the shelves in place so that children may not easily
climb inside.
You can be killed or seriously injured if you don't immediately
You
can be killed or seriously injured if you don't
follow
All safety messages will tell you what the potential hazard is, tell you how to reduce the chance of injury, and tell you what can
happen if the instructions are not followed.
Your safety and the safety of others are very important.
We have provided many important safety messages in this manual and on your appliance. Always read and obey all safety
messages.
This is the safety alert symbol.
This symbol alerts you to potential hazards that can kill or hurt you and others.
All safety messages will follow the safety alert symbol and either the word “DANGER” or “WARNING.”
These words mean:
follow instructions.
instructions.
DANGER
WARNING
IMPORTANT SAFETY INSTRUCTIONS
To reduce the risk of fire, electric shock, or injury when using your freezer, follow these basic precautions:
WARNING:
SAVE THESE INSTRUCTIONS
Plug into a grounded 3 prong outlet.
Do not remove ground prong.
Do not use an adapter.
Do not use an extension cord.
Disconnect power before servicing.
Replace all parts and panels before operating.
Use nonflammable cleaner.
Keep flammable materials and vapors, such as gasoline,
away from freezer.
Use two or more people to move and install freezer.
Keep key away from children.
Remove doors or lid from your old freezer or refrigerator.
Disconnect power before installing ice maker (on ice maker
kit ready models only).
State of California Proposition 65 Warnings:
WARNING: This product contains one or more chemicals known to the State of California to cause cancer.
WARNING: This product contains one or more chemicals known to the State of California to cause birth defects or other
reproductive harm.
WARNING
Suffocation Hazard
Remove doors or lid from your old freezer or
refrigerator.
Failure to do so can result in death or brain damage.
4
INSTALLATION INSTRUCTIONS
Unpacking
Remove Packaging Materials
Remove tape and glue residue from surfaces before turning
on the freezer. Rub a small amount of liquid dish soap over
the adhesive with your fingers. Wipe with warm water and
dry.
Do not use sharp instruments, rubbing alcohol, flammable
fluids, or abrasive cleaners to remove tape or glue. These
products can damage the surface of your freezer. For more
information, see “Freezer Safety.”
Clean Before Using
After you remove all of the packaging materials, clean the inside
of your freezer before using it. See the cleaning instructions in
“Freezer Care.”
Location Requirements
IMPORTANT: Do not install the freezer near an oven, radiator, or
other heat source, nor in a location where the temperature will fall
below 40°F (5°C).
Check the strength of the floor before installing your freezer. It
should hold the weight of a freezer fully loaded with food.
Allow at least 3" (7.5 cm) of air space at the top and on both sides
of the freezer and 1" (2.5 cm) between the back of the freezer and
the wall. If the freezer is to be against a wall, leave extra space on
the hinge side so the door can open wider.
NOTE: This freezer may be installed side by side with another
refrigerator or freezer. Allow for a 3" (7.5 cm) clearance at the top
and sides and a ¹⁄₄" (0.64 cm) clearance between the appliances.
WARNING
Excessive Weight Hazard
Use two or more people to move and install freezer.
Failure to do so can result in back or other injury.
When Moving Your Freezer:
Your freezer is heavy. When moving the freezer for
cleaning or service, be sure to cover the floor with cardboard
or hardboard to avoid floor damage. Always pull the freezer
straight out when moving it. Do not wiggle or “walk” the
freezer when trying to move it, as floor damage could occur.
Important information to know about glass shelves
and covers:
Do not clean glass shelves or covers with warm water when
they are cold. Shelves and covers may break if exposed to
sudden temperature changes or impact, such as bumping.
Tempered glass is designed to shatter into many small,
pebble-size pieces. This is normal. Glass shelves and covers
are heavy. Use both hands when removing them to avoid
dropping.
WARNING
Explosion Hazard
Keep flammable materials and vapors, such as
gasoline, away from freezer.
Failure to do so can result in death, explosion, or fire.
3" (7.5 cm)
3" (7.5 cm)
5
Electrical Requirements
Before you move your freezer into its final location, it is important
to make sure you have the proper electrical connection.
Recommended grounding method
A 115 volt, 60 Hz., AC only, 15- or 20-amp fused, grounded
electrical supply is required. It is recommended that a separate
circuit serving only your freezer be provided. Use an outlet that
cannot be turned off by a switch. Do not use an extension cord.
NOTE: Before performing any type of installation, cleaning, or
removing a light bulb, turn the Temperature Control to the OFF
position as shown and then disconnect the freezer from the
electrical source.
Freezer Door
TOOLS NEEDED: ⁵⁄₈" hex head socket wrench, ¹⁄₄" hex head
socket wrench, ¹⁄₂" hex head socket wrench, ³⁄₈" hex head socket
wrench, #2 Phillips screwdriver, flat-blade screwdriver, ⁵⁄₁₆" open-
end wrench, flat 2" putty knife.
IMPORTANT:
All graphics referenced in the following instructions are
included later in this section after “Final Steps.” The graphics
shown are for a right-hand swing door (hinges factory
installed on the right).
If you only want to remove and replace the door, see
“Remove Door and Hinges” and “Replace Door and Hinges.”
Before you begin, turn the control OFF, and remove food and
adjustable door or utility bins from door.
Install and Remove Handle
NOTE: If reversing the door swing, move the handle from one
side of the door to the other side.
To install handle:
1. Place the handle on the door as shown. See Handle graphic.
2. Using a flat-blade screwdriver, attach the handle to the door
with the four handle screws (provided).
3. Place the trim pieces on the upper and lower handle ends as
shown.
4. Apply firm pressure with your hand on the face of the trim.
Slide the top trim down and the bottom trim up toward the
handle.
To remove handle:
1. Remove the top and bottom trim.
2. Using a flat-blade screwdriver remove the four handle screws
and lift off the handle.
Remove Door and Hinges
⁵⁄₁₆
" Hex Head Hinge Screw
1. Unplug freezer or disconnect power.
2. Open freezer door and remove base grille from the bottom
front of the freezer. See Base Grille graphic 1A.
3. Close the freezer door and keep it closed until you are ready
to lift it free from the cabinet.
NOTE: Provide additional support for the door while the
hinges are being moved. Do not depend on the door magnets
to hold the door in place while you are working.
4. Remove the parts for the top hinge as shown in Top Hinge
graphic 1B.
5. Lift the freezer door free from the lower hinge and cabinet and
set aside.
6. Remove three hex head hinge screws and bottom hinge
assembly. See Bottom Hinge graphic 1C.
Electrical Shock Hazard
Plug into a grounded 3 prong outlet.
Do not remove ground prong.
Do not use an adapter.
Do not use an extension cord.
Failure to follow these instructions can result in death,
fire, or electrical shock.
WARNING
6
Reverse Door (optional on some models)
IMPORTANT: If you want to reverse your door so that it opens in
the opposite direction, continue with “Reverse Door (optional on
some models)” instructions. If you are not reversing the door, see
“Replace Door and Hinges.”
Cabinet
1. Remove the cabinet hinge hole plugs from the cabinet top
and move them to the opposite side hinge holes as shown in
Graphic 2.
2. Remove the door stop screws from the Bottom Hinge
bracket. See Bottom Hinge graphic 1C.
3. Remove the Hinge Pin Nut and Hinge Pin from the hinge
bracket.
4. Rotate the hinge bracket for installation on the opposite side
of the cabinet. See Graphic 3.
5. Reinstall the Hinge Pin Nut and Hinge Pin to the hinge
bracket. Hinge Pin must point “up” when hinge bracket is
installed to the cabinet.
6. Invert the door stop so that the countersunk holes line up
with the screw holes in the hinge assembly. See Graphic 4.
7. Reinstall the door stop screws. See Graphic 3.
8. Reinstall the hinge bracket to the cabinet with the three hex
head hinge screws.
Door
1. Remove the three hinge leaf screws that fasten a hinge leaf to
both the top and bottom of the door. See Graphic 5.
2. Remove the hinge leaf from the top of the door and from the
bottom of the door, and transfer them to the opposite side.
3. Fasten the hinge leaf to the door using the hinge leaf screws
removed in Step 1.
Replace Door and Hinges
NOTE: Graphic may be reversed if door swing is reversed.
1. Replace the parts for the bottom hinge as shown and tighten
screws. See Bottom Hinge graphic 1C. Replace the freezer
door.
NOTE: Provide additional support for the door while the
hinges are being moved. Do not depend on the door magnets
to hold the door in place while you are working.
2. Assemble the parts of the top hinge as shown in the Top
Hinge graphic 1B. Do not tighten the screws completely.
3. Line up the door so that the bottom aligns evenly with the
cabinet. Tighten all screws.
Final Steps
1. Check all holes to make sure that hole plugs and screws are
in place. Reinstall top hinge cover. See Top Hinge graphic 1B.
2. Replace the base grille. See Base Grille graphic 1A.
3. Plug into a grounded 3 prong outlet.
4. Reset the control. See “Using the Control.”
5. Return all removable door parts to door and food to freezer.
Electrical Shock Hazard
Plug into a grounded 3 prong outlet.
Do not remove ground prong.
Do not use an adapter.
Do not use an extension cord.
Failure to follow these instructions can result in death,
fire, or electrical shock.
WARNING
7
A. Cabinet Hinge Hole Plugs
A
6
Door Handle
Seal Screw
Door Swing Reversal (optional)
Door Removal &
Replacement
Top Hinge
Bottom Hinge
A. Top Hinge Cover
B.
3
/
8
"
Hex-Head Hinge Screws
C. Top Hinge
A
B
C
Base Grille
2
C. Hinge Pin
A. Door Stop Screws
B. Door Stop
E.
5
/
8
"
Hex-Head Hinge Screws
D. Hinge Pin Nut
C
D
E
A
B
1A
1B
1C
4
Right Hand Hinge
Door Stop
Left Hand Hinge
Door Stop
A. Door Stop Screws
B. Door Stop
C. Hinge Pin
E.
5
/
8
"
Hex-Head Hinge
Screws
D. Hinge Pin Nut
C
D
E
A
B
3
A. Handle Trim
B. Handle Screws
C. Handle
1
Handle
C
B
A
A
B
A. Hinge Leaf Screws
B. Hinge Leaf
5
B
A
8
Adjust the Door
1. Locate the two front leveling legs taped among the packing
materials.
2. Screw these legs into the front holes on the bottom of the
freezer. The back of the freezer rests on two fixed supports.
3. Adjust the front legs enough to lift the cabinet up off of the
floor.
NOTE: If your model is equipped with rollers, the front legs
should be lowered enough to lift the rollers off of the floor to
ensure the freezer does not roll forward when the door is
opened.
4. Place a leveling tool on top of the freezer first side to side,
then front to back. Turn leg counterclockwise to raise a
corner. Turn leg clockwise to lower a corner.
5. Repeat Step 4 until freezer is level.
6. After freezer is fully loaded with food, recheck with level as in
Step 4.
FREEZER USE
Ensuring Proper Air Circulation
In order to ensure proper temperature, you need to permit proper
airflow in the freezer. As shown in the illustration, cool air enters
through the freezer wall and moves down. The air then
recirculates through the vent near the bottom.
Do not block any of these vents with food packages. If the vents
are blocked, airflow will be restricted, and temperature and
moisture problems may occur.
IMPORTANT: To avoid odor transfer and drying out of food, wrap
or cover foods tightly.
Using the Control
Turn the freezer temperature control to 4. This setting is designed
to maintain the temperature at or near 0°F (-17.8°C) under normal
operating conditions.
Allow the freezer to cool 6 to 8 hours before filling with frozen
food. Let the freezer cool overnight before adding large amounts
of unfrozen food. Do not add more than 2 to 3 lbs (907 to 1,350 g)
of unfrozen food per cubic foot (28.32 L) of freezer space.
NOTE: When the freezer is first started, the compressor will run
constantly until the freezer is cooled. It may take up to 6 or
8 hours (or longer), depending on room temperature and the
number of times the freezer door is opened. After the freezer is
cooled, the compressor will turn on and off as needed to keep
the freezer at the proper temperature.
The outside of your freezer may feel warm. This is normal. The
freezer’s design and main function is to remove heat from the
contents and air inside the freezer. The heat is transferred to the
room air, making the outside of the freezer feel warm.
Adjusting Control
Turn control to a higher number for colder temperatures.
Turn control to a lower number for less cold temperatures.
NOTE: The small snowflake icon represents the number 1 or
the least cold setting. The large snowflake icon represents
6 or the coldest setting.
Fast Freeze (on some models)
This setting causes the freezer to run continuously, driving the
freezer temperature to the coldest possible temperature. To
activate, adjust the control knob to the igloo icon, which
represents the fast freeze setting. Use this feature just before
adding large amounts of unfrozen foods. For best food quality, do
not exceed 3 lbs (1,350 g) per cubic foot (28.32 L). Return to your
normal setting after 24 to 48 hours.
Key Eject Lock
(on some models)
To lock or unlock the freezer, you must hold the key in the lock
while turning. The lock is spring loaded, so the key cannot be left
in the lock.
If the key is lost, contact your dealer for a replacement. Always
give the model and serial number of your freezer when requesting
a replacement key.
9
FREEZER FEATURES
This manual covers several different models. The freezer you
have purchased may have some or all of the items listed. The
locations of the features may not match those of your model.
Refrigerated Shelves
(on some models)
Your freezer is equipped with refrigerated interior shelves.
Packages in direct contact with the shelves will have the best
refrigeration. Fresh, unfrozen food packages should be stored
directly on the shelves and not on top of already frozen food
packages.
When placing the food packages in your freezer, please
remember:
The cabinet shelves have the best freezing capability. The
door shelves and the bottom of the cabinet have a slightly
less cold temperature. Therefore, packages sensitive to
temperature (meat, poultry, etc.) should not be placed on the
door shelves or the freezer bottom.
Leave some space between the food packages so that cold
air can pass over and around them.
Door Bin
To remove and replace the bin:
1. Remove the bin by tipping the front of the bin forward and
sliding out.
2. Replace the bin by sliding it in above the desired support
tilting it back into place.
Storage Basket
(on some models)
The slide out basket provides separate storage space for items
that are difficult to store on freezer shelves. To remove the
basket, pull out and lift up.
Storage Gate
(on some models)
To Lower and Raise the Storage Gate:
1. Lift the top of the gate up slightly, out of the supports. Pull the
gate forward and down.
2. Return the gate to the upright position. Lift the top of the gate
slightly to clear the supports. Lower the gate into the
supports.
FREEZER CARE
Cleaning Your Frost-Free Freezer
(some models)
Frost-free means that you will not have to defrost your freezer.
Frost is removed by air moving and collecting any moisture and
depositing it on the cooling coil. The cooling coil periodically
warms up enough to melt the frost, and it then flows down to the
drain pan (located behind the base grille) where it is evaporated.
Complete cleaning should be done at least once a year.
1. Unplug freezer or disconnect power.
2. Remove all frozen food. Wrap frozen food in several layers of
newspaper and cover with a blanket. Food will stay frozen for
several hours. You may also store frozen food in a cooler,
additional refrigerator-freezer, or in a cool area.
3. Wash the inside walls with a solution of mild detergent in
warm water or 2 tbs (26 mg) baking soda to 1 qt (0.95 L)
warm water.
Do not use abrasive or harsh cleaners such as window
sprays, scouring cleansers, flammable fluids, cleaning
waxes, concentrated detergents, bleaches or cleansers
containing petroleum products on plastic parts, interior
and door liners or gaskets. Do not use paper towels,
scouring pads, or other harsh cleaning tools. These can
scratch or damage materials.
4. Rinse well and wipe dry with a clean soft cloth.
5. Use the appropriate cleaning method for your exterior finish.
Painted metal: Wash exteriors with a clean sponge or soft
cloth and a mild detergent in warm water. Do not use abrasive
or harsh cleaners, or cleaners designed for stainless steel.
Dry thoroughly with a soft cloth.
WARNING
Explosion Hazard
Use nonflammable cleaner.
Failure to do so can result in death, explosion, or fire.
10
Stainless steel finish: Wash with a clean sponge or soft
cloth and a mild detergent in warm water. Do not use abrasive
or harsh cleaners. Dry thoroughly with a soft cloth.
To keep your stainless steel refrigerator looking like new
and to remove minor scuffs or marks, it is suggested that
you use the manufacturer’s approved Stainless Steel
Cleaner and Polish.
IMPORTANT: This cleaner is for stainless steel parts only!
Do not allow the Stainless Steel Cleaner and Polish to
come into contact with any plastic parts such as the trim
pieces, dispenser covers or door gaskets. If unintentional
contact does occur, clean plastic part with a sponge and
mild detergent in warm water. Dry thoroughly with a soft
cloth.
6. Replace all frozen food.
7. Plug in freezer or reconnect power.
8. See “Using the Control.”
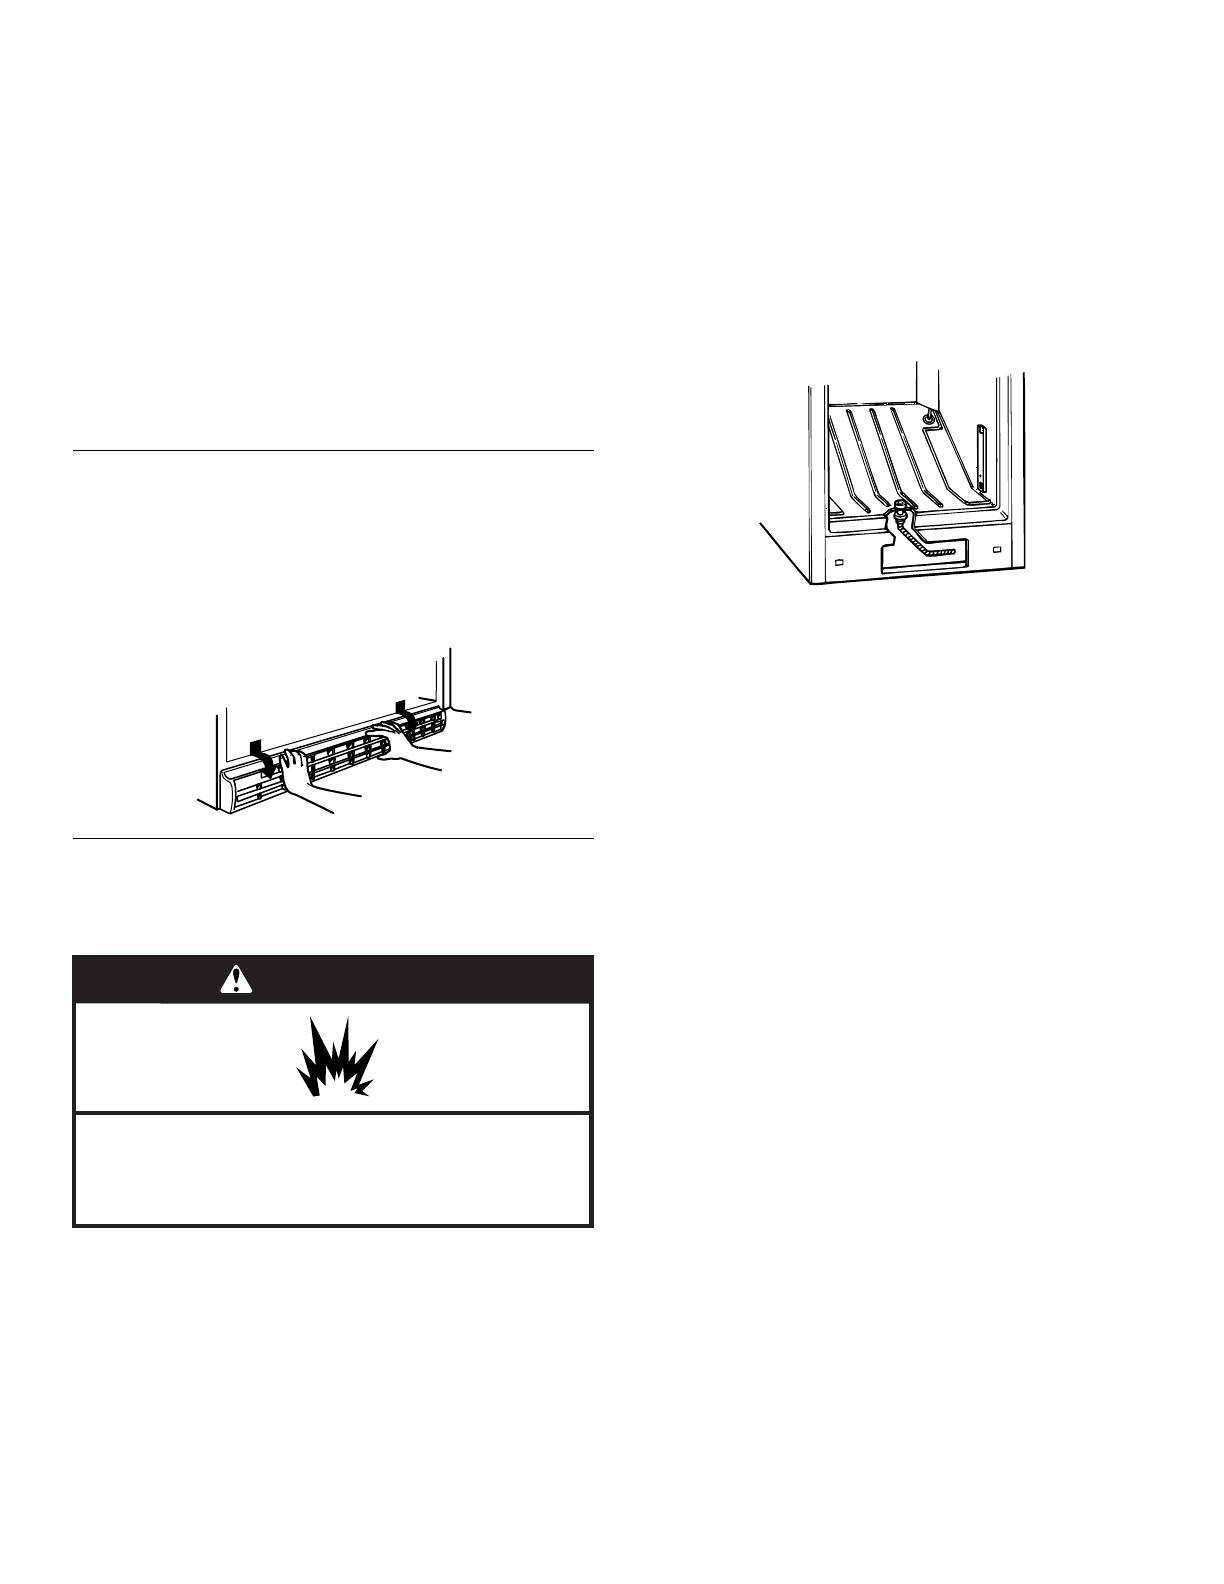
Base Grille
To Remove and Replace the Base Grille:
1. Open the freezer door and remove the base grille by pulling
down and out from the top.
2. Replace the base grille by putting the clips in the openings in
the refrigerator panel. Push in until the base grille snaps into
place.
Defrosting and Cleaning
Your Manual Defrost Freezer
(some models)
Defrost and clean your freezer when frost has built up to about
¹⁄₄" (6 mm) thickness. Complete defrosting and cleaning should
be done at least once a year. In high humidity areas, a freezer
may need more frequent defrosting and cleaning.
Do not use abrasive cleaners on your freezer. Do not use cleaning
waxes, concentrated detergents, bleaches, or cleaners
containing petroleum on plastic parts. Damage can occur.
NOTE: The drain cap must be removed before defrosting the
freezer and replaced securely afterward.
1. Unplug freezer or disconnect power.
2. Remove all frozen food. Wrap frozen food in several layers of
newspaper and cover with a blanket. Food will stay frozen for
several hours. You may also store frozen food in a cooler, an
additional refrigerator or freezer, or a cool area.
3. Remove base grille. See “Base Grille.”
4. Style 1–Models with a drain system
Reach under the unit and pull the drain hose out through the
opening. The drain hose carries defrost water out of the
freezer, and through the area behind the base grille. Place a
large shallow pan under the drain hose. Remove the drain
cap inside freezer.
NOTE: Check the drain pan frequently to avoid water
overflow. Have a second pan handy for easier emptying.
Style 2–Models without a drain system
Remove water from the freezer bottom using a sponge or
baster and empty the water into a large pan.
5. Place pans of hot water in freezer with door open to speed
melting. Directing air from an electric fan into freezer will also
help. Do not place fan or any electrical device in freezer.
6. Use a plastic scraper to remove frost.
NOTE: Do not use an ice pick, knife, or other sharp-pointed
tool to defrost freezer. Damage can occur.
7. Wipe water from walls with a towel or sponge.
8. Wash the inside walls with a solution of mild detergent in
warm water or 2 tbs (26 mg) baking soda to 1 qt (0.95 L)
warm water. Do not use abrasive or harsh cleaners.
9. Rinse well and wipe dry with a clean soft cloth.
10. Use the appropriate cleaning method for your exterior finish.
Painted metal: Wash exteriors with a clean sponge or soft
cloth and a mild detergent in warm water. Do not use abrasive
or harsh cleaners, or cleaners designed for stainless steel.
Dry thoroughly with a soft cloth.
Stainless steel finish: Wash with a clean sponge or soft
cloth and a mild detergent in warm water. Do not use abrasive
or harsh cleaners, or cleaners designed for stainless steel.
Dry thoroughly with a soft cloth.
To keep your Stainless Steel refrigerator looking like new
and to remove minor scuffs or marks, it is suggested that
you use the manufacturer’s approved Stainless Steel
Cleaner and Polish.
IMPORTANT: This cleaner is for Stainless Steel parts only!
Do not allow the Stainless Steel Cleaner and Polish to
come into contact with any plastic parts such as the trim
pieces, dispenser covers or door gaskets. If unintentional
contact does occur, clean plastic part with a sponge and
mild detergent in warm water. Dry thoroughly with a soft
cloth. To order the cleaner, see “Accessories.”
11. For models with a drain system, you should replace the drain
hose, drain cap and base grille.
12. Replace all frozen food.
13. Plug in freezer or reconnect power.
14. See “Using the Control.
WARNING
Explosion Hazard
Use nonflammable cleaner.
Failure to do so can result in death, explosion, or fire.
11
Changing the Light Bulb
NOTE: Not all appliance bulbs will fit your freezer. Be sure to
replace the bulb with one of the same size, shape, and wattage.
Style 1
1. Unplug freezer or disconnect power.
2. Replace the light bulb with an appliance bulb of the same
wattage.
3. Plug in freezer or reconnect power.
Style 2
1. Unplug freezer or disconnect power.
2. Remove the light shield. From the front of the light shield,
push backward and down.
3. Replace the light bulb with an appliance bulb of the same
wattage.
4. Replace the light shield.
5. Plug in freezer or reconnect power.
Power Interruptions
If the power will be out for 24 hours or less, keep the door closed
to help food stay cold and frozen.
If the power will be out for more than 24 hours, do one of the
following:
Remove all frozen food and store it in a frozen food locker.
If a food locker is not available, consume or can perishable
food at once.
After the power is restored, unplug the freezer for 30 minutes, to
allow the refrigeration system to equalize. During this time keep
the door closed whenever possible.
REMEMBER: A full freezer stays cold longer than a partially filled
one. A freezer full of meat stays cold longer than a freezer full of
baked goods. If you see that food contains ice crystals, it may be
refrozen, although the quality and flavor may be affected. If the
condition of the food is poor, dispose of it.
Moving Care
When you are moving your freezer to a new home, follow these
steps to prepare it for the move.
1. Remove all frozen food.
2. Unplug the freezer.
3. Take out all removable parts, wrap them well, and tape them
together so they don’t shift and rattle during the move.
4. Clean the freezer thoroughly.
5. Tape the freezer shut and tape the electrical cord to the
cabinet.
When you get to your new home, refer to the “Installation
Instructions” and “Freezer Use” sections for information on
installation and setting the controls.
TROUBLESHOOTING
Try the solutions suggested here first to avoid the cost of an unnecessary service call...
Your freezer will not operate
Is the power supply cord unplugged? Plug into a grounded
3 prong outlet.
Has a household fuse blown or circuit breaker tripped?
Replace the fuse or reset the circuit breaker.
Is the Temperature Control turned to the OFF position?
See “Using the Control.
Is the freezer defrosting (on some models)? Recheck to
see whether the freezer is operating in 30 minutes. Your
freezer will regularly run an automatic defrost cycle.
Electrical Shock Hazard
Plug into a grounded 3 prong outlet.
Do not remove ground prong.
Do not use an adapter.
Do not use an extension cord.
Failure to follow these instructions can result in death,
fire, or electrical shock.
WARNING
12
The lights do not work
Is the power supply cord unplugged? Plug into a grounded
3 prong outlet.
Is a light bulb loose in the socket or burned out? See
“Changing the Light Bulb.
There is water in the defrost drain pan (on some models)
Is the freezer defrosting? The water will evaporate. It is
normal for water to drip into the defrost pan.
Is it more humid than normal? When it is humid, expect that
the water in the defrost pan will take longer to evaporate.
The motor seems to run too much
Is there excessive frost or a package keeping the door
from closing? Defrost and clean the freezer, or move the
package so the door closes properly.
Is the room temperature hotter than normal? The motor
will run longer under warm conditions. At normal room
temperatures, your motor will run about 40% to 80% of the
time. Under warmer conditions, it will run even more.
Has a large amount of food just been added to the
freezer? Adding a large amount of food warms the freezer.
The motor normally will run longer to cool the freezer back
down.
Is the door opened often? The motor will run longer when
this occurs. Conserve energy by getting all items out at one
time, keeping food organized, and closing the door as soon
as possible.
Is the control set correctly for the surrounding
conditions? See “Using the Control.”
Is the door completely closed? Push the door firmly shut. If
it will not shut all the way, see “The door will not close
completely or is difficult to open” later in this section.
Are the condenser coils dirty (on some models)? This
blocks air transfer and makes the motor work harder. Clean
the condenser coils. See “Freezer Care.”
Is the door gasket sealed all the way around? Contact a
qualified person or a technician.
Is there enough air circulation space around the freezer?
See “Location Requirements.”
NOTE: If the problem is not due to any of the above,
remember that your new freezer will run longer than your old
one due to its high-efficiency motor.
The ice maker is not producing ice or not enough ice
(on some models)
Has the ice maker just been installed? Wait 72 hours for full
ice production to begin. Once your freezer is cooled, the ice
maker should produce 70-120 cubes every 24 hours.
Is the freezer temperature cold enough to produce ice?
Wait 24 hours after hookup for ice production. See “Using the
Control.”
Is the wire shutoff arm in the OFF (arm up) position?
Lower the wire shutoff arm to the ON (arm down) position.
See “Ice Maker.
Is the water line shutoff valve to the freezer turned on?
Turn on the water valve. See “Connect the Water Supply.”
Does the ice maker mold have water in it or has no ice
been produced? Be sure your freezer has been connected to
a water supply and the supply shutoff valve is turned on. See
“Connect the Water Supply.”
Is an ice cube jammed in the ejector arm? Remove the ice
from the ejector arm with a plastic utensil. See “Ice Maker.”
Has a large amount of ice just been removed? Allow
24 hours for ice maker to produce more ice.
Is the control set correctly? If too little ice is produced, see
“Using the Control.”
NOTE: If not due to any of the above, there may be a problem
with the water line. Call for service.
Off-taste, odor or gray color in the ice (on some models)
Are the plumbing connections new, causing discolored or
off-flavored ice? Discard the first few batches of ice.
Have the ice cubes been stored too long? Throw old ice
away and make a new supply.
Do the freezer and ice bin need to be cleaned? See
“Freezer Care.”
Does the water contain minerals (such as sulfur)? A filter
may need to be installed to remove the minerals.
Electrical Shock Hazard
Plug into a grounded 3 prong outlet.
Do not remove ground prong.
Do not use an adapter.
Do not use an extension cord.
Failure to follow these instructions can result in death,
fire, or electrical shock.
WARNING
WARNING
Explosion Hazard
Use nonflammable cleaner.
Failure to do so can result in death, explosion, or fire.
13
Temperature is too warm
Are the air vents blocked? Move objects away from the air
vents. See “Ensuring Proper Air Circulation” for air vent
locations.
Is the door opened often? Be aware that the freezer will
warm when this occurs. In order to keep the freezer cool, try
to get everything you need out of the freezer at once, keep
food organized so it is easy to find, and close the door as
soon as the food is removed.
Has a large amount of food just been added to the
freezer? Adding a large amount of food warms the freezer. It
can take several hours for the freezer to return to the normal
temperature.
Is the control set correctly for the surrounding
conditions? See “Using the Control.”
The door will not close completely or is difficult to open
Are food packages blocking the door? Rearrange
containers so that they fit more tightly and take up less
space.
Are the shelves and basket out of position (on some
models)? Put the shelves and basket back into their correct
positions.
Are the gaskets dirty or sticky? Clean gaskets according to
the directions in “Freezer Care.”
Does the freezer wobble or seem unstable? See “Adjust
the Door.”
The freezer clicks but does not run
Has the local power failed? Unplug the freezer for
30 minutes to allow the refrigeration system to equalize.
During this time, keep the door closed whenever possible.
ASSISTANCE OR SERVICE
Before calling for assistance or service, please check
“Troubleshooting.” It may save you the cost of a service call. If
you still need help, follow the instructions below.
When calling, please know the purchase date and the complete
model and serial number of your appliance. This information will
help us to better respond to your request.
If You Need Replacement Parts
If you need to order replacement parts, we recommend that you
only use factory specified replacement parts. Factory specified
replacement parts will fit right and work right because they are
made with the same precision used to build every new Maytag
®
appliance.
To locate factory specified replacement parts in your area, call us
or your nearest designated service center.
In the U.S.A.
For assistance, installation or service call Maytag
®
Appliances toll
free: 1-800-688-9900.
Our consultants provide assistance with:
Features and specifications on our full line of appliances.
Installation information.
Use and maintenance procedures.
Accessory and repair parts sales.
Specialized customer assistance (Spanish speaking, hearing
impaired, limited vision, etc.).
Referrals to local dealers, repair parts distributors, and
service companies. Maytag
®
designated service technicians
are trained to fulfill the product warranty and provide after-
warranty service, anywhere in the United States.
To locate the Maytag
®
designated service company in your
area, you can also look in your telephone directory Yellow
Pages.
For Further Assistance
If you need further assistance, you can write to Maytag with any
questions or concerns at:
Maytag Brand Home Appliances
Customer eXperience Center
553 Benson Road
Benton Harbor, MI 49022-2692
Please include a daytime phone number in your correspondence.
In Canada
For assistance, installation or service call toll free:
1-800-807-6777.
Our consultants provide assistance with:
Features and specifications on our full line of appliances.
Use and maintenance procedures.
Accessory and repair parts sales.
Referrals to local dealers, repair parts distributors, and
service companies. Maytag
®
designated service technicians
are trained to fulfill the product warranty and provide after-
warranty service, anywhere in Canada.
For Further Assistance
If you need further assistance, you can write to Maytag with any
questions or concerns at:
Maytag Brand Home Appliances
Customer eXperience Center
200 – 6750 Century Ave.
Mississauga, ON L5N 0B7
Please include a daytime phone number in your correspondence.
Accessories
To order accessories, call 1-800-688-9900 or contact your
authorized Maytag dealer. In Canada, call 1-800-807-6777.
WARNING
Explosion Hazard
Use nonflammable cleaner.
Failure to do so can result in death, explosion, or fire.
14
MAYTAG
®
MAJOR APPLIANCE WARRANTY
LIMITED WARRANTY
For one year from the date of purchase, when this major appliance is operated and maintained according to instructions attached to or
furnished with the product, Maytag brand of Whirlpool Corporation or Whirlpool Canada LP (hereafter “Maytag”) will pay for factory
specified parts and repair labor to correct defects in materials or workmanship that existed when this major appliance was purchased.
Service must be provided by a Maytag designated service company. YOUR SOLE AND EXCLUSIVE REMEDY UNDER THIS LIMITED
WARRANTY SHALL BE PRODUCT REPAIR AS PROVIDED HEREIN. This limited warranty is valid only in the United States or Canada
and applies only when the major appliance is used in the country in which it was purchased. Proof of original purchase date is required
to obtain service under this limited warranty.
ITEMS EXCLUDED FROM WARRANTY
This limited warranty does not cover:
1. Replacement parts or repair labor if this major appliance is used for other than normal, single-family household use or when it is
used in a manner that is inconsistent to published user or operator instructions and/or installation instructions.
2. Service calls to correct the installation of your major appliance, to instruct you on how to use your major appliance, to replace or
repair house fuses, or to correct house wiring or plumbing.
3. Service calls to repair or replace appliance light bulbs, air filters or water filters. Consumable parts are excluded from warranty
coverage.
4. Damage resulting from accident, alteration, misuse, abuse, fire, flood, acts of God, improper installation, installation not in
accordance with electrical or plumbing codes, or use of products not approved by Maytag.
5. Cosmetic damage, including scratches, dents, chips or other damage to the finish of your major appliance, unless such damage
results from defects in materials or workmanship and is reported to Maytag within 30 days from the date of purchase.
6. Any food or medicine loss due to refrigerator or freezer product failures.
7. Pickup and delivery. This major appliance is intended to be repaired in your home.
8. Repairs to parts or systems resulting from unauthorized modifications made to the appliance.
9. Expenses for travel and transportation for product service if your major appliance is located in a remote area where service by an
authorized Maytag servicer is not available.
10. The removal and reinstallation of your major appliance if it is installed in an inaccessible location or is not installed in accordance
with Maytag's published installation instructions.
11. Replacement parts or repair labor on major appliances with original model/serial numbers that have been removed, altered or
cannot be easily determined.
12. Discoloration, rust, or oxidation of stainless steel surfaces.
DISCLAIMER OF IMPLIED WARRANTIES
IMPLIED WARRANTIES, INCLUDING ANY IMPLIED WARRANTY OF MERCHANTABILITY OR IMPLIED WARRANTY OF FITNESS FOR
A PARTICULAR PURPOSE, ARE LIMITED TO ONE YEAR OR THE SHORTEST PERIOD ALLOWED BY LAW. Some states and provinces
do not allow limitations on the duration of implied warranties of merchantability or fitness, so this limitation may not apply to you. This
warranty gives you specific legal rights, and you also may have other rights that vary from state to state or province to province.
LIMITATION OF REMEDIES; EXCLUSION OF INCIDENTAL AND CONSEQUENTIAL DAMAGES
YOUR SOLE AND EXCLUSIVE REMEDY UNDER THIS LIMITED WARRANTY SHALL BE PRODUCT REPAIR AS PROVIDED HEREIN.
MAYTAG SHALL NOT BE LIABLE FOR INCIDENTAL OR CONSEQUENTIAL DAMAGES. Some states and provinces do not allow the
exclusion or limitation of incidental or consequential damages, so these limitations and exclusions may not apply to you. This warranty
gives you specific legal rights, and you also may have other rights that vary from state to state or province to province.
If outside the 50 United States and Canada, contact your authorized Maytag dealer to determine if another warranty applies.
If you think you need repair service, first see the “Troubleshooting” section of the Use & Care Guide. If you are unable to resolve the
problem after checking “Troubleshooting,” additional help can be found by checking the “Assistance or Service” section or by calling
Maytag. In the U.S.A., call 1-800-688-9900. In Canada, call 1-800-807-6777. 5/08
Keep this book and your sales slip together for future
reference. You must provide proof of purchase or installation
date for in-warranty service.
Write down the following information about your major appliance
to better help you obtain assistance or service if you ever need it.
You will need to know your complete model number and serial
number. You can find this information on the model and serial
number label located on the product.
Dealer name____________________________________________________
Address ________________________________________________________
Phone number__________________________________________________
Model number __________________________________________________
Serial number __________________________________________________
Purchase date __________________________________________________
1 / 1

Maytag MQF1656TEW User manual

Category
Freezers
Type
User manual
This manual is also suitable for

Ask a question and I''ll find the answer in the document

Finding information in a document is now easier with AI

Ask the document

in other languages