EHEIM aquaball 130 Owner's manual

Category
Water filters
Type
Owner's manual

This manual is also suitable for

Zubehör
Pumpenkammer, Wasserführung, Düsenrohr und die Aus-
strömöffnung mit Reinigungsbürste (Best.-Nr. 4009560)
säubern.
Anschließend das Pumpenrad wieder einsetzen und auf rich-
tigen Sitz der Achstüllen achten. Den Pumpendeckel schlie-
ßen und Pumpenkopf wieder einsetzen.
Über die Filterbox kann der Innenfilter zur gezielten Wasserbe-
handlung eingesetzt werden. Sie kann nach Bedarf auch mit dem
Feinfiltervlies (Best.-Nr. 2616080) – Feinfilterung, mit EHEIM
SUBSTRATpro – biologisch (250 ml Best.-Nr. 2510021), bioMECH
(1 l – Best.-Nr. 2508051) oder mit EHFIAKTIV – adsorptiv (250 ml
Best.-Nr. 2513021) befüllt werden.
A Filterbox (Best.-Nr. 7444138)
B
1
2 Filtermatten
(Best.-Nr. 2616085)
B
2
3 Filtervliese (Best.-Nr. 2616080)
C 2 Filterpatronen
(Best.-Nr. 2618080)
D Aktivkohlepatrone
(Best.-Nr. 2628080)
E
1
Breitstrahldüse
(Best.-Nr. 4009680)
E
2
Düsensatz (Best.-Nr. 4009700)
F Erweiterungs-SET 2
(Best.-Nr. 4009620)
G Up-grade-kit (Best.-Nr. 4024000)
IMPORTANT SAFETY INSTRUCTIONS
WARNING To guard against injury, basic safety precautions
should be observed, including the following.
a)
READ AND FOLLOW ALL SAFETY
INSTRUCTIONS.
b) DANGER To avoid possible electric shock, special care
should be taken since water is employed in the use of aquar-
ium equipment. For each of the following situations, do not at-
tempt repairs by yourself; return the appliance to an author-
ized service facility for service or discard the appliance.
1) If the appliance falls into the water,
DON’T reach for it!
First unplug it and then retrieve it. If electrical components of
the appliance get wet, unplug the appliance immediately. (Non-
immersible equipment only)
2) If the appliance shows any sign of abnormal water leak-
age, immediately unplug it from the power source. (Immersible
equipment only).
3) Carefully examine the appliance after installation. It should
not beplugged inif thereis water on parts not intendedto be wet.
4) Do not operate any appliance if it has a damaged cord or
plug, or if it is malfunctioning or has been dropped or damaged
in any manner.
5) To avoid the possibility of the appliance plug or receptacle
A
B
CD
F
E
1
E
2
G
getting wet, position aquarium stand and tank to one side of a
wall-mounted receptacle to prevent water from dripping onto
the receptacle or plug.
A ”drip-loop”, shown in the figure below, should be ar-
ranged by the user for each cord connecting an aquarium ap-
pliance to a receptacle.
The ”drip-loop” is that part of the cord below the level of the re-
ceptacle, or the connector if an extension cord is used, to pre-
vent water traveling along the cord and coming in contact with
the receptacle.
POWER
SUPPLY
CORD
DRIP
LOOP
AQUARIUM
TANK
If the plug or socket does get wet, DON’T unplug the cord.
Disconnect the fuse or circuit breaker that supplies power to
the appliance. Then unplug and examine for presence of water
in the receptacle.
c) Close supervision is necessary when any appliance is used by
or near children.
d) To avoid injury, do not contact moving parts or hot parts such
as heaters, reflectors, lamp bulbs, and the like.
e) Always unplug an appliance from an outlet when not in use, be-
fore putting on or taking off parts, and before cleaning. Never
yank cord to pull plug from outlet. Grasp the plug and pull to
disconnect.
f) Do not use an appliance for other than intended use. The use of
attachments not recommended or sold by the appliance manu-
facturer may cause an unsafe condition.
g) Do not install or store the appliances where it will be exposed
to the weather or to temperatures below freezing.
h) Make sure an appliance mounted on a tank is securely installed
before operating it.
i) Read and observe all the important notices on the appliance.
j) If an extension cord is necessary, a cord with a proper rating
should be used. A cord rated for less amperes or watts than the
appliance rating may overheat. Care should be taken to arrange
the cord so that it will not be tripped over or pulled.
k) This appliance has a polarized plug (one blade is wider than the
other). As a safety feature, this plug will fit in a polarized outlet
only one way. If the plug does not fit fully in the outlet, reverse
the plug. If it still does not fit, contact a qualified electrician.
Never use with an extension cord unless plug can be fully in-
serted. Do not attempt to defeat this safety feature.
Exception: This instruction may be omitted for an appliance
that is not provided with a polarized attachment plug.
l) ”SAVE THESE INSTRUCTIONS”.
Thank you
for purchasing your new EHEIM internal filter. This innovative
modular system combines optimised performance with maximum
reliability and the utmost efficiency.
Safety instructions
Function
A
Diffuser with hose and air regulating valve
nozzle
tube
power regulator
pump head
shaft with
bushings
impeller
pump cover
holder with suction
cups
pump head holding fixture
filter box
filter
pad
filter cartridge
filter canister
filter base
clip.
In a single operation, this modular internal filter ensures the mechan-
ical-biological cleaning of the aquarium water with permanent circu-
lation, specific surface movement and controllable oxygen supply.
For indoor use only. For use with aquariums.
All electrical equipment in the water must be disconnected from the
mains during care and maintenance work.
The connecting line of this device can not be replaced. When the
line is damaged, the device must no longer be used.
Never carry the pump by the cable; do not bend the cable.
Only use filter in water: The pump must be positioned beneath the
surface of the water.
This equipment is not intended for use by persons (incl. children)
with limited physical, sensory or mental abilities or for persons with
no experience or knowledge unless they are supervised by a per-
son responsible for safety or unless they have received from such
a person instructions on how to use the equipment. Children should
be supervised to ensure that they do not play with the equipment.
Notice: These divices produce magnetic fields which
might cause electronic and mechanical disturbances
or damages. This also refers to pacemakers.
Please consult the manuals of medical equipment for the required
safety margins.
For your own safety, we recommend to form
a drip loop with the connection cable to pre-
vent any water running along the cable from
intruding into the socket.
When using a multiple socket or an external
power supply unit, position them atop the
filter’s power connection.
Attention: Maintenance work presents the risk of crushing the fin-
gers due to high magnetic forces.
Do not clean the unit – or parts of it – in the dishwater. Not dish-
water resistant.
Do not dispose of this product as normal household waste. Take it
to your local refuse collection site.
The product is qualified in accordance with the respective national
regulations and guidelines and meets EC standards.
20 cm
Internal filters aquaball 60, 130, 180
Model: see type plate on motor body
English
geprüfte
Sicherheit
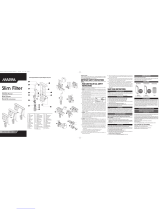
Installation / Putting into operation
B Attach diffuser with air hose and air regulating valve or
place nozzle tube on outlet connection.
C Fasten the holder with the suction cups to the inside of the
aquarium glass and clip the filter into place.
D Insert the filter such that the pump head is positioned just
beneath the surface of the water. Adjust the pump head to
the required outflow area and surface angle.
E By turning the power regulator, it is possible to infinitely
adjust the pump power to the required setting. The diffuser’s
air regulating valve is used to regulate the amount of oxygen
added to the water.
Important: The diffuser power decreases in line with the
degree of soiling.
Cleaning
F Disconnect the filter from the power supply and then pull
upwards out of the holder.
G The individual filter containers can be easily separated from
one another by a slight pressure on the clip.
H Now proceed to clean the modules and wash out the fil-
ter cartridge(s). The cartridges from models 130 and 180
should be only lightly rinsed under lukewarm, running water
in order to preserve the purifying bacteria and to accelerate
its new development.
I To remove the pump head, pull the pump out of the pump
head socket. Flip open the lid and clean or renew the filter
pad. Finish by reassembling the cleaned filter components,
taking care to assemble these in the correct way.
Thanks to the pump head that rotates in three dimensions, it is
possible to adjust the outflow direction. The output regulator de-
termines the desired flow rate and the air enrichment can be re-
gulated using the diffusor or nozzle tube.
The foam cartridges inside the filter canisters ensure the mechan-
ical cleansing and simultaneous biological clarification of the water.
A filter sponge is additionally fitted into the filter box to further in-
tensify the mechanical cleaning effects when heavy soiling is pre-
sent. The practical holder allows the filter to be positioned inside
the aquarium and removed with ease.
Maintenance
K Disconnect the filter from the power supply! To remove
the pump head, pull the pump out of the pump head socket.
L Remove the pump cover, take out the impeller and the bear-
ing box and clean. Pull out the power regulator with diffus-
er/nozzle tube from pump head. Use the special cleaning
brush (order no. 4009560) to clean the inflow and outflow
openings.
Subsequently, refit the impeller and check that the bearing
box is positioned correctly. Close the pump cover and re-
insert the pump head.
Accessories
The filter box allows the internal filter to be used specifically for
Für Aquarien bis
For aquariums up to 30-60 l 60-130 l 80-180 l
Pour aquariums jusqu’à
Voor aquaria tot 7-13 13-29 18-40
Per acquari fino a Imp. Imp. Imp.
För akvarier upp till gal./h gal./h gal./h
Tamaño acuarios hasta
Pumpenleistung
Pump output 150-480 180-550 210-650
Débit de la pompe l/h l/h l/h
Pompcapaciteit
Potenza della pompa 33-106 40-121 46-143
Pumpkapacitet Imp. Imp. Imp.
Caudal bomba gal./h gal./h gal./h
Förderhöhe H
max
Delivery head m wat. col. 0,37 0,43 0,43
Hauteur de réf. m col. d’eau
Opvoerhoogte m wk 1.2 ft. 1.4 ft. 1.4 ft.
Prevalenza / m
Lyfthöjd m / vst 14.6 in. 16.9 in. 16.9 in.
Altura máx. de bombeo / m
Filtervolumen
Filter volume 180 ml 320 ml 460 ml
Volume du filtre
Filtervolume
Volume del filtro 10.98 19.53 28.07
Filtervolym inch
3
inch
3
inch
3
Volumen filtrante
Leistungsaufnahme
Power consumption 5 W 6 W 6 W
Consommation de courant
Stroomverbruik
Assorbimento
Eleffekt
Consumo
Abmessungen Ø x Höhe 96 x 160 96 x 214 96 x 270
Dimensions Ø x height mm mm mm
Dimensions Ø x hauteur
Afmetingen Ø x hoogte
Dimensioni Ø x altezza 3.8 x 6.3 3.8 x 8.4 3.8 x 10.6
Måttuppgifter Ø x höjd inch inch inch
Dimensiones Ø x altura
230 V / 50 Hz
60 130 180
Typ Typ Typ
2401 2402 2403
30-60 l 60-130 l 80-180 l 30-60 l 60-130 l 80-180 l
7-13 13-29 18-40 8-16 16-34 21-48
Imp. Imp. Imp. U.S. U.S. U.S.
gal./h gal./h gal./h gal./h gal./h gal./h
150-480 180-550 210-650 150-480 180-550 210-650
l/h l/h l/h l/h l/h l/h
33-106 40-121 46-143 40-127 48-145 55-172
Imp. Imp. Imp. U.S. U.S. U.S.
gal./h gal./h gal./h gal./h gal./h gal./h
0,37 0,43 0,43 0,37 0,43 0,43
1.2 ft. 1.4 ft. 1.4 ft. 1.2 ft. 1.4 ft. 11.4 ft
14.6 in. 16.9 in. 16.9 in. 14.6 in. 16.9 in. 16.9 in.
180 ml 320 ml 460 ml 180 ml 320 ml 460 ml
10.98 19.53 28.07 10.98 19.53 28.07
inch
3
inch
3
inch
3
inch
3
inch
3
inch
3
5 W 6 W 6 W 5 W 6 W 6 W
96 x 160 96 x 214 96 x 270 96 x 160 96 x 214 96 x 270
mm mm mm mm mm mm
3.8 x 6.3 3.8 x 8.4 3.8 x 10.6 3.8 x 6.3 3.8 x 8.4 3.8 x 10.6
inch inch inch inch inch inch
240 V / 50 Hz 120 V / 60 Hz
60 130 180 60 130 180
Typ Typ Typ Typ Typ Typ
2401 2402 2403 2401 2402 2403
  • Page 1 1
  • Page 2 2
  • Page 3 3
  • Page 4 4
  • Page 5 5
  • Page 6 6
  • Page 7 7
  • Page 8 8
  • Page 9 9
  • Page 10 10
  • Page 11 11
  • Page 12 12
  • Page 13 13
  • Page 14 14
  • Page 15 15
  • Page 16 16
  • Page 17 17
  • Page 18 18
  • Page 19 19
  • Page 20 20
  • Page 21 21
  • Page 22 22
  • Page 23 23
  • Page 24 24
  • Page 25 25
  • Page 26 26
  • Page 27 27
  • Page 28 28
  • Page 29 29
  • Page 30 30
  • Page 31 31
  • Page 32 32
  • Page 33 33
  • Page 34 34
  • Page 35 35
  • Page 36 36
  • Page 37 37
  • Page 38 38
  • Page 39 39
  • Page 40 40
  • Page 41 41
  • Page 42 42
  • Page 43 43
  • Page 44 44
  • Page 45 45
  • Page 46 46
  • Page 47 47
  • Page 48 48
  • Page 49 49
  • Page 50 50
  • Page 51 51
  • Page 52 52
  • Page 53 53
  • Page 54 54
  • Page 55 55
  • Page 56 56
  • Page 57 57

EHEIM aquaball 130 Owner's manual

Category
Water filters
Type
Owner's manual
This manual is also suitable for

Ask a question and I''ll find the answer in the document

Finding information in a document is now easier with AI