DeLonghi EASYTURBO-S FXK22T Owner's manual
- Category
- Irons
- Type
- Owner's manual
Page is loading ...
Page is loading ...

FERRO A VAPORE
STEAM IRON
FER À VAPEUR
DAMPFBÜGELEISEN
STOOMSTRIJKIJZER
STOOMSTRIJKIJZER
STOOMSTRIJKIJZER
Istruzioni per l’uso
Instructions
Mode d’emploi
Anleitungen zum Gebrauch
Gebruiksaanwijzingen
Instrucciones para el uso
Instruções de utilização
Οδηγίε χρήση
Инструкции по эксплуатации
Használati utasítás
Návod k použití
Návod na použitie
Instrukcja obsługi
Kullanım talimatları
ΣΙΕΡΟ ΑΤΜΟΥ
ПАРОВОЙ УТЮГ
GŐZÖLŐS VASALÓ
NAPAŘOVACÍ ŽEHLIČKA
ŻELAZKO NA PARĘ
NAPAROVACIA ŽEHLIČKA
BUHARLI ÜTÜ

2
Electrical requirements (UK only)
Before using this appliance ensure that the voltage indicated on the product corresponds with the main voltage in your home, if you are in any doubt about your supply
contact your local electricity company.
The exible mains lead is supplied connected to a B.S. 1363 fused plug having a fuse of 13 amp capacity.
Should this plug not t the socket outlets in your home, it should be cut o and replaced with a suitable plug, following the procedure outlined below.
Note: Such a plug cannot be used for any other appliance and should therefore be properly disposed of and not left where children might nd it and plug it into a supply
socket - with the obvious consequent danger.
N.B. We recommend the use of good quality plugs and wall sockets that can be switched o when the machine is not in use.
IMPORTANT: the wires in the mains lead tted to this appliance are coloured in accordance with the following code:
GREEN AND YELLOW EARTH
BLUE NEUTRAL
BROWN LIVE
As the colours of the wires in the mains lead of this appliance may not correspond with the coloured markings identifying the terminals in your plug, proceed as follows:
- The wire which is coloured green and yellow must be connected to the terminal in the plug which is marked with the letter E or by the earth symbol or
coloured green or green and yellow.
- The wire which is coloured blue must be connected to the terminal which is marked with the letter N or coloured black.
- The wire which is coloured brown must be connected to the terminal which is marked with the letter L or coloured red.
When wiring the plug, ensure that all strands of wire are securely retained in each terminal. Do not forget to tighten the mains lead clamp on the plug. If your electricity
supply point has only two pin socket outlets, or if you are in doubt, consult a qualied electrician.
Should the mains lead ever require replacement, it is essential that this operation be carried out by a qualied electrician and should only be replaced with a exible cord
of the same size.
After replacement of a fuse in the plug, the fuse cover must be retted. If the fuse cover is lost, the plug must not be used until a replacement cover is obtained. The
colour of the correct replacement fuse cover is that of the coloured insert in the base of the fuse recess or elsewhere on the plug. Always state this colour when ordering
a replacement fuse cover.
Only 13amp replacement fuses which are asta approved to B.S. 1362 should be tted.
This appliance conforms to the Norms EN 55014 regarding the suppression of radio interference.
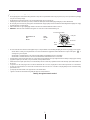
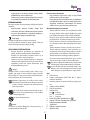
Warning - this appliance must be earthed
Green and Yellow to Earth
13 amp Fuse
Brown to live
Cord Clamp
Blue to
neutral
Page is loading ...
Page is loading ...
Page is loading ...

6
Symbols used in these instructions
Important warnings are identied by these symbols. These
warnings must absolutely be respected.
Danger!
Failure to observe the warning could result in possibly life threatening
injury from electric shock.
Important!
Failure to observe the warning could result in injury or damage to the
appliance.
Danger of burns!
Failure to observe the warning could result in scalds or burns.
PLEASE NOTE:
This symbol identies important advice or information for the user.
Fundamental safety warnings
Danger!
This is an electrical appliance and may cause electric shock.
You should therefore respect the following safety warnings:
• Nevertouchtheappliancewithdamphands.
• Never use the appliance with bare or wet feet.
• Never immerse the appliance in water.
• Never unplug the appliance by pulling the power cable or
the appliance itself.
• If the socket and power cable plug are incompatible, the
socket should be changed for a suitable type by a quali-
ed professional only who should ensure that the cross-
section of the wires leading to the socket is suitable for
the power absorbed by the appliance.
• Never place the iron under the tap to top up with water.
Always use the measure provided.
• Always unplug the appliance from the mains socket befo-
re lling the tank with water.
• If the power cable is damaged, it must be replaced by the
manufacturer or the manufacturer’s Customer Services in
order to avoid all risk.
• The safety of this appliance is guaranteed only if correctly
connected to a proper and eective earth connection as
specied by current electrical safety standards and regu-
lations.
This fundamental safety requisite should be veried. If in
doubt, ask a qualied electrician to check the mains sy-
stem thoroughly. Failure to earth the appliance absolves
the manufacturer of all liability for damage.
• When the appliance is to be discarded, after unplugging
from the mains, the lead should be cut as close as possible
Important safeguards
to the iron to make the appliance unusable.
• Before cleaning or servicing, disconnect the appliance by
unplugging from the mains.
• In the event of malfunction and/or faulty operation,
switch o the appliance and take it to Customer Services.
• Before plugging the appliance in, check that the
mains voltage corresponds to the voltage (V) in-
dicated on the rating plate of the iron. The socket
must be eciently earthed.
Danger of burns!
• Neveraimthesteamatpersonsoranimals.
• The user must never leave the iron unattended when
plugged in.
•
The ll hole must never be opened while the iron is in use.
Important!
• Afterremovingthepackaging,makesuretheappliance
is complete and undamaged. If in doubt, do not use the
appliance and contact qualied personnel only.
• Dispose of the plastic bag with care as it represents a ha-
zard for children.
• Theapplianceisnotintendedforusebypersons(inclu-
ding children) with reduced physical, sensory or mental
capabilities, or lack of experience and knowledge, unless
they have been given supervision or instruction concer-
ning use of the appliance by a person responsible for their
safety. Children must be supervised to ensure they do not
play with the appliance.
• Never overll the tank and never add stain removers or
similar products.
• When placing the iron on the iron rest, make sure the iron
rest is located on a stable surface.
• The iron must be used and rested on a stable surface.
Do not use the iron if it has been dropped and there are
visible signs of damage or leaks.
• If the appliance has been dropped causing visible dama-
ge, do not use. Have it repaired in an authorised customer
services centre.
• The iron should be placed on a at surface extremely resi-
stant to high temperatures.
INSTRUCTIONS
Read these instructions carefully before using the appliance.
• Failuretorespecttheseinstructionsmayresultinburnsor
damage to the appliance. The manufacturer is not liable
for damage deriving from failure to respect these instruc-
tions.
en

7
Description
N.B.:
Keep these instructions. If the appliance is passed to other per-
sons, they must also be provided with these instructions.
DESIGNATED USE
• This appliance must be used exclusively for the purpose
for which it was expressly conceived.
Any other use is considered improper and thus dange-
rous.
• The manufacturer is not liable for damage caused by inap-
propriate, incorrect or irresponsible use or for damage re-
sulting from repairs carried out by unqualied personnel.
Important!
The machine works with normal tap water.
Incaseofveryhardwater(hardnessabove27°f)wesuggest
using demineralised water diluted with 50% tap water.
The resin lter installed in the tank lters impurities,
and keeps the plate clean, thus ensuring constant ste-
am delivery during ironing.
Never use chemical substances or detergents (e.g.
perfumed water, essences, descaling solutions, etc).
Do not use mineral water.
Important!
If you use ltering devices, make sure the water obtained has
a neutral pH.
Using the appliance for the rst time
• Thersttimeyouusetheiron,removetheplateprotec-
tion(ifpresent).
• When used for the rst time, the appliance may
give o smoke and an odour for several minutes.
This is caused by heating and subsequent drying of
the sealers used in assembling the appliance.
You are recommended to ventilate the room.
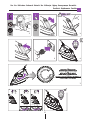
Ironing tips
• Theoriginalappearanceand softnessoffabrics suchas
velvet or wool, or gloves, bags etc. can be restored by pas-
sing the iron a short distance away with the steam jet in
operation.
• Donotrestorusetheirononzips,hooks,ringsetctoavoid
scratching the sole plate.
• Separateclothesaccordingtotherecommendedironing
temperature and begin ironing with items requiring the
lowest temperatures.
• Silkmaybedry-pressedonthereverse.
• Wool,cottonandnelinencaneitherbesteam-ironedon
the reverse or on the right side, interposing a thin cloth
between the iron and the fabric to avoid “shine”.
• Starchedfabricsrequiregreatermoisture.
• Ironwhitesandlightcoloursontherightsideanddark
colours on the reverse. Embroidery should also be ironed
on the reverse to make it stand out.
To obtain a good steam jet, wait a few seconds between
one burst of steam and the next.
The no-drip system automatically shuts o steam pro-
duction when the temperature is set too low to prevent
the plate from dripping.
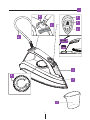
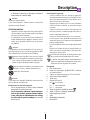
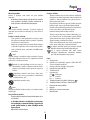
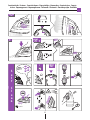
Description
A. Power cable
B. Auto-olight(AUTOSHUTOFF)(*certainmodelsonly)
C. Rubber vertical iron rest
D. ON/OFF light
E. Spray button
F. Steam regulator:
pos. : no steam
pos. 1: min. steam
pos. 2: max. steam
G. “EasyTurbo”button(steamburst)
H. “Self Clean” button
I. Tank ll hole cap
J. Spray
K. Thermostat dial
L. Water measure
en
Page is loading ...
Page is loading ...
Page is loading ...
Page is loading ...
Page is loading ...
Page is loading ...
Page is loading ...
Page is loading ...
Page is loading ...
Page is loading ...
Page is loading ...
Page is loading ...
Page is loading ...
Page is loading ...
Page is loading ...
Page is loading ...
Page is loading ...
Page is loading ...
Page is loading ...
Page is loading ...
Page is loading ...
Page is loading ...
Page is loading ...
Page is loading ...
Page is loading ...
Page is loading ...
Page is loading ...
Page is loading ...
-
 1
1
-
 2
2
-
 3
3
-
 4
4
-
 5
5
-
 6
6
-
 7
7
-
 8
8
-
 9
9
-
 10
10
-
 11
11
-
 12
12
-
 13
13
-
 14
14
-
 15
15
-
 16
16
-
 17
17
-
 18
18
-
 19
19
-
 20
20
-
 21
21
-
 22
22
-
 23
23
-
 24
24
-
 25
25
-
 26
26
-
 27
27
-
 28
28
-
 29
29
-
 30
30
-
 31
31
-
 32
32
-
 33
33
-
 34
34
-
 35
35
-
 36
36
-
 37
37


DeLonghi EASYTURBO-S FXK22T Owner's manual
- Category
- Irons
- Type
- Owner's manual
Ask a question and I''ll find the answer in the document
Finding information in a document is now easier with AI
in other languages
- italiano: DeLonghi EASYTURBO-S FXK22T Manuale del proprietario
- français: DeLonghi EASYTURBO-S FXK22T Le manuel du propriétaire
- español: DeLonghi EASYTURBO-S FXK22T El manual del propietario
- Deutsch: DeLonghi EASYTURBO-S FXK22T Bedienungsanleitung
- русский: DeLonghi EASYTURBO-S FXK22T Инструкция по применению
- Nederlands: DeLonghi EASYTURBO-S FXK22T de handleiding
- português: DeLonghi EASYTURBO-S FXK22T Manual do proprietário
- slovenčina: DeLonghi EASYTURBO-S FXK22T Návod na obsluhu
- polski: DeLonghi EASYTURBO-S FXK22T Instrukcja obsługi
- čeština: DeLonghi EASYTURBO-S FXK22T Návod k obsluze
- Türkçe: DeLonghi EASYTURBO-S FXK22T El kitabı
Related papers
Other documents
-
Rotel 9461 User manual
-
Bestron AST9000 User manual
-
Monster IB 35 Perfect Plus User manual
-
AEG DBS2300-U User manual
-
Termozeta Milord 6500 Owner's manual
-
Termozeta 74347G User manual
-
-
-
LauraStar PRO Owner's manual
-