Page is loading ...

18
PARACOPTER
Summary
Legal information
This manual is a publication of
XciteRC Modellbau GmbH & Co. KG
Autenbachstrasse 12
D-73035 Göppingen
Phone: +49 7161 40 799 0
Fax: +49 7161 40 799 99
E-mail: [email protected]
Web: www.XciteRC.de
All rights including translation, reproductions of any kind, such as photocoping, microfilming or storage in electronic data
processing equipment, without the written permission of the publisher, reproduction in whole or part, is prohibited.
This manual corresponds to the technical status of the product at time of printing, changes in technology and equipment
reserved. From the text and illustrations of this manual no claims can be derived.
NO LIABILITY FOR PRINTING ERROR! SUBJECT TO CHANGE!
The latest version of this manual can be found on the Internet at www.XciteRC.de
© Copyright 2013 by XciteRC-Modellbau GmbH & Co. KG
EN
Summary
Intended Usage ........................................................................................................................................ 19
Scope of delivery ...................................................................................................................................... 19
Required Accessories ............................................................................................................................... 19
Explanation of Symbols ............................................................................................................................19
Warnings and safety notes........................................................................................................................19
Handling precautions for batteries or rechargeable batteries: .................................................................... 21
Wind conditions ........................................................................................................................................ 22
Insert the drive battery .............................................................................................................................. 26
Charging the Battery: ................................................................................................................................26
The remote control system ....................................................................................................................... 26
Transmitter ............................................................................................................................................... 27
BINDING ..................................................................................................................................................27
Trim .......................................................................................................................................................... 27
Take off and fly .........................................................................................................................................28
Start - Hand launching: .............................................................................................................................28
Starting from ground with assistance: ....................................................................................................... 29
Starting from ground without assistance ................................................................................................... 30
Flying ........................................................................................................................................................30
Landing ....................................................................................................................................................31
Maintenance .............................................................................................................................................32
Troubleshooting ........................................................................................................................................ 32
Repairs, Spare Parts .................................................................................................................................32
Environmental Protection Notes ................................................................................................................ 33
Notes on battery law ................................................................................................................................33
Declaration of conformity ......................................................................................................................... 50
Spare Parts ..............................................................................................................................................51

19
PARACOPTER
Introduction
Thank you for purchasing the PARACOPTER of XciteRC. This manual contains important instructions for
operating your new model. Therefore, please read all instructions in this manual thoroughly before
using the model, so that you can operate your model safely.
All company and product names mentioned are trademarks of their respective owners. All rights reserved.
Intended Usage
The PARACOPTER is extensively constructed and electrically driven kite ready to fly including motor and
speed controller. The control is wireless with the included 2.4 GHz remote control. The model may only be
operated on a suitable and sufficiently large area without obstacles.
The product is not a toy and not suitable for children under 14 years of age, by children under 14 years the
maintenance and operation of the model must be supervised by an adult.
Read and observe all warnings and safety instructions in this manual and on the packaging before
operating!
This manual is part of this product. It contains important information for handling this product. Keep the
manual for future reference and also it must be strictly kept and passed on the subsequent sale
of the model to the buyer. Failure to follow the operating instructions and the safety instructions
may invalidate the warranty.
Scope of delivery
RTF PARACOPTER, pre-assembled
Transmitter
Manual with spare parts list
Required Accessories
4 size AA batteries or rechargeable batteries for the transmitter
1 Lithium polymer battery 7.4 V/1100 mAh for the PARACOPTER
Matching Charger
Explanation of Symbols
WARNING: These instructions must be strictly observed by the operator! Failure to follow
these instructions may interfere with the safe function. These notes are also for your own
safety and that of other people!
ATTENTION: this information must be observed by the operator! Failure to follow these
instructions can cause damage of many sorts, and the loss of warranty etc.
Information or advice, by which a smooth operation is ensured.
Instructions for care and maintenance to ensure a long duration of life of the product.
Warnings and safety notes
The following safety instructions must be strictly observed. For property damage, personal injury or conse-
quential damage caused by improper use or non-observance of the safety instructions the XciteRC Modell-
bau GmbH & Co. KG accepts no liability. In these cases, the warranty becomes void.
Move your model always with the maximum caution and responsibility, otherwise it may cause damage to
other property or even physical injury. We therefore recommend to secure the operation with a third party
liability insurance. If you already have a liability insurance policy, check before start-up the model, whether
radio-controlled models are covered by a corresponding amount.
EN

20
PARACOPTER
Safety notes
• The product contains small parts that can cause injury if swallowed, and must therefore be kept
away from children under 3 years.
• The product is not a toy and not suitable for children under 14 years.
• The operation of radio-controlled models requires practice. In the beginning operate your new model
therefore with extra caution and familiarize yourself with the response to your commands.
•
WARNING: The safe operation requires concentration and quick reaction. Do not operate your
model if you are tired or under the influence of drugs or alcohol – risk of accident and injury!
•
WARNING: The control of this model is done via radio signals, which can be influenced by the en-
vironment. This may cause a suddenly loss of control of your model. Operate your model therefore only
with sufficient light within line of sight and in an open area, away from cars, traffic and people – risk of
accident and injury!
• Do not operate your model during a thunder storm or near radio towers or power lines.
• Radio remote controlled models may not be operated at any public space by implication (streets, roads,
squares or lakes). Before operation please ask where the operation is allowed. This also applies to private
property, here the consent of the owner is required.
•
WARNING: Keep your fingers or loose clothing or hair away from the rotating parts or the propeller
/ rotor unit - risk of injury!
• Before you start operating your model, make sure that the frequency not in use already, so that your or
other models can not get out of control.
• Always switch on the transmitter first, then the model.
•
NOTE: during the operation of the transmitter must remain switched on!
• Never operate your model with low transmitter batteries, because this reduces the range of your model
dramatically.
• If the drive battery is empty, the model first slow down until it no longer reacts properly to your commands.
Stop the operation and change the drive battery or charge it again.
• Pay attention to the instructions and warnings for this and any other equipment used by you (chargers,
rechargeable battery packs, etc.).
•
WARNING: Keep packaging material, small parts, chemicals and electrical components away from
children – risk of accident and injury!
• The model and the transmitter may be neither get humid nor wet, especially the electronic components
(receiver, speed controller, servo) and, if used, lithium batteries, are not waterproof! The model may not be
used in the rain (or heavy fog), do not drive in wet grass or through puddles or snow.
•
WARNING: Fire or explosion due to moisture in lithium batteries!
• Plastic parts (eg. suspension and body) is less flexible and can break more easily at cold temperatures
(below 10 ° C).
• The modification of the model is not permitted for safety and CE approval regulations, which applies in
particular to the transmitter, receiver and speed controller. Maintenance or repairs using original replace-
ment parts are excluded.
• After use, first turn off the model and then the transmitter.
•
WARNING: remove the drive battery from the model and transmitter after use. Store the model
never with built-in battery. Fire hazard!
• Store batteries separately on a non-combustible surface.
• The drive components (motor and speed controller) or the car battery may become hot during operation.
WARNING: Risk of burns! Let these components cool down completely after the operation (and
also before each battery change)!
• The PARACOPTERs parachute may become distorted by direct sunlight. Do not let the model lie a long
EN

21
PARACOPTER
Safety notes
time in the sun!
Operation of the model is performed solely at the risk of the operator. Only a careful and deliberate operation
protects against physical injury and damage to property.
Handling precautions for batteries or rechargeable batteries:
• Keep batteries away from children! Never let batteries unattended, as they can be swallowed by children
or pets!
• Use only the recommended or equivalent type of batteries / rechargeable batteries.
•
WARNING: Do not expose batteries / rechargeable batteries to heat or throw into fire - fire or
explosion hazard!
•
WARNING: Insert batteries / rechargeable batteries with the correct polarity, no short-circuiting -
fire or explosion hazard!
• If possible, always replace all batteries at the same time, never use new and used batteries and batteries
with different charge levels simultaneously.
•
WARNING: Do not use defective or damaged batteries or rechargeable batteries – fire hazard!
Risk of chemical burns on contact with skin, use protective gloves!
•
WARNING: Do not attempt to recharge non-rechargeable batteries in a charger - fire or explosion
hazard!
• Remove the rechargeable batteries from the device before charging.
•
WARNING: Charging may take place only with a suitable charger for the type of battery on a fire-
proof surface and under constant adult supervision – fire hazard!
• Immediately remove used batteries from the devices.
•
NOTE: NiMH batteries must be checked at least every 3 months and, if necessary, recharged, other-
wise because of the typic self-discharge they may get deep discharged and damaged! Therefore, better
use so-called RTU batteries with a very low self-discharge.
•
NOTE: note the specified storage voltage for lithium batteries. Is a completely full or empty lithium
battery time stored for a longer time, it can be damaged.
The XciteRC Modellbau GmbH & Co. KG can not monitor the proper use of the battery or batteries you use,
therefore, the warranty is excluded due to incorrect charging or discharging.
EN

22
PARACOPTER
Safety notes
Windward
Windward
Danger!
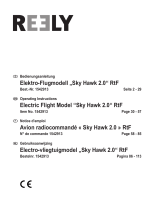
Wind conditions
Fly only in wind speeds up to 16 km/h. Do not fly in
wind speeds above 30 km/h!
Downslope winds at the foot of a hill or mountain
press the PARACOPTER down. Then it climbs very
slowly despite full throttle.
If your PARACOPTER gets in thermals and climbs
suddenly very high, so that you may lose control,
release the throttle immediately and fly close right
turns to reduce altitude rapidly!
Special care is required when flying near water. Always
make sure that the wind blows from the water. Then,
if the battery gets weak, the PARACOPTER moves
automatically away from the water and can be landed
safely. If the wind blows seaward, pay attention to
sufficient distance from the water, so you don‘t have
to land in the water!
EN

23
PARACOPTER
Finalisation
Connect the propeller guard with the
propeller guard axle set. Then attach
the horizontal brace with the screws
and nuts to the axle set.
Insert the rear axle in the chassis.
Position the nose of the axle in the
recess on the chassis. Then put the
wheels on both sides of the axle -
make sure they are properly engaged
– pay attention to the “click” noise.
The wheels are to be removed again
simply squeezing the axis on the ou-
ter side.
The assembled propeller guard is
then attached to the chassis. Make
sure that it is firmly in place (pay at-
tention to the “click” noise).
The servo rods are inserted from abo-
ve through the guiding holes of the
propeller guard holder and then snap-
ped to the servo arm.
EN

24
PARACOPTER
Finalisation
The pilot figure is mounted with the
included double-sided tape and a
screw on the chassis.
Connnect the front yellow lines in the
eyes of the servo rods (A). The rear
red lines run through the small lateral
opening (B) on the propeller guard.
Now the rear red lines are connected
in the round eyes of the hook sus-
pension lines (white). The suspension
lines then is hooked into the holes of
the servo rods - take note at the wind
speed:
With a gentle breeze use the middle
position in the servo rods, with a mo-
derate breeze the second position
from the top
The wind speed (wind) can be easily
estimated from a deciduous tree: with
a gentle breeze (about 16 km/h) only
the leaves move on a tree, with a mo-
derate breeze (about 30 km/h) also
thin branches.
Front lines (yellow)
Rear lines (red)
Front lines (yellow)
Rear lines
(red)
gentle
breeze
moderate
breeze
Hook suspension
lines
EN

25
PARACOPTER
Finalisation
ATTENTION: if the wind is
stronger (also thicker branches move,
over 30 km/h), the PARACOPTER
must not be flown because it is dif-
ficult to control! Crash hazard!
Changing the location of the lines in the servo rods also affects the
angle of the parachute. A higher point increases the speed of the
PARACOPTER - the model can be easily adapted to different wind
conditions or requirements of the pilot.
ATTENTION: threading the stabilizing rod requires caution and care so that the parachute will not
damaged.
Connect the items in numerical order (1-3)
Thread the assembled rod through the hole in the parachute (4) and push it through the entire parachute.
Connect the end pieces (5 + 6) on the stabilizer bar.
For transport, the stabilizing bar can be removed.
EN

26
PARACOPTER
Battery charging
Insert the drive battery
• Pull the locking lever to open the battery compart-
ment on the underside of the chassis.
• Pull the plug out and connect it to the drive battery.
• Now thread the plug first, then the battery into the
chassis as shown in the figure.
• The battery compartment must be closed with an
audible “click”, so it cannot suddenly open during
the flight.
Charging the Battery:
WARNING: Make sure to read all safety instructions regarding the use of rechargeable batteries. Also,
if necessary, further safety instructions in the manual for your used charger.
Place the charger to a suitable, non-flammable surface. Connect the charger to a suitable power source. The
PARACOPTERs battery is equipped with an XH balancer connector. Before starting the charging process,
read the instruction manual of your charger used.
The remote control system
Here you get an overview of the remote control system of your PARACOPTER and its various features and
settings. Before the first flight, you should have read and understood all these functions and settings.
• Make sure that the transmitter is turned off - ON / OFF switch in the lower position.
• Now open the battery compartment cover on the back of the transmitter and insert four AA batteries
(or rechargeable batteries) into the battery compartment of the transmitter. Pay attention to the correct
polarity!
• Close the battery compartment cover and turn on transmitter – push ON / OFF switch upwards.
• The POWER LED must lit red.
•
WARNING: If the POWER LED is flashing, supported by a beep, the model may not be started –
crash hazard! Change transmitter batteries immediately (or charge batteries).
• Pay attention to the POWER LED and the beeper also during operation. In this case, land immediately and
replace transmitter batteries (or recharge the batteries).
Transmitter
1
2
3
EN

27
PARACOPTER
Remote control system
1. On / Off Switch: Turns the power of
the transmitter ON / OFF
2. Control lever: direction right or left
3. Control trim: adjusts the straight
flight
4. Throttle stick: controls the rise or
sink of the model
5. Throttle trim: adjust the neutral po-
sition of the controller (always in the
middle position!)
6. POWER LED: indicates the battery
voltage
7. Antenna
BINDING:
The 2.4 GHz receiver of PARACOPTER must be once „connected“ with a suitable transmitter, the so-called
„binding“ procedure. This ensures that the receiver establishes a connection only with this transmitter and the
model can be operated without interference. This process can be repeated any time.
The transmitter and receiver of the PARACOPTER are already bound so that you can start flying immediately.
Should a rebind gets necessary (eg. after a transmitter change), proceed as follows:
• Make sure that no other 2.4 GHz network (eg. WLAN or other transmitter) sends nearby.
• The distance between transmitter - PARACOPTER should be maximum one meter.
• Switch transmitter and PARACOPTER on. Now press the button of the receiver unit on the bottom of The
PARACOPTER (Fig.) - the green LED starts to flash red. After about 5 seconds it will turn back to green,
the transmitter is now bound to the PARACOPTER.
• If the LED remains red, repeat the steps.
Tr i m
On both control sticks the neutral position of the servos and speed controller can be precisely adjusted by
pressing on the corresponding side of the rocker trim. Thus, e.g. the straight flight can be set precisely.
• Switch transmitter and then the PARACOPTER on.
• Move the throttle stick to the top and then all the way down (see illustration). The motor may not start in
this stick position, but if yes, press the lower part of the left rocker trim until the motor stops.
• Move the control lever to the center position. Watch the red servo arm of the PARACOPTER, it should
now be exactly horizontal. If not, press the right side of the rocker trim to correct it clockwise, the left side
for a counterclockwise rotation. The PARACOPTER now should just fly straight.
• In flight you can correct in the same way as you press the right side of the rocker trim when the PARA-
COPTER pulls to the left, and vice versa.
Throttle lever
Rise / Descent
Control lever
Left / Right
Trim
Left / Right
Trim
Rise / Descent
EN
Throttle lever
Rise / Descent
Left / Right
Antenna
Trim
Left / Right
Trim
Rise / Descent
Control lever
ON/OFF switch

28
PARACOPTER
Take off and fly
Take off and fly
Before you begin please check:
•
WARNING: Only start with a suffici-
ently full transmitter batteries (batteries-) and
fully charged flight battery – crash hazard!
• Check all parts for damage and dirt. Repla-
ce any damaged parts and clean the model,
because dirt increases the weight and there-
fore can degrade the flying qualities.
• Check all steering lines for damage and cor-
rect installation (especially twisting).
• Switch on the transmitter and then the PA-
RACOPTER. Note: the PARACOPTER is
protected against unintentional starting of
the motor when turning ON to avoid the risk
of injury. To activate the motor, the throttle
must moved once all the way up and then
moved back to the lower position. If the
lower position is
correct (motor off)
a short beep will
sound. Only now
the PARACOPTER
responds to your
commands.
• Check the motor
and servo func-
tions.
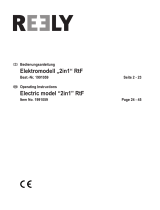
Start - Hand launching:
• ATTENTION: Observe the wind direction! Start always against the wind direction!
• Place yourself at a 45 ° angle against the wind (Figure 1).
• Hold the PARACOPTER centered at the bottom of the chassis (2) and move the arm with a uniform circu-
lar motion upwards. When the parachute is fully deployed, give full throttle (3).
• Do not move the model further up (4), release the model if it is above your head (5).
• Note: Do not move jerkily or throw the model, because the parachute will not unfold properly (6)!
EN

29
PARACOPTER
Take off and fly
Starting from ground with assistance:
• ATTENTION: Observe the wind direction! Start always against the wind direction!
• The PARACOPTER can only start on smooth, level surface. An assistant stands behind the model and
unfolds the parachute. The parachute must be taken that all the lines are taut. Now the pilot goes full
throttle, the helper releases the parachute, the PARACOPTER starts.
EN

30
PARACOPTER
Take off and fly
• Note: the PARACOPTER rises in normal wind conditions in a 10 ° angle, means relatively flat. Make sure
there are no obstacles or trees are in the takeoff distance.
Starting from ground without assistance
• ATTENTION: Observe wind direction! Start always
against the wind direction!
• The PARACOPTER can only start on smooth, level sur-
face. Stand behind the model and place the unfold pa-
rachutes on your feet as shown in the picture.
•
ATTENTION: Observe the wind speed! The PARA-
COPTER must remain on the starting spot, otherwise the
start is not possible.
• Now give full throttle. After about 4 -5 m rolling the PARA-
COPTER will start.
• Note: the PARACOPTER rises in normal wind conditions
in a 10 ° angle, means relatively flat. Make sure there are
no obstacles or trees are in the takeoff distance.
Flying
Right turn:
move control lever to the right
Straight:
control lever in neutral position
Left Turn:
move control lever to the left
EN

31
PARACOPTER
Landing
If the wind gets stronger during the flight unexpectedly (strong breeze, over 30 km/h) and you risk losing
control of the model, release the throttle stick immediately and fly close right turns to lose height quickly. Land
the model and wait until the wind calms down!
Landing
With the recommended flight battery the PARACOPTER – depending on the wind con-
ditions – has a flight time of about 8 - 10 minutes. If the battery gets weak immediately
begin with the landing. WARNING: if the battery is too weak, the PARACOPTER can no
longer be controlled – crash hazard!
1. Start with the preparation for landing preferably in an altitude between 20 - 30 m.
When possible, fly against the wind for a better descent control.
2. Now fly in direction of the landing spot and begin to sink slowly.
3. No later than 10 meters altitude the PARACOPTER must be rotated against
the wind, the landing approach starts now. Control the sink angle with the
throttle position.
4. In order to reduce the speed as best as possible and to allow a soft
landing, land against the wind direction.
Turn off the model and then the transmitter. Disconnect the flight batte-
ry and remove it from the model.
WARNING: the motor of the PARACOPTER may get very hot
during operation. Allow to cool down minimum 20 minutes before
the next start to avoid damage. Fire hazard!
EN

32
PARACOPTER
Maintenance and spare parts
Maintenance
To have fun with your model over a long period, occasional service work is required to get your model in good
condition and to minimize wear.
• Remove dirt or dust depending with compressed air or a soft brush after each use. For stubborn dirt, a
harder brush or a toothbrush can be used.
• To clean the body/fuselage no chemical cleaners such as thinners may used, as this damage the plastic
of the body/fuselage. Normally a piece of soft cloth is ok, stubborn dirt can be removed with washing-up
liquid.
• Check the tightness of all screws and tighten if necessary.
• Also check all connections, cables and power battery / rechargeable battery for damage.
•
WARNING: Damaged batteries or rechargeable batteries must not be used again and must be
disposed of immediately – fire hazard! Please note the disposal notes at the end of this manual.
• Check the model for worn, broken or jammed parts and gears and repair if necessary.
•
WARNING: remove the batteries / rechargeable batteries of the transmitter and model when not in
use – fire hazard!
Troubleshooting
Problem Possible Cause Solution
Propeller is not turning ON / OFF switch in the OFF position
Flight battery weak
Turn ON
Recharge flight battery
Propeller suddenly
stops
flight battery is low, the motor is
switched off
Charge flight battery
PARACOPTER not ac-
tively responds to the
transmitter
security function activated
transmitter and receiver are not
bound
Enable Drive: move the throttle lever
once all the way up and then all the way
down
Bind transmitter and receiver, see chap-
ter “binding”
Repairs, Spare Parts
Normal wear and defective parts that result from an accident, are excluded from the warranty. These include
in particular:
for car models: bald tires, worn parts and drive gears, or bent / broken suspension, chassis or bodywork
ship models: damaged or broken propellers, torn superstructure
airplanes: damage due to improper transport or crash
If you find a part that is defective in material or workmanship right after opening the package, return - before
you used it – to your dealer or directly to us and we will send you a replacement.
For the PARACOPTER all parts are available as spares. If a part is defective or worn, you can identify it with
the help of the exploded view.
In case of problems or questions, please contact your dealer or:
XciteRC Modellbau GmbH & Co. KG - Service, Autenbachstrasse 12, D-73035 Göppingen, Phone +49 7161
40 799 50
Email: [email protected]
Spare parts for the PARACOPTER you may order in your local hobby shop or online at http://www.XciteRC.
de/ under Order No.: 24000000.
EN

33
PARACOPTER
Environment
ENVIRONMENTAL PROTECTION NOTES
The symbol of the crossed out dust bin on the product or packaging indicates that this product
must be disposed of separately from normal household waste. In order to avoid harmful effects on
the environment and human health in the disposal of electrical and electronic equipment and the re-
use or recycling are possible. You have the opportunity to submit electrical and electronic equipment
free of charge at an appropriate collecting point in your area. Please check with your city or town across the
available depot. You also have the option to return old electrical and electronic equipment which has been
purchased from us. We will then perform a proper recycling or reuse.
Possibly contained batteries must be removed from the product and disposed of at the appropriate collecting
point.
Notes on battery law
According to the German Battery Act (BattG) the one who sells batteries (and accumulators etc.) or devices
containing batteries, we are obliged to draw your attention to the following:
Batteries and rechargeable batteries should not be disposed of with household waste but you are legally
obliged to return used batteries. Batteries can contain contaminants that could harm the environment or your
health if improperly stored or disposed of. Batteries also contain important raw materials such as iron, zinc,
manganese or nickel and can be recycled.
You can send us back the batteries after use either sufficient postage:
XciteRC Modellbau GmbH & Co.KG
Autenbachstr. 12
D-73035 Göppingen
returned free of charge or in close proximity (eg in trade or municipal collection). The levy is limited to points
of sale to end-users for the disposal of such waste batteries and customary amounts, which the distributor
as new batteries in his range or has done.
Batteries containing pollutants are marked with a sign, a crossed-out rubbish bin, and the chemical symbol
of the pollutant-heavy metal.
This crossed-out bin means that you must not dispose of batteries with household waste.
Among these characters, see also the following symbols
have the following meanings:
• Cd = cadmium
• Pb = plumbium
• Hg = mercury
• Li = lithium
EN
Cd Hg Pb
Li-Po

50
PARACOPTER
Konformität · Conformity · Conformité
DE Die XciteRC Modellbau GmbH & Co. KG erklärt hiermit, dass dieses Produkt den grundlegen-
den Anforderungen und anderen relevanten Vorschriften der Richtlinie R&TTE 1999/5/EC sowie
RoHS 2011/65/EC entspricht.
Die ausführliche Konformitätserklärung finden Sie im Internet unter www.XciteRC.com beim
jeweiligen Produkt unter dem Link Konformitätserklärung oder per E-Mail: info@xciterc.de.
EN The XciteRC Modellbau GmbH & Co. KG declare that this product complies with the essen-
tial requirements and other relevant regulations of the directives R&TTE 1999/5/EC and RoHS
2011/65/EC.
The detailed Declaration of Conformity can be found at www.XciteRC.com at the respective
product link Declaration of Conformity or via E-mail: info@xciterc.de.
FR La société XciteRC Modellbau GmbH & Co. KG déclare que cet article est conforme aux
directives CE R&TTE 1999/5/EC and RoHS 2011/65/EC.
Vous trouverez la déclaration de conformité détailée sur internet, sous www.XciteRC.com, sur
la page de l‘article en question , sous le lien de la Déclaration de conformité ou e-mail: info@
xciterc.de.

51
PARACOPTER
Ersatzteile · Spare Parts · Pièces de rechange
24000001
Rumpfgondeln PARACOPTER
Fuselage PARACOPTER
Cabine fuselage PARACOPTER
24000002
Propellerring PARACOPTER
Propeller Guard PARACOPTER
Protection hélice PARACOPTER
24000003
Propeller PARACOPTER
Propeller PARACOPTER
Hélice PARACOPTER
24000004
Halterung Regler-Empfängereinheit
Receiver-ESC covers
Couvercle récepteur/variateur
24000007
Motorhalterung
Motor mount
Support moteur
24000010
Servoarm PARACOPTER
Servo Arm PARACOPTER
Palonnier Servo PARACOPTER
24000013
Hinterachse PARACOPTER
Rear Axle PARACOPTER
Axe arrière PARACOPTER
24000006
Akkufachdeckel
Battery Cover
Couvercle batterie
24000009
Hülse für Antriebswelle
Shaft Cover
Manche d'arbre de transmission
24000015
Halterung für Propellerring
Bearing Frame
Support pour protection hélice
24000014
Aufhängungsschnurbefestigung
Hook Suspension Lines
Fixation fil de suspension
24000011
Vorderrad PARACOPTER
Front Wheel PARACOPTER
Roue avant PARACOPTER
24000008
Steuerstangen (2)
Servo Rods (2)
Tringlerie servo (2)
24000005
Aufhängung Propellerring
Propeller guard mount
Support protection hélice
24000012
Hinterrad PARACOPTER
Rear Wheel PARACOPTER
Roue arrière PARACOPTER
/