Page is loading ...

www.gracobaby.com
OWNER'S MANUAL
MANUEL D'UTILISATEUR
MANUAL DEL PROPIETARIO
Duo 2-in-1
Swing & Bouncer
©2010 Graco PD150904A 5/10

2
Failure to follow these warnings and the
assembly instructions could result in serious injury or death.
• PLEASE KEEP OWNER’S
MANUAL FOR FUTURE USE.
• ADULT ASSEMBLY REQUIRED.
FALL HAZARD:
To prevent serious injury or
death from falling or being
strangled in straps:
• Never leave child unattended.
• Always use restraint system.
Adjust belt as needed to get
a snug fit around your child.
• Never carry child in swing.
• Stop using this swing when
child attempts to climb out or
reaches 25lbs (11.4kg).
STRANGULATION HAZARD:
• DO NOT suspend strings
over the product or attach
strings to toys.
• DO NOT place product in any
location where there are cords,
such as window blind cords,
drapes, phone cords, etc.
• Strings can cause
strangulation. DO NOT place
items with a string around
your child’s neck, such as hood
strings or pacifier cords.
• DO NOT USE THIS PRODUCT
if it is damaged or broken.
• NEVER USE as a car seat.
• READ ALL INSTRUCTIONS
BEFORE ASSEMBLY AND USE
OF THIS PRODUCT. If you
experience any difficulties,
please contact the Customer
Service Department.
• ELECTRONIC TOYS (on
certain models): Do not open.
No serviceable parts inside.
Remove and immediately discard
plastic tab from slot in toy.
• ELECTRONIC MIX N’ MOVE
TOYS (on certain models) are
not intended for use in water.

3
• BOUNCER/CARRIER MODE:
FALL HAZARD:
To prevent serious injury or death
from falling :
• Never leave child unattended.
• Always use restraint system.
Adjust belt as needed to get a
snug fit around your child.
• Child's movement can slide
product. Use only on floor.
NEVER use on any elevated
surfaces.
• Never use for a child able to sit
up unassisted.
• NEVER use this product as a
means to transport an infant in a
motor vehicle.
• Maximum recommended height
is 30 inches (76.2cm).
STRANGULATION HAZARD:
• Child can strangle in loose
restraint straps. NEVER leave
child in product when straps are
loose or undone.
SUFFOCATION HAZARD:
• Product can roll over on soft sur-
faces and suffocate child. NEVER
place product on beds, sofas,
cushions or other soft surfaces.

12
Insert leg wire into leg
brace as shown until it
snaps into place.
Inserte el alambre de la
pata en el soporte de la
pata como se indica hasta
que se trabe en su lugar.
Insérer la tige de la patte
dans le support horizon-
tal, jusqu’à ce qu’elle
s’enclenche en place.
J
SNAP!
ENCLENCHEZ!
¡CHASQUIDO!
K
Snap the other side of the
brace on to the other leg
wire.
Trabe el otro lado del
soporte en el alambre de
la otra pata.
Enclencher l’autre côté du
support horizontal sur
l’autre tige de patte.
SNAP!
ENCLENCHEZ!
¡CHASQUIDO!

13
L
Place seat frame face
down and place
hooks on seat cover
over the seat wire as
shown.
Ponga el armazón del
asiento hacia abajo y
coloque los ganchos
en la funda del
asiento sobre el
alambre del asiento
como se indica.
Retourner le siège à
l’envers et placer les
crochets de la housse
de siège par-dessus la
tige du siège, tel
qu’illustré.
Snap flap and seat
back together.
Trabe la aleta y el
asiento juntos.
Presser le rabat et
l’arrière du siège l’un
contre l’autre.
M
Attaching Seat Pad
• Fixer le coussin du siège
• Instalación de la almohadilla del asiento

14
Envuelva la cinta con
la traba a presión
alrededor del alambre
del asiento y trábela a
la parte de abajo de
la almohadilla del
asiento.
Enrouler la courroie
avec le fermoir à
pression autour de la
tige du siège et
enclencher sous le
coussin de siège.
EN
SNAP!
ENCLENCHEZ!
¡CHASQUIDO!
Wrap strap with snap
around seat wire and
snap to the underside
of seat pad.

15
SNAP!
ENCLENCHEZ!
¡CHASQUIDO!
Rear leg
Patte arrière
Pata trasera
One button
Seul bouton
Solo botón
Attaching Rear Legs
• Installation des pattes arrière
• Colocación de las patas traseras
SNAP!
ENCLENCHEZ!
¡CHASQUIDO!
Insert rear legs into holes
in housings as shown.
Button MUST snap
through hole.
Inserte las patas traseras en
los agujeros del armazón
como se indica. El botón
DEBE trabarse a través del
agujero.
Insérer les pieds arrière
dans les orifices situés dans
les boîtiers, tel qu’illustré.
Le bouton DOIT
s’enclencher dans l’orifice.
12
13
2X
EE
EF

16
SNAP!
ENCLENCHEZ!
¡CHASQUIDO!
Front leg
Patte avant
Pata delantero
The double buttons must fit into
the channels inside the battery
housing. Button MUST snap
through hole.
Los botones dobles deben caber
en los canales en el interior del
armazón de las pilas. Le bouton
DOIT s’enclencher dans l’orifice.
Les deux boutons doivent
s’insérer dans les sillons à
l’intérieur du boîtier à piles. El
botón DEBE trabarse a través del
agujero.
Gire la pata hacia afuera hasta
que el botón simple se trabe en
su ranura. VERIFIQUE que la
pata esté debidamente instalada
girándola en el armazón.
Faire pivoter la patte vers
l’extérieur jusqu’à ce que le
bouton seul s’enclenche dans sa
coche. S’ASSURER que les pattes
sont bien fixées en les tournant
dans les boîtiers.
Swing the leg outward until the
single button snaps into its
notch. CHECK that the leg is
properly attached by twisting
them in the housings.
Attaching Front Legs
• Installation des pattes avant
• Colocación de las patas delanteras
14
EG

17
SNAP!
ENCLENCHEZ!
¡CHASQUIDO!
REPEAT step 13 with
other housing and leg.
Button MUST snap through hole.
REPITA l paso 13 con la
otra pata y armazón.
Le bouton DOIT s’enclencher
dans l’orifice
RÉPÉTER l‘étape 13 avec
l’autre boîtier et patte.
El botón DEBE trabarse a través
del agujero.
VERIFIQUE que la pata esté
debidamente instalada girándola
en el armazón.
S’ASSURER que les pattes sont
bien fixées en les tournant dans
les boîtiers.
CHECK that the leg is properly
attached by twisting them in the
housings.
Front leg
Patte avant
Pata delantero
e
15
EH

18
FRONT
FR
ONT
FRONT 2
FRONT 1
EI
FR
ONT
FRONT
FR
ONT 2
FR
ONT 1
EJ
Front tube • Tube avant
• Tubo delantero
Front tube
Tubo delantero
Tube avant
FRON
T
FR
ONT
Ponga la pata con el
texto FRONT
(FRENTE) en el tubo
delantero como se
indica.
El texto FRONT
deberá mirar al piso.
Installer les pieds
portant l'inscription «
FRONT » sur le tube
avant, tel qu’illustré.
Le texte « FRONT »
doit être orienté vers
le plancher.
Place feet with the
text “FRONT” onto
the front tube as
shown. The text
“FRONT ” should
face floor.
Asegure la pata
delantera con un
tornillo. Repita el
procedimiento del
otro lado.
Fixer le pied avant
avec une vis. Répéter
cette opération de
l’autre côté.
Secure front foot
with screw.
Repeat on other
side.
Big feet
Pies grandes
Grosses pattes
2X

19
SNAP!
ENCLENCHEZ!
¡CHASQUIDO!
CHECK that all tubes are
securely attached.
CHECK that the parts of
the frame are assembled in
the positions shown.
VERIFIQUE que todos los
tubos estén instalados
apretadamente.
VERIFIQUE que las piezas
del armazón estén armadas
en las posiciones indicadas.
S’ASSURER que tous les
tubes sont bien fixés.
S’ASSURER que toutes les
pièces de l’armature sont
bien montées dans les
positions illustrées.
Front base tube
Tubo de la base delantera
Tube de la base avant
EK

20
Rear tube • Tube arrière • Tubo trasero
Rear tube
Tubo trasero
Tube arrière
REAR
REAR
CHECK that all tubes are securely attached.
CHECK that the parts of the frame are assembled
in the positions shown.
VERIFIQUE que todos los tubos estén instalados apretadamente.
VERIFIQUE que las piezas del armazón estén armadas en las posi-
ciones indicadas.
S’ASSURER que tous les tubes sont bien fixés.
S’ASSURER que toutes les pièces de l’armature sont bien montées
dans les positions illustrées.
SNAP!
ENCLENCHEZ!
¡CHASQUIDO!
EL
Rear 4
Rear 3

26
FK
To use as carrier or bouncer,
pull up on handles to remove
seat from frame.
Para usarlo como
transportador o saltador, tire
de las manijas para sacar el
asiento del armazón.
Pour utiliser comme
porte-bébé ou siège sauteur,
tirer sur les poignées pour
dégager du cadre.

27
To Secure Child • Attacher l’enfant
• Para asegurar al niño
FM
WARNING
Falling Hazard:
Always use the
seat belt.
ADVERTENCIA
Peligro de caida:
Use siempre el
cinturón de seguridad.
MISE EN GARDE
Danger de chute:
Toujours utiliser la
ceinture du siège.
FL

30
For Safe Battery Use
Keep the batteries out of children’s reach.
Any battery may leak battery acid if mixed with a different battery
type, if inserted incorrectly (put in backwards) or if all batteries are
not replaced or recharged at the same time. Do not mix old and
new batteries. Do not mix alkaline, standard (carbon-zinc) or
rechargeable (nickel-cadmium) batteries.
Any battery may leak battery acid or explode if disposed of in fire
or an attempt is made to charge a battery not intended to be
recharged. Never recharge a cell of one type in a recharger made
for a cell of another type.
Discard leaky batteries immediately. Leaky batteries can cause skin
burns or other personal injury. When discarding batteries, be sure to
dispose of them in the proper manner, according to your state and
local regulations.
Always remove batteries if the product is not going to be used for a
month or more. Batteries left in the unit may leak and cause damage.
Recommended type batteries—alkaline disposables, size D
(LR20 - 1.5V). NEVER mix battery types. Change batteries when
product ceases to operate satisfactorily.

31
WARNING
Changes or modifications to this unit not expressly approved by the
party responsible for compliance could void the user authority to
operate the equipment.
NOTE: This equipment has been tested and found to comply with
the limits for a Class B digital device, pursuant to Part 15 of the
FCC Rules. These limits are designed to provide reasonable
protection against harmful interference in a residential installation.
This equipment generates, uses and can radiate radio frequency
energy and, if not installed and used in accordance with the
instructions, may cause harmful interference to radio
communications.
However, there is no guarantee that interference will not occur
in a particular installation. If this equipment does cause harmful
interference to radio or television reception, which can be
determined by turning the equipment off and on, the user is
encouraged to try to correct the interference by one or more of
the following measures:
• Reorient or relocate the receiving antenna.
• Increase the separation between the equipment and receiver.
• Connect the equipment into an outlet on a circuit different from
that to which the receiver is needed.
• Consult the dealer or an experienced radio/TV technician for help.

36
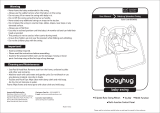
Starting Swing (6 Speed)
• Mise en marche de la balançoire (6 vitesses)
• Activación del columpio (6 velocidades)
GH
1
4
3
2
5
6
Power ON/OFF
MARCHE/ARRÊT
ENCENDIDO/APAGADO
Nature sounds
Bruits de la nature
Sonidos de la
naturaleza
Music/Nature Off
ARRÊT musique/
nature
Apagado de la
música/naturaleza
Volume control
Commande de volume
Control del volumen
Music
Musique
Música
Timer
Minuterie
Reloj
WARNING avoid serious injury from falling or sliding out.
Always use seat belt. After fastening buckles, adjust belts to get a snug
fit around your child.
TO TURN SWING ON:
Press On /Off button or press any speed from 1 to 6, then push
swing. When pressing On/Off button, it automatically starts with the
last speed setting that was selected before the swing was turned off.
Observe the swinging motion for a minute. It takes time for the
swing to adjust to a setting. Change setting if needed.
A small, quiet baby will swing higher on each setting than a larger,
more active baby.
Your seat may be stopped at any time the motor is running without
damaging the motor. Push swing to restart.
If your swing motor stops operating by itself, a protective device
may have been activated. Turn off motor, wait three minutes, then
restart swing.
TO TURN SWING OFF: Press On /Off button.

40
TIMER— Push “Timer” button to set the timer for the
swing and/or Music/Nature sounds. If the timer button
is not pushed, the swing and/or music/nature sound
will continue to play until the power on/off button is
pushed or the music/nature off button is pushed.
When using the timer with the swing on, if the button
is pushed once, the red speed light will flash once and timer is set for
10 minutes. Pushing the timer button a second time will increase the
run time to 20 minutes and the red speed light will flash twice.
Pushing a third time will increase the time to 30 minutes and the red
speed light will flash three times.
When using the timer with the Music/Nature sounds on, the timer
will set to 10, 20 or 30 minutes as described for the swing, but there
will be no flashing light.
RELOJ – Empuje el botón “Reloj” (Timer) para fijar la duración del
columpio y la música/sonidos de la naturaleza. Si no empuja el botón
del reloj, el columpio y/o la música/sonidos de la naturaleza
continuarán sonando hasta que se vuelva a empujar el botón de
encendido/apagado o el botón de apagado de la música/sonidos de
la naturaleza. Cuando usa el reloj para el columpio, si empuja el
botón una vez, la luz roja indicadora de la velocidad destellará una
vez y el reloj estará programado para 10 minutos. Empujar el botón
del reloj por segunda vez aumentará el tiempo de funcionamiento a
20 minutos y la luz roja indicadora de velocidad destellará dos veces.
Empujarlo por tercer vez aumentará la duración a 30 minutos y la luz
roja indicadora de velocidad destellará tres veces. Cuando se usa el
reloj solamente para la música/sonidos de la naturaleza, el reloj se
fijará a 10, 20 ó 30 minutos como se describe para el columpio, pero
no destellará ninguna luz.
MINUTERIE - Appuyer sur le poussoir « minuterie » pour activer la
commande de la balançoire et/ou des bruits de la nature et de la
musique par minuterie. Si le bouton de la minuterie n'est pas enclen-
ché, la balançoire et/ou des bruits de la nature et la musique continu-
ent à fonctionner jusqu’à ce qu’on appuie sur le bouton de mise en
marche ou sur le bouton de commande des bruits de la nature et de
la musique. Lorsqu’on appuie une fois sur le bouton pour utiliser la
minuterie pour la balançoire, le voyant rouge clignote une fois et la
minuterie est réglée pour 10 minutes. En poussant une
seconde fois, on augmente le temps de fonctionnement à 20 minutes
et le voyant rouge clignote deux fois. Pousser le bouton une troisième
fois augmente le temps de fonctionnement à 30 minutes et le voyant
rouge clignote trois fois. Lorsqu’on appuie sur le bouton pour utiliser
la minuterie pour les bruits de la nature et la musique, le réglage tel
que décrit ci-dessus pour obtenir un fonctionnement de 10, 20 ou 30
minutes, mais le voyant rouge ne s’allume pas.

42
Problem Solving
SWING WON’T OPERATE:
1. No batteries in swing.
2. Batteries dead.
3. Speed setting too low.
4. Batteries in backwards — check “+” and “-”.
5. Corrosion on battery terminals. Rotate batteries in place against
terminals, or clean with sandpaper or steel wool if corrosion is
severe.
6. Baby leaning too far forward.
7. Baby grabbing swing legs. (Discontinue use.)
8. Seat not pushed high enough for a good start.
9. Protective device activated. (Turn off motor, wait 3 minutes, then
restart swing.)
SEAT DOESN’T SWING VERY HIGH:
1. Control setting too low.
2. Blanket hanging down, causing increased wind resistance.
3. Batteries too weak.
4. Baby leaning too far forward.
5. Baby too heavy or too active. (Discontinue use.)
6. Soft carpet (swings higher on hard floors).

46
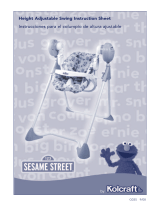
For Storage • Pour l’entreposage
• Para guardarlo
Empuje los botones para
plegarlo.
Push buttons to fold.
Se replie en appuyant sur
les boutons.
GM
GL
/