Page is loading ...
Page is loading ...
Page is loading ...
Page is loading ...
Page is loading ...
Page is loading ...
Page is loading ...
Page is loading ...
Page is loading ...
Page is loading ...
Page is loading ...

GB
OVEN
FP T5.1
Contents
Installation, 13-14
Positioning
Electrical connections
Data plate
Description of the appliance, 15
Overall view
Control panel
Start-up and use, 16
Setting the clock and timer
Starting the oven
Control panel lock
DEMO mode
Cooking modes, 17-19
Cooking modes
Automatic cooking modes
Programming your cooking
Practical cooking advice
Cooking advice table
Precautions and tips, 20
General safety
Disposal
Respecting and conserving the environment
Maintenance and care, 21
Switching the appliance off
Cleaning the appliance
Cleaning the oven door
Replacing the light bulb
Assistance
Operating Instructions
Italiano, 1 Français, 22English,12
IT FR
GB
Nederlands,
32
Deutsch, 42
NL DE

GB
13
Before placing your new appliance into operation
please read these operating instructions carefully.
They contain important information for safe use, for
installation and for care of the appliance.
Please keep these operating instructions for future
reference. Pass them on to possible new owners of
the appliance.
Positioning
Keep packaging material out of the reach of
children.It can become a choking or suffocation
hazard. (see Precautions and tips).
The appliance must be installed by a qualified
person in compliance with the instructions provided.
Incorrect installation may cause harm to persons,
animals or may damage property.
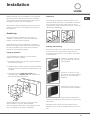
Fitting the appliance
Use the appropriate cabinet to ensure that the
appliance functions properly.
The panels adjacent to the oven must be made of
heat-resistant material.
Cabinets with a veneer exterior must be assembled
with glues which can withstand temperatures of up
to 100°C.
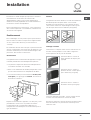
To install the oven under the counter (see
diagram) and in a kitchen unit, the cabinet must
have the following dimensions:
The appliance must not come into contact with
electrical parts once it has been installed.
The consumption indications on the data plate have
been calculated for this type of installation.
Ventilation
To ensure good ventilation, the back panel of the
cabinet must be removed. It is advisable to install the
oven so that it rests on two strips of wood, or on a
completely flat surface with an opening of at least 45 x
560 mm (see diagrams).
Centring and fastening
Position the 4 tabs on the side of the oven according
to the 4 holes of the outer frame. Adjust the tabs
according to the thickness of the cabinet side panel,
as shown below:
thickness of 20 mm: take off
the removable part of the tab
(see diagram)
thickness of 18 mm: use the
first groove, which has already
been set in the factory (see
diagram)
thickness of 16 mm: use the
second groove (see diagram)
Secure the appliance to the cabinet by opening the
oven door and putting 4 screws into the 4 holes of the
outer frame.
All parts which ensure the safe operation of the
appliance must not be removable without the aid of a
tool.
560 mm.
45 mm.
595 mm.
595 mm.
24 mm.
545 mm.
5 mm.
567 mm.
23 mm.
593 mm.
45 mm.
558 mm.
Installation

GB
14
Electrical connections
Ovens equipped with a three-pole power supply
cable are designed to operate with alternating current
at the voltage and frequency indicated on the data
plate located on the appliance (see below).
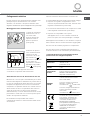
Fitting the power supply cable
1. Open the terminal
board by inserting a
screwdriver into the side
tabs of the cover. Use
the screwdriver as a
lever by pushing it down
to open the cover (see
diagram).
2. Install the power
supply cable by
loosening the cable
clamp screw and the
three wire contact
screws L-N-
.
Connect the wires to the
corresponding
terminals: the Blue wire
to the terminal marked
(N), the Brown wire to
the terminal marked (L) and the Yellow Green wire to
the terminal marked
(see diagram).
3. Secure the cable by fastening the clamp screw.
4. Close the cover of the terminal board.
Connecting the supply cable to the mains
Install a standardised plug corresponding to the load
indicated on the data plate (see side).
The appliance must be directly connected to the mains
using an omnipolar circuit-breaker with a minimum
contact opening of 3 mm installed between the appliance
and the mains, suitable for the load indicated and
complying with current electrical regulations (the earthing
wire must not be interrupted by the circuit-breaker). The
supply cable must not come into contact with surfaces
with temperatures higher than 50°C.
The installer must ensure that the correct electrical
connection has been made and that it is compliant
with safety regulations.
Before connecting to the power supply, make sure that:
The appliance is earthed and the plug is compliant
with the law.
The socket can withstand the maximum power of
the appliance, which is indicated on the data plate
(see below).
The voltage must be in the range between the
values indicated on the data plate (see below).
The socket is compatible with the plug of the
appliance. If the socket is incompatible with the
plug, ask an authorised technician to replace it. Do
not use extension cords or multiple sockets.
Once the appliance has been installed, the power
supply cable and the electrical socket must be easily
accessible.
The cable must not be bent or compressed.
The cable must be checked regularly and replaced
by authorised technicians only (see Assistance).
The manufacturer declines any liability shou
ld
these safety measures not be observed.
NL
DATA PLATE
Dimensions
width 43.5 cm
height 32 cm
depth 40 cm
Volume
lt. 56
Electrical
connections
voltage: 220-240V ~ 50Hz
maximum power absorbed
2800W or 2560-3050W (see data
plate)
ENERGY LABEL
Directive 2002/40/EC on the label
of electric ovens.
Standard EN 50304
Energy consumption for Natural
convection – heating mode:
Convection mode.
Declared energy consumption for
Forced convection Class – heating
mode: Rotisserie.
This appliance conforms to the
following European Economic
Community directives:
73/23/EEC of 19/02/73 (Low
Voltage) and subsequent
amendments;
- 89/336/EEC of 03/05/89
(Electromagnetic Compatibility) and
subsequent amendments;
- 93/68/EEC of 22/07/93 and
subsequent amendments.
- 2002/96/EC

GB
15
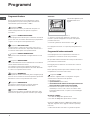
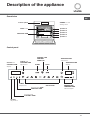
Control panel
GRILL rack
DRIPPING PAN
GUIDES for the
sliding racks
position 5
position 4
position 3
position 2
position 1
CURRENT
PREHEATING
TEMPERATURE
indicator lights
TURNING THE
CONTROL
PANEL ON
TIMER
adjustment
COOKING MODES
SELECTION
TEMPERATURE
display
TEMPERATURE
adjustment
START STOP
CLOCK and
COOKING TIME
display
Programming END
COOKING TIME
Programming
COOKING TIME
CLOCK
adjustment
CLOCK and
COOKING TIME
adjustment
Overall view
Control panel
Description of the appliance

GB
16
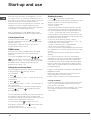
The first time you switch your appliance on, heat
the empty oven to its maximum temperature for at
least half an hour, making sure the door is kept shut.
Ensure that the room is well ventilated before
switching the oven off and opening the oven door. The
appliance may emit a slightly unpleasant odour
caused by the burning away of protective substances
used during the manufacturing process.
The Control panel lock and DEMO mode can be
activated/deactivated even when the control panel is off.
Control panel lock
To lock the oven controls, press and . for 5
seconds. A buzzer sounds and the TEMPERATURE
display shows r-0.
Press again to unlock the controls. The STOP
symbol remains always active.
DEMO mode
The oven can operate in DEMO mode: all heating
elements are deactivated, and controls remain
operative.
To activate the DEMO mode, press
, , , and
at the same time. A buzzer sounds and the two
displays show demo on. Press again to deactivate
the DEMO mode: a buzzer sounds and the two
displays show demo off.
Setting the clock and timer
After the appliance has been connected to the mains,
or after a blackout,
will begin to blink.
To set the time:
1. press
2. set the time using + and - on the left side of the
control panel
3. press
again
4. set the minutes using + and - on the left side of
the control panel
To make any changes, turn on the control panel by
pressing
, then press and follow the steps
described above.
The timer operates in minutes: when the selected time
has elapsed, a buzzer will sound. The buzzer will
automatically stop after one minute or when any active
symbol on the control panel is pressed.
To set the timer, press
and follow the steps
described to set the clock. The
symbol will remind
you that the timer is on.
The timer does not turn the oven on or off.
Starting the oven
1. Press to turn on the control panel.
2. Press the symbol of the desired cooking mode. The
displays show the time and temperature of the
selected cooking mode.
3. Press START.
4. The oven will start the preheating phase, and the
current preheating temperature indicator lights turn
red. The temperature may be changed by pressing
+ and - on the right side of the control panel.
3. When preheating is finished, a buzzer sounds and
all current preheating temperature indicator lights turn
on: place the food in the oven.
4. You may do the following during cooking:
- change the temperature by pressing + and - on
the right side of the control panel
- set the cooking time (see Cooking Modes)
- press STOP to interrupt cooking.
5. The oven switches off automatically after two hours:
this default time is set for all cooking modes for safety
reasons.
The cooking time may be changed (see Cooking
Modes).
6. In case of a blackout, if the oven was already
operating, an automatic system within the appliance
will reactivate the cooking mode from where it was
interrupted as long as the temperature did not drop
below a certain level. Programmed cooking modes
which have not started will not be restored and must
be reprogrammed.
There is no preheating in the FAST COOKING and
BARBECUE modes.
Never put objects directly on the oven bottom to
avoid damaging the enamel coating.
Always place cookware on the rack(s) provided.
Cooling ventilation
In order to cool down the external temperature of the
oven, a cooling fan blows air between the control
panel and the oven door.
Once the cooking has been completed, the cooling
fan remains on until the oven has cooled down
sufficiently.
Start-up and use

GB
17
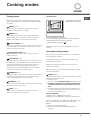
Cooking modes
All cooking modes have a default cooking temperature
which may be adjusted manually between 30°C and 300°C
as desired.
BREAD mode
Use this function to make bread. Refer to the chapter
"Automatic cooking modes" for details.
BAKING mode
This mode is ideal for baking and cooking temperature
sensitive foods such as cakes that need to rise and to
prepare certain tartlets on 3 shelves simultaneously.
MULTI-COOKING mode
Since the heat remains constant throughout the oven, the air
cooks and browns food uniformly. A maximum of two racks
may be used at the same time.
TRADITIONAL OVEN mode
With this traditional cooking mode, it is best to use one
cooking rack only.
ROTISSERIE mode
This combination of features increases the effectiveness of
the unidirectional thermal radiation of the heating elements
through forced circulation of the air throughout the oven.
This helps prevent food from burning on the surface,
allowing the heat to penetrate right into the food. Always
cook in this mode with the oven door closed.
BARBECUE mode
The high and direct temperature of the grill is recommended
for food that requires high surface temperature. Always
cook in this mode with the oven door closed.
TURNSPIT mode
The function is ideal for turnspit cooking. Always cook in this
mode with the oven door closed.
PIZZA mode
Use this function to make pizza. Refer to the chapter
"Automatic cooking modes" for details.
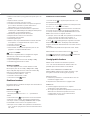
The Rotisserie
To operate the rotisserie (see
diagram) proceed as follows:
1. Place the dripping pan in position 1.
2. Place the rotisserie support in position 3 and insert the spit in
the hole provided on the back panel of the oven.
3. start the rotisserie by selecting
.
When this mode is on, the turnspit will stop if the door is
opened.
Automatic cooking modes
These modes are completely automatic: the cooking time
and temperature are preset.
It is possible to vary the cooking time to optimise and
personalise the final result.
When the cooking time has been reached, the oven
buzzer sounds 3 times.
Do not open the oven door to avoid offsetting the cooking
time and temperature.
BREAD mode
To obtain the best results, we recommend that you carefully
observe the instructions below:
follow the recipe;
do not exceed the maximum weight of the dripping pan.
remember to put 100 ml of water at the bottom of the
oven and commence cooking while the oven is still
cold.
the dough must be leavened at room temperature for 1 -
1 ½ hours (depending on the room temperature) or until
the dough has doubled in size.
Recipe for
BREAD:
1 Dripping pan of 1000 g Max, lower level
2 Dripping pans of 1000 g Max, medium and lower levels
Recipe for 1000 g of dough: 600 g flour, 350 ml water, 10 g
salt, 25 g fresh yeast (or 2 sachets of powder yeast)
Method:
Mix flour and salt in a large bowl.
Dilute yeast in lukewarm water (approximately 35
degrees).
Cooking modes

GB
18
Make a small well in the mound of flour.
Pour in water and yeast mixture.
Knead dough by stretching and folding it over itself
with the palm of your hand for 10 minutes until it has a
uniform consistency and is not too sticky.
Ball and cover the dough with plastic wrap and leave it to
leaven at room temperature for 1 - 1 ½ hours (until it has
doubled in size).
Cut the dough into equal sized loaves.
Place them in the dripping pan on oven paper.
Cover the loaves with flour.
Make incisions on the loaves.
Pour 100 ml of cold distilled water onto the bottom of the
oven. For cleaning purposes, we recommend the use of
water and vinegar.
Place loaves inside the cold oven.
Start BREAD cooking mode
Once baked, leave the loaves on one of the grills until
they have cooled completely.
PIZZA mode
To obtain the best results, we recommend that you carefully
observe the instructions below:
follow the recipe.
the weight of the dough should be between 500g and
700g.
lightly grease the dripping pan.
Recipe for PIZZA:
1 Dripping pan, Lower level, Hot or cold oven
Recipe for 3 pizzas of approximately 550g: 1000g flour,
500ml water, 20g salt, 20g sugar, 100ml olive oil, 20g fresh
yeast (or 2 sachets of powder yeast)
leavening at room temperature: 1 hour.
place inside hot or cold oven.
start PIZZA cooking mode.
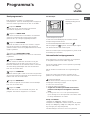
Programming your cooking
Select a cooking mode before programming.
Programming Time
Press
, then:
1. Set the time using + and - on the left side of the control
panel.
2. Press
to store the setting.
3. Press START to activate programming.
4. When the selected time has elapsed, END appears on
the TEMPERATURE display and a buzzer sounds.
For example: it is 9:00 a.m. and a time of 1 hour and 15
minutes is programmed. The programme stops
automatically at 10:15 a.m.
Programming Delayed Cooking
1. Press
and repeat steps 1 to 4 as described in the
Programming Time procedure.
2. Then press
and set the end time using + and - on
the left side of the control panel.
3. Press to store the setting.
4. Press START to activate programming.
5. When the selected time has elapsed, END appears on
the TEMPERATURE display and a buzzer sounds.
For example: it is 9:00 a.m. and a time of 1 hour and 15
minutes is programmed and the end time is set to 12:30.
The programme starts automatically at 11:15 a.m.
Programming has been set when
and flash. The
CLOCK and COOKING TIME displays show the end time
and the cooking time alternately.
To cancel programming press STOP.
When selecting a cooking mode,
is illuminated
whereas
is not. When setting the cooking time, is
illuminated and delayed cooking can be programmed.
Practical cooking advice
Do not place racks in position 1 and 5 during fan-assisted
cooking. Excessive direct heat can burn temperature
sensitive foods.
In the TURNSPIT, BARBECUE and ROTISSERIE cooking
modes, particularly when using the rotisserie, place the
dripping pan in position 1 to collect cooking residues (fat
and/or grease).
MULTI-COOKING
Use position 2 and 4, placing the food that requires more
heat on 2.
Place the dripping pan on the bottom and the rack on
top.
BARBECUE
Insert the rack in position 3 or 4. Place the food in the
centre of the rack.
We recommend that the temperature is set to its
maximum level. The top heating element is regulated by
a thermostat and may not always be on.

GB
19
Cooking advice table
Cooking modes
Foods
W eight
(in kg)
Rack position
Preheating
Recommended
temperature
(°C)
Cooking time
(minutes)
Tarts
0.5 1 or 2
yes
180 25-35
Fruit cakes
1 1 or 2 yes
180 40-50
Sponge cake made with yoghurt
0.7 1 or 2 yes
170-180 45-55
Small cakes on 2 racks
0.7 1 and 3 yes
180-190 20-25
Sponge cake
0.6 1 or 2 yes
160-170 30-40
Cream puffs on 3 racks
0.7 1, 2 and 4 yes
180-190 20-25
Biscuits on 3 racks
0.7 1, 2 and 4 yes
180 20-25
Filled pancakes
0.8 1 yes
200 30-35
Meringues on 3 racks
0.5 1, 2 and 4 yes
90 180
Baking
mode
Cheese puffs
0.5 1 yes
210 20-25
Pizza on 2 racks
1 and 3
yes
220-230 20-25
Tarts on 2 racks
/cakes (on 2 racks)
1 and 3
yes
180 30-35
Sponge cake cooked on 2 racks (on the dripping
pan)
1 and 3
yes
170 20-25
Roast chicken + potatoes
1+1 1 and 3
yes
200-210 65-75
Lamb
1 1 yes
190-200 45-50
Mackerel
1 1 yes
180 30-35
Lasagne
1 1 yes
190-200 35-40
Cream puffs on 2 racks
1 and 3
yes
190 20-25
Biscuits on 2 racks
1 and 3
yes
190 10-20
Cheese puffs on 2 racks
1 and 3
yes
210 20-25
Multi-cooking
Savoury pies
1 and 3
yes
200 20-30
Duck
1.5 1 yes
200-210 70-80
Chicken 1.5 1 yes 200-210 60-70
Roast veal or beef 1 1 yes 200 70-75
Roast pork 1 1 yes 200-210 70-80
Biscuits (shortcrust pastry) - 1 yes 180 15-20
Convection
Oven
Tarts 1 1 yes 180 30-35
Grilled chicken
1.5 2 no
210 55-60
Cuttlefish 1 2 no 200 30-35
Spit-roast chicken using rotisserie (where
present)
1.5 - no 210 70-80
Spit-roast duck using rotisserie (where present) 1.5 - no 210 60-70
Roast veal or beef 1 2 no 210 60-75
Roast pork 1 2 no 210 70-80
Lamb 1 2 no 210 40-45
Rotisserie
Focaccia bread
0.5 1 yes
200 20-25
Mackerel
1 3 no
300 15-20
Sole and cuttlefish
0.7 3 no
300 10-15
Squid and prawn kebabs
0.7 3 no
300 8-10
Cod fillet
0.7 3 no
300 10-15
Grilled vegetables
0.5 2 or 3
no
300 15-20
Veal steak
0.8 3 no
300 15-20
Sausages
0.7 3 no
300 15-20
Hamburgers
4 or 5
3 no
300 10-12
Toasted sandwiches (or toast)
4 or 6
3 no
300 3-5
Spit-roast chicken using rotisserie (where
present)
1 - no
300 70-80
Barbecue
Spit-roast lamb using rotisserie (where present)
1 - no
300 70-80
Chicken on the turnspit 1.5 - no 270 70-80
Turnspit
Duck on the turnspit 1.5 - no 270 60-70
The cooking times listed above are intended as guidelines only and may be modified according to personal tastes. Oven preheating times are set as
standard and may not be modified manually.

GB
20
Precautions and tips
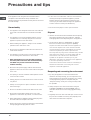
The appliance was designed and manufactured in
compliance with international safety standards. The
following warnings are provided for safety reasons and must
be read carefully.
General safety
The appliance was designed for domestic use inside the
home and is not intended for commercial or industrial
use.
The appliance must not be installed outdoors, even in
covered areas. It is extremely dangerous to leave the
appliance exposed to rain and storms.
When handling the appliance, always use the handles
provided on the sides of the oven.
Do not touch the appliance with bare feet or with wet or
moist hands and feet.
The appliance must be used to cook food by adults only
and according to the instructions in this manual.
When the appliance is in use, the heating elements
and some parts of the oven door become extremely
hot. Make sure you don't to
uch them and keep
children well away.
Ensure that the power supply cable of other electrical
appliances does not come into contact with the hot parts
of the oven.
The openings used for ventilation and dispersion of heat
must never be covered.
Always grip the oven door handle in the centre: the ends
may be hot.
Always use oven gloves to place cookware in the oven or
when removing it.
Do not use aluminium foil to line the bottom of the oven.
Do not place flammable materials in the oven: if the
appliance is switched on by mistake, it could catch fire.
When unplugging the appliance always pull the plug from
the mains socket, do not pull on the cable.
Never carry out any cleaning or maintenance work without
having unplugged the plug from the mains.
In the case of a malfunction, under no circumstances
should you attempt to repair the appliance yourself.
Repairs carried out by inexperienced persons may
cause injury or further malfunctioning of the appliance.
Contact a Service Centre (see Assistance).
Do not rest heavy objects on the open oven door.
Disposal
Observe local environmental standards when disposing
packaging material for recycling purposes. Observe
existing legislation when disposing of the old appliance.
The European Directive 2002/96/EC on Waste
Electrical and Electronic Equipment (WEEE),
requires that old household electrical appliances
must not be disposed of in the normal unsorted
municipal waste stream. Old appliances must be
collected separately in order to optimise the
recovery and recycling of the materials they contain
and reduce the impact on human health and the
environment. The crossed out wheeled bin
symbol on the product reminds you of your
obligation, that when you dispose of the appliance
it must be separately collected.
Consumers should contact their local authority or
retailer for information concerning the correct
disposal of their old appliance.
Respecting and conserving the environment
By using the appliance in the hours between late
afternoon and early morning, you can help reduce the
work load placed on electrical companies. The cooking
mode programming options, and particularly the
delayed cooking mode (see Cooking modes), make
this possible.
Always keep the oven door closed when using the
TURNSPIT, BARBECUE and ROTISSERIE mode to
attain best results and to save energy (approximately
10%).
Regularly check the door seals and wipe clean to ensure
they are free of debris so that they stick properly to the
door and do not allow heat to disperse.

GB
21
Switching the applianc e off
Disconnect your appliance from the electricity
supply before carrying out any work on it.
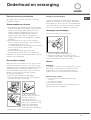
Cleaning the appliance
The stainless-steel or enamel-coated external
parts as well as the rubber seals may be cleaned
using a sponge that has been soaked in
lukewarm water and neutral soap. If these stains
are difficult to remove, use only specialised
products. After cleaning, rinse and dry
thoroughly. Do not use abrasive powders or
corrosive substances.
Ideally, the inside of the oven should be cleaned
after each use, when it is still lukewarm. Use hot
water and detergent, rinse and dry with a soft
cloth. Do not use abrasive products.
The accessories can be washed like everyday
crockery (even in your dishwasher).
Never use steam cleaners or pressure cleaners on
the appliance.
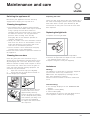
Cleaning the oven door
Clean the glass part of the oven door using a
sponge and a non-abrasive cleaning product, then
dry thoroughly with a soft cloth. Do not use rough
abrasive material or sharp metal scrapers as these
could scratch the surface and cause the glass to
crack. For more thorough cleaning purposes, the
oven door may be removed:
1. Open the oven door fully (see diagram).
2. Lift up and turn the small levers located on
the two hinges (see diagram).
3. Grip the door on the two
external sides and close it
approximately half way.
Unlock the door by pressing
on the clamps F, then pull the
door towards you lifting it out
of its seat (see diagram).
To replace the door, reverse
this sequence.
Inspecting the seals
Check the door seals around the oven periodically. If
the seals are damaged, please contact your nearest
After-sales Service Centre (see Assistance). We
recommend not using the oven until the seals have
been replaced.
Replacing the light bulb
To replace the oven light bulb:
1. Remove the glass cover of the lamp-holder.
2. Remove the light bulb and replace it with a similar
one: Wattage 25 W, cap E 14.
3. Replace the glass cover (see diagram).
Assistance
Warning:
The appliance is fitted with an automatic diagnostic
system which detects any malfunctions.
Malfunctions are displayed by messages of the
type: ER followed by numbers.
Call for technical assistance should a malfunction
occur.
Communicating:
the message displayed on the TEMPERATURE
display
appliance model (Mod.)
serial number (S/N)
This information is found on the data plate located
on the appliance and/or on the packaging.
Maintenance and care
F
F
Page is loading ...
Page is loading ...
Page is loading ...
Page is loading ...
Page is loading ...
Page is loading ...
Page is loading ...
Page is loading ...
Page is loading ...
Page is loading ...
Page is loading ...
Page is loading ...
Page is loading ...

NL
35
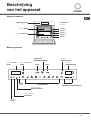
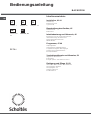
Bedieningspaneel
Rooster GRILL
Rooster LEKPLAAT
GLIJDERS in te
schuiven
positie 5
positie 4
positie 3
positie 2
positie 1
Onmiddellijke
TEMPERATUURAANWIJZERS
AANZETTEN
BEDIENINGSPANEEL
TIMER
regelen
Selectie
PROGRAMMAS
Display
TEMPERATUUR
Regelen
TEMPERATUUR
START STOP
Display TIJD en
DUUR
Programmering
EINDE KOOKTIJD
Programmering
KOOKTIJD
Regeling
KLOK
RegelingTIJD en
DUUR
Algemeen aanzicht
Bedieningspaneel
Beschrijving
van het apparaat
Page is loading ...
Page is loading ...
Page is loading ...
Page is loading ...
Page is loading ...
Page is loading ...
Page is loading ...
Page is loading ...
Page is loading ...
Page is loading ...
Page is loading ...
Page is loading ...
Page is loading ...

DE
49
Praktische Back-/Brathinweise
Verwenden Sie beim Heißluftgaren nicht die
Einschubhöhen 1 und 5: Sie sind der Heißluft zu direkt
ausgesetzt, wodurch empfindliche Gerichte leicht
verbrennen könnten.
Setzen Sie beim Garen mit den Programmen
BRATSPIEß, GRILL und BRATEN vor allem bei
Verwendung des Bratspießes die Fettpfanne zum
Auffangen von abtropfendem Fett oder Fleischsaft auf
Einschubhöhe 1 ein.
Echte Heißluft
Verwenden Sie bitte die Einschubhöhen 2 und 4,
wobei die 2. Ebene für die Speisen verwendet
werden sollte, die mehr Hitze verlangen.
Setzen Sie die Fettpfanne in die untere und den
Grillrost in die obere Führung ein.
Grill
Schieben Sie den Grillrost in die Position 3 oder 4
ein und geben Sie die zu garenden Speisen in die
Mitte des Grillrostes.
Es empfiehlt sich die Einstellung auf
Höchsttemperatur. Im Übrigen ist es bei dieser
Funktion völlig normal, dass das obere Heizelement
nicht ständig rot glüht: Es wird durch einen
Thermostaten gesteuert.
Back-/Brattabelle
P rogram m e
Speisen
Gewicht
(kg)
Einschubhö he
Vorheizen
Empfohlene
Tem peratur
(°C )
Garzeit
(M inuten)
Torten 0,5 1 oder 2 Ja 180 25-35
Obstkuchen 1 1 oder 2 Ja 180 40-50
Plum Cake 0,7 1 oder 2 Ja 170-180 45-55
Kleingebäck auf 2 Ebenen 0,7 1 und 3 Ja 180-190 20-25
Biskuitböden 0,6 1 oder 2 Ja 160-170 30-40
Windbeutel auf 3 Ebenen 0,7 1, 2 und 4 Ja 180-190 20-25
Gebäck auf 3 Ebenen 0,7 1, 2 und 4 Ja 180 20-25
G efüllte Crêpes 0,8 1 Ja 200 30-35
Baisers auf 3 Ebenen 0,5 1, 2 und 4 Ja 90 180
Gebä ck
Mit Käse gefülltes Blätterteiggebäck 0,5 1 Ja 210 20-25
Pizza auf 2 Ebenen 1 und 3 Ja 220-230 20-25
Torten auf 2 Ebenen 1 und 3 Ja 180 30-35
Biskuitböden auf 2 Ebenen (auf Backblech) 1 und 3 Ja 170 20-25
Brathähnchen + Kartoffeln 1+1 1 und 3 Ja 200-210 65-75
Lamm 1 1 Ja 190-200 45-50
Makrelen 1 1 Ja 180 30-35
Lasagne 1 1 Ja 190-200 35-40
Windbeutel auf 2 Ebenen 1 und 3 Ja 190 20-25
Gebäck auf 2 Ebenen 1 und 3 Ja 190 10-20
Mit Käse gefülltes Blätterteiggebäck auf 2
Ebenen
1 und 3 Ja 210 20-25
Echte Heiß lu ft
Quiche 1 und 3 Ja 200 20-30
Ente 1,5 1 Ja 200-210 70-80
Hähnchen 1,5 1 Ja 200-210 60-70
Kalbs- oder Rinderbraten 1 1 Ja 200 70-75
Schweinebraten 1 1 Ja 200-210 70-80
Mürbeteiggebäck - 1 Ja 180 15-20
Standard
Plus
Torten 1 1 Ja 180 30-35
G egrilltes Hähnchen 1,5 2 Nein 210 55-60
Tintenfische 1 2 Nein 200 30-35
Brathähnchen a/Spieß mit Drehspieß (w o
vorhanden)
1,5 - Nein 210 70-80
Ente a/Spieß mit Drehspieß (w o vorhanden) 1,5 - Nein 210 60-70
Kalbs- oder Rinderbraten 1 2 Nein 210 60-75
Schweinebraten 1 2 Nein 210 70-80
Lamm 1 2 Nein 210 40-45
Braten
Fladen 0,5 1 Ja 200 20-25
Makrelen 1 3 Nein 300 15-20
Seezungen und Tintenfische 0,7 3 Nein 300 10-15
Tintenfisch- und Krebsspieße 0,7 3 Nein 300 8-10
Ka belja u filet 0,7 3 Nein 300 10-15
G egrillte Gemüse 0,5 2 oder 3 Nein 300 15-20
Kalbssteaks 0,8 3 Nein 300 15-20
Bratwürste 0,7 3 Nein 300 15-20
Hamburger 4 oder 5 3 Nein 300 10-12
Toast (oder ge to a ste tes Brot) 4 oder 6 3 Nein 300 3-5
Brathähnchen a/Spieß mit Drehspieß (w o
vorhanden)
1 - Nein 300 70-80
Grill
Lamm a/Spieß mit Drehspieß (w o vorhanden) 1 - Nein 300 70-80
Hähnchen am Spieß 1.5 - no 270 70-80
Drehspieß
Ente am Spieß 1.5 - no 270 60-70
Bei den angegebenen Garzeiten handelt es sich um R ichtwerte, die je nach W unsch geändert werden können. Die Vorheizzeiten des Backofens sind
voreingestellt und können demnach nicht von Hand geändert werden.
Page is loading ...
Page is loading ...
Page is loading ...
-
 1
1
-
 2
2
-
 3
3
-
 4
4
-
 5
5
-
 6
6
-
 7
7
-
 8
8
-
 9
9
-
 10
10
-
 11
11
-
 12
12
-
 13
13
-
 14
14
-
 15
15
-
 16
16
-
 17
17
-
 18
18
-
 19
19
-
 20
20
-
 21
21
-
 22
22
-
 23
23
-
 24
24
-
 25
25
-
 26
26
-
 27
27
-
 28
28
-
 29
29
-
 30
30
-
 31
31
-
 32
32
-
 33
33
-
 34
34
-
 35
35
-
 36
36
-
 37
37
-
 38
38
-
 39
39
-
 40
40
-
 41
41
-
 42
42
-
 43
43
-
 44
44
-
 45
45
-
 46
46
-
 47
47
-
 48
48
-
 49
49
-
 50
50
-
 51
51
-
 52
52


Ask a question and I''ll find the answer in the document
Finding information in a document is now easier with AI
in other languages
- italiano: Indesit FP T5.1 Guida utente
- français: Indesit FP T5.1 Mode d'emploi
- Deutsch: Indesit FP T5.1 Benutzerhandbuch
- Nederlands: Indesit FP T5.1 Gebruikershandleiding
Related papers
-
Indesit FZ 100 P.1 (AN) User guide
-
-
-
-
Scholtes FP T6.1 Owner's manual
-
Hotpoint F48 1012 C.1 IX /HA Owner's manual
-
-
-
-
Indesit FZ 1012 C.1 IX User guide
Other documents
-
-
Whirlpool FZ 1002 C.2 (ALU) User guide
-
-
Whirlpool FZ 970 C.1 IX Owner's manual
-
-
Scholtes FP T5.1 N S Operating Instructions Manual
-
-
-
Hotpoint Ariston FK89EL .20 X/HA (CF) User guide
-