
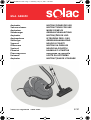
Solac is a registered Trade Mark
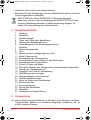
INSTRUCCIONES DE USO
INSTRUCTIONS FOR USE
MODE D’EMPLOI
GEBRAUCHSANLEITUNG
INSTRUÇÕES DE USO
ISTRUZIONI PER L’USO
GEBRUIKSAANWIJZING
NÁVOD K POUZITÍ
INSTRUCJA OBSLUGI
NÁVOD NA POUZITIU
HASNÁLATI UTASÍTÁS
инсрукция за употреба
UPUTE ZA UPOTREBU
INSTRUCŢIUNI DE UTILIZARE
Aspirador
Vacuum cleaner
Aspirateur
Staubsauger
Aspirador
Aspirapolvere
Stofzuiger
Vysavač
Odkurzacz
Vysávač
Porszívó
П
РахосмукаЧка
Usisavač
Aspirator
Mod. AB2650
07/07
UntitledBook1.book Page 1 Thursday, July 12, 2007 6:08 PM
Page is loading ...

UntitledBook1.book Page 1 Thursday, July 12, 2007 6:08 PM

UntitledBook1.book Page 2 Thursday, July 12, 2007 6:08 PM
Page is loading ...
Page is loading ...
Page is loading ...
Page is loading ...
Page is loading ...

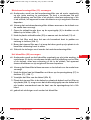
10 Safety Instructions
ENGLISH en
1 Safety Instructions
• Read these instructions completely before using the appliance.
• This appliance must only be used in the home and is not for industrial
application. Use of this appliance for any other purpose than that
indicated may be dangerous.
• Keep the appliance out of the reach of children and disabled persons .
When used in their presence, keep a close watch.
• Do not attempt to modify or repair the appliance. If you observe any
anomaly in the electrical cord or any other part of the appliance, do not
use it and contact an authorised after-sales service.
• Do not use parts or accessories that are not supplied or recommended
by SOLAC.
• Before plugging the appliance into the mains, check that the voltage
indicated corresponds to the voltage in your home.
• Always unplug the appliance after use, before disassembling or
assembling parts and before performing maintenance or cleaning on the
appliance. Always unplug the appliance in the event of a power loss. The
appliance should be switched off before it is plugged in or unplugged.
• Do not pull on or hang the appliance from the cord. Always unplug the
appliance by pulling on the plug and never on the cord.
• Take care that the cord does not come into contact with sharp edges or
hot surfaces. Do not leave the cord hanging from the edge of a table or
counter to prevent children from pulling on it, causing it to fall.
• Never immerse the appliance in water or any other liquid, and do not put
it in the dishwasher.
• Never handle the vacuum cleaner or the plug with wet hands.
• Do not leave the appliance plugged into the mains if you are not present.
• Keep your vacuum away from heat.
• Make sure that the air inlets and outlets are always free of obstacles.
• Never use without the paper bag or the protective filters correctly fitted.
b
CAUTION!: When you wish to dispose of the appliance, NEVER
throw it in the rubbish. Instead, go your nearest CLEAN POINT or
UntitledBook1.book Page 10 Thursday, July 12, 2007 6:08 PM

11
en
Main components
waste collection point, where it will receive subsequent treatment.
You will thus be helping to take care of the environment.
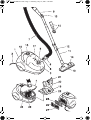
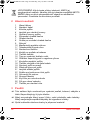
2 Main components
1 Main body
2 Power cord
3 Bag compartment
4 Compartment opening latch
5 Bag compartment opening
6 Flexible hose fitting
7 Flexible hose
8 Release tabs for the flexible hose
9 Handle
10 Mechanical power regulator
11 Telescopic metal tube
12 Adjustment button
13 Floor and carpet brush
14 Brush button
15 Tip for vacuuming grooves and corners
16 On/Off and electronic power regulation control
17 Dust-bag full indicator
18 Carrying handle and cord collector button
19 Paper dust-bag
20 Plastic support for the bag
21 Bag holder tab
22 Bag carton notch
23 Motor protection filter
24 Rubber seal
25 Air outlet filter cover
26 Air outlet filter
27 Lid opening button
3Use
This appliance has been exclusively designed to vacuum clean floors,
carpets, furniture and fabrics. Do not use it for any other purpose.
Never vacuum live ash, splinters , sharp objects, or liquids. Never
vacuum lit matches or cigarette butts.
Completely remove all transportation and packaging items.
Unplug the plug from the mains before placing or removing the
accessories or opening the cover of the bag compartment.
UntitledBook1.book Page 11 Thursday, July 12, 2007 6:08 PM

12 Use
Do not use the appliance over the power supply cord.
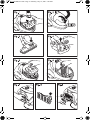
1 Check that the dust-bag container (19) and filters (23 and 25) are fitted
correctly. See the following section (Cleaning and Maintenance).
2 Fit the flexible hose (7), placing the fitting (6) in the bag compartment
opening (5), until you hear a click. To remove the hose, press the detach
latches (8), turn and pull on the fitting.
3 Prepare the accessories that correspond to the surface you desire to
clean. They snap on with a gentle turn. The attachments can be placed
directly on the flexible hose (7) or, for out-of-reach places, the telescopic
metallic tube (11) can be used.
• The suction brush (13) on these models can be used for all types of
floors, carpets and rugs. This brush is retractable so it adapts to the
surface to be vacuumed. To change the cleaning position of the brush,
press the brush button (14) with your foot (fig. 3). We recommend
cleaning hard floors, wood and parquet with the fibre brush enabled, and
cleaning carpets and rugs with the fibre brush retracted.
• This model is supplied with a vacuum nozzle for narrow places, grooves
and corners (15) that can be placed directly on the flexible hose (7) or
the telescopic metal tube (11).
• The length of the telescopic tube (11) can be changed by moving the
adjustment button (12) while moving both parts of the telescopic tube.
4 Pull out the cord (2) to the yellow mark (ideal length). If necessary, the
cord can be pulled out to the red mark, but not any further.
5 Place the operating and regulating knob (16) at the MIN position and
plug into the mains.
6 Switch the vacuum cleaner on by pressing the control knob (16) and
regulate the motor power by turning the knob (do not press the kob,
because this will switch off the vacuum cleaner).
Notice that the knob (16) has both the on/off function (by pressing) and
the motor power regulating function (by turning).
7 Suction power can also be adjusted by opening or closing the
mechanical power regulator on the handle (10).
8 When finished, switch the appliance off by pressing the ON/OFF button
(16). Unplug it and press the button (18) on the handle to wind up the
cord. Hold the cord plug in your hand to prevent it from banging against
the vacuum cleaner housing.
9 The handle (18) can be used to carry the vacuum cleaner.
UntitledBook1.book Page 12 Thursday, July 12, 2007 6:08 PM

13
en
Cleaning and Maintenance
4 Cleaning and Maintenance
Changing the dust-bag (19)
When the indicator (17) is completely red, a new paper bag must be
installed in the vacuum cleaner.
• This indicator may show red if something is stuck in the flexible hose or
in an attachment. To find out if that is the case, unplug the vacuum
cleaner, remove the flexible hose, and turn the vacuum cleaner on again.
If the indicator does not show red, clean the flexible hose and its
attachment.
• To change the paper bag, unplug the vacuum cleaner and proceed as
follows:
1 Open the bag compartment by pressing on the latch (4) and lifting the
cover (fig. 1).
2 Remove the plastic base (20) and the bag (19).
3 Press the tab (21) and separate the base while holding the bag by the
carton (fig. 4). Do not crumple the bag, as this may expel the dust inside.
4 Place the new paper bag inside the plastic base (20) and lower the notch
(22).
5 Place the base with the new bag (fig. 5) in the compartment and make
sure that it fits tightly.
6 To close the compartment (2), lower the cover and press down on the
opening space with your hand (1), until you hear a click (fig. 2).
It is very important that the bag be placed correctly.
Changing the motor protection filter (23)
We recommend that you check the motor protection filter regularly to
make sure that it works properly. This will rule out that poor placing of the
filter or of the dust-bag, or tears or leaks in the bag obstruct the appliance
and reduce suction capacity.
Replace the motor protection filter every 6 changes of the dust-bag.
1 Open the dust-bag container by pressing on the latch (4), and lifting the
cover (fig. 1).
2 Remove the plastic base (20) and the bag (19).
3 Remove the filter by pulling the top upward (fig 6).
4 Insert the new filter, making sure that it is properly placed and fits tightly
in the top rubber seal.
UntitledBook1.book Page 13 Thursday, July 12, 2007 6:08 PM

14 Cleaning and Maintenance
Never use the vacuum cleaner without the motor protection filter.
Changing the air outlet filter (26)
We recommend that you check the motor protection filter regularly to
make sure that it works properly. This will rule out that poor placing of the
filter or of the dust-bag, or tears or leaks in the bag obstruct the appliance
and reduce suction capacity.
Replace the motor protection filter every 6 changes of the dust-bag.
1 Remove the cover of the outlet filter by pressing on the opening button
(27), (fig.7).
2 Separate the filter from the cover (fig. 8).
3 Insert the new filter in the cover and place the cover with the filter in its
place (fig.9): make sure that the latch on the cover coincides with its
housing and press the cover on the side of the opening button until you
hear a click.
Never use the vacuum cleaner without the air outlet filter.
Cleaning
Clean the appliance before the first use, immediately after each use and
after a prolonged period of disuse.
Unplug the appliance from the mains before cleaning.
1 Clean the outside of the appliance with a damp cloth. Do not use
abrasive products or solvents.
UntitledBook1.book Page 14 Thursday, July 12, 2007 6:08 PM
Page is loading ...
Page is loading ...
Page is loading ...
Page is loading ...
Page is loading ...
Page is loading ...
Page is loading ...
Page is loading ...
Page is loading ...
Page is loading ...
Page is loading ...
Page is loading ...
Page is loading ...
Page is loading ...
Page is loading ...
Page is loading ...
Page is loading ...
Page is loading ...
Page is loading ...
Page is loading ...
Page is loading ...
Page is loading ...
Page is loading ...
Page is loading ...
Page is loading ...
Page is loading ...
Page is loading ...
Page is loading ...
Page is loading ...
Page is loading ...
Page is loading ...
Page is loading ...
Page is loading ...
Page is loading ...
Page is loading ...
Page is loading ...
Page is loading ...
Page is loading ...
Page is loading ...
Page is loading ...
Page is loading ...
Page is loading ...
Page is loading ...
Page is loading ...
Page is loading ...
Page is loading ...
Page is loading ...
Page is loading ...
Page is loading ...
Page is loading ...
Page is loading ...
Page is loading ...
Page is loading ...
Page is loading ...
Page is loading ...
Page is loading ...
Page is loading ...
Page is loading ...
Page is loading ...
Page is loading ...
Page is loading ...
Page is loading ...
Page is loading ...
Page is loading ...
Page is loading ...
Page is loading ...
Page is loading ...

UntitledBook1.book Page 82 Thursday, July 12, 2007 6:08 PM

UntitledBook1.book Page 83 Thursday, July 12, 2007 6:08 PM

UntitledBook1.book Page 84 Thursday, July 12, 2007 6:08 PM

UntitledBook1.book Page 85 Thursday, July 12, 2007 6:08 PM

UntitledBook1.book Page 86 Thursday, July 12, 2007 6:08 PM
-
 1
1
-
 2
2
-
 3
3
-
 4
4
-
 5
5
-
 6
6
-
 7
7
-
 8
8
-
 9
9
-
 10
10
-
 11
11
-
 12
12
-
 13
13
-
 14
14
-
 15
15
-
 16
16
-
 17
17
-
 18
18
-
 19
19
-
 20
20
-
 21
21
-
 22
22
-
 23
23
-
 24
24
-
 25
25
-
 26
26
-
 27
27
-
 28
28
-
 29
29
-
 30
30
-
 31
31
-
 32
32
-
 33
33
-
 34
34
-
 35
35
-
 36
36
-
 37
37
-
 38
38
-
 39
39
-
 40
40
-
 41
41
-
 42
42
-
 43
43
-
 44
44
-
 45
45
-
 46
46
-
 47
47
-
 48
48
-
 49
49
-
 50
50
-
 51
51
-
 52
52
-
 53
53
-
 54
54
-
 55
55
-
 56
56
-
 57
57
-
 58
58
-
 59
59
-
 60
60
-
 61
61
-
 62
62
-
 63
63
-
 64
64
-
 65
65
-
 66
66
-
 67
67
-
 68
68
-
 69
69
-
 70
70
-
 71
71
-
 72
72
-
 73
73
-
 74
74
-
 75
75
-
 76
76
-
 77
77
-
 78
78
-
 79
79
-
 80
80
-
 81
81
-
 82
82
-
 83
83
-
 84
84
-
 85
85
-
 86
86


Ask a question and I''ll find the answer in the document
Finding information in a document is now easier with AI
in other languages
- italiano: Solac AB2650 Manuale del proprietario
- français: Solac AB2650 Le manuel du propriétaire
- español: Solac AB2650 El manual del propietario
- Deutsch: Solac AB2650 Bedienungsanleitung
- Nederlands: Solac AB2650 de handleiding
- português: Solac AB2650 Manual do proprietário
- slovenčina: Solac AB2650 Návod na obsluhu
- polski: Solac AB2650 Instrukcja obsługi
- čeština: Solac AB2650 Návod k obsluze
- română: Solac AB2650 Manualul proprietarului
Related papers
-
Solac AB2750 Owner's manual
-
-
Solac AB2701 Owner's manual
-
Solac AS3258 Owner's manual
-
Solac AB2845 Owner's manual
-
Solac MC6250 Owner's manual
-
-
Solac AB2850 Owner's manual
-
-
Other documents
-
LG V-CP983ST Owner's manual
-
Amica Viento VI2032 User manual
-
-
Polti ASPIRA AS404 Owner's manual
-
Koncar US700V1S Owner's manual
-
Palson 30552 Owner's manual
-
HQ W7-52753/HQN Datasheet
-
Bosch BSG82485/08 User manual
-
Bosch GSS 23 AE Professional Operating instructions
-
Amica Sumam VM6011 User manual