Zibro SRE 1330 TC User manual

Category
Space heaters
Type
User manual

This manual is also suitable for

SRE 1330 TC / SRE 1730 TC
3
2
6
5
4
>
u
1
9
:
=
SLO
FIN
MANUEL D’UTILISATION
GEBRAUCHSANWEISUNG
BRUGSANVISNING
INSTRUCCIONES DE USO
KÄYTTÖOHJE
OPERATING MANUAL
ISTRUZIONI D’USO
BRUKSANVISNING
GEBRUIKSAANWIJZING
MANUAL DE INSTRUÇÕES
INSTRUKCJI OBSŁUGI
BRUKSANVISNING
NAVODILA ZA UPORABO
4
16
28
40
52
64
76
88
100
112
124
136
148
Dear Sir, Madam,
Congratulations with your purchase of a portable domestic heater. You have
purchased a quality product, which will serve you for many years to come. This,
of course, provided you use the heater correctly. Please read these Directions
for Use first, to ensure maximum lifetime for your heater.
Your heater comes with a 24-month manufacturer’s warranty on all defects in
materials or workmanship.
We wish you a warm and comfortable time with your heater.
Yours sincerely,
PVG Holding b.v.
Customer Service Department
1 READ THE DIRECTIONS FOR USE FIRST.
2 IN CASE OF ANY DOUBT, CONTACT YOUR DEALER.
4
64
GENERAL DIRECTIONS FOR USE
Below you will find the main steps to be taken for
using your heater. For more details, please refer to
the MANUAL (pages 67 ff.).
MAIN COMPONENTS
4
As a fire precaution, the tank must be filled either
when the heater has been switched off or in
another room than the room where the heater is
installed.
Always ensure that the tank is closed properly after
filling it at a safe distance from all sources of heat
and open flames (see chapter B).
The first time the heater is ignited it will smell like
“new” for a short time.
Store all fuel containers with their original caps and
seals in a cool and dark place.
Fuel ages. Use new fuel at the start of every heating
season.
The use of Qlima Premium Quality Fuels as a heating
fuel assures you that you have a good quality fuel.
Before changing brands and/or types of fuel make
sure that the mobile heater first completely empties
all of the remaining fuel inside the heater.
Information display
Operating keys
Tank compartment
lid
Removable tank
Metal cap
Fuel filter
Fixed tank
Flame inspection
window
Hot air grille
Air supply
Safety bracket
Filter ventilator
Plug
Connecting lead
Child safety catch
key
Low fuel level indi-
cator
Green timer indica-
tor
Timer key
Mode key
Key to set tempera-
ture/time
On/off key (red indi-
cator on)
A
B
C
4
E
F
G
H
I
J
K
L
M
N
O
P
Q
R
S
Remove all packaging materials (refer to Section A, Fig. A).
Fill the removable tank 4 (refer to Section B, Fig. C-F).
Insert the plug into the wall-socket.
Ignite the heater using the ON-OFF key
21
(refer to Section D).
If required, change the temperature using the adjustment keys
(refer to Section E).
Switch off the heater by pressing the ON-OFF key
21
.
1
2
3
4
5
6
1 READ THE DIRECTIONS FOR USE FIRST.
2 IN CASE OF ANY DOUBT, CONTACT YOUR DEALER.
21
65
WHAT YOU NEED TO KNOW IN ADVANCE
Read this user manual carefully before using the appliance and keep it for future
reference. Install this device only when it complies with local/national legislation,
ordinances and standards. This product is intended to be used as a heater in
residential houses and is only suitable for use in dry locations, in normal household
conditions, indoors in living room, kitchen and garage.
Regardless of the model, you must always make sure that the heater is used in
a room large enough to enable the heater to be used safely without extra
ventilation. If the room is smaller than required, you must always open a door or
window slightly (ensuring an opening of approx. 2.5 cm). It is important that every
room where the heater is used has sufficient air intake and efficient air outflow
(both openings must have a minimum cross section of 50 cm
2
). No modifications
to the safety system are allowed, as that will invalidate the guarantee that the air
probe will work properly. Consult your dealer in case of doubt.
Especially for France: Your heater was designed to operate exclusively on fuel for
liquid fuel-operated mobile heaters in accordance with the Decrees of 18-07-2002
and 25-06-2010. The use of other fuels is forbidden.
Ask your dealer or check our website for the addresses of our retailers.
The liquid fuel-operated mobile heater is intended as an extra heater, and not as a
continuous source of heat.
Especially for United Kingdom: Only use Class C1 paraffin fuel in accordance with
BS2869; Part 2, or equivalent.
The user must comply with the following instructions for proper use:
DO NOT
- use the liquid fuel-operated mobile heater in caravans, boats, and vehicle cabins;
- use the liquid fuel-operated mobile heater in insufficiently ventilated rooms
(consult the table of properties for the minimum dimensions of the room to be
heated), underground rooms and / or at a height of over 1500 metres;
- modify the heater safety features.
The use of this type of heating in public rooms is subject to prior regulatory
permission. Obtain proper information on this in advance.
THE RIGHT FUEL
Your heater has been designed for use with high-quality water-free pure paraffin
oil, such as Qlima Premium Quality Fuels. Only fuels of this kind will ensure clean
and proper burning. Lower quality fuel may result in:
E increased possibility of malfunctioning
E incomplete combustion
E reduced heater lifetime
E smoke and/or fumes
E deposits on the grid or mantle
Using the right fuel is therefore essential for safe, efficient, and comfortable use
of your heater.
Damage and/or malfunctions of the heater due to the use of other than high-
quality water-free pure parafine oil is not covered by the warranty.
Always refer to your local dealer for the right fuel for your heater.
4
This transportation cap
is packed separately in
the box. Only this cap
ensures trouble-free
transportation of the
heater after use.
Store it well!
Only the use of the
correct fuel will ensure
safe, efficient, and
comfortable use of your
heater.
66
MANUAL
A INSTALLING THE HEATER
1
Carefully remove your heater from the box and check the contents.
In addition to the heater you also need to have:
E a transportation cap
E these directions for use
Keep the box and the packaging materials (Fig. A) for storage and/or
transportation.
2
Open the lid of the removable tank C and remove the piece of cardboard.
3
Fill the removable tank as indicated in Section B.
4
The floor should be firm and completely level. Reposition the heater, when it
is not level. Do not try to correct the situation by placing books or other
goods under the heater.
5
Use the horizontal safety bracket K to prevent the curtains from covering the
ventilator (Fig. B.).
6
Insert the plug M into the wall-socket (230 Volts - AC / 50 Hz) and set the
correct time using the adjustment keys (refer to Section C).
7
Your heater is now ready for use.
B FILLING FUEL
Fill the removable tank in a suitable place since there can always be some spillage.
Follow the procedure below:
1
Make sure that the heater is switched off.
2
Open the upper lid and lift the removable tank out of the heater (Fig. C).
Note: Some drops may leak from the tank. Put down the removable tank
(cap pointing upwards, handle on floor and screw off the fuel cap.
3
Remove the metal cap (unscrew). Easy to open by holding the outside (fig. D.).
4
Fill the removable tank using a fuel pump (refer to fuel pump operation
instructions.) Make sure that it is in a higher position than the removable tank
(Fig. E). Insert the ribbed hose into the opening of the removable tank.
5
Check the removable tank fuel gauge while filling the tank (Fig. F). Stop
filling once the gauge indicates that the tank is full. Never overfill the tank,
especially not when the fuel is very cold (fuel expands when it heats up).
6
Let the remaining fuel in the pump flow back into the jerrycan and carefully
4
E E E E E E
67
A
B
C
D
E
+
+
4
+
remove the pump. Carefully screw the fuel cap back on the tank. Clean off
any spilled fuel.
7
Check whether the fuel cap is straight and tightened properly. Reinstall the
removable tank in the heater (cap down). Close the lid.
• Do not move the heater after reinstalling the tank.
Take care not to damage the cap while filling the tank. Deformation of the cap
can lead to fuel leakage.
8
Turn the heater on again.
C SETTING THE TIME
Set the time to use the heater as a clock or if using the timer. You can even set
the time when the heater is on.
1
Press the mode key S to set the time (fig. G). Time set and the time flash on
the display.
2
Press the buttons (-) or (+)
20
to set the time. The time displays the numbers
00:00 to 23:59. Press the ( + ) button to go forwards and the ( - ) button to go
backwards. The time will change in one minute steps each time you press one of
these 2 buttons. The time on the display will change in ten minute steps if you
keep the button pressed (fig. H.).
3
Press the mode key S again to activate the timer function. See chapter F.
4
Press the mode key S to display the time (fig. I.). If the time is not set, the
display indicates --:--.
The time must be set again after a power cut or if the plug has been removed
from the socket.
D IGNITING THE HEATER
When used for the first time, a new heater may give out a smell for a short while.
You should therefore provide extra ventilation.
Always ignite the heater with the ON / OFF
button
21
. Never use matches or a
cigarette lighter.
1
Press the ON / OFF button
21
.
The ignition indicator will light up: the required temperature and the ambient
temperature are displayed (fig. J.). The ambient temperature is displayed from
1ºC. If the temperature is below 0ºC, Lo is displayed. Ignition takes about 45
seconds.
2
Normal combustion:
T he flames are blue
The burner grille can become red
68
G
H
I
J
F
empty full
+ +
+
4
Abnormal combustion:
The flame is yellow and blue In this case take appropriate measures.
This heater cannot be switched on continuously for more than 36 hours. After 36
hours it stops automatically, even if the tank has been refilled within this period.
E SETTING THE REQUIRED TEMPERATURE
If the heater is on, the required temperature can be changed using the adjustment
buttons
20
(fig. K). To increase the temperature, press the + button. To decrease
the temperature, press the - button. Each time you press the adjustment button
the temperature changes by 1ºC. The temperature can be set to a minimum of
12ºC and a maximum of 26ºC.
If the heater is used in a small space, in a well-insulated space or if the outside
temperature is relatively high, the ambient temperature can become higher
than the required temperature. In this case, turn the heater off.
The displayed temperature is the mean ambient temperature. This
temperature may not correspond with that indicated by a thermometer.
F USING THE TIMER
The timer allows you to switch on the heater automatically at a preset time.
In order to switch on the timer, the correct time must have been set (refer to
Section C) and the heater should be off. Follow the procedure below:
1
Check that the time is set properly (see chapter C).
2
Press the mode button S (fig. L) until Timer and Set appear in the display.
3
Press the ( - ) or ( + ) buttons to set the required activation time for the
heater. Press the ( + ) button to go forwards and the ( - ) button to go backwards.
The time will change in one minute steps each time you press one of these 2
buttons. The time on the display will change in ten minute steps if you keep
the button pressed (fig. M).
4
Press the ON / OFF buttons
21
to turn the heater on (the indicator will light up).
It is not necessary to press this button if the heater is on.
5
Press the timer button R. The indicator goes out. The time indicator will light
up and the timer is set.
Take care not to press the ON / OFF button
21
again after setting the timer, this
will reset the timer.
6
The heater turns on at the time chosen.
To cancel the timer, press the ON / OFF button
21
(the timer indicator goes
out).
• Set the timer and the clock again after a power cut.
• In case of an earthquake, or shocks, code E01 will appear in the display. Reset
the error and repeat from point 4 to set the timer again.
69
K
L
M
N
+
4
G TURNING THE HEATER OFF
1
Press the ON / OFF button
21
. The red lamp flashes for about 8 seconds and the
heater is turned off. Always check that the flame goes out.
The ventilator continues operating for about 3 minutes after turning off in order
to cool the inside of the heater. If you turn off the power earlier, uncontrolled
symptoms can occur (release of smoke, smell etc.)..
H IN CASE OF PROBLEMS
The symptoms mentioned above are not faults and not abnormal.
Check the list.
Symptoms Causes
While igniting
Igniting is tedious
Igniting takes about 45 seconds.
After filling the tank, wait till
the fuel has reached the fixed
tank. Repeat ignition 2 or 3
times.
Crackling sound
This sound is made by the elec-
tric ignition.
White smoke
This can happen if the fuel does
not circulate past the burner
properly
During ignition
or turning off
Smoke and an unpleasant smell
during first use
That is the protective lacquer
getting warm. This soon stops.
Give the space more ventila-
tion.
The ambient temperature does
not increase and the requested
temperature is higher.
The space is too large.
The flame glows red.
The ambient air is damp or salty
or it contains too many impu-
rities.
The ambient temperature does
not decrease and the requested
temperature is lower.
The heater is being used in a
small insulated space or the
outside temperature is relati-
vely high. Turn the heater off.
The displayed ambient tempe-
rature is not the same as indica-
ted by a thermometer.
This is because the displayed
ambient temperature is an indi-
cation of the average tempera-
ture of the space.
Small knocking noises when the
heater is in operation or imme-
diately after turning off.
This is the sound of the metal
expanding.
Noise 8 seconds after turning
off.
A ticking sound: can occur
when the heater cools off.
70
4
THE INFORMATION DISPLAY
The information display not only serves as an indicator of the (set) time and
temperature (sections C, E, and F), it also indicates any malfunctioning of the
heater. The code on the information display tells you what is the matter:
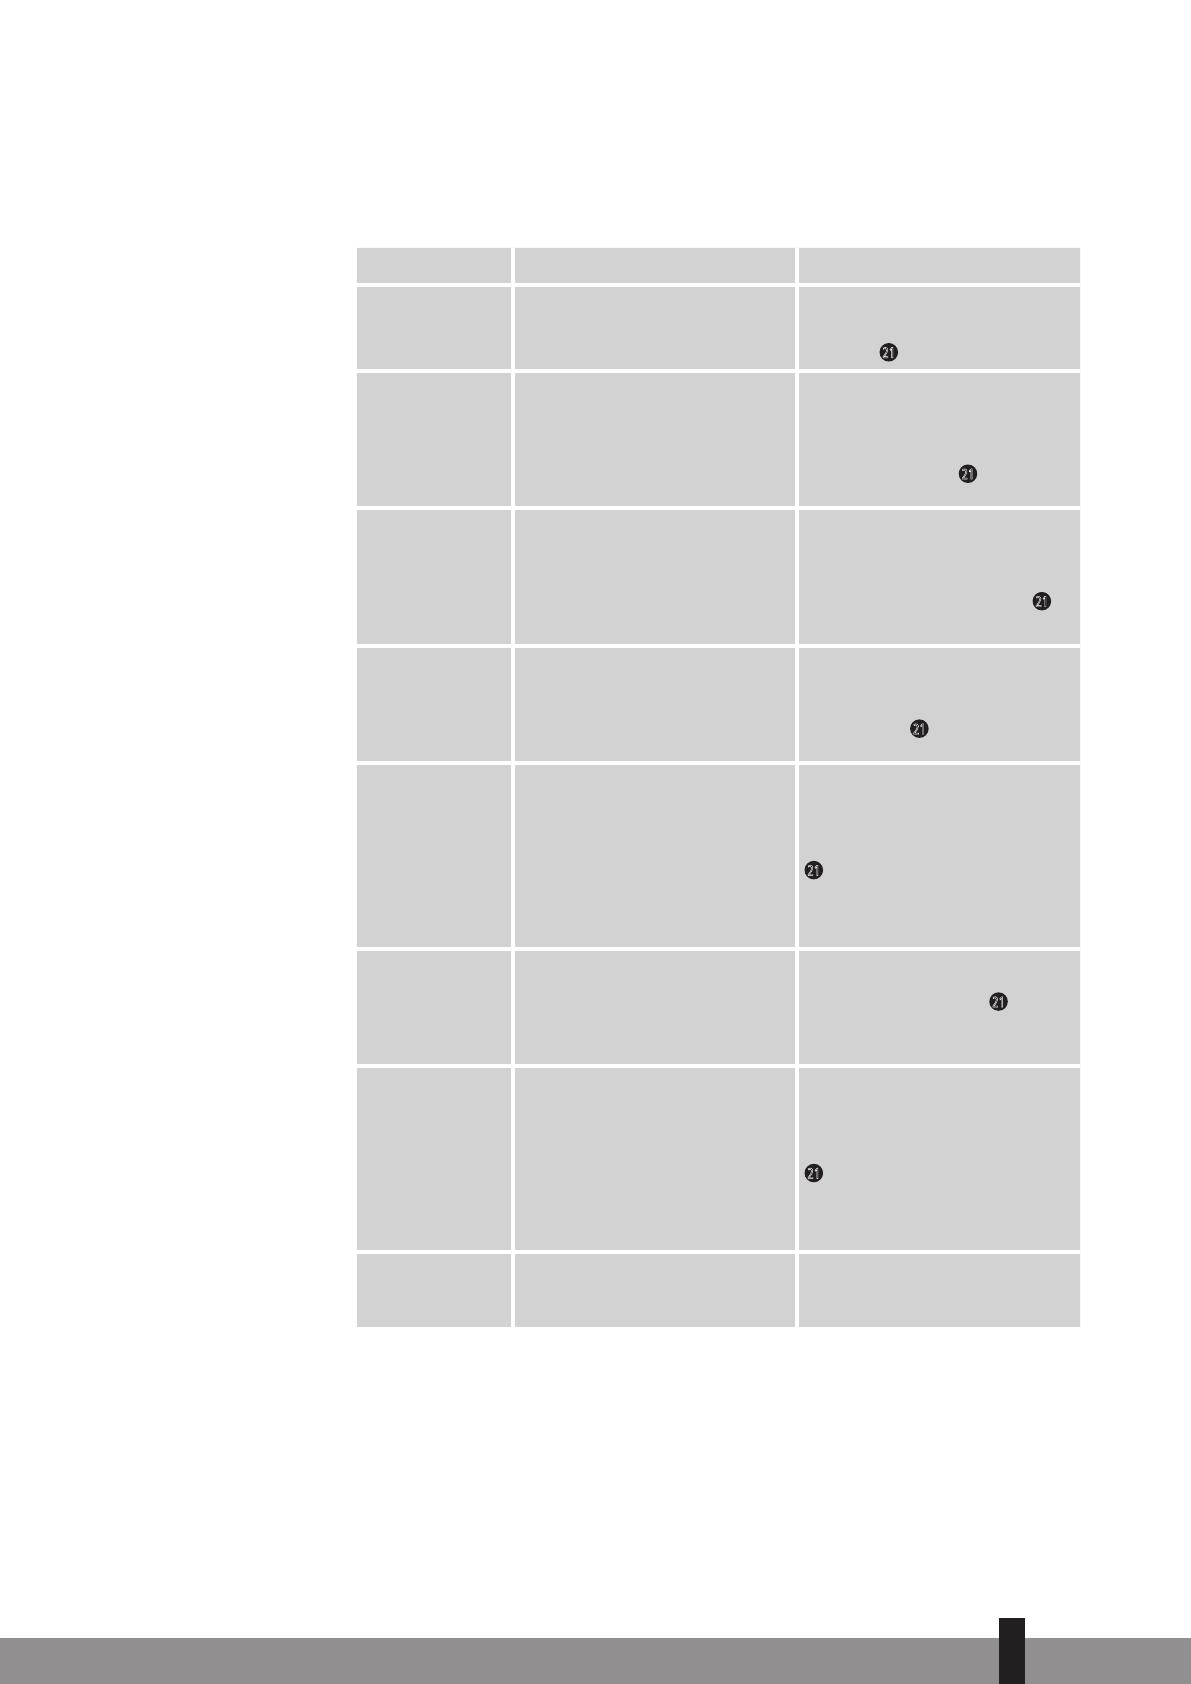
Code Information Action
Time
----
The heater has been automa-
tically turned off by a power
cut or bad connection.
Restore power or restore the
connection. Press the ON /
OFF key
21
again.
E01
An earthquake (magnitude 5
or more), strong vibrations or
a shock will ensure that the
heater automatically
turns off. (The safety system
against shocks has worked).
Make sure there are no com-
bustible materials around the
heater, or fuel leakages. Press
the ON / OFF key
21
again.
E02
E03
The heater has been automa-
tically turned off after a fault
or during ignition or due to
the presence of water or dust
in the fuel filter or in the
fixed tank.
Remove the water and the
dust in the fixed tank. Clean
the fuel filter (see chapter K).
Press the ON / OFF button
21
again.
E07
An increase in ambient
temperature has turned the
heater off. (The tempera-
ture monitoring system has
worked).
Ventilate the space. Let the
heater cool off. Press the ON /
OFF button
21
again.
Filter
E09
Filter
The heater has been automa-
tically turned off because the
hot air stream, the ventila-
tor or the ventilator filter
is blocked or hindered by
something. (The safety system
against overheating has
worked).
Remove obstacles from the
ventilator opening. Clean the
ventilator filter (see chapter
K) Press the ON/OFF button
21
again. If the problem oc-
curs again after taking the
above measures, contact your
dealer.
E13
The heater has been turned
off in a closed space. (The
safety system against incom-
plete combustion has wor-
ked).
Ventilate the space and press
the ON / OFF button
21
again.
Ensure the space is sufficien-
tly ventilated.
The ON indica-
tor flashes. Err
lights up
The heater has automatically
stopped because the ON / OFF
button was kept pressed in or
was blocked.
Remove obstacles from the
ventilator opening. Clean the
ventilator filter (see chapter
K) Press the ON/OFF button
21
again. If the problem oc-
curs again after taking the
above measures, contact your
dealer.
F00 – F30
Poor functioning. Heater
needs maintenance
Note the messages displayed
and turn the heater off. Con-
tact your dealer.
71
4
Symptoms Causes Measures to be taken
Heater doesn’t
ignite
The child safety catch lights
up
Turn the child safety catch off
The fuel in-
dicator lamp
doesn’t work
The tank is empty Fill the tank
The tank is deformed Replace the tank
Dirt particles dust or water on
the filter and / or in the fixed
tank
Clean the fixed tank and the
fuel filter.
Power loss
The fuel indicator flashes
The fuel indicator flashes Fill the tank
A poor quality fuel has been
used.
Remove the fuel from the
two tanks, then rinse with the
correct fuel.
Abnormal com-
bustion
A poor quality fuel has been
used.
Poor ventilation Ventilate regularly
Dust on the ventilator filter Clean the ventilator filter
Unpleasant
smells
A poor quality fuel has been
used
Remove the fuel from the
two tanks, then rinse with the
correct fuel.
No fuel in the tank Fill the tank
Fuel leakage or spilled fuel
Do not use any more and
contact your dealer
Fuel leakage
Move the heater, the tank is
not empty
A poor quality fuel has been
used.
AUTOMATIC DEACTIVATION
This heater is fitted with a safety system that ensures that it switches off
automatically after 36 hours continuous operation. If desired, you can switch the
heater on again by pressing the ON/OFF button
21
(see section D).
I CHILDPROOF LOCK
The childproof lock can be used to prevent children accidentally changing the
heater settings. When the heater is burning and the childproof lock is on, the heater
can only be switched off. Other functions are blocked then. If the heater has already
been switched off, the childproof lock also prevents accidental ignition of the
heater.
Activate the childproof lock by pressing the CHILDLOCK key O and holding it
down for more than 3 seconds. The childlock indicator will appear on the information
display (Fig. O), indicating that the childproof lock has been activated. Switch off the
childproof lock by pressing the CHILDLOCK key O and holding it down for more than
3 seconds once again.
J THE ‘OIL’ INDICATOR
If the low fuel level indicator P lights up in combination with a short tone, then
the fuel tank is empty. The heater will automatically burn at its lowest setting
for a period of about 80 minutes. The fuel tank must be replenished.
72
O
+
+
+
E remove the removable tank from the heater and fill it with new fuel (outside
the living space in a safe place) (see chapter B)
If you take no action, the fuel tank will be emptied and the display will indicate
“E 03” (fig. Q). The heater is automatically turned off.
To ignite the heater once more, fill the tank and wait a few minutes.
Then press the ON / OFF button
21
.
K MAINTENANCE
Switch off the heater and let it cool down, before you start any maintenance
work. Also disconnect the plug from the mains. Your heater needs hardly any
maintenance.
Clean the ventilator filter:
1
Press the buttons on top left and right. Pull the filter 1 cm towards you. Move
the filter up so that the two lower fixing points come loose.
2
Clean the ventilator.
3
Replace the ventilator.
Clean the fuel filter:
1
Remove the removable tank 4 from the heater and remove the fuel filter
(Fig. S). Some drops may leak from the filter; keep a cloth at hand.
2
Remove the dirt by tapping the fuel filter upside-down against a hard surface.
(Never clean it with water!)
3
Reinstall the fuel filter into the heater.
We recommend that you remove dust and stains from time to time with a damp
cloth, because otherwise these may cause stains that are hard to remove.
Do not use solvents or alcohol to clean the heater: fire hazard.
Clean very dirty components with a light synthetic cleaning agent.
Do not remove any heater components yourself. Always contact your dealer for
repairs.
When the power cord is damaged, it may only be replaced by an authorised
fitter. Use a new cord of the type H05 VV-F.
4
73
P
Q
R
S
Fuel filter
T
+
4
L STORAGE (END OF THE HEATING SEASON)
At the end of the heating season, you must store the heater in a dust-free place, if
possible in its original packaging. Unused fuel cannot be used in the next heating
season. We therefore recommend that you burn up all fuel. If there is still some
fuel left, do not throw it away, but dispose of it in accordance with the local
regulations for the disposal of domestic chemical waste.
Always start the new heating season with fresh fuel. When you start re-using the
heater follow the instructions again (starting from section A and as specified).
M TRANSPORTATION
Take the following measures to avoid fuel leakage during the transportation of
the heater:
1
Let the heater cool down.
2
Remove the removable tank 4 from the heater and remove the fuel filter.
Some drops may leak from the filter; keep a cloth at hand. Store the fuel filter
and the removable tank outside the heater.
3
Empty the fixed fuel tank (fig. U).
4
Place the transport cap.
5
Always move the heater in an upright position.
Make the fixed tank empty with a fuel pump before transportation or in case
of wrong or dirty fuel. First remove the fuel filter and then insert the fuel pump
into the empty fixed tank. Follow the same procedure if the fuel tank contains
water.
N SPECIFICATIONS
Ignition electrical Dimensions (mm) width 371
Fuel paraffin (including base plate) depth 294
Capacity (kW) max. 3,00 height 429
Capacity (kW) min. 1,08 Accessories: - transportation cap
Suitable space (m³)** 48-120
Fuel consumption (l/hr)* 0,313 Mains 230 V
-- AC 50 Hz
Fuel consumption (g/hr)* 250 Electrical consumption:
Burning time per tank (hr)* 16 - igniter 335 W
Capacity removable tank (litres) 5 - continuous 78 - 123 W
Weight (kg) 8,1 Fuse rating 250V, 5A
* At maximum setting ** Specified values are indicative
The CE marking corresponds with the compliance with the standards EN 60-335
part 1 (1995) and EN 50-165 (08/97)
U
74
Transport cap
O WARRANTY PROVISIONS
Your heater comes with a 24-month warranty starting on the date of purchase.
Within this period all defects in material or workmanship will be repaired without
any charge. The following provisions shall apply regarding this warranty:
1
We expressly dismiss all other claims for damages, including consequential
damages.
2
Any repairs or replacements of components within the term of warranty will
not result in an extension of the term of warranty.
3
The warranty shall no longer apply, when the heater has been modified,
non-original parts have been used, or when it is repaired by third parties.
4
The warranty shall not apply to parts that are subject to normal wear, such as
the manual fuel pump.
5
The warranty shall only apply, when you present the original, dated proof of
purchase, provided no changes have been made to it.
6
The warranty shall not apply to damages caused by actions not in compliance
with the Directions for Use, neglect, and the use of an incorrect type of fuel,
or fuel past its use-by date. The use of incorrect fuel can even be dangerous*.
7
Transportation costs and the risks involved during the transportation of the
heater or heater components shall always be at the expense of the purchaser.
In order to avoid unnecessary costs, we recommend that you always read the
’Directions for Use’ carefully first. In case they offer no solution, please take the
heater to your dealer for repair.
* Highly inflammable substances may induce uncontrollable burning, causing flames to break out. Should this
happen, never try to move the heater, but always switch off the heater immediately. In case of emergency you
may use a fire extinguisher, but only a type B extinguisher: a carbon dioxide or powder extinguisher.
4
75
  • Page 1 1
  • Page 2 2
  • Page 3 3
  • Page 4 4
  • Page 5 5
  • Page 6 6
  • Page 7 7
  • Page 8 8
  • Page 9 9
  • Page 10 10
  • Page 11 11
  • Page 12 12
  • Page 13 13
  • Page 14 14
  • Page 15 15
  • Page 16 16
  • Page 17 17
  • Page 18 18
  • Page 19 19
  • Page 20 20
  • Page 21 21
  • Page 22 22
  • Page 23 23
  • Page 24 24
  • Page 25 25
  • Page 26 26
  • Page 27 27
  • Page 28 28
  • Page 29 29
  • Page 30 30
  • Page 31 31
  • Page 32 32
  • Page 33 33
  • Page 34 34
  • Page 35 35
  • Page 36 36
  • Page 37 37
  • Page 38 38
  • Page 39 39
  • Page 40 40
  • Page 41 41
  • Page 42 42
  • Page 43 43
  • Page 44 44
  • Page 45 45
  • Page 46 46
  • Page 47 47
  • Page 48 48
  • Page 49 49
  • Page 50 50
  • Page 51 51
  • Page 52 52
  • Page 53 53
  • Page 54 54
  • Page 55 55
  • Page 56 56
  • Page 57 57
  • Page 58 58
  • Page 59 59
  • Page 60 60
  • Page 61 61
  • Page 62 62
  • Page 63 63
  • Page 64 64
  • Page 65 65
  • Page 66 66
  • Page 67 67
  • Page 68 68
  • Page 69 69
  • Page 70 70
  • Page 71 71
  • Page 72 72
  • Page 73 73
  • Page 74 74
  • Page 75 75
  • Page 76 76
  • Page 77 77
  • Page 78 78
  • Page 79 79
  • Page 80 80
  • Page 81 81
  • Page 82 82
  • Page 83 83
  • Page 84 84
  • Page 85 85
  • Page 86 86
  • Page 87 87
  • Page 88 88
  • Page 89 89
  • Page 90 90
  • Page 91 91
  • Page 92 92
  • Page 93 93
  • Page 94 94
  • Page 95 95
  • Page 96 96
  • Page 97 97
  • Page 98 98
  • Page 99 99
  • Page 100 100
  • Page 101 101
  • Page 102 102
  • Page 103 103
  • Page 104 104
  • Page 105 105
  • Page 106 106
  • Page 107 107
  • Page 108 108
  • Page 109 109
  • Page 110 110
  • Page 111 111
  • Page 112 112
  • Page 113 113
  • Page 114 114
  • Page 115 115
  • Page 116 116
  • Page 117 117
  • Page 118 118
  • Page 119 119
  • Page 120 120
  • Page 121 121
  • Page 122 122
  • Page 123 123
  • Page 124 124
  • Page 125 125
  • Page 126 126
  • Page 127 127
  • Page 128 128
  • Page 129 129
  • Page 130 130
  • Page 131 131
  • Page 132 132
  • Page 133 133
  • Page 134 134
  • Page 135 135
  • Page 136 136
  • Page 137 137
  • Page 138 138
  • Page 139 139
  • Page 140 140
  • Page 141 141
  • Page 142 142
  • Page 143 143
  • Page 144 144
  • Page 145 145
  • Page 146 146
  • Page 147 147
  • Page 148 148
  • Page 149 149
  • Page 150 150
  • Page 151 151
  • Page 152 152
  • Page 153 153
  • Page 154 154
  • Page 155 155
  • Page 156 156
  • Page 157 157
  • Page 158 158
  • Page 159 159
  • Page 160 160
  • Page 161 161
  • Page 162 162

Zibro SRE 1330 TC User manual

Category
Space heaters
Type
User manual
This manual is also suitable for

Ask a question and I''ll find the answer in the document

Finding information in a document is now easier with AI