Page is loading ...

I.
Undermount Installation / Montaje bajo Cubierta
Universal Mount Installation Instructions
Instrucciones de Instalación del Soporte Universal
®
CAREFULLY READ THESE INSTRUCTIONS
BEFORE YOU BEGIN
• Elkay is not responsible for sink or countertop if damaged
during installation.
• Metal edges may be sharp - use caution when handling.
• Follow all local plumbing and building codes.
• Inspect sink for damage prior to beginning installation.
MAKING COUNTERTOP CUTOUT
1. Position template on countertop. Template is designed for
undermount installations. Locate the template front to rear, so
that sink will not interfere with the cabinet and ample space for
the faucet.
2. Trace a line around the template. Cut along the inside of this
line to provide opening. Follow countertop manufacturer’s
directions for cutting countertop.
LEE ATENTAMENTE ESTAS
INSTRUCCIONES ANTES DE COMENZAR
• Elkay no es responsable por daños al fregadero ni al
mostrador durante la instalación.
• Los bordes de metal pueden estar afilados - ten cuidado al
manipularlos.
• Sigue todas las normas locales de plomería y
construcción.
• Antes de la instalación, revisa el fregadero para ver si tiene
defectos.
CÓMO HACER EL CORTE DEL MOSTRADOR
1. Coloca la plantilla en el mostrador. La plantilla está diseñada
para instalaciones bajo cubierta. Coloca la plantilla de corte
desde el frente yendo hacia atrás, para que el fregadero no
interfiera con el gabinete y amplíe el espacio para el grifo.
2. Traza una línea alrededor de la plantilla. Corta por dentro de
esta línea para la abertura. Sigue las instrucciones del
fabricante del mostrador para cortarlo.
ATTENTION INSTALLER:
• Elkay recommends that undermount sinks should be
installed by a professional experienced installer.
• WARNING: The enclosed cutout template will create a
countertop opening that will contour to the inner rim
ledge. It is recommended that you discuss this with your
customer and agree that this finished appearance is the
desired effect. Elkay is not responsible for improper sink
or countertop installations. Due to the aesthetic qualities
of the the converging bowl radii, the template furnished
with each sink provides the only opening recommended
for installation of undermount sinks. See illustration
above.
• Elkay undermount sinks should only be fastened to a
solid surface countertop (i.e. granite/Corian/Silestone
®
)
ATENCIÓN INSTALADOR:
• Elkay recomienda contratar a un instalador profesional
con experiencia para montar este fregadero bajo
cubierta.
• ADVERTENCIA: La plantilla de corte incluida creará una
abertura en el mostrador que contorneará el filo interior
del borde. Recomendamos que hables con tu cliente
para determinar si esta es la apariencia final que desea.
Elkay no se hace responsable por instalaciones
inadecuadas del fregadero ni del mostrador. Debido a
las cualidades estéticas de los radios de los tazones
convergentes, la plantilla incluida con cada fregadero
ofrece la única abertura recomendada para la
instalación de los fregaderos bajo cubierta. Ver la
ilustración
• Los fregaderos bajo cubierta Elkay sólo deben
instalarse en un mostrador sólido (es decir
granito/Corian/Silestone
®
).
COUNTERTOP
MOSTRADOR
SILICONE CAULK (NOT FURNISHED)
PASTA SELLADORA DE SILICONA
(NO INCLUIDA)
SINK
FREGADERO

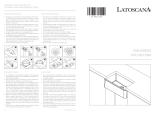
STEP ONE
Place sink upside down on countertop
s
urface. Place sink in exact position for
installation and pencil completely around
sink to create a sink outline.
STEP TWO
S
cribe actual opening 5/16" inside the sink
outline, all the way around.
STEP THREE
Cut out on inside of this line (following the
manufacturer’s instructions). Install faucet to
sink and tighten.
STEP FOUR
Apply a silicone caulk around entire
perimeter of opening. Set bowl into opening.
STEP FIVE
From underside of sink, place one clamp
near center, tighten by hand enough to hold
sink in place. This applies to all four sides.
Fasten balance of clamps in position and
hand tighten. (Usually 3 clamps on end,
balance divided equally front and back).
Space clamps as equally as possible.
STEP SIX
From the top side, check seal between rim
and countertop. Adjust clamps to high spot if
necessary.
STEP SEVEN
Tighten clamp evenly with screwdriver or
socket wrench in rotation until sink is seated
with countertop. Caution: Do not over-
tighten clamps.
PASO UNO
C
oloca el fregadero boca abajo en la
superficie del mostrador. Coloca el fregadero
en la posición exacta para la instalación y
delinea con un lápiz alrededor del fregadero.
PASO DOS
Traza la línea de la abertura real 0,79 cm más
a
dentro del borde delineado del fregadero,
bordeándolo por completo.
PASO TRES
Corta dentro de esta línea (siguiendo las
instrucciones del fabricante). Si el fregadero
viene con una plataforma para grifo, instala
el grifo en el fregadero y apriétalo.
PASO CUATRO
Aplica pasta selladora de silicona alrededor
de todo el perímetro de la abertura. Coloca
el tazón en la abertura.
PASO CINCO
Desde debajo del fregadero, coloca una
abrazadera cerca del centro, ajústala con la mano
lo suficiente como para mantener el fregadero en
su lugar. Esto debe hacerse en los cuatro lados.
Sujeta el contrapeso de las abrazaderas en su
lugar y apriétalo con la mano. (Generalmente 3
abrazaderas en el extremo, el contrapeso dividido
igualmente entre la parte frontal y posterior). Coloca
las abrazaderas a la misma distancia una de la
otra, tanto como sea posible.
PASO SEIS
Desde el lado superior, revisa el sello entre el
borde y el mostrador. Ajusta las abrazaderas a un
punto más alto si es necesario.
PASO SIETE
Aprieta la abrazadera de forma pareja con un
destornillador o llave de dados en rotación hasta
que el fregadero se asiente en el mostrador.
Precaución: No aprietes demasiado las
abrazaderas.
II
.
Top Mount Installation / Montaje sobre Cubierta
1
C
OLOCA EL FREGADERO
B
OCA ABAJO EN EL MOSTRADOR.
4
DIBUJA UNA LÍNEA ALREDEDOR
DEL FREGADERO.
DRAW LINE 5/16" INSIDE SINK OUTLINE.
CUT ON INSIDE LINE.
DIBUJA UNA LÍNEA A 0,79 CM DENTRO DEL
ESQUEMA DEL FREGADERO. CORTA POR LA
LÍNEA INTERIOR.
5/16"
0,79 CM
S
INK
FREGADERO
S
INK OUTLINE
ESQUEMA
DEL FREGADERO.
1
-1/2" RADIUS
RADIO DE 3,81 CM
APPLY SILICONE
CAULK AROUND
CUTOUT.
APLICA PASTA
SELLADORA DE
SILICONA ALREDEDOR
DEL CORTE.
2
3
Wh at You W i l l Nee d
The tools you will need to install your stainless steel sink
are few and commonly found in the average home tool
box.
Here is a list of what you will need:
Caulking for mounting sink rim
3lumbers putty for mounting faucet and strainers
<ardstick or Rule (at least 3-feet long).
)lashlight
Long, thin screwdriver (shank at least six inches).
Adjustable wrenches (2), or open ends.
3ipe wrench.
Lo Que Necesitarás
Las herramientas que necesitarás para instalar tu fregadero
de acero inoxidable son pocas y pueden encontrarse
normalmente en una caja de herramientas común del hogar.
Masilla para instalar el borde del fregadero.
Masilla de plomero para instalar el grifo y los escurridores.
Vara de medir o Regla (de al menos 91 cm).
/interna.
Destornillador largo y fino (vástago de al menos 15,24 cm).
2 Llaves ajustables, o de extremos abiertos.
Llave para tubería.
Los tornillos de instalación vienen con el fregadero.
agua.
2
S
A continuación una lista de lo que necesitarás:
COUNTERTOP
MOSTRADOR
SINK
FREGADERO
7
5
6
SILICONE CAULK
PASTA SELLADORA DE
SILICONA
POSITION SINK ON
COUNTER UPSIDE DOWN.
DRAW LINE AROUND SINK.
CLAMP DEVICE FOR RECTANGLE AND SQUARE STAINLESS STEEL SINKS
DISPOSITIVO CON ABRAZADERA PARA FREGADEROS
RECTANGULARES Y CUADRADOS DE ACERO INOXIDABLE.

Elkay
2222 Camden Court
Oak Brook, IL 60523
©2012 Elkay
elkayusa.com
(2/12) 74180728
S
atin Finish
R
egular cleaningisimportant to maintain the appearance of your Elkay sink.
Easy Cleaning Instructions
Rinsingisthe mostimportantpartofsinkcare. An Elkay stainless steel
sink finish will retain its originalbrightappearanceifthesinkis rinsed
t
horoughlyaftereachuse.“Thorough”rinsingcanbedonebyrunningthe
w
ater throughout thesinkforafewminutesaftereachuse.Typically,a
rinse and toweldryingaftereachusetakescare of mosteverydayclean
ups.
Recommendations forProperMaintenance
•
Do...Use onlyamild liquid dishwashing detergent with a soft
s
pongetocleanandthenthoroughlyrinse thesink.
• Do... Rinsethoroughlyaftereachuse.“Thorough”rinsingcanbedone
b
yrunningwaterforafewminutes andrubbingthecleanedareawitha
sponge.
• Do...Towel dryaftereachusetopreventmineraldepositsfrombuild-
i
nguponthesurfaceofthesink.
• Do Not...Allow liquid soap or other household cleansers to dryonthesur-
f
ace of thesink.Mostbrandscontainchemicaladditiveswhichwill
a
ffect the original finish.
• Do Not...Use solutionsofchlorinebleachandwaterinthesink.
C
hlorides, which are foundinmost soaps,detergents,bleaches,and
cleansers, are very aggressive to stainless steel. If left on thesinktoo
longtheycancausesurfacepitting.
• Do Not...Use a steel wool padtocleanyoursink.Steelwoolpadshave
a
tendency to breakapartandsmallparticlesofsteelcanbecome
embedded in thesurfaceofthesink.Thesteelparticleswillrustandwill
give theappearancethatthesinkitselfisrusting.
• Do Not...Use abrasive cleansers or abrasive pads as it will scratch the
surface.
• Do Not...Leave wetsponges,cloths,orcleaningpadsonthesink.This
canleadtosurfacerust.
Followingtheserecommendationsfor the care andcleaningofyour
stainless steel sink will insure that it will provide youwithmany years of
service.
C
hlorides
T
oday, chloridesarefoundinmost all soap,detergents,bleachesand
c
leansers;chlorides canbeoppressive to stainless steel. However, chl o-
r
ides are very water soluable. Therefore, THOROUGH RINSINGofyour
s
inkaftereachusetoremoveanychlorideresidueand a weeklyscouring
is allthatisrequiredtokeepyoursinklooking bright andshiny.
Water Quality
T
he qualityofyour water can affect your sink’s appearance.Ifyourwater
hasahighironcontent, a brown surface stain can formonthesinkgiving
t
he appearance of rust. Additionally, in areas withahigh concentration
o
f minerals,orwith over-softened water, a white filmmaydeveloponthe
sink. To combattheseproblems,wesuggest thatthesinkbetowel dried
a
fter use.
Discoloration,RustandPossible Pitting
W
et sponges,cloths,cleaningpadsand rubbermatsleftonthesinkcan
leadtodiscoloration. Steel woolpadsshouldneverbeusedtocleanyour
s
inkastheyleavesmallironparticlesinthe grainlineswhich rust andcan
d
amage thesink.Continuedusageinthismannermayeventuallyleadto
thesinkitselfrusting andpitting.
LiquidSoap
Do notallowconcentratedliquiddetergenttodryonyoursink.Most
b
rands containchemicaladditiveswhich willaffectthe originalfinish.
Spotting
Thequalityofyour water canaffectyoursink’sappearance.Inareas with
hard water, a brownsurfacestaincan formonthesinkgiving theappear-
a
nceofrust. Thisphenomenaalsooccursinwater withhighironcontent.
Additionally, in areas with a high concentrationofminerals, or withover-
softened water, a whitefilmmaydeveloponthesink.Tocombatthis
problem,wesuggestthatthesinkbetowel driedafteruse.
Foods
Heavysaltconcentrationorfoods containinghighlevelsofsaltshould
notbeallowedtodry onto thesinksurface.Rinse yoursinkthoroughly
afteruse.
Use and Care Hints
ELKAY LIMITED SINK WARRANTY
Elkay warrants to the original purchaser of an Elkay stainless steel sink that Elkay will,
at its option, replace or repair, without charge, such product if it fails due to a
manufacturing defect for a lifetime of normal residential use. Product replacement
does not include transportation cost or labor installation cost. This warranty covers
only stainless steel self-rimming drop-in sinks installed in a conventional countertop
surface and stainless steel undermount sinks installed in a conventional solid
surface countertop and applies to residential installations only. Elkay reserves the
right to examine product in question and its installation prior to replacement.
WASTE FITTINGS AND ACCESSORIES ARE NOT WARRANTED
OTHER WARRANTY CONDITIONS ON SINKS
This warranty applies to sinks purchased after March 1st 2001 as shown on the
purchaser’s dated receipt. For sinks purchased prior to March 1st 2001, the applicable
warranty at that time will be in effect. Our warranty does not cover product failure or
damage caused by the use of optional Elkay accessories, abusive treatment, misuse,
environmental factors, normal wear including dents and scratches, improper care
and cleaning, use of aggressive and abrasive cleaners, damage due to handling or
failure to follow the recommended procedures for installation, care and maintenance
as detailed in the installation and care guide provided with every sink. This warranty
is extended only to the original consumer purchaser of the product. This warranty
does not cover shipping costs, labor costs, or any other charges for such items as
installation or replacement of the sink, diagnosis or replacement of any faucet or
component part, or any other expense or loss.
This warranty does not cover obsolete, discontinued nor display products, whether
such items are purchased at discount outlets and/or on-line or sold on clearance or
close out.
All incidental or consequential damages are specifically excluded. No
additional warranties, express or implied are given, including but not limited
to, any implied warranty of merchantability or fitness for a particular purpose.
Some states do not allow the exclusion or limitation of incidental or consequential
damages or limitations on how long an implied warranty lasts, so the above
limitations or exclusions may not apply to you.
This warranty gives you specific legal rights, and you may also have other rights
which vary from state to state.
TO OBTAIN SERVICE UNDER WARRANTY
1. Write to: Elkay Manufacturing Company
Attention: Consumer Services
2222 Camden Court
Oak Brook, IL 60523
2. Include a letter containing the following information:
a. Date of purchase and installation
b. Proof of Purchase (copy of original dated invoice)
c. Description of nature of defect
d. Model number or description of model and/or component part if
possible.
/