

2
TABLE OF CONTENTS
1. MANUAL OVERVIEW ....................................................................................................... 3
2. WATER MASSAGE ........................................................................................................... 3
3. AIR MASSAGE (Pearl bath) .............................................................................................. 3
4. DISINFECTION ................................................................................................................. 3
5. TRANSPORT .................................................................................................................... 3
6. PREPARING THE ROOM ................................................................................................. 3
7. PRELIMINARY BATHTUB PLACEMENT ......................................................................... 3
8. CLEANING THE BATHTUB .............................................................................................. 4
9. CONNECTING TO THE SEWAGE SYSTEM ................................................................... 4
10. CONNECTING TO THE WATER SUPPLY ....................................................................... 4
11. CONNECTING TO THE POWER SUPPLY ....................................................................... 4
12. TESTING BATHTUB LEAKPROOFNESS DURING INSTALLATION ............................... 4
13. PROPER INSTALLATION ................................................................................................. 4
14. INSTALLING PANEL ENCLOSURE ................................................................................. 5
15. SYSTEMS AND THEIR CONTROL PANELS ................................................................... 6
15.1. SX1 SYSTEM - water massage .................................................................................. 6
15.2. SX2 SYSTEM - water and air massage ...................................................................... 7
16. PLACE OF FAUCET INSTALLATION .............................................................................. 8
17. BATHTUB MAINTENANCE .............................................................................................. 9
18. REPAIRS .......................................................................................................................... 9
19. IMPORTANT INFORMATION ......................................................................................... 10
20. TECHNICAL DRAWINGS ............................................................................................... 10
WARRANTY TERMS ............................................................................................................. 14
WARRANTY CARD ............................................................................................................... 15

3
1. MANUAL OVERVIEW
Follow the instruction manual for hydro-massage systems closely to ensure the best use of massage capabilities and to
avoid problems or failure caused by inappropriate operation.
We recommend hiring a qualifi ed ROCA POOL-SPA installer to install the bathtub.
The system to which the bathtub is connected must be equipped with a residual current device. Only a person with
appropriate electrical qualifi cations is permitted to connect the bathtub to the electrical system. This person should
confi rm correct bathtub connection in the Warranty Card. This is required in order for the warranty to be deemed valid
by the manufacturer!
2. WATER MASSAGE
Water massage is generated by a water pump located under the bathtub. The water pump power is 900 W.
Water massage is performed by nozzles installed in the bathtub. Water is forced by the pump through the nozzles
located inside the bathtub. The intensity of water massage can be controlled by adding air to the water stream fl owing
out of the nozzles (aeration). The more air, the more intense the stream.
3. AIR MASSAGE (Pearl bath)
Air massage (so-called “pearl massage”) can be used as an addition to hydro-massage. It involves using small air bubbles
to perform a gentle relaxing massage.
The air massage is generated by an air blower. The blower power is 500 W. Small bubbles of air are forced into the bathtub
through a system of tubes and nozzles under the bathtub.
4. DISINFECTION
The water system of hydro-massage bathtubs requires periodic disinfection. Perform it regularly to ensure clean and
pleasant bathing.
Disinfecting the water and air system:
Every 2 to 4 weeks – depending on the frequency of bathtub use – fi ll the bathtub with clean cold water above the nozzle
level and add 50 ml of a disinfecting liquid for each 100 l of water in the bathtub. Activate the pump and the blower for
a few minutes. Leave the bathtub fi lled for 10-20 minutes, and then activate the device for a few minutes again. Then,
empty the bathtub and rinse it thoroughly with clean tepid water.
Disinfecting the air system (temporarily):
Fill the bathtub with clean cold water up to a level of ca. 5-6 cm and add ca. 20 ml of disinfectant. Activate the blower
for 1 minute, and then leave the bathtub fi lled for 10 minutes. Repeat this step two more times. Then, empty the bathtub
and rinse it thoroughly with clean tepid water. Approximately 10 minutes after draining the water, activate air massage
(blower) for ca. 1 minute to dry the air nozzles completely.
5. TRANSPORT
The bathtub should be transported in its original container. When moving the bathtub, hold it by its aluminum frame or
acrylic parts.
Never use the tubes and hoses of massage systems as handles.
6. PREPARING THE ROOM
When preparing the room for bathtub installation, make sure it meets the following requirements:
- appropriate size
- 230 V~ power supply
- water inlet and outlet
- leveled surface
- appropriate ventilation
- for corner bathtubs: the corner where the bathtub will be installed should have a right angle, and the vertical deviation
of walls should not exceed 1 mm/m.
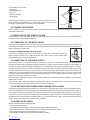
7. PRELIMINARY BATHTUB PLACEMENT
After unpacking the bathtub, install the enclosed legs immediately (placing the bathtub without its legs may damage the
overfl ow). The package included with the bathtub contains parts of these legs.

4
The installation set includes::
QXW
OHJ
SLQ
IUDPH
- plastic legs,
- M10 threaded pins,
- M10 nuts,
- plastic top handles,
- handle plugs.
Screw the legs and locking nuts onto the pins, and then screw the pins inside
profi le sockets (see the illustration). Turn the bathtub, place it on the legs, set
the height, and then level it in its future place of installation
8. CLEANING THE BATHTUB
Before installation, clean the chromium-plated surfaces of the accessories and the acrylic bathtub surface to remove
preservative substances.
9. CONNECTING TO THE SEWAGE SYSTEM
Screw one end of the enclosed drain trap to the bathtub outlet and connect the other end to the sewage system
connection using an appropriate fl exible hose.
10. CONNECTING TO THE WATER SUPPLY
The hydro-massage bathtub can be fi lled normally using concealed faucets or bathtub-mount faucets with a spout. If you
cut out holes for bathtub-mount faucets using a professional hole saw in the places recommended by the manufacturer,
bathtub warranty will remain valid.
Connection for fi lling the bathtub through nozzles:
The bathtub is equipped with a pipe tee (included in piping) with a connection for fi lling the
bathtub through nozzles. It is a single connection with a check valve, to which mixed water
should be led using an armored fl exible hose.
11. CONNECTING TO THE POWER SUPPLY
The electrical system of the bathtub should be connected to power by a qualifi ed electrician. The warranty terms
require that a person with appropriate electrical qualifi cations confi rms correct electrical connection of the bathtub. In
accordance with the Polish Standards (PN-EN 60335-1, PN-EN 60335-2-60) a hydro-massage bathtub is a Class I
electrical device and, as such, must be connected to power permanently. For safety reasons, the bathtub power cord
should be connected to power using only an electrical connection secured with a residual current device (RCD) with
rated cut-off current not exceeding 30 mA. The minimum section of the bathtub power cord is 3 x 1.5 mm2. The electrical
connection for permanent bathtub connection should be prepared in zone I (device located under the bathtub). The
bathtub also requires an equalizer connection.
We recommend checking the residual current device periodically in accordance with the guidelines on testing and
resetting such devices.
The electrical system should be equipped with appropriate manual cut-off mechanism. The device must ensure that
contacts are spread on each power supply pole at overvoltage category III.
12. TESTING BATHTUB LEAKPROOFNESS DURING INSTALLATION
After preliminary bathtub placement, leveling and connecting it to the water supply, power supply and sewage system,
adjust the threaded shank to set the height of the overfl ow/drain device head, and then fi ll the bathtub with hot water to
the overfl ow level. Inspect the surface of the bottom as well as all devices and parts of bathtub piping. If the results of
inspection are positive, activate the massage systems available in a given bathtub for 10 minutes. When the systems
are switched off completely, leave the bathtub fi lled for 1 hour, and then inspect it again. If the results of inspection are
positive, empty the bathtub and proceed to proper installation.
13. PROPER INSTALLATION
Once the bathtub is tested for leakproofness:
- place it in the desired location
- set the bathtub height, keeping in mind the possible height of bathtub enclosure,
- perform bathtub leveling, making sure the bottom is slightly sloped towards the outlet,
- set the gap between room walls and bathtub top (ca. 3 mm),
- set the location of bathtub top and mount plastic handles on walls,

5
- lock bathtub legs with locking nuts
- enclose the bathtub, ensuring access of fresh air to bathtub devices (area equal to 2 standard ventilation grates) and
space for removing drain tap when it needs to be cleaned
- seal the gap between the bathtub and surrounding walls using masking strip or sanitary silicone.
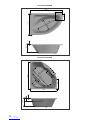
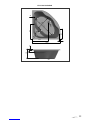
14. INSTALLING PANEL ENCLOSURE
Panel bathtub enclosures were designed to ensure the access of air to devices under the bathtub.
Their height was measured as to create a ca. 3 mm gap under the enclosure after installation.
When installing manufacturer’s suggested enclosures:
- set enclosure spacer screws located in the aluminum bathtub frame
- attach pressure springs to holes in the bottom part of bathtub enclosure
- place the enclosure with compression springs near the bathtub
- attach free spring ends to holes in the bottom part of aluminum bathtub frame
- place the upper rib of bathtub enclosure in the gap between bathtub edge and limiters.
Panel bathtub enclosures with simplifi ed frame are equipped with laminated aluminum fl ats, to which you should screw
the legs that set the height and support the enclosure.
A
B
1
2
1
1 - panel
2 - bathtub
Detail A
1
2
Detail B
1/3 2/3
2/3

6
15. SYSTEMS AND THEIR CONTROL PANELS
15.1. SX1 SYSTEM - water system
• Water massage
- 4 back nozzles
- 2 foot nozzles
- 4 side nozzles
- control of water massage intensity through aeration
- water level sensor that prevents the pump from running dry.
• Water massage intensity control knobs
- bathtub top includes control knobs for adjusting air fl ow that adds aeration to water massage.
The control knobs direct air to side nozzles, back nozzles and foot nozzles.
• Chromotherapy
- multi-color LED spotlight
SX1 hydro-massage system control
Proper activation or deactivation of features is always confi rmed with a beep.
System activation:
Touch the symbol once to activate the hydro-massage system (all icons on the control panel
as well as the LED light with automatic color changer will be switched on).
Touch the symbol again to deactivate the entire system.
Water massage:
The bathtub is equipped with a water level sensor to prevent the water massage pump from running
dry. If the water level is below the required level, the pump will not start.
Touch the symbol once to activate the water massage pump.
Touch the symbol again to deactivate this feature.
The massage switches off automatically after 30 minutes. The system will then wait until you switch it back on or empty
the bathtub.
Chromotherapy:
The LED light with color changer is switched on automatically after activating the hydro-massage system.
Touch the symbol once to deactivate the multi-color light.
Touch the symbol again to activate or deactivate this feature. The light switches off automatically after 30 minutes.
NOTE! After approximately 3 min of the whirlpool system operation (water massage or
the light function active), the control panel will be automatically locked. To unlock the
panel, hold your fi nger at the position shown in the fi gure below, until the „beep” will be
heard.
CAUTION! If there is too much water on the control panel, remove it to ensure proper system operation.

7
15.2. SX2 SYSTEM - water and air system
• Water massage
- 4 fi xed back nozzles,
- 2 fi xed foot nozzles (excluding Klio Asymmetric 140 x 80),
- 4 fl at side nozzles with the option to direct water stream,
- independent control of back/side/foot massage intensity through aeration,
- water level sensor that prevents the pump from running dry,
- drain for removing water from the water massage system after bath.
• Water massage intensity control knobs
- bathtub top includes control knobs for adjusting air fl ow that adds aeration to water massage.
The control knobs direct air to side nozzles, back nozzles and foot nozzles.
• Air massage:
- system of air ducts in the bathtub,
- drain for removing water from the air massage system after bath,
- automatic hot air drying of the air system after bath.
• Chromotherapy
- multi-color LED spotlight.
SX2 hydro-massage system control
Proper activation or deactivation of features is always confi rmed with a beep.
System activation:
Touch the symbol once to activate the hydro-massage system (all icons on the control panel
as well as the LED light with automatic color changer will be switched on).
Touch the symbol again to deactivate the entire system.
Water massage:
The bathtub is equipped with a water level sensor to prevent the water massage pump from running
dry. If the water level is below the required level, the pump will not start.
Touch the symbol once to activate the water massage pump.
Touch the symbol again to deactivate this feature.
The massage switches off automatically after 30 minutes. The system will then wait until you switch it back on or empty
the bathtub.
Air massage:
Touch the symbol once to activate the air massage pump. Touch the symbol again to deactivate this feature.
The massage switches off automatically after 30 minutes. The system will then wait until you switch it back on or empty
the bathtub.
Blowing through air ducts:
The air nozzles are automatically blown through and dried 30 minutes after draining water from the bathtub (for 5
minutes), even if none of the features was activated.
If the bathtub was fi lled with a small amount of water, the water level sensor will not detect it. That is why, once
you empty the bathtub, activate the blower for ca. 1 minute manually to blow through air nozzles and remove
remaining water.

Chromotherapy:
The LED light with color changer is switched on automatically after activating the hydro-massage system.
Touch the symbol once to deactivate the multi-color light.
Touch the symbol again to activate or deactivate this feature. The light switches off automatically after 30 minutes.
NOTE! After approximately 3 min of the whirlpool system operation (water massage or the light function active),
the control panel will be automatically locked. To unlock the panel, hold your fi nger on any function button,
until the „beep” will be heard.
CAUTION! If there is too much water on the control panel, remove it to ensure proper system operation.
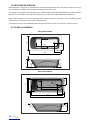
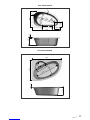
16. PLACE OF FAUCET INSTALLATION
Klio rectangular Klio asymmetric 140 x 80
No place for bathtub-mount faucets. Suggested installation of wall-mount faucets.
Klio symmetric 133 and 140 Klio asymetryczne 150 x 100
8

9
Klio asymmetric 163 x 103
17. BATHTUB MAINTENANCE
Clean the bathtub using delicate liquids only (not containing acetone, abrasives or caustic substances). Thanks to the
structure and low adhesion of acryl it is easy to keep the bathtub clean.
Disinfect the bathtub at least once a month and remember to activate bathtub massage systems every time. Rinse the
bathtub thoroughly after disinfection.
Clean the water suction device periodically (at least once a quarter) to remove any dirt. If the suction device is
contaminated, it may damage pump engine or the water massage pump itself.
18. REPAIRS
Mechanical damage (minor scratches) of acryl can be easily repaired. For minor scratches, use a very small amount of
wax-free liquid car polish. Deeper scratches or cracks can be removed by using fi rst abrasive paper with 800, 1200 and
2000 grit, and then the above-mentioned liquid. To keep bathtub surface smooth, rub it with circular moves, and then
apply a wax-based car body polish (thus ensuring high gloss).
Problem Possible cause Procedure
Massage systems do not work Interrupted power supply Check bathtub power supply
Water pump works, although
there is no water in the bathtub Damaged water level sensor Call the ROCA POOL-SPA service center
Low water pressure in nozzles Contaminated water system Clean the suction device mesh and clean
the water system using a disinfectant
Cracking noise and deformation
of bathtub fi lled with water.
Inappropriate placement of bathtub
on its legs, lack of installation gaps
Adjust support points, secure screws with
locking nuts, create installation gaps
Bathtub emits an unpleasant
smell
Inappropriate bathtub maintenance,
no maintenance of overfl ow/draining
valve
Disinfect on a regular basis
Foaming occurs during bath Use of inappropriate bathing
products Use only low-foam bathing products
Bathtub scratches Use of inappropriate cleaning
agents, external factors
Remove scratches by polishing the
bathtub; surface cracks prevent repairs

10
19. IMPORTANT INFORMATION
Remember that it is easy to slip on the wet surface of most bathtubs, especially when using soaps, shampoos, bath oils,
etc. The designers, installers and users alike should always keep this in mind.
The bathtub may be positioned and repaired only by qualifi ed installers with appropriate offi cially recognized certifi cates
that confi rm their compliance with local safety regulations (e.g. electrical or water supply/drain qualifi cations).
Small children should not use a hydro-massage bathtub without supervision. The elderly, infi rm and disabled people
should be extra careful when using a hydro-massage bathtub.
To make sure everyone uses this bathtub safely, hand this instruction manual over to its future owners and users.
20. TECHNICAL DRAWINGS
KLIO 160x70 bathtub
KLIO 170x70 bathtub


14
WARRANTY TERMS
1. Roca Pool-Spa Sp. z o.o. grants a 60-month warranty for the acrylic surface and a 24-month warranty for other parts
of the product.
2. This warranty is valid only if the bathtub is installed by an installer with electrical qualifi cations.
3. Any noticed damage or fault should be reported to the dealer within 7 days from its occurrence. If it is impossible
to contact the dealer, the Roca Pool-Spa Service Department, Poland should be notifi ed in writing within the above-
mentioned period.
4. All repairs are performed at customer’s location.
6. This warranty becomes void in the following cases:
- mechanical damage of accessories
- mechanical damage of product surface
- user’s own repairs and modifi cations
- installation of other devices on the product (except faucets mounted on bathtubs in designated places)
- maintenance performed contrary to instructions in this manual.
7. The warranty document is invalid if the dealer does not confi rm the sale with their signature, stamp and date on the
Warranty Card on the day of purchase.
8. The manufacturer does not reimburse costs of any damage to wall and fl oor surfaces (e.g. glaze, terracotta, wood
paneling, etc.) caused directly by the need to repair the product.
Roca Pool-Spa Sp. z o.o.
ul. Wyczółkowskiego 20,
44-109 Gliwice, Poland
phone: +48 32 339 41 00,
www.roca.pl, e-mail: [email protected]

15
WARRANTY CARD
MODEL, ACCESSORIES
SERIAL NUMBER
PRODUCTION DATE
RATED POWER CONSUMPTION
REQUIRED CURRENT PROTECTION
THERMAL PROTECTION CLASS
QUALITY CONTROL
F
DEALER:
(date of sale, dealer's
signature and stamp)
ELECTRICIAN'S/INSTALLER'S STAMP
ROCA POOL-SPA
QUALITY CONTROL
..................../..................../....................

16.03.2015
PI3000098
ROCA POOL-SPA Sp. z o.o.
ul. Wyczółkowskiego 20,
44-109 Gliwice, Poland
phone: +48 32 339 41 00
www.roca.pl,
e-mail: [email protected]
ROCA POOL-SPA is committed to constant improvement of its products and reserves
the right to introduce changes to the specifi cation and colors without prior notifi cation.
However, ROCA POOL-SPA makes every effort to ensure that the specifi cations are
up-to-date on the date of publication.
-
 1
1
-
 2
2
-
 3
3
-
 4
4
-
 5
5
-
 6
6
-
 7
7
-
 8
8
-
 9
9
-
 10
10
-
 11
11
-
 12
12
-
 13
13
-
 14
14
-
 15
15
-
 16
16


Poolspa Klio symmetric 133x133 User manual
- Type
- User manual
- This manual is also suitable for
Ask a question and I''ll find the answer in the document
Finding information in a document is now easier with AI
Other documents
-
VANITYFUS VF-21S0105-60 User manual
-
Xspracer VF-20S0104-63 Installation guide
-
Stivier 21S0105-60 User manual
-
Universal Tubs H3060WCRWACE Installation guide
-
Universal Tubs H3238LWHCB Installation guide
-
Unbranded H3238RWSCA Installation guide
-
-
Unbranded HSI3060LWSCB Installation guide
-
Universal Tubs H3260LWSCA Installation guide
-
Unbranded H2953WCLWHCE Installation guide