Page is loading ...

+
Thank you for purchasing genuine Design Engineering, Inc. products. Be sure to always wear the proper
safety equipment when installing any DEI product. Design Engineering, Inc. WILL NOT BE HELD LIABLE
FOR IMPROPER INSTALLATION OR USE OF THIS PRODUCT. Please follow all instructions provided.
If you are unsure of any installation procedure, please contact a certified technician.
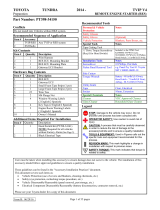
1. Begin initially tightening the tie using hands
or pliers. Be careful as the sides of the
metal ties can be sharp. Figure 1
2. Insert the slotted tool through the tie just
after the clasp. Figure 2
TOP TIP: Working in small space? No
problem, slide the tool onto any ¼” drive
extension to give your hands some extra
room. Great when tying exhaust wrap near
cylinder heads.
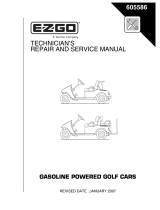
3. Twist the tie away from the locking clasp..
Figure 3
4. Remove slot tool.
5. Trim excess tie using side cutters, fold
under, and crimp. Figure 4
TOP TIP: DEI recommends using a hand
driver because of better torque control and
a reduced risk of over tightening. However,
a ratcheting socket driver will also work
with this tool.
(Continued on back)
PRODUCT INSTRUCTIONS
DESCRIPTION: Tie Tool Extension, ¼” Drive
PART NUMBER: 010220
APPLICATION(s): For tightening Stainless Steel
Locking Ties
KIT CONTENTS:
Locking Tie Tool (1)
TOOLS NEEDED: ¼” drive handle or ratcheting
socket driver, ¼” extension (optional), and side
cutters.
ADDITIONAL INFORMATION: This tool is designed
to work with all types of metal locking ties up to
12mm wide.
Fig. 1
Fig. 2

D e s i g n E n g i n e e r i n g , I n c .
604 Moore Rd Avon Lake Ohio 44012
800-264-9472 designengineering.com
INS1003 REV 10/14
Fig. 3
Fig. 4
/