Page is loading ...

INSTALLATION INSTRUCTIONS
POP UP ASSEMBLY
Model No: 324, 325, 326
Recommended Installation by a Professional Plumbing Contractor
Note: The use of petroleum base plumbers putty on our products will nullify the warranty. We recommend the use of
clear silicone sealing materials.
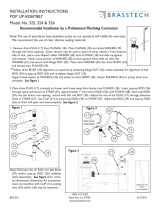
1. Remove drain FLANGE (3),WHITE WASHER (4) and PLUNGER ASSY (1), and discard drain CAP
(2), from drain assembly. Place drain FLANGE (3) and WHITE WASHER (4) in place through the
sink drain hole. (Clear silicone may be used in place of the WHITE WASHER). From underside of
the sink install LOCK NUT (8), FLAT WASHER (7), RUBBER CONE WASHER (6), and install
drain BODY (9) with the side port pointing toward the back. Cone portion of WASHER (6) to
face upward. Secure in place by threading the drain FLANGE (3) onto drain BODY (9).Then tight-
en LOCK NUT (8) firmly.
** Adjust drain BODY (9) alignment, as required, by loosening LOCK NUT (8), rotate assembly for
alignment of ball ROD (12) to pop-up ROD (10) and re-tighten LOCK NUT (8).
2. Apply thread sealant to TAILPIECE (5) and attach to drain BODY (9). Attach TAILPIECE (5)
to p-trap drain (not included). See Figure 1.
3. Place PLUNGER ASSY(1), oriented as shown, into drain FLANGE (3). Insert pop-up ROD (10) through spout and secure
to STRAP (16), approximately 1" from end of ROD (10), with SCREW (17). Insert ball ROD (12) into the drain's side
port opening and connect it with the bottom hole of PLUNGER ASSY (1), secure with ball rod NUT (14). Adjust the
height of the drain cap of PLUNGER ASSY (1) through elevation holes in STRAP (16). Use CLIP (15) to secure ball
ROD (12) to STRAP (16). Adjust ball ROD (12) and pop-up ROD (10) adjusting via the elevation of the STRAP (16)
so drain will open and close properly. See Figure 2.
BRS-325 02/06/2018
2
1
Note Hole
Orientation
3
4
SINK
HOLE
7
6
8
For 324
For 325 & 326
9
5
P-TRAP
DRAIN
Figure 1

Figure 3
12
10
16
Extension Kit
#3251
(not supplied)
12
14
Figure 2
Note hole
orientation
9
11
16
White washer inside
the body
Blue washer
in this end
2
1
13
15
17
10
Note: Extension Kit (# 3251) for ball ROD (12) and/or pop-up ROD (10) available (sold separately).
See Figure 3 for nominal dimensions. (Extension Kit connection must not interfere with CLIP (15),
cutting item (12) and/or (10) may be required.)
2001 CARNEGIE AVE, SANTA ANA CA 92705
(949) 417-5207
02
/06/2018
BRS-325
EN-3529
Rev C
4” MIN
7” MAX
/