Dell PowerEdge FD332
WARNING: Before setting up your system, review and follow the safety instructions that are shipped with the system.
CAUTION: Do not remove the storage sled from the enclosure when the sled is powered on, as it may result in data loss.
NOTE: Install the storage sled(s) in the bottom slots of the enclosure, beginning from the left. In the four-bay chassis,
you can also install the storage sled in the top right slot of the enclosure.
NOTE: When installing the storage sled, the compute sled(s) to which the storage sled is mapped to, must be turned off.
NOTE: The storage sled turns on only when the compute sled to which it is mapped is turned on.
NOTE: Th e documentation set for your system is available at Dell.com/poweredgemanuals. Always check for updates
and read the updates first because they often supersede in formation in other documents.
NOTE: For information on setting up the PowerEdge FX2s enclosure, see the Getting Started With Your System
document that shipped with the enclosure.
警告:设置系统前,请查看并遵循系统随附的安全说明。
小心:不要在存储托架启动后从盘柜中将其移除,否则会导致数据丢失。
注:在盘柜的底部插槽中安装存储托架,从左侧开始。在四盘位机箱中,还可以在盘柜右上部的插槽中安装存储托架。
注:安装存储托架时,必须关闭存储托架映射的计算托架。
注:存储托架只有在其映射的计算托架开启时才会启动。
注:系统文档集可从 Dell.com/poweredgemanuals 获取。始终检查更新,并先阅读这些更新,因为它们通常会取代其他文档中的信息。
注
:
有关设置 PowerEdge FX2s 盘柜的信息,请参阅盘柜随附的《系统入门指南》文档。
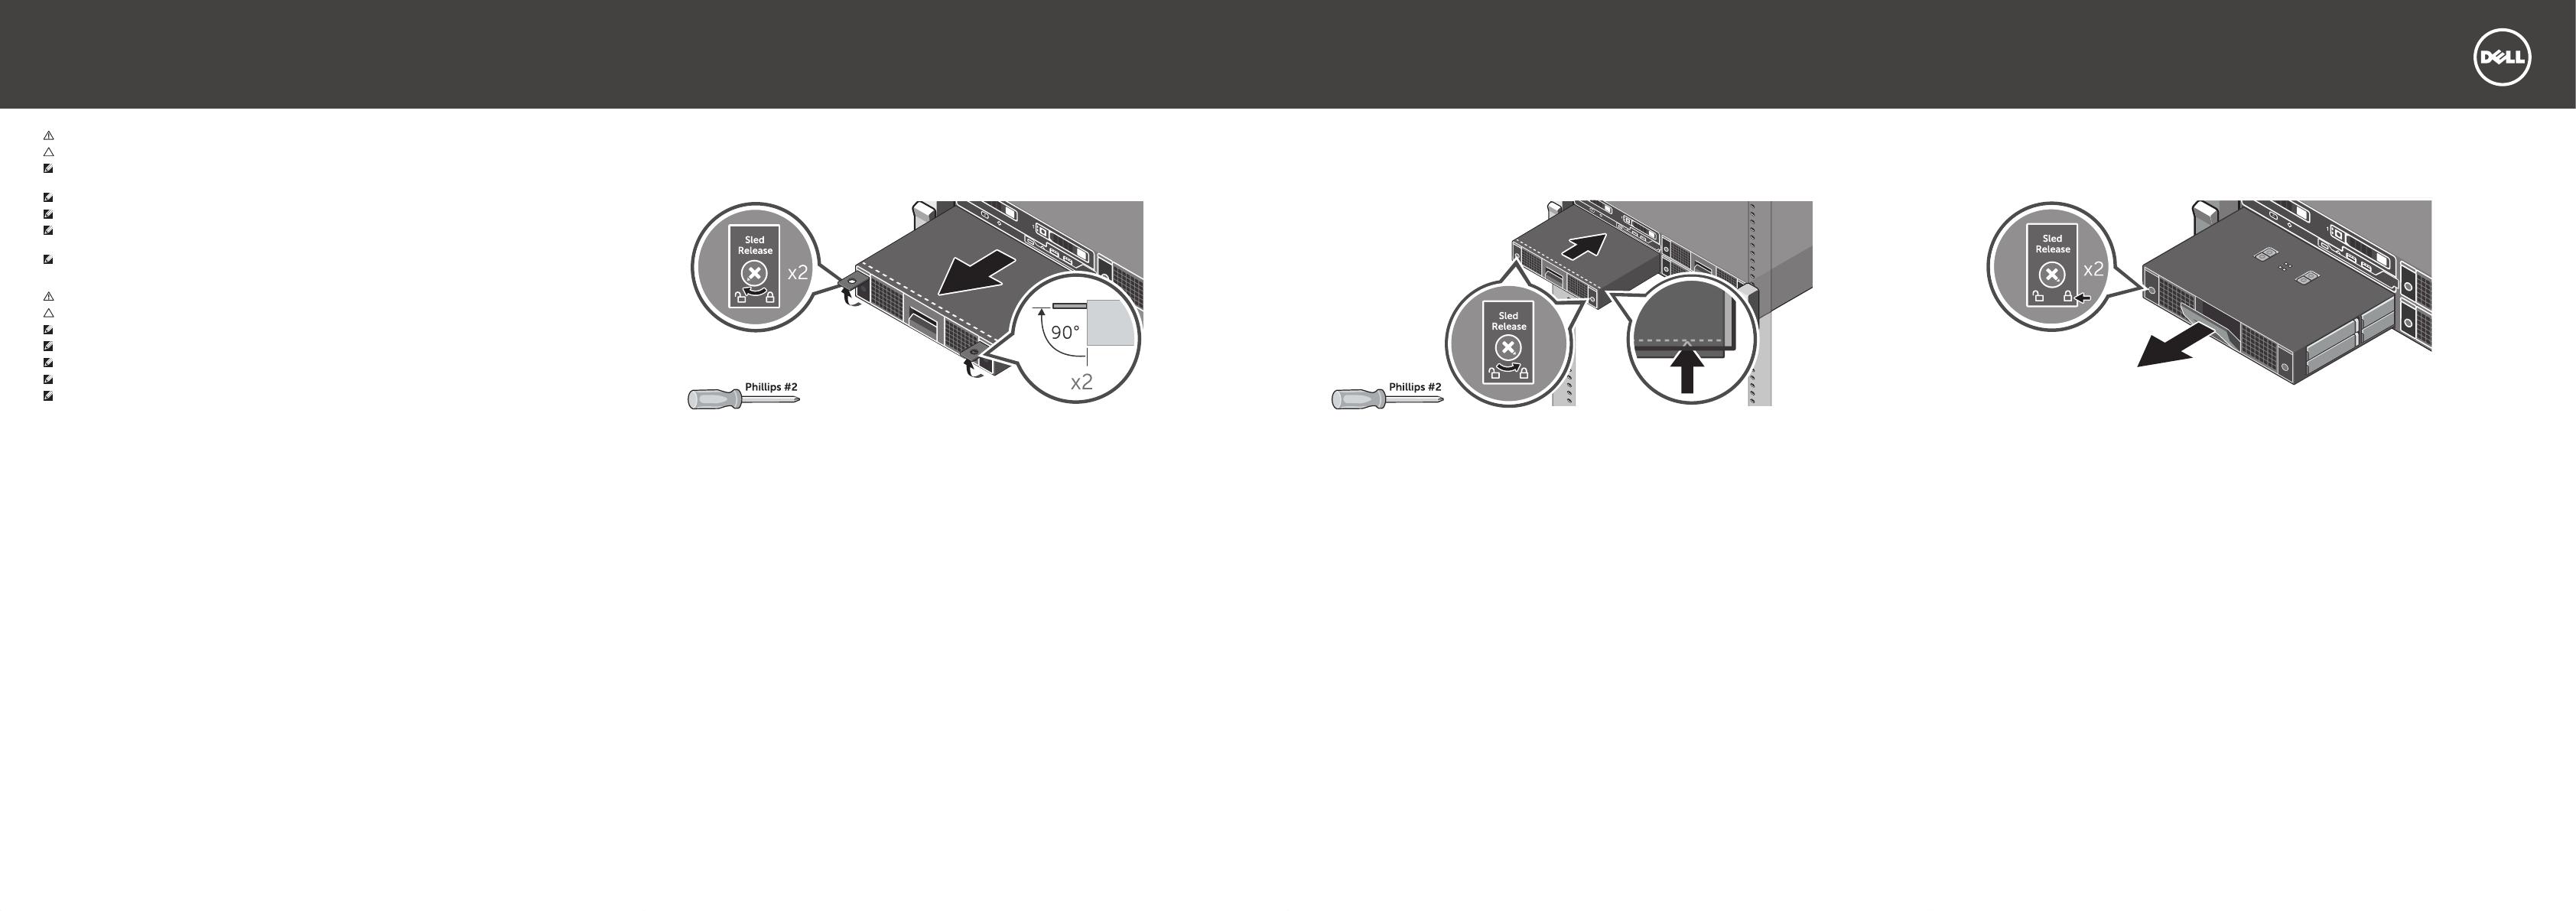
1. Use a Philips #2 screwdriver to unlock the Sled Release lock.
2. Lift the release tabs up and pull the storage sled out of the enclosure.
1. 使用 2 号十字螺丝刀打开托架释放锁。
2. 提起释放卡舌并拉出盘柜中的存储托架。
1. Gunakan obeng Philips #2 untuk membuka kunci Pelepas Sled.
2. Angkat tab pelepas dan tarik sled penyimpanan keluar dari wadahnya.
1. #2 プラスドライバーを使用して、スレッド解除のロックを外します。
2. 解除タブを持ち上げてエンクロージャからストレージスロットを引きます。
1. 필립스 #2 드라이버를 사용하여 슬레드 분리 락의 잠금을 해제합니다.
2. 분리 탭을 위로 들어올리고 스토리지 슬레드를 인클로저 밖으로 잡아 당깁니다.
1. Slide the storage sled into the enclosure until the dotted line on top of the sled is not visible from the top edge of the bay
and the sled clicks into place.
2. Use a Philips #2 screwdriver to lock the Sled Release lock and secure the sled in the enclosure.
1. 将存储托架滑入盘柜,直到从盘位的上边缘看不到托架顶部的虚线且托架卡入到位。
2. 使用 2 号十字螺丝刀关闭托盘释放锁并将托架固定到盘柜中。
1. Geser sled penyimpanan ke dalam wadahnya sampai garis putus-putus yang ada di bagian atas sled tersebut tidak
terlihat dari tepi atas bay dan sled masuk ke tempatnya sampai terdengar suara klik.
2. Gunakan obeng Philips #2 untuk mengunci kunci Pelepas Sled dan amankan sled di dalam wadahnya.
1.
スレッド上部の点線がベイの上端から見えなくなり、カチッと音がするまでストレージスレッドをエンクロージャに差し込みます。
2. #2 プラスドライバーを使用して、スレッド解除をロックし、スレッドをエンクロージャに固定します。
1. 베이의 상단 가장자리에서 슬레드 상단의 점선이 보이지 않고 슬레드가 딸깍 소리를 내며 제 자리에 걸릴 때까지 스토리지
슬레드를 인클로저로 밀어 넣습니다.
2. 필립스 #2 드라이버를 사용하여 슬레드 분리 락을 잠그고 슬레드를 인클로저에 고정시킵니다.
NOTE: Ensure that the Sled Release lock is in the locked position.
Pull the drive drawer handle on the front panel and slide the drawer out.
注
:
确保托架释放锁位于锁定位置。
拉动前面板上的硬盘抽屉手柄并滑出抽屉。
CATATAN: Pastikan bahwa kunci Pelepas Sled ada dalam posisi terkunci.
Tarik pegangan laci drive yang ada di panel depan dan geser laci keluar.
メモ:スレッド解除のロックがロック位置にあることを確認します。
フロントパネルにあるドライブドロワーのハンドルを引き、ドロワーを引き出します。
주: 슬레드 분리 락이 잠금 위치에 있는지 확인합니다.
전면 패널의 구동 서랍 핸들을 당겨 서랍을 빼냅니다.
Removing the storage sled |
卸下存储托架 | Melepaskan sled penyimpanan |
ストレージスレッドの取り外し | 스토리지 슬레드 제거
Installing the storage sled |
安装存储托架 | Memasang sled penyimpanan |
ストレージスレッドの取り付け | 스토리지 슬레드 설치
Accessing the hard drive or SSD |
检查硬盘或 SSD | Mengakses hard disk atau SSD |
ハードドライバーまたは SSD へのアクセス | 하드 드라이브 또는 SSD 액세스
