Page is loading ...

www.islabikes.co.uk
Beinn 29
Owner’s manual

Beinn 29 www.islabikes.co.uk
5
5
1
11
9
12
6
14
16
18
17
20
21
22
23
4
10
13
15
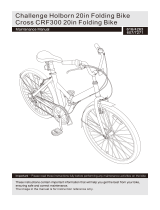
1. Brake levers
2. Brake callipers
3. Rotors
4. Saddle
5. Seatpost
6. Seatpost clamp
7. Saddle clamp
8. Stem
9. Stem bolts
10. Headset
11. Headset spacers
12. Headset adjuster bolt
13. Handlebars
14. Rim
15. Spokes
16. Tyres
17. Chain
18. Rear derailleur
19. Cassette
20. Frame
21. Fork
22. Cranks
23. Pedals
2
3
7
8
19
Setting up your Beinn 29

Beinn 29 www.islabikes.co.uk
Do not pull brake when calliper spacer is removed. Please
keep calliper spacer for transportation when wheel is removed.
Step 1 of 6
Removing front wheel packaging
continued
c. Install front QR from pedal box.
Step 1 of 6
Removing front wheel packaging
a. Remove front wheel protection
packaging.
b. Remove fork and
brake calliper plastic
protection packaging.

Beinn 29 www.islabikes.co.uk
Step 2 of 6
Securing front wheel continued
c. Clamp the QR lever to fully ‘closed’ position towards rear of bike.
The QR lever should start to feel tight at 90 degrees as you close
– if it is too tight or too loose you can adjust by holding lever
‘open’ again and turning nut.
Check front wheel is correctly installed by lifting the handlebar and
holding the wheel at the fork. Firmly push from side to side. If
thereisnomovementthewheelisttedcorrectly.
Step 2 of 6
Securing front wheel
a. Put front wheel into the fork.
Ensure quick release (QR) lever
is not on gear side. Check this
matches rear.
b. Hold QR lever in fully ‘open’
position and turn nut
clockwise. Do not fully
tighten nut.
Tighten

Beinn 29 www.islabikes.co.uk
Step 4 of 6
Pedal installation
a. Left pedal – rotate pedal axle clockwise towards front of bike.
b. Right pedal – rotate axle anti-clockwise towards front of bike.
Tighten max. 30Nm
Please ensure you identify the left and right pedals
before installing.
Step 3 of 6
Handlebar set up
(Onlyrequiredifmudguardsaretted)
a. Turn handlebars clockwise and align with front wheel
b. Tighten stem clamp bolt Max. 7Nm
Failure to correctly tighten stem clamp bolt may result in serious
injury or death. If in doubt, please consult our technical support
team on +44 (0)1584 856 881 or
Tighten
Tighten
a. Left pedal
b. Right pedal
Turn
Do Not
Tighten
Tighten

Beinn 29 www.islabikes.co.uk
Step 6 of 6
Brake pad bed-in
It is important to bed-in your new brake pads to achieve optimal
performance, increase pad longevity and reduce the likelihood of brake
fade and noise.
To safely achieve optimal results, remain seated on the bike during the
entire bed-in procedure. Accelerate the bike to a moderate speed (12mph /
20kph), then rmly apply the brakes until you are at walking speed. Repeat
approximately twenty times. Next, accelerate the bike to a faster speed
(20mph/30kpm), then rmly apply the brakes until you are at a walking
speed. Repeat approximately ten times.
Important: do not lock up the wheels at any point during the bed-in
procedure. Allow the brakes to cool prior to any additional riding. If you
require further information about your brakes, contact our technical support
team on +44 (0)1584 856 881 or email techsupport@islabikes.co.uk.
Step 5 of 6
Adjust saddle height
a. Loosen seatpost clamp
b. Move to desired height
c. Tighten clockwise max. 4Nm
Seatposts are clearly marked with minimum insertion mark.
Please do not raise saddle above this line.
Tighten

Beinn 29 www.islabikes.co.uk
Be aware braking performance and grip will be drastically reduced
in wet conditions.
Take extra precaution when riding by any busy streets or highways.
Always observe national legal requirements if riding on public
roads. Our bikes are supplied with a bell and reectors that meet
the minimum UK regulations. If you are riding in any other countries
or in the EU, please check national guidelines.
Safety rst
Before you head off please read our advice for safe cycling.
Ensure that a helmet is adjusted correctly in accordance with the
manufacturer’s instructions.
Ensure you are wearing sturdy footwear and nothing can become
entangled in the pedal or drivetrain.
Ensure that you familiarise yourself with your new bicycle
in a safe environment.
We pride ourselves on light action brakes, if you are unfamiliar with
cycling or have been using other bikes previously our brakes will be
more responsive. To check you can come to a stop safely
using the brakes, walk beside the bike and pull the brakes to feel
their responsiveness.
Your Islabike is set up so that the right hand brake lever operates
the front brake. Where the destination country drive on the right
(with the exception of our balance bike) the right hand brake lever
will operate the rear brake.

Beinn 29 www.islabikes.co.uk
Guarantee
Your Islabike comes with a 5-year guarantee on frame and forks and a 2-year
guarantee on parts. This covers faulty manufacturing but not normal wear and
tear. This guarantee only applies to the original purchaser of the bike.
Your statutory rights are not affected by the guarantee.
Ex-display / Demo: 5-years frame and forks / 2-year parts
Second hand: 12-months frame and forks
As with all mechanical components, the bicycle is subjected to
wear and stress. Materials and components may react to wear
or stress fatigue in different ways. If the design life of a component
has been exceeded it may suddenly fail, possibly causing injuries
to the rider. Cracks, scratches or a change of colour could indicate
that the design life of the component has been reached and it
should be replaced. Extra care should be taken in inspection of
parts that are subjected to high levels of stress.
Our bikes are not guaranteed for racing in sanctioned or
competitive events. The use of a bicycle in hazardous conditions
including changeable and uneven surfaces can put high,
unpredictable loads on the bicycle and its components. Lack of
rider skill and experience can further increase these loads leading
to the possibility of serious damage to the bicycle and/or injury to
the rider. If you choose to participate in these events then please
carry out more frequent and thorough maintenance and checks,
including regularly inspecting the frame, fork, stem, cranks and
handlebars for signs of damage. Discontinue use immediately if
anything untoward is spotted and contact our technical support
team on +44 (0)1584 856 881 or email techsupport@islabikes.co.uk.
User guidelines
Your Beinn has been designed to be ridden on paved, unpaved,
gravelroadsando-roadtrailswithmoderategradients.Contact
with irregular terrain and loss of tyre contact with the ground may
occur. Drops are intended to be limited to less than 15cm. The
maximum safe combined rider and luggage weight limits
are as follows:
•Beinn29S/M/L=125Kg
It is not possible to make a bike that is never going to be damaged.
If your child uses their bike beyond its limitations, there is a high
risk of failure which could result in serious injury or death. Bikes
that are used competitively should be subject to more frequent and
rigorous checks. Take particular care to check the frame tube
junctions and welds as well as all the components for damage or
excessive wear. If in any doubt, please contact our technical
support team on +44 (0)1584 856 881 or email techsupport@
islabikes.co.uk.Ortakeittoaqualiedcyclemechanicfor
inspection.
Please note your bike is not intended for the following
types of riding:
•Dirtjumping
•BMX
•Fourcross
•Downhill
•Slalom

Beinn 29 www.islabikes.co.uk
Disc brakes
Considered one of the most important safety features of your Islabike. It is
a good habit to check the brakes on a regular basis. This should be done
depending on the type, frequency or duration of riding. If your bike has not
been used for a period of time we recommend a quick check before riding.
Brake operation – Pull on one brake at a time and look at the brake pads.
Check to see if they are touching the discs evenly when applied. If the
pads are not contacting the discs correctly, they are uneven, rubbing or feel
spongy to apply please contact our technical support team on +44 (0)1584
856 881 or email techsupport@islabikes.co.uk.
Brake pad wear and replacement – Brake pads do not last forever.
Eventually they will need replacing. This will depend on the type, frequency
and duration of riding. Brake pads must be replaced if the total thickness of
the backing plate and pad friction material is less than 3mm.
Riding with backing plate and pad friction material less than 3mm
can result in reduced braking performance, crash, and/or death.
Pads tted as standard are organic compound. We recommend
replacing with the same compound to maintain performance.
Maintenance
Keeping your bike clean and maintained comes with many benets. Not
only will your Islabike perform better but it will be safer, last longer and look
great. To do this we have listed some regular checks to help you along the
way. Of course, if you are unsure of anything we strongly recommend you
seek professional advice or contact our technical support team on +44
(0)1584 856 881 or email techsupport@islabikes.co.uk.
Firstly, moving parts on your bicycle will need lubricating from time to
time. Weather conditions are generally the biggest factor that determine
frequency of maintenance and lubrication. However, it is also heavily
dependent on the frequency, type and duration of riding.
Component Lubricant Frequency
Chain Oil Weekly or after washing / rain
Rear derailleur Oil Weekly or after washing / rain
Brake / Gear cables Oil Weekly or after washing / rain
Wheel bearings Grease 6 months
Headset n/a Sealed bearings
Bottom bracket n/a Sealed bearings

Beinn 29 www.islabikes.co.uk
Tyres and Tubes
Tyre wear - Regularly check tyres for general wear and tear. Overtime
your tyres will become more worn and can become more susceptible
to punctures.
Tyre pressure - Regularly check your Islabike tyre pressure as they slowly
go down over time. To check, simply push your thumb hard onto the tyre or
use a pressure gauge tted to most quality bicycle track pumps. If you can
touch the rim this probably needs some more air.
You should not exceed the maximum tyre pressure printed on the
sidewall of the tyre. We recommend approx. 70% of the maximum
tyre pressure illustrated on your tyre. To inate presta valves you
must rst open the valve by unscrewing and tapping the valve end
to relieve it if stuck. Inate to correct pressure and then carefully
re-tighten to close the valve.
Use our guide to inate your tyres, http://www.islabikes.co.uk/info-hub/
how-to-inate-your-tyres-video.
Valve closed Valve open
Wheels
Rim trueness - Depending on the type of riding your child does, your
bike’s wheels may become untrue or damaged when riding. This means
they will not spin straight and will wobble. To check this please see step 3
Brakes. If for any reason they are untrue our wheels can be easily repaired.
Please contact our technical support team on
+44 (0)1584 856 881 or email techsupport@islabikes.co.uk.
Hubs - Your hubs are tted with cup and cone bearings. Although they
are sealed water and grit can enter your hubs and cause premature
wear. To prolong the life and keep them running smooth and efcient. We
recommend annual maintenance and re-greasing of hub bearings.

Beinn 29 www.islabikes.co.uk
Recommended torque settings
All stem bolts 7Nm
Saddle clamp bolts 10Nm
Seatpost collar clamp 4Nm
Crank bolts 35Nm
Pedals 30Nm
Wheel bolts 8Nm
Calliper bolts 9Nm
Rotor bolts 6Nm
Rear derailleur 6Nm
Spares and replacement parts
We carry stock of replacement parts for your Islabike including inner tubes,
tyres and grips. Please visit our website for a list of readily available spares or
contact us on +44 (0)1584 856 881 or email info@islabikes.co.uk.
We only recommend using genuine parts for safety critical components e.g.
brake cables, brake blocks and bolts.
If you can’t nd what you are looking for or are unsure of any compatibility for
older models, please contact our technical support team by phone or email.
techsupport@islabikes.co.uk
+44 (0)1584 856 881
For support on teaching your child to ride, please see our Info Hub.
www.islabikes.co.uk/info-hub
Drivetrain
The drivetrain is a category of components made up of the chain, cranks,
cassette and pedals. These components work together to drive your
Islabike forward and are crucial in maintaining the optimum performance
and life of your Islabike. To keep these running smoothly we advise the
following.
Chain cleaning and lubricating – We recommend cleaning and
lubricating your chain weekly or after washing/rain. Simply use soapy
water to wipe over your chain and rear derailleur then dry with a cloth.
Then gently apply any general bicycle oil direct whilst simultaneously
turning the cranks backwards to ensure full chain coverage. Wipe off any
surplus with a cloth.
Gears
Your Islabike has had its gears adjusted prior to delivery. These should be
checked periodically or after a fall to ensure they are operating correctly.
Quick check:
Ensure your rear derailleur hanger is not twisted or bent. Place your
Islabike in gear 1 or the biggest sprocket and look from the rear.
Look out to see if the rear derailleur is fouling the spokes or looks
twisted.
If the gears are not working correctly contact our technical support team on
+44 (0)1584 856 881 or email techsupport@islabikes.co.uk.

Beinn 29 www.islabikes.co.uk
Frame number
Please make a record of your frame number. This is a combination of
letters and numbers unique to your bike stamped to the underside of the
frame. This is required by police and insurance companies in case of loss.
Frame
number

www.islabikes.co.uk
/