- Click the Playback file button and select the last file recorded to play the video you
just recorded
- To play a video you recorded earlier, click the Playback File button and then move
your mouse and click once on the video you want to play. Click Open and the file will
start playing.
The recorded video file is saved in the directory set in Recordings directory directory
which can be found in the Configuration menu. The default directory is MyVideos. To
change this directory, click the
Settings button and then the Folders tab. Every time you record a
file, a new file is automatically created. The file will be formatted as
(ChannelNumber)_(ChannelName)YearMonthDay_TIme.
If you want to pause a TV show you are watching:
- Click the Pause button. Your TV video will stop and the Time counter will start
counting.
- To start the video from
where you paused,
click the Play button
- To rewind the video to
the beginning, click
the Skip to the
beginning button. If
your video was
paused, click the Play
button.
- To rewind the video 1
minute, click the Skip
back 1 minute
button. If your video
was paused, click the
Play button.
The Delay counter displays how much time you are behind the live video. For example, if
the delay counter says 00:01:23, then the video window is showing video 1 minute and 23
seconds behind live video.
Configuration menu
The WinTV v7 Configuration menu is accessed by clicking the gear button in the lower
left hand corner of WinTV v7.
General tab: you can set the Video Renderer which allows WinTV v7 to display video with a wide range
of graphics systems.
Devices tab: allows is where you can re-scan for TV channels and set up the TV sources in WinTV v7.
Parental control tab: is where you can set the Parental Control level.
Advanced options: you can set options such as Convert TV recordings to .MPG file
type and Game mode here.
WinTV v7 TV Scheduler
WinTV v7’s built-in TV Scheduler allows you
to schedule the recording of TV shows.
Once a record event is set, WinTV v7 can
be closed and will “wake up” at the desired
time and tuned to the desired channel.
When a scheduled record event takes
place, the WinTV v7 application records “in
background” so that you can continue to
watch your live TV program, even as the
recording progresses.
The TV Scheduler can be found in the
WinTV v7 Options menu. Right click
your mouse button in the TV window to
see the Options menu. Click
Scheduler. To set up an event for timed
watching or recording, click the
Add
button
.
The items that need to be set for each
event are:
- Name: you can add a name to the
recording. If you do not enter a name, the
name will be in the channel/date format.
- Channel: chose one of your scanned
channels.
- Start time: set to the desired start
time. Click on the hour to set the hour, the
minute to set the minute.
Note: It takes
about 15 seconds to launch the
WinTV
and start recording.
- Duration: number of minutes in the
recorded program.
- Recurrance: one time, daily, weekly. Note: If you set for Record Weekly, you must
also specify the Day of the Week for the recording.
- Date to Begin Program: today's date is the default. Change this if you want to schedule on another
date.
- Source selection: leave set at WinTV to bring up the WinTV at the requested time and on the request-
ed channel.
Once these are set, click OK. You can add more recordings, clicking OK after each event is
set.
When you are finished click Close. The WinTV program does not have to be running for
the Schedular to work. If WinTV is not running, it takes about 15 seconds to start WinTV
and to start the recording of TV.
Configuring the IR blaster for use with WinTV v7
Setting up the IR Blaster for use with the WinTV v7 application
In WinTV v7, the IR RemoteBlaster lets the HD PVR 2 and Colossus change the channel
on a satellite or cable TV set top box by transmitting ‘channel change’ commands to the
box via an Infra Red (IR) transmitter.
N
ote: You will need the remote control from your set top box to complete the con-
figuration in this section.
N
ote: this proceedure is only necessary if you are using WinTV v7. If you are using
Windows Media Center, it will configure the IR blaster automatically
The HD PVR’s IR blaster function
consists of two components:
1. IR Receive/Blast cable:
This cable has an IR cable
jack on one end, and an IR
Receiver and Learn sensor
and IR transmitter on the
other end. The IR
Receive/Blast cable plugs
into the IR jack on the back
of the HD PVR 2 or Colossus.
The IR Blaster end of the
cable needs to be positioned
over the IR receiver on your
set top box using the self
stick tape supplied. The IR
Receiver and Learn sensor
will be used to receive remote control commands and to learn your set top box (if
necessary).
2. IR Blaster Config program (BlastCfg.exe) for configuring the codes for the IR
transmitter.
During the installation of the WinTV application from the Installation CD-ROM,
BlastCfg.exe will be automatically installed.
Every time you boot Windows, the IR32 application should automatically run. You will
notice a small IR icon in your system device tray.
The Blaster Configuration program
The Blaster Configuration program allows you to choose the cable TV or satellite set top
box to control, or to “learn” a
new set top box. The Blaster
Configuration program can be
found in the Program Groups /
Hauppauge WinTV. Run
BlasterCfg.EXE
To install the IR Blaster, see the
guide IR Remote Blaster
Quick Installation Guide for
WinTV v7.
Learning remote control
codes for your set top box
First, make sure the IR transmitter is positioned over the remote sensor on your set top
box. The IR transmitter has a very short transmission distance and needs to be posi-
tioned over the remote sensor on your set top box.
To access the learn function in BlastConfig.exe, click on
Advanced Config and Learn.
You will need to ‘learn’ the 0 through 9 keys, plus Power on and Enter. To learn the
new keys:
- hold the remote control from your
set top box as close to the IR
Receiver and Learn sensor as pos-
sible
-in the Blaster config program,
click the button you would like to
learn (for example: 1)
- then depress and hold the corre-
sponding key on your set top box
remote control. You will be instructed
in the message box when to release
the key onyour remote control.
- Do this for the keys 0 to 9 plus
On and Enter
You should receive a LearnKey(key#)
Succeeded message. Then move on to
the next key.
If you receive a LearnKey(key#) Failed
error, this means that the key was either
held down too long, or not long enough,
or that the remote was not held close
enough to the IR sensor on the HD PVR.
Try again.
Once you are finished with the numbers 0
to 9 and On and Enter, you can test the
learning by clicking the Send button in
the Blaster Configuration program. It will send the numbers 123 to your set top box.
Your set top box should now be on channel 123.
Close the Blaster Configuration program and your configuration will be saved.
7 8 9
10 11 12
Message box
Key numbers
Send button
Aug. 20, 2013 QI-WINTV-HDPVR2_rev 2.1
IR Receive/Blast
Cable
IR Blaster
IR Receiver
and Learn
sensor


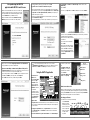 1
1
 2
2


Hauppauge Colossus Installation guide
Hauppauge WinTV-HVR-1800/1850 Quick setup guide
Hauppauge WinTV-HVR-2250 Media Center Kit Installation guide
Hauppauge WinTV HVR-1800 TV Tuner PCIe Capture Card WinTV HVR-1800 User manual
Hauppauge StreamEez-Pro User manual
HD PVR HD PVR User manual
Hauppauge WinTV-HVR-1600 Quick setup guide