Lexmark 543dn - C Color Laser Printer Reference guide

Category
Multifunctionals
Type
Reference guide
Quick Reference
Loading paper and
specialty media
Loading the standard 250-sheet
tray
The printer has one standard 250-sheet tray (Tray 1) with an attached
manual feeder. The 250-sheet tray, the 650-sheet duo drawer, and the
optional 550-sheet tray support the same paper sizes and types and
are loaded in the same way.
Note: The optional 550-sheet tray is not available for all printer
models.
1 Pull the tray out.
Note: Do not remove trays while a job prints or while Busy
appears on the display. Doing so may cause a jam.
2 Squeeze the length guide tab inward as shown, and slide the
guide to the correct position for the paper size being loaded.
Note: Use the size indicators on the bottom of the tray to help
position the guide.
3 If the paper is longer than A4 or letter size, push the green tab at
the back of the tray to extend it.
4 Flex the sheets back and forth to loosen them, and then fan them.
Do not fold or crease the paper. Straighten the edges on a level
surface.
5 Load the paper stack with the recommended print side faceup.
6 Make sure the paper guides are secure against the edges of the
paper.
Note: Make sure that side guides are placed tightly against the
edges of the paper so that the image is registered properly on
the page.
7 Insert the tray.
8 If a different type or size of paper was loaded than the type or size
previously loaded in the tray, change the Paper Type or Paper Size
setting for the tray from the printer control panel.
Note: Mixing paper sizes or types in a tray may lead to jams.
1
Loading the 650-sheet duo drawer
The 650-sheet duo drawer (Tray 2) consists of a 550-sheet tray and an
integrated 100-sheet multipurpose feeder. The drawer is loaded in
the same way as the 250-sheet tray and the optional 550-sheet tray,
and supports the same paper types and sizes. The only differences
are the look of the guide tabs and the location of the paper size
indicators, as shown in the following illustration:
Note: The optional 550-sheet tray is not available for all printer
models.
1
Length guide tabs
2
Size indicators
3
Width guide tabs
Using the multipurpose feeder
1 Push the feeder release latch to the left to allow the multipurpose
feeder to fall open.
2 Grasp the extension, and pull it straight out until it is fully
extended.
3 Prepare the paper for loading.
Flex sheets of paper back and forth to loosen them, and then
fan them. Do not fold or crease the paper. Straighten the edges
on a level surface.
Hold transparencies by the edges and fan them. Straighten
the edges on a level surface.
Note: Avoid touching the print side of transparencies. Be
careful not to scratch them.
Flex a stack of envelopes back and forth to loosen them, and
then fan them. Straighten the edges on a level surface.
4 Locate the stack height limiter and tab.
Note: Do not exceed the maximum stack height by forcing paper
under the stack height limiter.
1 Tab
2 Stack height limiter
3 Width guides
4 Size indicators
5 Squeeze the left width guide tab, and align it for the size of paper
being loaded.
6 Load the paper, and then adjust the width guide to lightly touch
the edge of the paper stack.
Load paper, card stock, and transparencies with the
recommended print side facedown and the top edge entering
first.
2
Load envelopes with the flap side up.
Warning—Potential Damage: Never use envelopes with
stamps, clasps, snaps, windows, coated linings, or self-stick
adhesives. These envelopes may severely damage the
printer.
Notes:
Do not load or close the multipurpose feeder while a job is
printing.
Load only one size and type of paper at a time.
7 Make sure the paper is as far into the multipurpose feeder as it will
go with very gentle pushing. Paper should lie flat in the
multipurpose feeder. Make sure the paper fits loosely in the
multipurpose feeder and is not bent or wrinkled.
8 From the printer control panel, set the Paper Size and Paper Type.
Clearing jams
200 paper jam
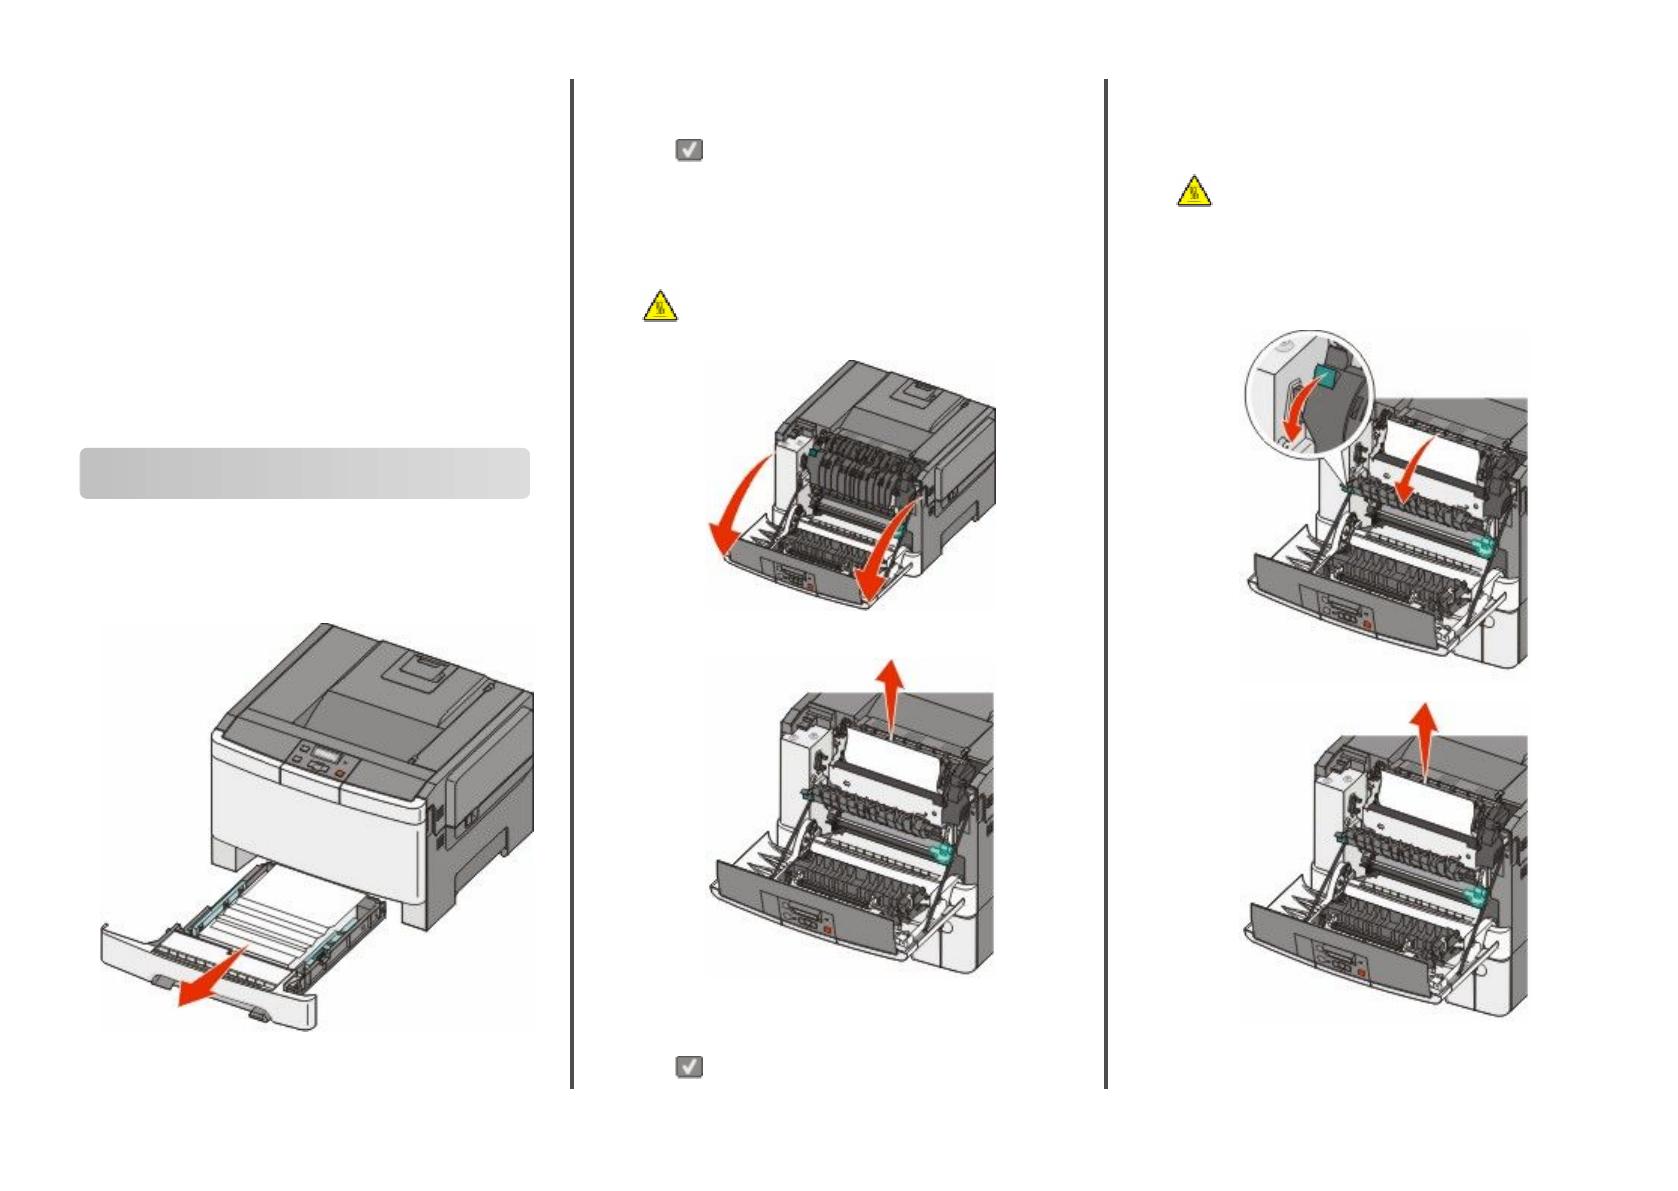
1 Grasp the handle, and pull the standard 250-sheet tray (Tray 1)
and manual feeder out.
2 Remove the jam.
Note: Make sure all paper fragments are removed.
3 Insert the tray.
4 Press .
201 paper jam
1 Grasp the front door at the side handholds, and then pull it toward
you to open it.
CAUTION—HOT SURFACE: The inside of the printer
might be hot. To reduce the risk of injury from a hot
component, allow the surface to cool before touching.
2 Remove the jammed paper.
Note: Make sure all paper fragments are removed.
3 Close the front door.
4 Press .
202 paper jam
1 Grasp the front door at the side handholds, and then pull it toward
you to open it.
CAUTION—HOT SURFACE: The inside of the printer
might be hot. To reduce the risk of injury from a hot
component, allow the surface to cool before touching.
2 Grasp the green lever, and then pull the fuser cover toward you.
3 Hold the fuser cover down, and then remove the jammed paper.
The fuser cover closes when released.
Note: Make sure all paper fragments are removed.
3
4 Close the front door.
5 Press .
230 paper jam
1 Grasp the front door at the side handholds, and then pull it toward
you to open it.
2 Remove the jam.
3 Press .
235 paper jam
1 Grasp the front door at the side handholds, and then pull it toward
you to open it.
2 Remove the jam.
3 Load the tray with the correct paper size.
4 Insert the tray.
5 Close the front door.
6 Press .
242 and 243 paper jams
1 Grasp the handle, and pull the optional 550-sheet tray out.
Note: The optional 550-sheet tray is not available on all printer
models.
2 Remove the jammed paper.
Note: Make sure all paper fragments are removed.
3 Insert the tray.
4 Press .
250 paper jam
1 Push the lever in the multipurpose feeder down to access the
jammed paper.
2 Remove the jam.
Note: Make sure all paper fragments are removed.
3 Insert the tray.
4 Press .
4
  • Page 1 1
  • Page 2 2
  • Page 3 3
  • Page 4 4

Lexmark 543dn - C Color Laser Printer Reference guide

Category
Multifunctionals
Type
Reference guide

Ask a question and I''ll find the answer in the document

Finding information in a document is now easier with AI