Page is loading ...

MICRO COMPONENT SYSTEM
UX-GD6S
—Consists of CA-UXGD6S and SP-UXGD6S
UX-GD6M
—Consists of CA-UXGD6M and SP-UXGD6M
INSTRUCTIONS
GVT0149-002A
[UW, US, UN, UG, UX]
SUPER VIDEO
UX-GD6S UX-GD6M
Cover[US].fm Page 1 Friday, March 4, 2005 4:30 PM

G-1
Warnings, Cautions and Others
CAUTION— (STANDBY/ON) button!
Disconnect the mains plug to shut the power off completely
(all lamps and indications go off). The (STANDBY/ON)
button in any position does not disconnect the mains line.
• When the unit is on standby, the STANDBY/ON lamp lights in
red.
• When the unit is turned on, the STANDBY/ON lamp lights in
green.
The power can be remote controlled.
CAUTION
To reduce the risk of electrical shocks, fire, etc.:
1. Do not remove screws, covers or cabinet.
2. Do not expose this appliance to rain or moisture.
IMPORTANT FOR LASER PRODUCTS
1. CLASS 1 LASER PRODUCT
2.
CAUTION:
Do not open the top cover. There are no user
serviceable parts inside the unit; leave all servicing to
qualified service personnel.
3.
CAUTION:
Visible and invisible laser radiation when open
and interlock failed or defeated. Avoid direct exposure to
beam.
4. REPRODUCTION OF LABEL: CAUTION LABEL, PLACED
INSIDE THE UNIT.
CAUTION
• Do not block the ventilation openings or holes.
(If the ventilation openings or holes are blocked by a
newspaper or cloth, etc., the heat may not be able to get
out.)
• Do not place any naked flame sources, such as lighted
candles, on the apparatus.
• When discarding batteries, environmental problems must
be considered and local rules or laws governing the
disposal of these batteries must be followed strictly.
• Do not expose this apparatus to rain, moisture, dripping or
splashing and that no objects filled with liquids, such as
vases, shall be placed on the apparatus.
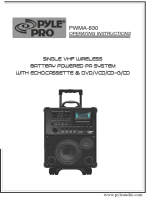
Caution: Proper Ventilation
To avoid risk of electric shock and fire, and to prevent damage, locate the apparatus as follows:
1. Front: No obstructions and open spacing.
2. Sides/ Top/ Back: No obstructions should be placed in the areas shown by the dimensions below.
3. Bottom: Place on the level surface. Maintain an adequate air path for ventilation by placing on a stand with a height of 10 cm
or more.
10 cm
15 cm
1 cm
15 cm
15 cm
1 cm
15 cm
15 cm
Front view Side view
SP-UXGD6S
SP-UXGD6M
CA-UXGD6S
CA-UXGD6M
SP-UXGD6S
SP-UXGD6M
CA-UXGD6S
CA-UXGD6M
SP-UXGD6S
SP-UXGD6M
Safty[US].fm Page 1 Friday, March 4, 2005 4:31 PM

1
Precautions
Installation
• Install the System in a location with adequate ventilation to
prevent internal heat buildup in the System.
• Install in a place which is level, dry and neither too hot nor
too cold—between 5°C and 35°C.
• Leave sufficient distance between the System and the TV.
• Keep the speakers away from the TV to avoid interference
with TV.
Power sources
• When unplugging the System from the wall outlet, always
pull on the plug, not the AC power cord.
Moisture condensation
Moisture may condense on the lenses inside the System in
the following cases:
• After starting to heat the room
• In a damp room
• If the System is brought directly from a cold to a warm
place.
Should this occur, the System may malfunction. In this case,
leave the System turned on for a few hours until the moisture
evaporates, unplug the AC power cord, then plug it in again.
Internal heat
• Make sure there is good ventilation around the unit. Poor
ventilation could overheat and damage the unit.
Others
• Should any metallic object or liquid fall into the System,
unplug the AC power cord and consult your dealer before
operating any further.
• If you are not going to operate the System for an extended
period of time, unplug the AC power cord from the wall
outlet.
If anything goes wrong, unplug the AC power cord and
consult your dealer.
Contents
Connections ..............................................................3
Display Indicators....................................................6
Daily Operations—Playback ..................................7
Daily Operations—Sound & Other Adjustments
.....12
Adjusting the Volume ....................................................... 12
Adjusting the Sound.......................................................... 12
Creating 3-dimentional Sound Field—3D Phonic ............ 13
Presetting Automatic DVD Video Sound
Increase Level ............................................................... 13
Changing the Scanning Mode .......................................... 13
Changing the Display Brightness...................................... 14
Changing the Picture Tone................................................ 14
Adjusting the Audio Input Level ...................................... 14
Setting the Clock............................................................... 15
Turning Off the Power Automatically .............................. 15
Unique DVD/VCD Operations .............................16
Selecting the Audio Track................................................. 16
Selecting the Subtitle Language........................................ 17
Selecting the View Angle ................................................. 17
Selecting the Browsable Still Pictures .............................. 17
Playing Back Bonus Group............................................... 17
Making Dialogues Clear—Clear Voice ............................ 18
Special Effect Playback .................................................... 18
Advanced Disc Operations....................................19
Programming the Playing Order—Program Play ............. 19
Playing at Random—Random Play .................................. 20
Playing Repeatedly ........................................................... 21
Prohibiting Disc Ejection—Child Lock............................ 21
On-Screen Disc Operations...................................22
Advanced Tape Operations ..................................28
Recording on a Tape ......................................................... 28
Synchronized Disc Recording........................................... 29
Enjoying Karaoke..................................................30
Singing Along (Karaoke) .................................................. 30
Microphone Mixing .......................................................... 31
Timer Operations...................................................32
Setup Menu Operations ........................................34
Additional Information .........................................36
Operating JVC’s TVs Using the Remote Control............. 42
Specifications .................................................................... 43
Parts Index ............................................................44
DO NOT install the System in a location near
heat sources, or in a place subject to direct
sunlight, excessive dust or vibration.
DO NOT handle the AC power cord with wet
hands.
DO NOT block the ventilation openings or
holes. If they are blocked by a newspaper or
cloth, etc., the heat may not be able to get out.
DO NOT disassemble the System since there
are no user serviceable parts inside.
Introduction
UX-GD6_US_TOC.fm Page 1 Tuesday, March 8, 2005 5:37 PM

2
Playable Disc Types
In addition to the above discs, this system can play back
audio data recorded on CD Text, CD-G (CD Graphics), and
CD-Extra.
• The following discs cannot be played back:
DVD+R, DVD+RW, CD-I (CD-I Ready), CD-ROM,
Photo CD, etc.
Playing back these discs will generate noise and damage
the speakers.
• In this manual, “file” and “track” are interchangeably used
for MP3/JPEG operations.
About color system
This System accommodates the NTSC and PAL system and
can play back discs recorded in either the NTSC or the PAL
system.
• To change the color system, see page 4.
Note on Region Code
DVD players and DVDs have their own Region Code
numbers. This System can play back only DVDs with an
appropriate Region Code number.
• For details, see “Specifications” on page 43.
(For Central and South American countries)
Audio formats
The System can play back the following digital audio formats.
•
LPCM
(Linear PCM),
DIGITAL
(Dolby Digital),
DTS
(Digital Theater Systems),
MLP
(Meridian Lossless
Packing)
When playing a multi-channel encoded DVDs, the System
properly converts these multi-channel signals into 2 channels,
and emits the downmixed sound from the speakers.
•
To enjoy the powerful sound of these multi-channel
encoded DVDs,
connect a proper decoder or an amplifier
with a proper built-in decoder to the DVD OPTICAL
DIGITAL OUT terminal on the rear.
How to Read This Manual
• Button and control operations are explained as listed in the
table below.
•
Some related tips and notes are explained later in the
sections “Learning More about This System” and
“Troubleshooting,” but not in the same section
explaining the operations ( indicates that the
content has some information).
“DVD Logo” is a trademark of DVD Format/Logo
Licensing Corporation registered in the US, Japan and other
countries.
Caution for DualDisc playback
The Non-DVD side of a “DualDisc” does not comply with
the “Compact Disc Digital Audio” standard. Therefore, the
use of Non-DVD side of a DualDisc on this product may not
be recommended.
• CD-R/RW: Recorded in the Audio CD, Video CD,
SVCD, MP3, and JPEG formats.
• DVD-R: Recorded in the DVD Video format.
• DVD-RW/RAM: Recorded in the DVD Video
Recording (VR) format.
EX.:
INFO
DIGITAL VIDEO
SUPER VIDEO
COMPACT
DIGITAL AUDIO
IMPORTANT: Before playing a disc, make sure of
the following...
• Turn on the TV and select an appropriate input mode on
the TV to view the pictures or on-screen displays.
• For disc playback, you can change the initial setting to
your preference. See “Setup Menu Operations” on
page 34.
If “ ” appears on the TV screen when you press a
button,
the disc cannot accept the operation you have
tried to do.
Indicates that you press the button
briefly.
Indicates that you press the button
briefly and
repeatedly
until an option you want is
selected.
Indicates that you press one of the buttons.
Indicates that you
press and hold
the button
for a specified period.
Indicates that you turn the control toward the
specified direction(s).
Indicates that this operation is only possible
using the remote control.
Indicates that this operation is only possible
using the main unit.
INFO
2
sec.
Remote
ONLY
Main Unit
ONLY
UX-GD6[US].book Page 2 Tuesday, March 8, 2005 5:03 PM

3
Connections
• Connect VIDEO OUT/COMPONENT directly to the video
input of your TV. Connecting VIDEO OUT/COMPONENT
to a TV via a VCR may interfere with your viewing when
playing back a copy-protected disc. Your viewing may be
interfered when connecting VIDEO OUT/COMPONENT
to an integrated TV/VCR system.
Do not connect the AC power cord until all other
connections have been made.
Supplied accessories
Check to be sure that you have all the following items.
• FM antenna (x1)
• AM loop antenna (x1)
• Composite video cord (x1)
• Remote control (x1)
• Batteries (x2)
• AC plug adapter (x1) (Except for the Middle East)
If any item is missing, consult your dealer immediately.
ANTENNA
SUB
WOOFER
OUT
DVD OPTICAL
DIGITAL OUT
SPEAKERS
COMPONENT
VIDEO OUT
FM
(
75
)
COAXIAL
AM
LOOP
Y
RIGHT
SPEAKER
IMPEDANCE
6
–
16
LEFT
P
B
P
R
AM
EXT
PCM
/
STREAM
NTSC
VIDEO
OUT
SELECT
PAL
220V-
230V
VIDEO
S-VIDEO
127V
~ From AM/FM antenna
See page 4.
! From the digital input of digital audio
component such as CD recorder
See page 5.
Ÿ From the input of TV/monitor
See page 4.
@ From the speakers
See page 5.
⁄ From the powered subwoofer
See page 5.
¤ From a wall outlet
Plug the AC power cord only after all
connections are complete.
• If the wall outlet does not match the AC
plug, use the supplied AC plug adapter
(except for the Middle East).
UX-GD6[US].book Page 3 Tuesday, March 8, 2005 5:03 PM

4
~
AM/FM antenna
To assemble the AM loop antenna
To connect AM/FM antenna
For better AM/FM reception
• Disconnect the supplied FM antenna, and connect to an
outdoor FM antenna using a 75
Ω
wire with coaxial type
connector (IEC or DIN45325).
Ÿ
TV/monitor
Connect the COMPONENT, S-VIDEO, or VIDEO jacks
which you want to use.
• To select progressive scanning mode (see page 13), use
COMPONENT jacks.
Selecting the Video Output Selector
You can select the video output to match it to the color
system of your TV.
ANTENNA
FM
(
75
)
COAXIAL
AM
LOOP
AM
EXT
Extend it so that you can obtain the best
reception.
AM loop antenna (supplied)
FM antenna (supplied)
ANTENNA
FM
(
75
)
COAXIAL
AM
LOOP
AM
EXT
AM loop antenna (supplied)
Keep it connected.
Vinyl-covered wire (not supplied)
Extend it horizontally.
FM outdoor antenna
(not supplied)
NTSC:
For an NTSC TV.
PAL:
For a PAL TV.
• When using a multi-color system
TV, either position will work.
COMPONENT
Y
P
B
P
R
Green
Blue
Red
Component video cord
(not supplied)
VIDEO OUT
VIDEO
S-VIDEO
Composite video cord
(supplied)
S-video cord
(not supplied)
VIDEO
OUT
SELECT
PAL
NTSC
UX-GD6[US].book Page 4 Tuesday, March 8, 2005 5:03 PM

5
!
Digital audio component
• Set “DIGITAL AUDIO OUTPUT” in the “AUDIO” menu
correctly according to the connected digital audio
equipment (see page 35). If setting is incorrect, loud noise
may be generated causing damage to the speakers.
⁄
To connect the powered subwoofer
@
Speakers
• When connecting the speaker cords, match the polarity of
the speaker terminals: red color to (+) and black color to (–).
Before plugging in the System
Set the correct voltage for your area with the voltage selector
on the rear.
Use a screwdriver to set the voltage selector to the same
voltage as where you are plugging in the unit. (See also the
back cover page.)
Preparing the remote control
• Dispose of batteries in the proper manner, according to
federal, state, and local regulations.
When using the remote control
Point the top of the remote control toward the remote sensor
as directly as possible. If you operate it from a diagonal
position, the operating range (approx. 5 m) may be shorter.
• DO NOT connect more than one speaker to
each terminal.
• DO NOT push or pull the speakers as this
will damage the foot spacers at the bottom
of the speakers.
DVD OPTICAL
DIGITAL OUT
PCM
/
STREAM
Protective cap
SUB-
WOOFER
OUT
From the powered
subwoofer
(not supplied)
From right
speaker
From left
speaker
Red
Black
When connecting auxiliary equipment (AUX)
DO NOT recharge, short, disassemble or
heat the battery or dispose of it in a fire.
Stereo mini plug
(not supplied)
110V
VOLTAGE
SELECTOR
127V
220V-
230V
R6(SUM-3)/AA(15F)
UX-GD6[US].book Page 5 Tuesday, March 8, 2005 5:03 PM

6
Display Indicators
The indications on the display teach you a lot of things while you are operating the System.
Before operating the System, be familiar with when and how the indicator illuminates on the display.
1
FM reception indicators
• MONO: lights while receiving an FM stereo station in
monaural.
• ST (stereo): lights while an FM stereo station with
sufficient signal strength is tuned in.
2
Main display
• While listening to radio: Band (or preset number) and
station frequency appear.
• While selecting “AUX”: “AUX” appears.
• While playing a disc: Current status appears.
• While playing a tape: “TAPE” appears.
3
SOUND TURBO indicator
• Lights when Sound Turbo II is activated.
4
AHB PRO indicator
• Lights when Active Hyper Bass Pro is activated.
5
A(auto). STANDBY indicator
• Lights when Auto Standby is activated.
• Flashes when disc playback stops with Auto Standby
activated.
6
Timer indicators
•: lights when Daily Timer stands by or is being preset.
• 1/2/3: lights when a Daily Timer (1, 2, or 3) stands by;
flashes while being preset or working.
• REC: lights when the Recording Timer stands by; flashes
while being preset or working.
7
MP3 indicator
• Lights when an MP3 track is detected.
8
PG/PL indicators
• PG: lights when a DVD-VR formatted disc is called up.
• PL: lights when Play List recorded on the DVD-VR
formatted disc is called up.
9
Disc operation indicators
• RANDOM: lights when Random Play is activated.
•PROGRAM: lights when Program Play is activated.
•
(repeat)1
ALL:
–: lights when Disc Repeat is activated.
–: lights when One Track/Chapter/Step repeat is
activated.
–: lights when any Repeat other than the above is
activated.
p
3D PHONIC indicator
• Lights when 3D Phonic is activated.
q
(Clear Voice) indicator
• Lights when Clear Voice is activated.
w
B.S.P. (Browsable Still Picture) indicator
• Lights when
Browsable
Still Pictures are detected while
playing a DVD Audio.
e
BONUS indicator
• Lights when
a DVD Audio with a bonus group is
detected
.
r
PROGRESSIVE indicator
• Lights when the progressive scanning mode is selected.
t
RESUME indicator
• Lights when Resume is activated (see page 35).
y
REC indicator
• Lights while recording.
u
Tape operation indicators
•
2
3
(tape direction):
– Lights to indicate the current tape running direction.
– Flashes slowly during playback and recording.
– Flashes quickly while rewinding a tape.
• (reverse mode):
–: tape play continues endlessly.
–: tape automatically reverses once.
–: tape play stops at the end of one side.
i
SLEEP
indicator
• Lights when the Sleep Timer is activated.
MONO
MP3
1ALL
PL
PG
RANDOM
PROGRAM
3DPHONIC B.S.P. BONUS RESUME
PROGRESSIVE
ST
AHB PRO
A.STANDBY 1 2 3
SOUNDTURBO
SLEEP
REC
REC
13245 6
w
qe
r
t yp97 8 iu
ALL
1
UX-GD6[US].book Page 6 Tuesday, March 8, 2005 5:03 PM

7
Daily Operations
—Playback
1
Turn on the power.
The STANDBY/ON lamp on the main unit lights in
green.
• Without pressing AUDIO, the System turns on
by pressing one of the source buttons in the next step.
2
Select the source.
Playback automatically starts if the selected source is
ready.
• If you select “AUX,” start playback source on the
external component.
3
Adjust the volume.
4
Operate the target source as explained
later.
To turn off (stand by) the unit
2
1
VOLUME
TV VOLUME
3
4
DVD/CD
1
3
GROUP/TITLE SKIP
FM/PLAY MODE
4/¢
1/¡
SET
10 keys
8
7
SHIFT
,, ,
2
ENTER
MENU/PL
RETURN
TOP MENU/PG
In this manual, the operation using the remote control
is mainly explained; however, you can use the buttons
and controls on the main unit if they have the same (or
similar) name and marks.
The STANDBY/ON lamp on the main unit
lights in red.
•A small amount of power is always
consumed even while on standby.
For private listening
Connect a pair of headphones to the PHONES jack on the
main unit. The sound will no longer come out of the
speakers.
Be sure to turn down the volume before
connecting or putting the headphones.
• Disconnecting the headphones will activate the
speakers again.
DO NOT turn off (stand by) the System with
the volume set to an extremely high level;
otherwise, the sudden blast of sound can
damage your hearing, speakers and/or
headphones when you turn on the System or
start playback.
UX-GD6[US].book Page 7 Tuesday, March 8, 2005 5:03 PM

8
Listening to the Radio
To set the AM tuner interval spacing
Before operating the tuner, it is required to select the
appropriate AM space interval used for your area.
1
Select the AM band.
2
Turn off the power.
3
Select the appropriate AM space interval for your
area.
• You can only use the button and the control on the front
panel.
To select the band (FM or AM)
To tune in to a station
While FM or AM is selected...
Frequency starts changing on the display.
When a station (frequency) with sufficient signal strength is
tuned in, the frequency stops changing.
• When you repeatedly press the button, the frequency
changes step by step.
To stop searching manually,
press either button.
If the received FM station is hard to listen
The MONO indicator lights on the display. Reception will
improve though stereo effect is lost—Monaural reception.
To restore the stereo effect,
press the button again (the
MONO indicator goes off).
To preset the stations
You can preset 30 FM and 15 AM stations.
1
Tune in to a station you want to preset.
• You can also store the monaural reception mode for FM
preset stations if selected.
INFO
Main Unit
ONLY
FM/AM
FM AM
DOWN
AM 9KHZ
(9 kHz interval)
UP
AM 10KHZ
(10 kHz interval)
While holding...
While holding...
Remote control:
Main unit:
Remote control: Main unit:
FM AM
AUX
FM/AM
FM
AM
GROUP/TITLE SKIP
2 sec.
2 sec.
DOWN
UP
Remote
ONLY
REV.MODE
FM/PLAY MODE
Remote
ONLY
UX-GD6[US].book Page 8 Tuesday, March 8, 2005 5:03 PM

9
2
Activate the preset number entry mode.
• Finish the following process while the indication on the
display is flashing.
3
Select a preset number for the station you store.
• You can also use the ¡
or 1
button.
4
Store the station.
To tune in to a preset station
1
Select the band (FM or AM).
2
Select a preset number for the station you store.
Playing Back a Tape
To insert a tape
You can play back type I tapes.
To change the tape running direction
To reverse the tape automatically
Examples:
To select preset number 5, press
5.
To select preset number 15, press
+10, then 5.
To select preset number 30, press
+10, +10, then 10.
• You can also use the ¡
or
1
button.
SET
CANCEL
DIMMER
A.STANDBY
SLEEP
VFP
3D PHONIC
DVD LEVEL
PA G E
RETURN
SCAN MODE
1
4
7
10
2
5
8
3
6
9
10
SET
CANCEL
Remote
ONLY
FM AM
AUX
DIMMER
A.STANDBY
SLEEP
VFP
3D PHONIC
DVD LEVEL
PA G E
RETURN
SCAN MODE
1
4
7
10
2
5
8
3
6
9
10
To start:
To stop:
To rewind tape:
Tape is played from the forward side to the
reverse side. When the reverse side is played
back, playback stops.
Tape is automatically reversed, and playback
repeats until you stop it.
Tape will not be reversed. When the current
side of the tape reaches its end, playback stops.
INFO
Push Insert Close
With the tape side facing outside
GROUP/TITLE SKIP
Rewind the tape to the right.
Rewind the tape to the left.
3 (forward play)
2 (reverse play)
REV. MODE
FM/PLAY MODE
(at the same time)
Basic_US.fm Page 9 Wednesday, March 9, 2005 9:50 AM

10
Playing Back a Disc
Before operating a disc, be familiar how a disc is recorded.
• DVD Video comprises of “
Titles
” which includes
“
Chapters
,” DVD Audio/MP3/JPEG comprise of
“
Groups
” which includes “
Tracks
,” and CD/SVCD/VCD
comprise of only “
Tracks
.”
• For MP3/JPEG playback, see also page 25.
To insert a disc
You can insert a disc while playing another source.
• When using an 8 cm disc, place it on the inner circle of the
disc tray.
To close the disc tray,
press 0
again.
• If you press DVD/CD 3
, disc tray closes automatically
and playback starts (depending on how the disc is
programmed internally).
•
While playing DVD/SVCD/VCD/MP3:
This System can
store the stop point, and when you start playback again by
pressing DVD/CD 3
(even while on standby), it starts
from the position where you have stopped—Resume Play.
(“RESUME” appears on the display when you stop
playback.)
To stop completely while Resume is activated,
press 7
twice. (To cancel Resume, see “RESUME” on page 35.)
• When operating the System, the on-screen guide icon (see
the following table) appears on the TV.
To select a title/group
While playing a disc...
• Group name appears for MP3 discs.
To select a chapter/track
While playing a disc...
To locate a particular portion
While playing a disc...
• Search speed changes as illustrated above except for MP3
discs. For MP3 discs, search speed and the indications on
the monitor are different.
• No sound comes out if searching is carried out while
showing the moving picture.
To return to normal playback,
press DVD/CD 3
.
To start: To pause: To stop:
To release, press
DVD/CD 3
.
INFO
DVD/CD
On-screen guide icons
• During DVD Video playback, the following icons may
appear on the TV:
At the beginning of a scene containing multi-
angle views.
At the beginning of a scene containing multi-
audio sounds.
At the beginning of a scene containing multi-
subtitles.
• The following icons will be also shown on the TV to
indicate your current operation.
, , , , ,
• To deactivate the on-screen guide icons, see “ON
SCREEN GUIDE” on page 35.
• First time you press 4
, you
can go back to the beginning of
the current chapter/track.
Remote
ONLY
GROUP/TITLE SKIP
(at the same time)
GROUP/TITLE SKIP
Remote
ONLY
SLOW
+
–
x2 x5
x10 x20 x60
x2 x5
x10 x20 x60
UX-GD6[US].book Page 10 Tuesday, March 8, 2005 5:03 PM

11
To locate an item directly
You can select a title/chapter/track directly and start
playback.
• For DVD Video, you can select
a title before starting
playback
, while you can select
a chapter after starting
playback
.
To play back using the disc menu
7
For DVD Video/DVD Audio:
1
Show the disc menu.
2
Select an item on the disc menu.
• With some discs, you can also select items by entering the
number using the 10 keys.
7
For SVCD/VCD with PBC:
While playing a disc with PBC, “PBC” appears on the
display.
When disc menu appears on the TV, select an item on the
menu. Playback of the selected item starts.
To cancel PBC
Playback starts with the selected track.
To reactivate PBC,
press 7
(twice if Resume is turned
“ON”), then press DVD/CD 3
.
Examples:
To select number 5, press 5.
To select number 15, press +10,
then 5.
To select number 30, press +10,
+10, then 10.
Remote
ONLY
DIMMER
A.STANDBY
SLEEP
VFP
3D PHONIC
DVD LEVEL
PA G E
RETURN
SCAN MODE
1
4
7
10
2
5
8
3
6
9
10
Remote
ONLY
TOP MENU/PG MENU/PL
KARAOKE ECHO
TV CH
ENTER
TV CH
Examples:
To select number 5, press 5.
To select number 15, press +10,
then 5.
To select number 30, press +10,
+10, then 10.
To move to the next or previous page of the current
menu:
To return to the previous menu:
DIMMER
A.STANDBY
SLEEP
VFP
3D PHONIC
DVD LEVEL
PA G E
RETURN
SCAN MODE
1
4
7
10
2
5
8
3
6
9
10
GROUP/TITLE SKIP
Moves to the next page.
Moves to the previous page.
RETURN
10
(at the same time)
DIMMER
A.STANDBY
SLEEP
VFP
3D PHONIC
DVD LEVEL
PA G E
RETURN
SCAN MODE
1
4
7
10
2
5
8
3
6
9
10
Stop playback.
Select a track.
UX-GD6[US].book Page 11 Tuesday, March 8, 2005 5:03 PM

12
Daily Operations
—Sound & Other Adjustments
Adjusting the Volume
You can adjust the volume level from level 0 (VOL MIN) to
level 40 (VOL MAX).
To drop the volume in a moment
Adjusting the Sound
To reinforce the heavy sound
This boosts the low and high frequency sound—Sound
Turbo II.
• When Sound Turbo II is turned on, AHB Pro is
automatically turned on, and cannot be turned off.
(AHB PRO indicator does not lights even though the
function is turned on.)
To reinforce the bass sound
The richness and fullness of the bass sound is clearly
maintained regardless of how you set the volume—Active
Hyper Bass Pro.
SOUND
TURBO
VOLUME
+/–
A.STANDBY
SLEEP
SET
ENTER
DISPLAY
CLOCK/
TIMER
BASS/TREBLE
VFP
DVD LEVEL
DIMMER
SCAN MODE
SHIFT
FADE
MUTING
,, ,
3D PHONIC
AHB PRO
VOLUME +/–
SOUND
TURBO
Remote control
Main unit
Remote control:
Main unit:
To restore the volume,
press again, or
adjust the volume level.
VOLUME
TV VOLUME
VOLUME
Remote
ONLY
FADE
MUTING
INFO
SOUND
TURBO
TURBO ON
TURBO OFF
AHB PRO
AHB ON
AHB OFF
UX-GD6[US].book Page 12 Tuesday, March 8, 2005 5:03 PM

13
To adjust the tone
You can adjust the bass and treble level from –3 to +3.
To adjust the bass
To adjust the treble
Creating 3-dimentional Sound Field
—3D Phonic
While playing a disc...
• The selected mode can only be shown on the TV.
Presetting Automatic DVD Video Sound
Increase Level
The DVD Video sound is sometimes recorded at a lower
level than for other discs and sources. You can set the
increase level for the currently loaded DVD Video, so you
do not have to adjust the volume when you change the
source.
• This also functions for DVD-VR formatted discs.
• Once the current DVD is ejected, this setting is canceled
and set automatically to “NORMAL.”
Changing the Scanning Mode
This System supports progressive scanning.
• If you connect a progressive TV through the
COMPONENT jacks, you can enjoy a high quality picture
from the built-in DVD player by selecting “PROGRE.”
ACTION
Suitable for action movies and sports
programs.
DRAMA
Creates natural and warm sound. Enjoy
movies in a relaxed mood.
THEATER
Enjoy sound effects like in a major theater.
BASS/
TREBLE
BASS
TRE
Canceled
VOLUME
TV VOLUME
BASS/
TREBLE
BASS
TRE
Canceled
VOLUME
TV VOLUME
Remote
ONLY
7
3D PHONIC
3D PHONIC
ACTION
3D PHONIC
DRAMA
3D PHONIC
THEATER
3D PHONIC
OFF
(at the same time)
NORMAL
Original recording level.
MIDDLE
Output level is increased (less than “HIGH”).
HIGH
Output level is increased (more than
“MIDDLE”).
PROGRE
Progressive scanning. For a progressive TV.
• The PROGRESSIVE indicator lights.
INTER
Interlaced scanning. For a conventional TV.
Remote
ONLY
INFO
DVD LEVEL
9
NORMAL MIDDLE
HIGH
(at the same time)
Remote
ONLY
INFO
SCAN MODE
5
PROGRE
INTER
(at the same time)
UX-GD6[US].book Page 13 Tuesday, March 8, 2005 5:03 PM

14
Changing the Display Brightness
You can dim the display window.
* “AUTO DIM” does not work for CD/MP3.
Changing the Picture Tone
• While showing a playback picture on the TV, you can
select the preset picture tone, or adjust it and store your
own taste.
To select a preset picture tone
1
While playing, display VFP setting screen.
2
Select a preset picture tone.
To erase the screen,
press VFP again while holding SHIFT.
To adjust the picture tone
1
Select “USER1” or “USER2.”
• Follow steps
1
and
2
explained on the left column.
2
Select a parameter you want to adjust.
3
Adjust the parameter.
4
Repeat steps
2
to
3
to adjust other parameters.
To erase the screen,
press VFP again while holding SHIFT.
Adjusting the Audio Input Level
If the sound from the component connected to the
AUX jack is too loud or is not loud enough when changing
from another source to “AUX,” you can change the audio
input level through the AUX jack (without changing the
volume level).
While the “AUX” is selected as a source...
DIM1
Dims the display.
DIM2
Erases the display illumination.
AUTO DIM
Erases the display illumination when
disc playback starts.*
• The display illuminates when
playback stops.
NORMAL
Normally select this.
CINEMA
Suitable for a movie source.
USER1/USER2
You can adjust parameters and can
store the settings.
Remote
ONLY
1
DIMMER
DIM1
DIM2
AUTO DIM
DIM OFF
(Canceled)
(at the same time)
Remote
ONLY
VFP
4
0
NORMAL
GAMMA
BRIGHTNESS
CONTRAST
SATURATION
TINT
SHARPNESS
0
0
0
0
0
(at the same time)
On the TV
NORMAL CINEMA
USER2 USER1
GAMMA
Adjust if the neutral color is bright or
dark (–3 to +3).
BRIGHTNESS
Adjust if the entire picture is bright or
dark (–8 to +8).
CONTRAST
Adjust if the far and near positions
are unnatural (–7 to +7).
SATURATION
Adjust if the picture is whitish or
blackish (–7 to +7).
TINT
Adjust if the human skin color is
unnatural (–7 to +7).
SHARPNESS
Adjust if the picture is indistinct
(–8 to +8).
AUX LVL1
Select this when the sound is too loud (initial
setting).
AUX LVL2
Select this when the sound is not loud enough.
ENTER
TV CH
TV CH
ENTER
TV CH
TV CH
Remote
ONLY
AUX LVL1
AUX LVL2
SET
CANCEL
2 sec.
UX-GD6[US].book Page 14 Tuesday, March 8, 2005 5:03 PM

15
Setting the Clock
Without setting the built-in clock, you cannot use Timers
(see page 32) and Sleep Timer.
• To correct a misentry during the process, press CANCEL
(while holding SHIFT) or CLOCK/TIMER. You can
return to the previous step.
1
Activate the clock setting mode.
• If you have already adjusted the clock before, press the
button repeatedly until the clock setting mode is
selected.
2
Set the time.
• Adjust the hour, then the minute.
Now the built-in clock starts working.
To check the current clock time during play
• While playing a DVD and MP3, you cannot check the
clock time (other disc information appears).
Turning Off the Power Automatically
Auto Standby
When Auto Standby is in use, the A.STANDBY indicator
lights on the display.
When disc play stops, the A.STANDBY indicator starts
flashing. If no operation is done for about 3 minutes while
the indicator is flashing, the System turns off (stands by)
automatically.
Sleep Timer
You can set the shut-off time so that you can go to bed
without turning it off yourself.
1
Specify the time (in minutes).
2
Wait until the set time goes off.
To check the time remaining until the shut-off time,
press
SLEEP while holding SHIFT.
• If you press the button repeatedly, you can change the shut-
off time.
Remote
ONLY
INFO
CLOCK/
TIMER
CANCEL
SET
TV/VIDEO
DISPLAY
Clock
Source information
Remote
ONLY
A.STANDBY
3
On
Canceled
(at the same time)
SLEEP
2
10 20 30 60 90 120
Canceled
150
(at the same time)
UX-GD6[US].book Page 15 Tuesday, March 8, 2005 5:03 PM

16
Unique DVD/VCD Operations
Selecting the Audio Track
For DVD Video:
While playing back a chapter containing
audio languages, you can select the language to listen to.
For DVD Audio:
While playing back a track containing
audio channels, you can select the audio channel to listen to.
For DVD-VR and Karaoke SVCD/VCD:
When playing
back a track, you can select the audio channel to play.
• You can also select the audio track using the on-screen bar
(see page 22).
While playing a DVD Video...
While playing a DVD Audio...
While playing a DVD-VR, or Karaoke SVCD/VCD...
• SVCD can have 4 audio channels. Karaoke SVCD usually
uses these 4 channels to record two 2-channel recordings
(ST1/ST2).
ANGLE
ENTER
SLOW /
10 keys
AUDIO
ZOOM
87
SUBTITLE
SHIFT
PAGE
DVD/CD 3
,, ,
Remote control
ST1/ST2
ST
To listen to normal stereo (2 channel)
playback.
L1/L2/L
To listen to the left audio channel.
R1/R2/R
To listen to the right audio channel.
Remote
ONLY
INFO
AUDIO
ENGLISH
1/3
3/3
FRENCH
2/3
JAPANESE
ENGLISH
1/3
FRENCH
2/3
JAPANESE
3/3
Ex.:
1
1/3
2
2/3
3
3/3
Ex.:
AUDIO
ST1 ST2 L1
R2 L2 R1
ST L R
SVCD
DVD-VR/VCD
UX-GD6[US].book Page 16 Tuesday, March 8, 2005 5:03 PM

17
Selecting the Subtitle Language
For DVD Video:
While playing back a chapter containing
subtitles in different languages, you can select the subtitle
language to display on the TV.
For SVCD:
While playing, you can select the subtitles even
if no subtitles are recorded on the disc.
• You can also select the subtitle language using the on-
screen bar (see page 22).
While playing a DVD Video...
1
2
While playing an SVCD video...
Selecting the View Angle
For DVD Video only:
While playing back a chapter
containing multi-view angles, you can view the same scene
from different angles.
• You can also select the multi-view angles using the on-
screen bar (see page 22).
While playing...
Selecting the Browsable Still Pictures
For DVD Audio only:
While playing back a track linked to
browsable still pictures (B.S.P.), you can select the still
picture (turn the page) to be shown on the TV screen.
• If a track is linked to browsable still pictures (B.S.P.), they
are usually shown in turn automatically during playback.
• You can also select the page using the on-screen bar (see
page 22).
Playing Back Bonus Group
For DVD Audio only:
Some DVD Audios have a special
group called “bonus group” whose contents are not open to
the public.
• To play back a bonus group, you have to enter the specific
“key number” (a kind of password) for the bonus group.
The way of getting the key number depends on the disc.
1
Select the bonus group.
• The bonus group is usually recorded as the last group
(for example, if a disc contains 4 groups including a
bonus group, “group 4” is the bonus group).
• For how to select the group, see “To select a title/group”
on page 10.
Remote
ONLY
SUBTITLE
ENGLISH
1/3
ENGLISH
1/3
1/3
3/3
2/3
FRENCH JAPANESEENGLISH
1/3 2/3
JAPANESE
3/3
ENGLISH FRENCH JAPANESE
TV CH
TV CH
Ex.:
SUBTITLE
Each time you press
the button, the still
picture changes one
after another (if
available).
Remote
ONLY
1
1/3
2
2/3
3
3/3
1
1/3
2
2/3
3
3/3
ANGLE
Ex.:
Remote
ONLY
PAG E
10
(at the same time)
Remote
ONLY
UX-GD6[US].book Page 17 Tuesday, March 8, 2005 5:03 PM

18
2
Enter the key number.
3
Follow the interactive instructions shown on the
screen.
To cancel the key number entry,
press 7
.
Making Dialogues Clear—Clear Voice
When you play back a disc, you can use this function—Clear
Voice. You can make the singer’s voices or dialogues of the
movie clear.
• This function only works for center-channel encoded
multi-channel disc, and when 3D Phonic is activated.
Special Effect Playback
Still picture playback
Frame-by-frame playback
1
While playing...
2
Advance the still picture frame by frame.
To resume normal playback,
press DVD/CD 3
.
Slow-motion playback
1
While playing...
2
Select slow motion speed.
*Only available for DVD-Video.
To resume normal playback,
press DVD/CD 3
.
To replay the previous scenes
(One-Touch Replay)
• This function is only used while playing DVD Video/
DVD-VR.
While playing back...
Zoom
1
While playing back...
2
Move the zoomed-in position.
To cancel Zoom,
press ZOOM repeatedly until “ZOOM
OFF” appears on the TV.
To start still picture play-
back:
To resume normal
playback:
While playing...
Still picture playback starts.
0
ENTER
DIMMER
A.STANDBY
SLEEP
VFP
3D PHONIC
DVD LEVEL
SCAN MODE
1
4
7
2
5
8
3
6
9
Remote
ONLY
8
(On)
Off
(at the same time)
Remote
ONLY
INFO
DVD/CD
Still picture playback starts.
The playback position moves
back about 10 seconds before the
current position (only within the
same title).
SLOW
+
–
1/32 1/16 1/8 1/4 1/2
1/32 1/16 1/8 1/4 1/2
Reverse slow motion
*
starts.
Forward slow motion starts.
Remote
ONLY
Remote
ONLY
ZOOM 1 ZOOM 2 ZOOM 3 ZOOM 4
ZOOM 5ZOOM 6
ZOOM OFF
ZOOM
TV CH
TV CH
UX-GD6[US].book Page 18 Tuesday, March 8, 2005 5:03 PM
/