Page is loading ...

11/2007-v1H1S057
WARRANTY
This KOOLATRON product is warranted to the retail consumer for 90 days from
date of retail purchase, against defects in material and workmanship.
WHAT IS COVERED
- Replacement parts and labor.
- Transportation charges to customer for the repaired product.
WHAT IS NOT COVERED
- Commercial or industrial use of this product.
- Damage caused by abuse, accident, misuse, or neglect.
- Transportation of the unit or component from the customer to Koolatron.
IMPLIED WARRANTIES
Any implied warranties, including the implied warranty of
merchantability are also limited to duration of 90 days from the date
of retail purchase.
WARRANTY REGISTRATION
Register on-line at www.koolatron.com AND keep the original, dated, sales
receipt with this manual.
WARRANTY AND SERVICE PROCEDURE
If you have a problem with your UNIT, or you require replacement parts, please
telephone the following number for assistance:
North America 1-800-265-8456
The Service Advisors will advise you on the best course of action.
Koolatron has Master Service Centres at these locations:
Koolatron USA Koolatron Canada
4330 Commerce Dr. 27 Catharine Ave.
Batavia, NY Brantford, ON
14020-4102 N3T 1X5
U.S.A. CANADA
A Koolatron Master Service Centre must perform all warranty work. Service
after warranty may be obtained at a Master Service Centre or at an authorized
service dealer. Purchase Receipt is required to establish warranty eligibility.
™
Owner’s Manual
Z100B
™

A REVOLUTION IN COOKING!
Welcome to the revolutionary way of cooking with the Total Chef Oven™. You
can now prepare delicious, healthy meals in less time than traditional methods.
The technology of infrared has been brought to your home so that instead of
spending countless hours in the kitchen preparing meals, you can spend more
time doing things more important to you and your family. So enjoy the healthy
and tasty meals you will have for years to come with your new Infrared Oven.
We at Koolatron pride ourselves in bringing to your home reliable and effective
appliances, which will not only serve you for years to come, but also make your
life easier.
Carefully read the following directions. They provide important
information with regard to safety, use and maintenance.
Keep this booklet safe for future reference.
IMPORTANT INSTRUCTION
1) Read all instructions before use.
2) Check electric wiring. Beware of damaged cords or plugs.
3) All surfaces of the oven significantly heat up when cooking.
4) Do not touch with bare hands, always use mitts to remove top component.
5) Do not immerse plug, cord or heater control unit in water.
6) Do not keep in reach of children.
7) Unplug from outlet when not in use and prior to cleaning.
8) When top dome is removed from oven, always rest it on the dome holder
provided.
9) Do not let cord hang over edge of counter.
10) Position the oven securely in center of counter when cooking.
11) Use extreme caution when removing hot liner pan or racks.
12) Do not place near hot gas, stove or electrical burner.
13) Do not use appliance for anything else other than what it is intended for.
14) The use of accessory attachments is not recommended by Koolatron and
may cause injuries.
15) Do not leave appliance unattended while in use.
16) Use handles when lifting the dome from oven.
17) Use caution when disposing of hot grease.
NOTE:
If an extension cord is to be used, the marked electrical rating of the cord should
be at least as great as the electrical rating of the appliance. The longer cord
should be arranged so that it will not drape over the tabletop where it can be
pulled on by children or accidentally tripped over.
TECHNICAL SPECIFICATIONS
Power Rating: 120V / 60Hz Power: 1300W
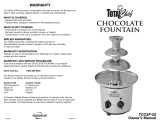
PARTS
32
Dome Holder
a) Heater Unit w/ Control
- heater of the oven
b) Hood - see through Dome
of the cooking enclosure
c) Rack (Non-Stick) - to
hold items to be cooked
d) Liner Pan - non-stick pan
e) Base - enclosure pan,
placed on bottom
f) Dome Holder- to hold Hood
and Heater assembly

54
ASSEMBLING THE TOTAL CHEF OVEN™
Assembling the Total Chef Oven
1) Place Liner Pan (d) in Base (e).
2) Place Cooking Rack (c) onto the Liner Pan (d).
3) Place food onto the Cooking Rack (c).
4) Position the Cooking Dome (b) over the Base (e) and over the food.
5) Put the Heater Unit into designated space on the Cooking Dome (b) and
twist into place.
6) Plug power cord into outlet.
7) Choose desired cooking time and turn on.
COOKING TIPS
To use your Total Chef Oven™ to it’s optimum potential, here are some
helpful hints.
• Whenever possible place food on wire rack for cooking. Cooking on the wire
rack allows the air to circulate freely and allows the food to be cooked evenly.
• Try cooking the whole meal at once. It is much more efficient to cook all por-
tions of the meal at the same time. This can be done on the cooking rack.
• Make sure the foods do not touch the heater unit. Keep foods at least a ½
inch away from the heater unit.
• When using foil poke a few holes to allow the air to circulate.
• Do not preheat when baking.
• Lightly coat meats with margarine or cooking oil to aid with browning.
• Use plastic or wooden utensils on the non-stick surface of the liner pan.
HELPFUL HINTS
PREHEATING - Set thermostat to high for 2 minutes without the cooking rack
inside. To prevent heat loss, place food on the cooking rack and quickly place
into the oven.
USING RACKS
1) Most oven cooking requires use of the cooking racks.
2) When baking small items, wrap the rack in foil and poke a few holes into the
foil to allow air circulation.
USING COOKWARE - Be careful when using cookware and check the cook-
ware touching the Heater Unit.
USING FOIL - Poke a few holes in foil to allow air to circulate for better heating.
COOKING TIME - Should there be no guide time, occasionally look into see-
through cover to check condition of food.
BAKING - Do not preheat before baking.
ROASTING CHICKEN - Breast should face downward to drain water and oil.
FROZEN PIZZA - Cut in half to reduce baking time.
COOKING TO PERFECTION
Check points of the Total Chef Oven™
1) Heater unit should be locked into place on the hood.
2) Set timer to desired cooking time. Timer Setting: turn the timer clockwise
and match the required time to the indicator on the timer knob.
3) Set cooking temperature to High (H) position when starting.
4) Be sure the appliance is firmly connected at the outlet.
5) Turn on the power switch.
TEMPERATURE CHART
Position Temperature Range Guide
Celsius Fahrenheit
Low (L) 100°C +- 10° 210°F+- 50° Warm Heating
Medium (M) 150°C +- 10° 300°F +- 50° Bake
High (H) 200°C +- 10° 400°F +- 50° Roast
Warm 50°C +- 5° 120°F +- 25° Dehydrating
CLEANING AND CARE INSTRUCTIONS
• DO NOT IMMERSE HEATING UNIT IN WATER AT ANYTIME.
• Unplug oven prior to cleaning.
• Cooking domes, racks, liner pan and base are all dishwasher safe.
• Do not use any abrasive cleaning pads or cleansers.
• Clean after each use.
/